
Below 16mm you normally accept f/2.8 or f/4. This one is f/1.8, smaller than the Sigma, and it changed how close I can put a slider to the ground.
Continue reading
Below 16mm you normally accept f/2.8 or f/4. This one is f/1.8, smaller than the Sigma, and it changed how close I can put a slider to the ground.
Continue reading
SLOG3 is not noisy. It is usually exposed wrong. Here is PP8 versus PP9, the metering number to aim for, the zebra level that actually matters, and the ISOs to avoid on the a7S III, FX3 and FX6.
Continue reading
The settings are in the first paragraph, because I hate videos that make you wait ten minutes for them. Then the why: two profiles, one for 10-bit bodies and one for mixed kit, and how to expose each.
Continue reading
Sony’s 24mm f/2.8, 40mm f/2.5 and 50mm f/2.5 look redundant and overpriced next to the lenses they already sell. Here is why the build, the clickless aperture and the silent autofocus make them the ones I would buy for filmmaking anyway.
Continue reading
Part two of my run and gun settings for the a7S III and FX3: the custom buttons, the mode dial presets, the function menu and My Menu, so you never dig through the menu system again.
Continue reading
😍 Download my a7S III Settings Preset
😁 Download my FX3 Settings Preset
Here is how I have my Sony a7S III menus set up for filming weddings and other events in the “run and gun” style of filmmaking, meaning quick setup times, near-instantaneous changing of frame rates and resolution, and rapid dialing in of settings like white balance, aperture, and ISO. And because the Sony FX3 has the same menu, everything below applies to it as well.
This is a two-part series, because I don’t want to just tell you what settings I use, I also want to tell you why I chose them, and going through this menu takes a while. This part digs through every single menu tab and tells you what to change, what to turn off, and what you can safely ignore forever. Part 2 covers the mode dial, the custom menu, the custom buttons, and the function menu, and that one is the payoff, because once your buttons are set up you will basically never need to dive into these menus again.
If you want to skip all of it, download the settings file above, load it onto your camera, and you will immediately have everything I’m about to describe.
First off, make sure the camera is in video mode by selecting the film strip on the mode dial. The a7S III customizes its menus depending on whether you’re in photo or video mode, and considering this whole thing is about filmmaking settings, we need it in video mode before we start.
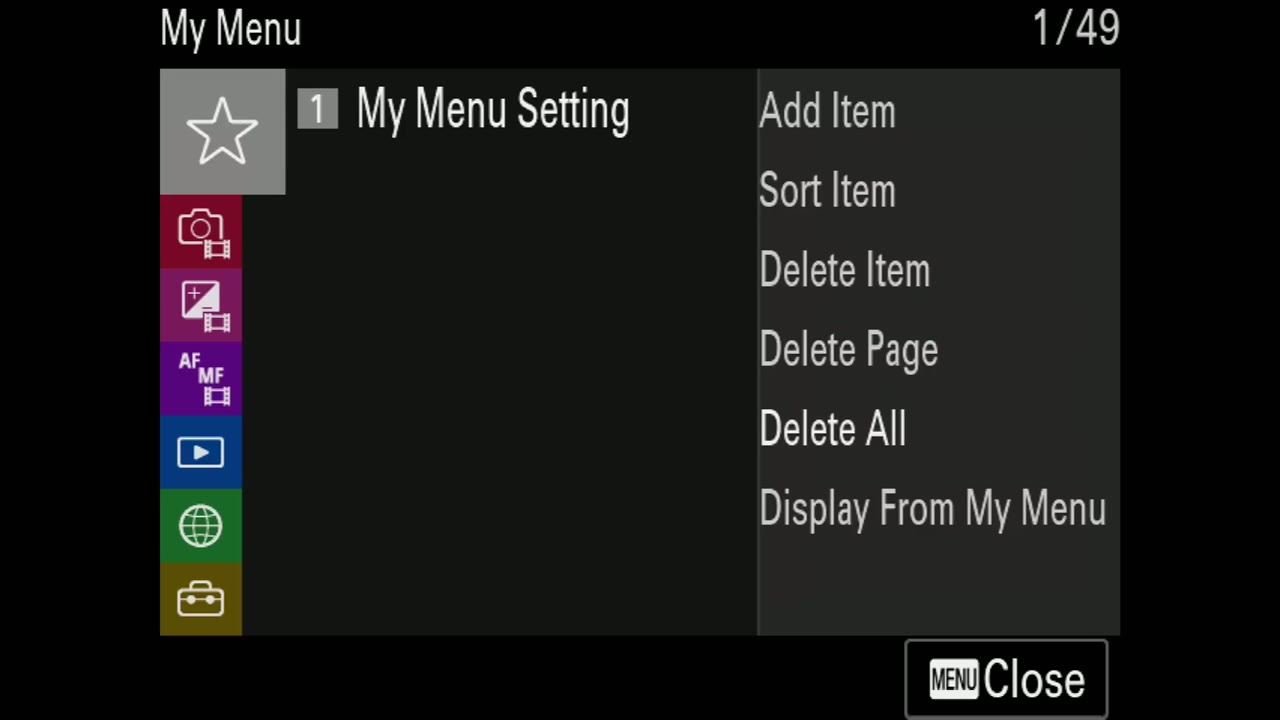
Press the menu button and you’ll notice the first icon is a gray star that says My Menu. That’s a completely customizable menu that lets you quickly access the settings you need most, and it’s covered in part two. For now we’re skipping down to the red camera icon.
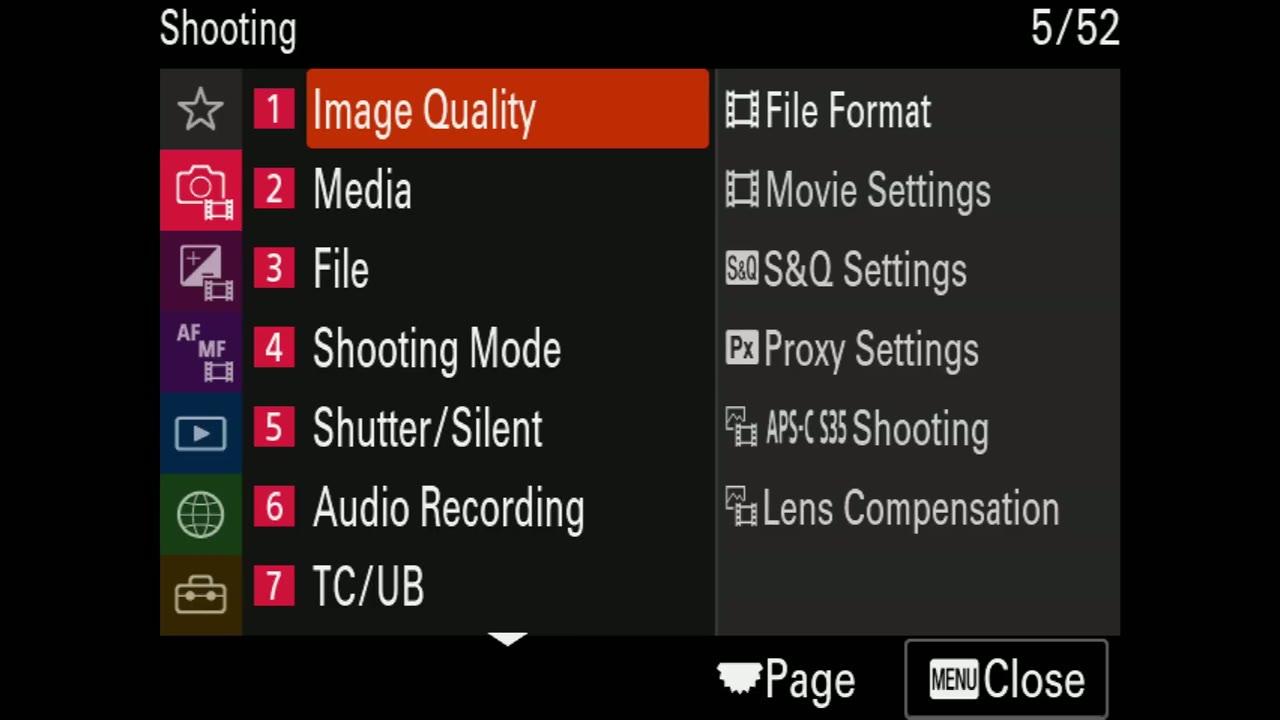
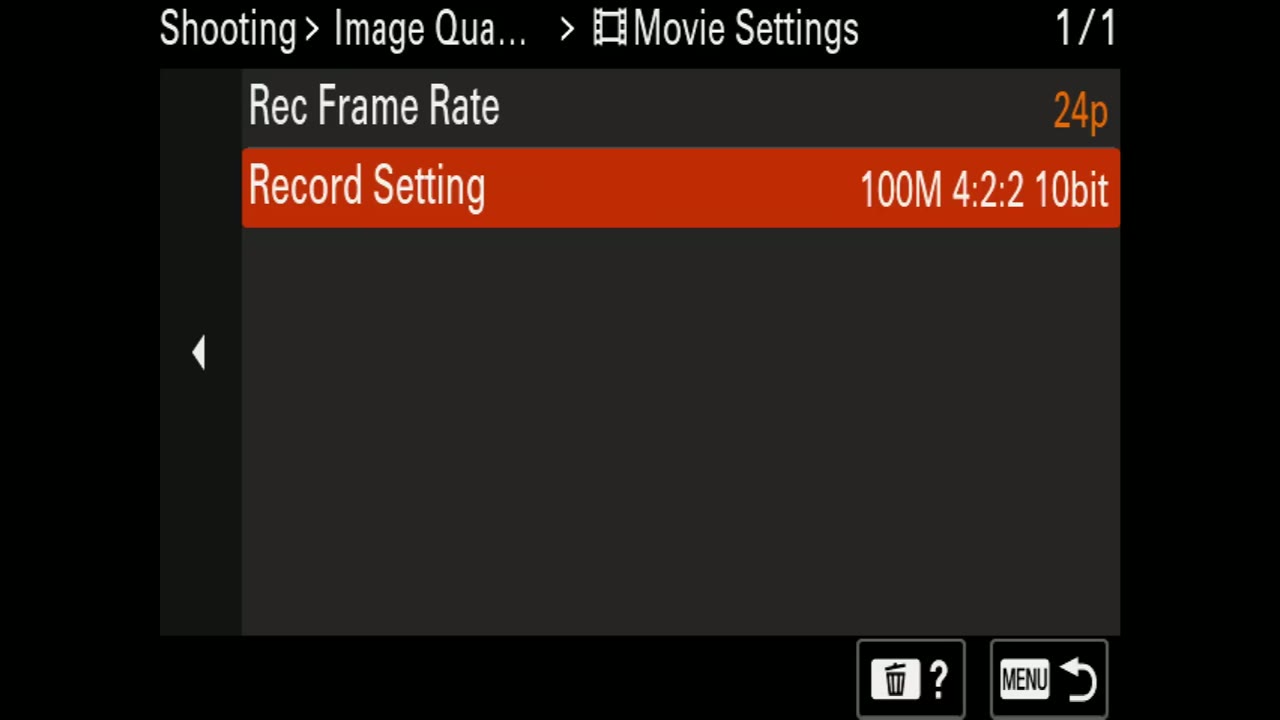
The first two options are File Format and Movie Settings. I usually shoot XAVC S 4K, and for movie settings I want my Record Setting on the highest bit rate I can get along with 4:2:2 10-bit. If you want the long version of why, I made a whole video on it: Sony a7S III Video Formats Explained. We’re going to customize these in part two in a way that means you never have to dive into the menu to change your file format or bit rate again, because all of it gets handled by the mode dial. It’s gonna be awesome.
Moving on down to S&Q Settings, which stands for Slow and Quick. Normally, whenever you set the a7S III to record at a higher frame rate like 60 or 120, the camera still records that footage at normal speed, meaning you take it into your editing software and slow it down yourself. S&Q instead lets you record high and have the camera conform the footage in camera to 24 or 30 frames per second. That sounds great because it saves you a step later, but there’s a big caveat: whenever you record in S&Q, the camera will not record audio. I guess Sony figures you don’t need audio in slow motion.
I really prioritize on-camera audio so I always have a scratch track, in case I need ambient sound or heaven forbid one of my mics dies, so I would essentially recommend never using S&Q mode. There is exactly one situation where I would: if you want to record XAVC S-I, which is the highest quality format this camera can record internally, at 120 frames per second. That combination pushes the camera to its absolute limit and S&Q is the only way to get it. You’ll also need a CFexpress Type A card, because SD cards are not fast enough and will not work.
Proxy Settings are really great if you’re on a lower-powered computer, because this camera can record two files simultaneously: the high quality one you’ll export from, and a much smaller, lower-resolution proxy your computer can actually play back. Most modern editing software will let you work with both.
APS-C S35 Shooting will be grayed out if you’re recording in 4K. In 1080p you can turn it on, and it crops in on the sensor so you can use a lens that wasn’t made for a full frame camera. The catch is that the sensor has such a low megapixel count that it doesn’t have enough pixels to do it in 4K. Lens Compensation I leave on auto and it works great.
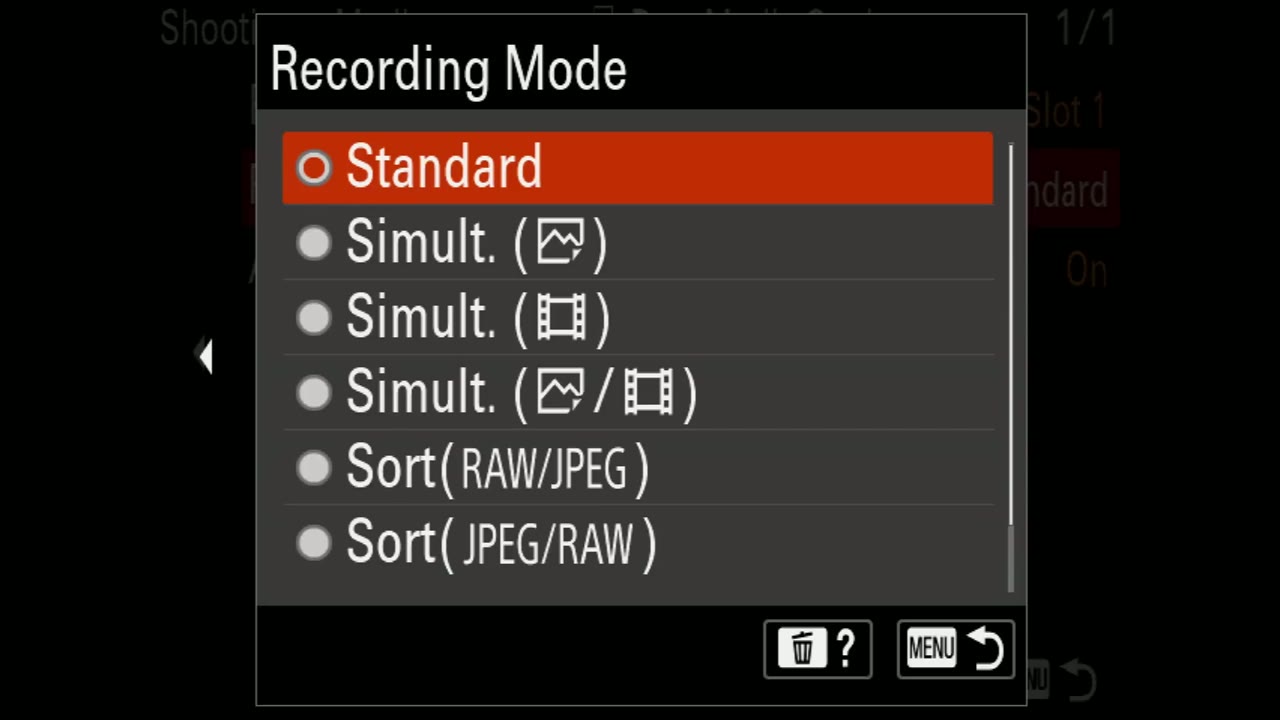
Format is self-explanatory, and I always recommend formatting your cards before a shoot so they’re ready to go. Rec. Media Settings, though, is very important. One of the main perks of Sony’s newer cameras is dual card slots, which means they can record to two cards at the same time. If you’ve ever used any form of digital storage, a flash drive, an SD card, a hard drive, you know it’s not a question of if something fails but when. So if you film weddings or documentaries or anything else that only happens once, go into Recording Mode and change it from Standard to Simultaneous with the little film strip next to it. Yes, you now have to buy twice the memory cards. That cost is completely worth it.
Recover Image DB is there if a card ever fails or gets scrambled, and it may help you recover it. Display Media Info. tells you how much recording time is left, which is redundant because the back of the camera already tells you that.
If you’re not sure which cards to put in the thing in the first place, I covered that here: Sony a7S III Memory Cards Guide.
Set File Number to Series. This one matters a lot if you shoot with multiple cameras, because in the past cameras would all start at file names like C0001, so every camera produced identically named files and you couldn’t tell which was which at edit time. With Series it keeps counting up and the odds of a collision drop way off.
You can go further by setting File Name Format to Title and then using Title Name Settings to name the files yourself. So if you have a camera that only ever shoots the ceremony, name its files something like “ceremony camera one,” and whenever you sit down to edit you can tell at a glance what you’re looking at.
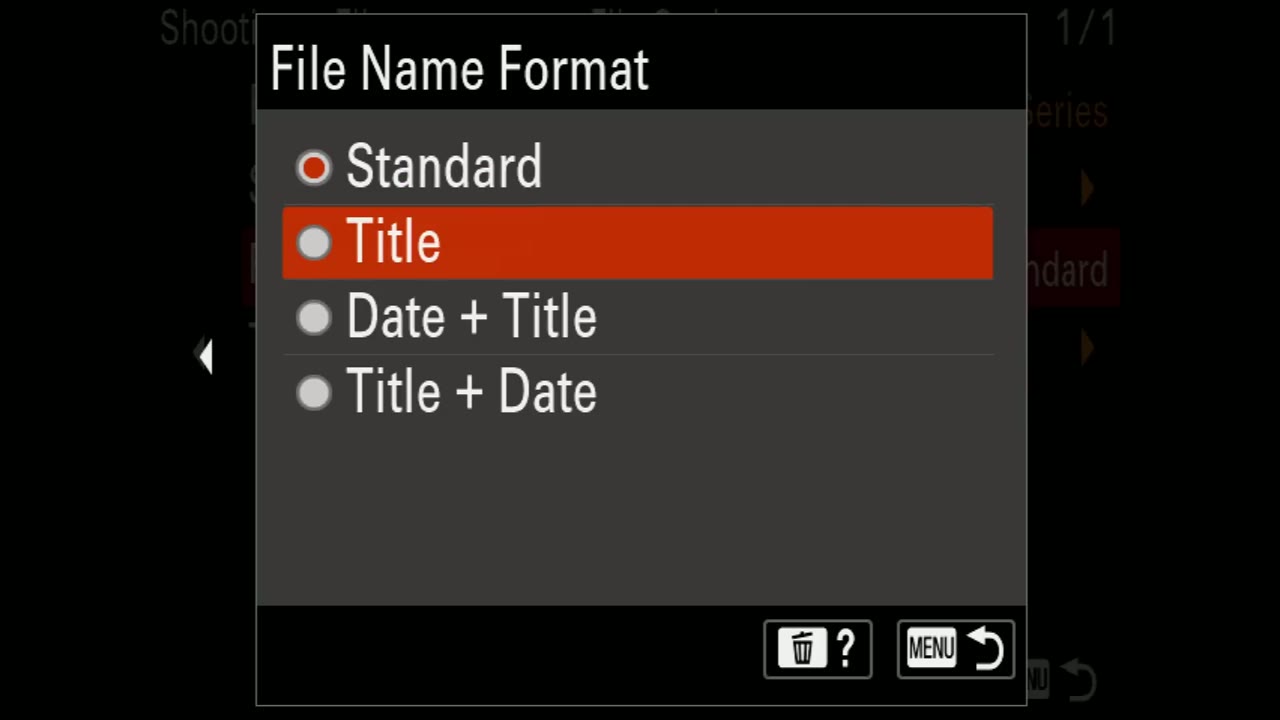
Set Exposure Mode to Manual Exposure. We do not want any auto settings on this camera, you always want to be dialing everything in yourself so your image looks its best. Under Exposure Ctrl Type, set it to P/A/S/M Mode so you have full manual control. The next three settings, Recall Camera Setting, Camera Set. Memory, and Memory Recall Media, all get covered in part two.
Don’t worry about the silent mode settings, we’re shooting video and it’s already silent. Release w/o Lens is the one to change here, and I would definitely set it to Enable. With a native lens you won’t notice a thing, but whenever you adapt a non-native lens and your adapter doesn’t have an electronic connection, there’s a chance the camera flat out refuses to let you press record and tells you it can’t release without a lens. That’s a bummer at the wrong moment. Set it to Enable and the camera will work with basically anything you hang off the front of it.
Audio is a very important component of video, so this whole section matters. Audio Recording on, obviously. Audio Rec Level I usually keep at 15, and part two shows you how to change that in about a second without the menu.
Audio Out Timing matters if you’re monitoring through an external monitor. If your audio sounds slightly out of sync with the picture while you’re recording, change Audio Out Timing from Live to Lip Sync and it should line back up. Wind Noise Reduct. I would leave off, because it does its work with a digital filter and you can do the same thing in post just as easily.
Shoe Audio Set. only becomes available if you’re using a Sony microphone that talks to the camera electronically through the hot shoe, so no dangling cable into the mic jack. Audio Level Display you obviously want on, since that’s how you see your levels on the monitor.
TC/UB stands for Time Code and User Bit. If you use time code these settings are awesome, though I don’t know many wedding or documentary filmmakers who do. They’re here if you need them.
Image Stabilization, also called SteadyShot, also called IBIS, is a really great feature and you don’t need to change anything in here right now, because part two covers how to toggle it instantly without the menu.
Zoom is awesome. Go to Zoom Range and select Clear Image Zoom. I know it says Digital Zoom right below it, ignore that, Clear Image Zoom is higher quality. Same as stabilization, we’ll set this to a preset in part two so you’re not menu-diving every time you want it. Do check the Zoom Speed settings while you’re in here and tweak the numbers if you want the zoom faster or slower.
Under Shooting Display you can turn grid lines on and off and choose the type. I prefer the rule of thirds grid, so that’s what I have selected.
At the bottom you’ll see Emph. Disp. Dur. REC, which is Emphasized Display During Recording, and you definitely want this on. It draws a bright red border around the whole screen while you’re rolling, which makes it dead obvious at a glance whether the camera is recording. It’s a small thing and it’s one of my favorite things about this camera.
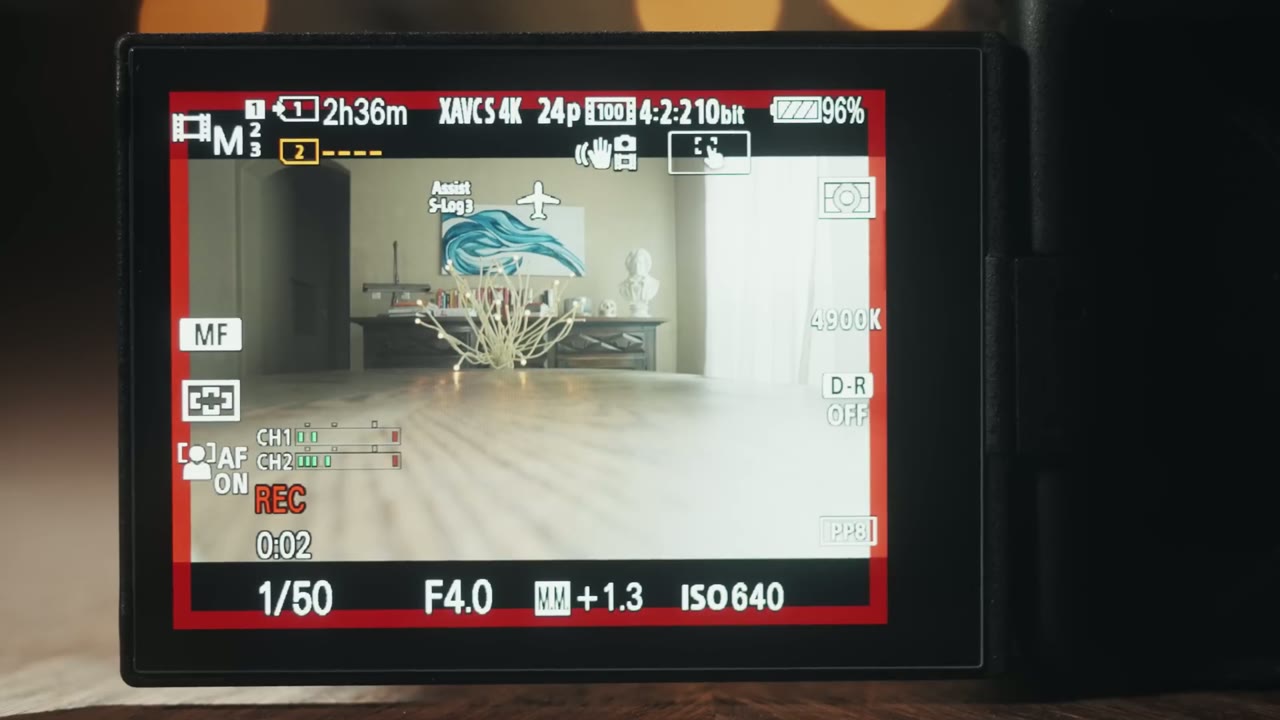
Marker Display works like the grid lines but gives you a lot more choices. The one worth your attention is Aspect Marker, because if you like shooting with those cinematic black bars, you can turn on 2.35:1 or 1.66:1, flip Marker Display on, and you’ll get white lines on the screen previewing exactly what your crop will look like.
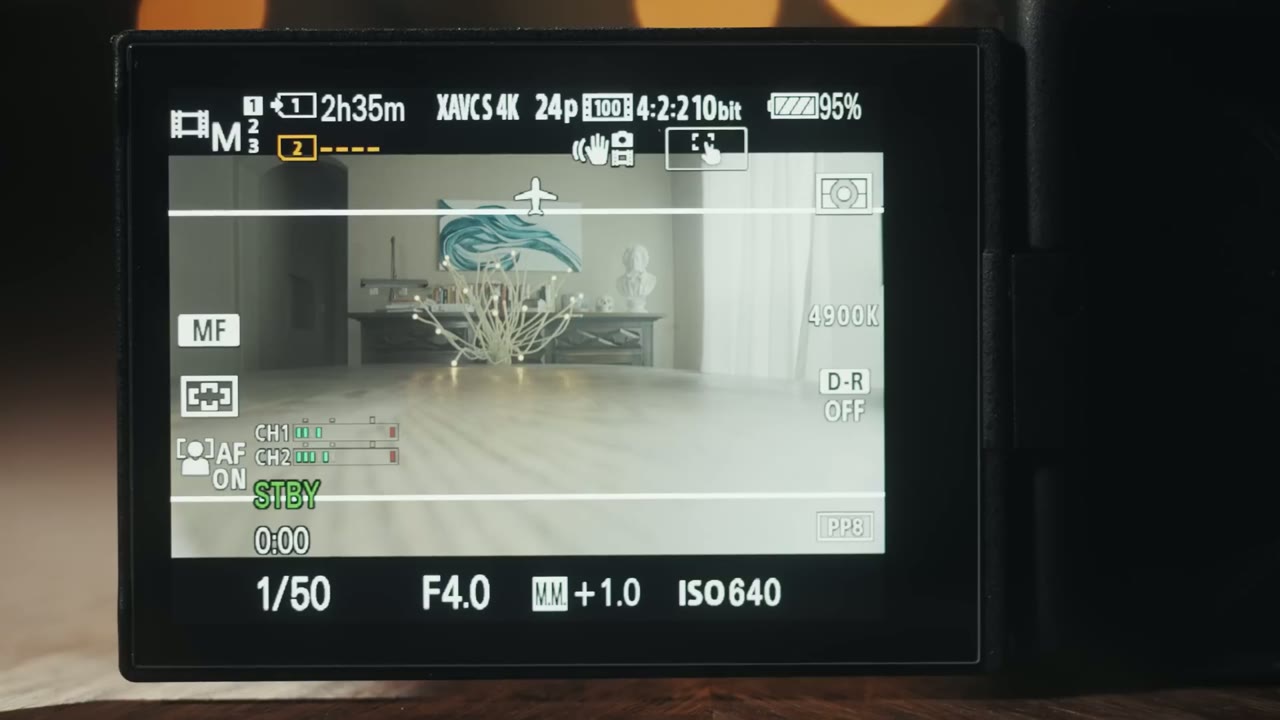
Auto Slow Shutter automatically changes your shutter and ISO depending on how bright the image is. Remember what I said: we don’t want anything auto, everything should be manual. Turn it off and ignore the rest of that section.
Exposure Comp. is exposure compensation, and the good news is you don’t need to worry about it since we’re setting everything manually. That said, check that it reads plus or minus 0.0, and check that the little physical wheel on the a7S III is also on zero and locked, because that’s just another way of changing the same setting behind your back.
I cannot express how much I love metering. It’s a weird thing to say out loud that I love metering, but I do. Metering is the camera’s way of telling you whether what you’re recording is too bright or too dark, and without it this camera would be genuinely hard to shoot with.
Look at the bottom of the screen on the back and you’ll see your shutter speed, your f-stop, and then “MM” with a number somewhere between negative 2.0 and positive 2.0. That’s the exposure meter. If it says 1.0, you’re one stop overexposed.
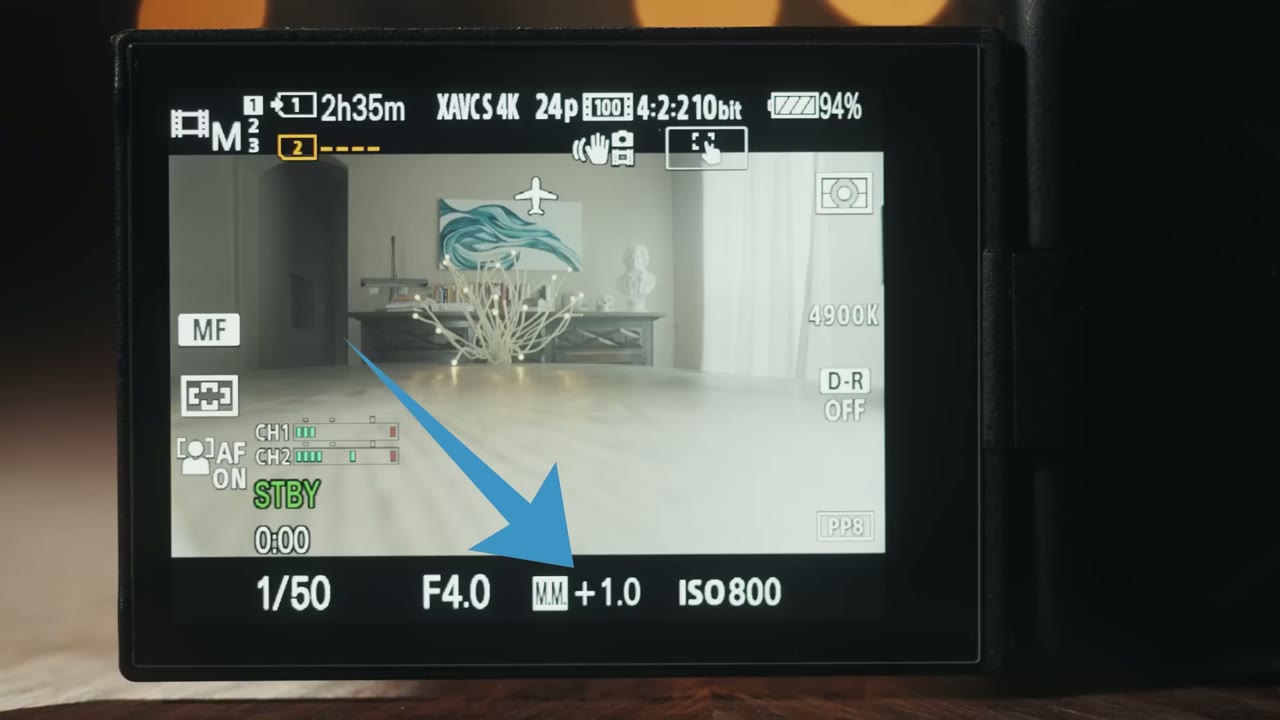
Leave Metering Mode on Multi for most shooting, which checks the exposure of everything in frame and reports it back in that MM number. Below that, turn Face Priority in Multi Metering on and leave it on, so whenever the camera detects a face it prioritizes telling you the exposure of the face. Properly exposing skin tones is the whole ballgame on this camera, so that setting earns its keep.
Spot Metering Point is there if you need to check one specific part of the frame. Set Metering Mode to Spot, set Spot Metering Point to Focus Point Link, and tapping the screen tells you whether that area is blown out. It’s a cool feature, though I don’t find myself using it, because I keep the camera on multi metering and use zebras instead.
Another super important one. I always prefer to dial white balance in manually using Kelvin, so scroll down to C.Temp/Filter, press right to move the selector over to the Kelvin number, and dial it in to match the light in your scene. As a bonus, press right again to get to the white balance adjustment screen, where you can push green or magenta into the image so it looks its best.
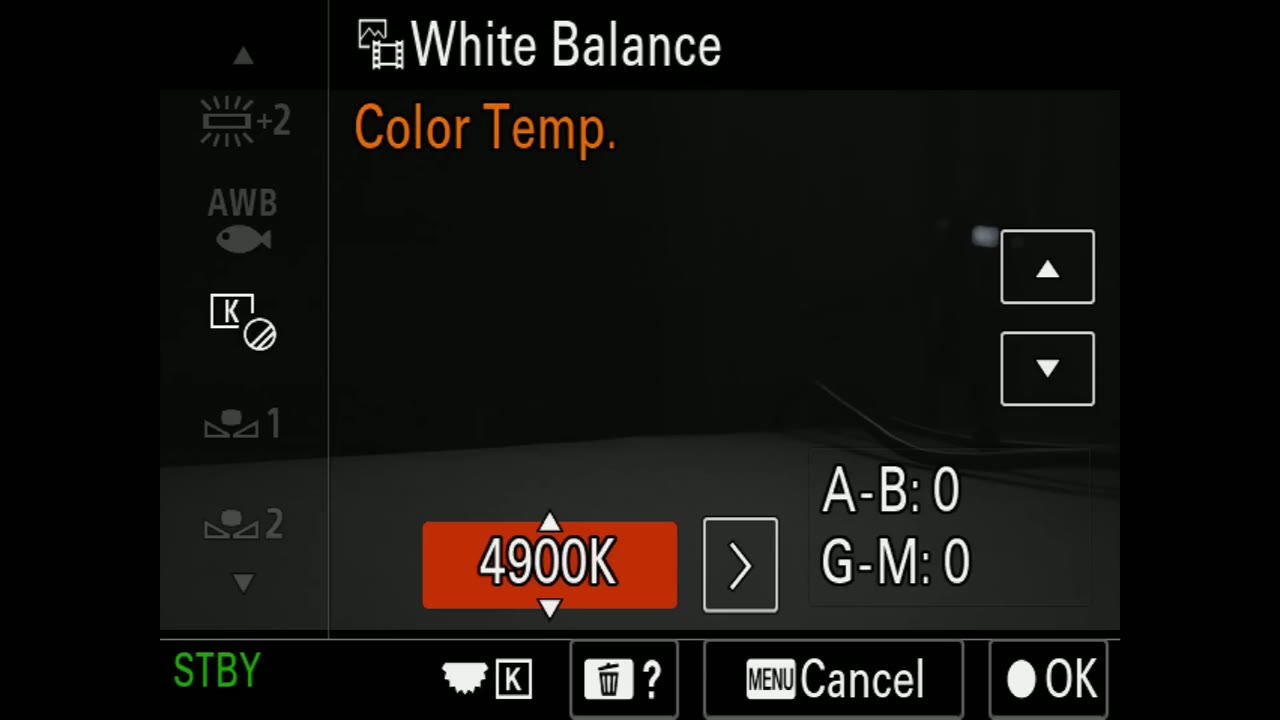
Priority Set in AWB has the word auto in it, so ignore it. Shockless WB, though, is one of my favorite settings, and I keep mine set to 3. When I change white balance in the middle of a take, the camera eases into the new value instead of snapping to it, so you don’t shock your audience. Probably why they called it shockless.
Turn D-Range Optimizer off, you don’t need it and you can make those changes in post. Creative Look lets you do things like sepia or ultra vivid color, and I wouldn’t mess with any of it. The only one I’d consider is NT, which stands for Neutral, and it can look decent straight out of camera if you don’t want to color grade at all.
Then there’s Picture Profile, and oh, I love picture profiles, because that’s how you really maximize the dynamic range and color this camera can capture. If you don’t know what you’re doing yet, leave Picture Profile set to Off for now. If you’d rather have the grade handled for you afterward, that’s what my LUTs are for.
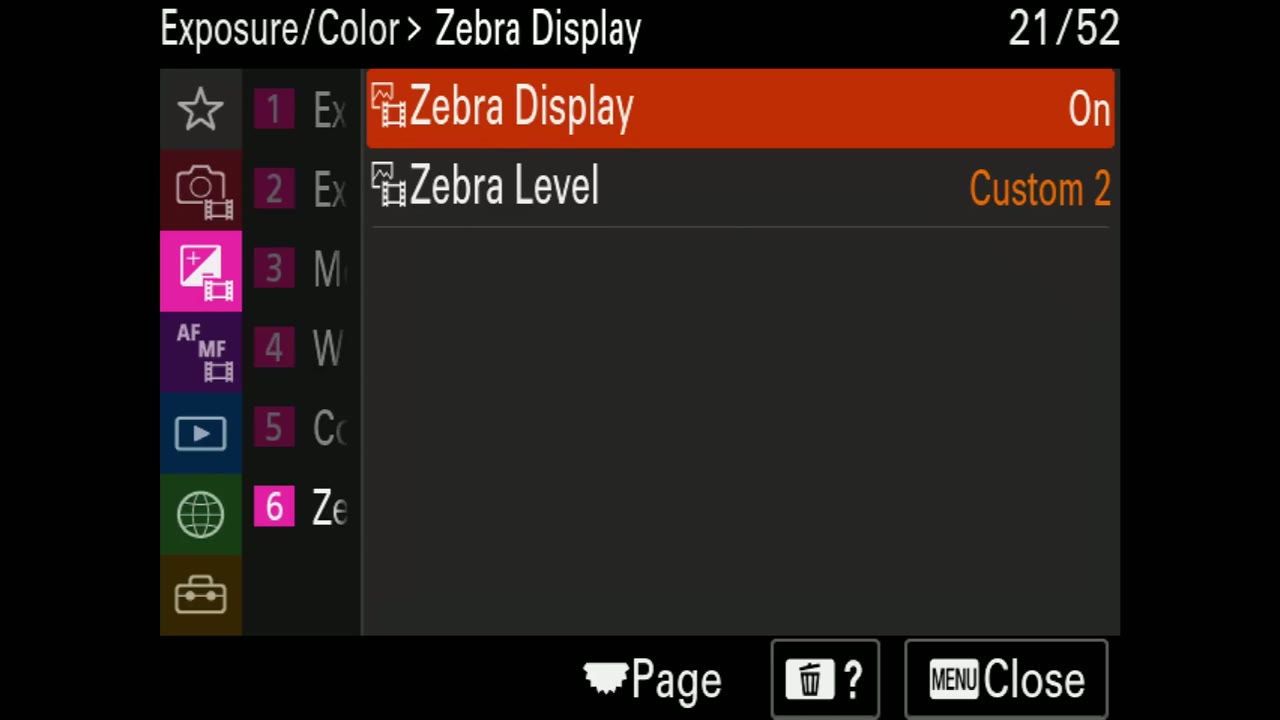
Turn Zebra Display on. Zebras tell you your footage is overexposed by covering the blown-out areas in bright diagonal stripes, which, yes, look like zebras. I always recommend using them, but it’s important that you pick your zebra level based on the picture profile you’re shooting, so choose your profile first, then use Zebra Level below to set the brightness where you want the stripes to appear.
This camera is really, really good at autofocus. Under Focus Mode, if you’re on native Sony lenses, set it to Continuous AF so the camera keeps adjusting while you roll.
AF Transition Speed changes how quickly the camera racks from one subject to another. Play with it and see what looks right to you, though I found the default of 3 is a good starting point. AF Subj. Shift Sens., which sounds like a tongue twister, sets how sticky the autofocus is: 1 means it locks onto a person and stays glued there, 5 means it hops to whatever else walks into frame. I think 3 is a good mix, and go lower if the focus feels too jumpy.
I set Focus Area to Wide and let face detection do the work. If you want the camera locked to one specific part of the frame you can use Zone or Spot instead. Focus Area Limit lets you uncheck the area modes you never use so you stop cycling through them, though since I stay on Wide I leave them all checked. Focus Area Color I keep on white, but you can pick red if you’re feeling fancy. Circ. of Focus Point and AF Frame Move Amt. only matter if you’re using Spot, and I’d stick with Wide and skip both.
I love all of these. Make sure Face/Eye Priority in AF is on, so the camera prioritizes faces and eyes whenever it sees them. Set Face/Eye Subject to Human, though it doesn’t really matter, because unfortunately the camera can’t use animal eye AF in video. Sorry to every dog at every wedding.
Right/Left Eye Select I’d leave on Auto unless you have a specific need. Face/Eye Frame Display should definitely be on, since it draws a box around whoever you’re filming and helps you confirm things are actually sharp. Regist. Faces Priority you can turn off, unless you’ve registered a face in photo mode, which most people haven’t.
Focus Assistant is a fantastic way to punch in and check focus, especially on a manual lens with no autofocus to fall back on. Ignore Focus Magnifier itself for now, since all it does is punch in and we’re putting it on a button in part two. Do set Focus Magnif. Time to No Limit, because you should be the one deciding how long you’re punched in, and set Initial Focus Mag. to x4.0 so a single button press takes you straight there. Very useful whenever you’re shooting fast.
Peaking Display matters a lot if you’re on manual lenses. Turn peaking on and the camera highlights whatever is in focus in a color of your choosing. Peaking Color gives you red, white, blue, or yellow, and Peaking Level sets how aggressive it is. I usually leave that on Mid.
Good news, there’s almost nothing to do in here. The one setting worth knowing about is Select Playback Media, which decides whether pressing the play button reviews the footage on card one or card two. Very useful to know where that lives whenever you’re shooting to two cards.
Magnification is for photos. Selection/Memo lets you protect images, which doesn’t help because formatting the card deletes them anyway, and ratings only apply to photos. Don’t use Delete to remove things mid-shoot either, since that’s a good way to confuse a memory card. Always fully format before a shoot, then leave the card alone.
Under Edit, Rotate actually is worth knowing about, because the a7S III has a built-in gyroscope, and if you hit record while holding the camera sideways it saves that clip as a vertical video and you are going to be very confused whenever you open it in your editor. If you spot a rotated clip, come here, pick it, and rotate it back. Photo Capture pulls a still from a video clip, but grab your stills in your editing software instead, they’ll look better.
In Playback Option, ignore everything except Image Jump Method. Set it from One by One to 10 Images, and then the front or rear dial (whichever you pick under Select Image Jump Dial) will scrub through your clips quickly, which is great whenever you need to jump back and review something.
Same story, the majority of this doesn’t matter for what we’re doing. Transfer/Remote is where you’d set up controlling the camera from your phone, which I don’t use often but that’s where it lives. Literally everything else is Wi-Fi and Bluetooth, and you’re not going to be using it in a run and gun scenario.
The one thing I’d do is go into Network Option and turn Airplane Mode on, because it may help the camera save a little bit of battery, and that’s always a good thing.
Whenever you get one set up, I put together Sony a7 IV Menu Setup Guide | Fast Filmmaking Settings For The Sony a7 IV Part 1 and Sony FX30 Menu Setup Guide | Fast Filmmaking Settings For The Sony FX30 Part 1 so you can get dialed in fast.
If you ever notice the highest frame rate you can select is 100 instead of 120, go into NTSC/PAL Selector and make sure the camera is set to NTSC. That gives you the higher frame rate options. The only reason to be on PAL is if you’re in a PAL country doing something specifically for broadcast. For the vast majority of people, and definitely if you’re uploading to YouTube, NTSC is great.
Setting Reset will roll back some of the camera’s settings or take the whole thing back to factory, which is your escape hatch whenever you’ve screwed something up and can’t figure out how to undo it. Below that is Save/Load Settings, which reads and writes your camera settings to the memory card. I love this feature, and it’s exactly what you use to load my settings file onto your own camera.
The custom key settings for photo, video, and playback all get covered in part two. Different Set for Still/Mv lets you keep separate settings for photo and video, which is handy if you shoot both, but this is a video about filmmaking so we’re not worrying about stills.
DISP Screen is a great way to control what information shows up on the monitor and in the viewfinder. I leave everything checked for the monitor except Monitor Off, and everything checked for the finder.
Then there’s Rec. w/ Shutter, and oh my goodness. Instead of using the dedicated record button or burning a custom button on it, you can set the shutter button to record, which is fantastic, because it’s the big ergonomic button that your finger is already resting on. The second I realized I could turn this on, I turned it on, and it’s the button I record with now.
Buried at the very bottom is Zoom Ring Rotate, which is grayed out unless you’re on certain native Sony lenses. Check whether it’s available and mess with it if it is, otherwise don’t worry about it.
My Dial Settings lets you customize how the dials behave, but part two shows you a different way to get there that’s just as fast, so skip it. Dial Setup gives you Tv/Av or Av/Tv, which is just choosing whether your front or rear dial handles aperture versus shutter speed. I prefer Av/Tv. Av/Tv Rotate flips the direction those dials turn, and I leave mine on Normal. Dial Ev Comp relates to that exposure compensation dial up top, so don’t worry about it. Function Ring (Lens) is for the Sony lenses that have one, so dig in there if that’s you.
Last is Lock Operation Parts, which lets you hold the function menu button for about three seconds to lock every button on the camera. That’s nice if you’re worried about bumping something, but we’re running and gunning, we want to be able to grab anything instantly. I always leave it off.
Definitely turn Touch Operation on, since that’s what lets you tap the screen to pull focus with native Sony lenses. Touch Sensitivity I leave on Standard, and Touch Panel/Pad I set to Touch Panel Only. Touch Pad Settings only apply if you’re looking through the viewfinder and want to use the screen as a trackpad, which is kind of wonky, so I don’t use it.
For Touch Func. in Shooting, set it to Touch Tracking, so the camera focuses on whatever you tap and then keeps tracking it as it moves. You can set it to Touch Focus instead, but the moment your subject moves, focus is gone.
By default the a7S III switches automatically between the monitor and the EVF using a motion sensor under the eyepiece. I hate it, because if you wave your hand past that sensor while you’re changing a setting, the monitor blacks out and you can’t see what you’re shooting. So I set Select Finder/Monitor to Monitor(Manual), and then in part two we put the switch on a custom button so you never have to fight the sensor again.
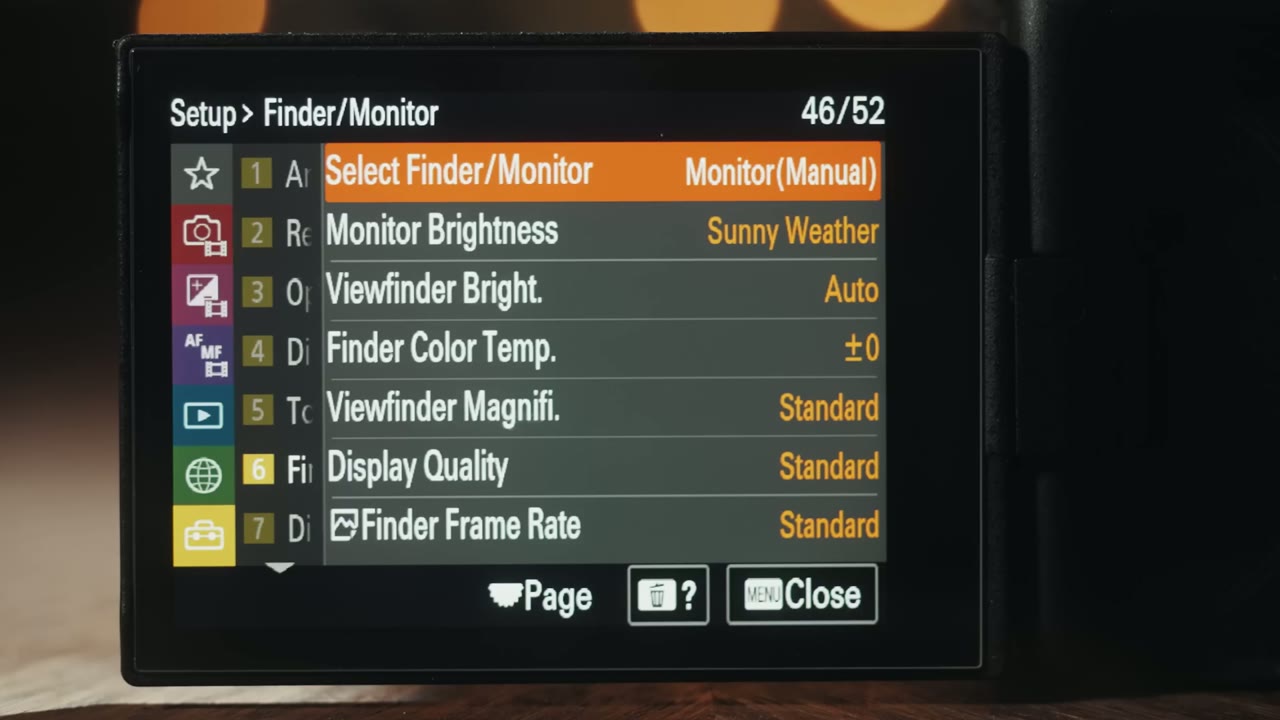
Monitor Brightness, turn it to Sunny Weather so your screen stays bright outdoors. Viewfinder Bright. I leave on Auto, since it does a good job. Finder Color Temp. I leave at zero. Finder Magnification I keep on Standard, though if you wear glasses you may want Zoom Out.
Display Quality is important: leave it on Standard. That lowers the refresh rate of the monitor on the back, but don’t worry, it has zero effect on the frame rate you’re actually recording, only on the monitor itself. Keeping it on Standard buys you real battery life without causing any problems. Finder Frame Rate, same thing, same reason.
More time code display settings, which you can leave on Counter unless you’re using time code. Then there’s Gamma Disp. Assist, and this one is a very important feature. Whenever you’re shooting S-Log or HLG, it turns the camera’s built-in LUT on so you can preview what your image will actually look like instead of staring at a flat gray picture. We’re putting this on a custom button in part two, so you can leave it off here. Gamma Disp. Assist Typ. stays on Auto.
Remain Shoot Display and Auto Review both have a little photo icon next to them, which means they’re for stills. Ignore both.
Power Save Start Time controls how long the camera stays awake before shutting off. If you’re bad about turning the camera off, set it low, like one minute. Otherwise turn it up to 30.
Auto Power OFF Temp., though, definitely set to High. The camera is going to give you a warning about it, and you can ignore that warning. All it does is let the body get warmer before it shuts itself down. In my overheating test, having this set to High kept the camera running outdoors in 100 plus degree weather recording 4K.
Volume Settings is the playback volume through the tiny camera speaker or your headphones, so set it however you need. 4ch Audio Monitoring only matters if you’re using Sony’s XLR-K3M adapter to record four channels, which you probably aren’t while running and gunning, so leave it on CH1/CH2.
Then there’s Audio Signals, and ugh, this is one of the worst features of any Sony camera, I kid you not. It’s what governs that little beep whenever you start and stop recording. For run and gun shooting the whole goal is to be invisible, and this thing announces to the entire room that you’re rolling. It’s awful. Turn it off immediately.
I leave USB Connection on Auto and USB LUN Setting on Multi. USB Power Supply is the one that actually matters here, because turning it on lets the a7S III run off its USB-C port, which means an external battery pack or a wall outlet can keep this camera alive indefinitely. Definitely turn that on.
External Output is where you set the resolution and frame rate going out to an external monitor, and the HDMI Output Settings menu is also where you tell the camera to send raw to an external recorder, so turn that on if that’s what you’re doing. HDMI Info. Display puts all your camera settings on the external screen: turn it off if you’re recording to an external recorder so you’re sending a clean signal, turn it on if you’re only monitoring. Ctrl for HDMI lets you press record on something like an Atomos and have it trigger the camera too, which is a nice feature to have.
Video Light Mode and IR Remote Ctrl are there if you use a Sony video light or an infrared remote. I don’t use either, and I definitely wouldn’t recommend sticking a light on top of this camera. Off-camera lights are your friend.
Sensor Cleaning is worth using first whenever you want to manually clean the sensor, because it locks the sensor in place with the IBIS motors so you can actually get at it. Auto Pixel Mapping handles it if one of the pixels on your sensor goes bad, so just leave that on auto and don’t mess with it. Version tells you the firmware your camera and your lens are running, which is handy whenever an update drops.
That’s every menu setting you need to change to get the a7S III or the FX3 recording as fast as possible. But we’re not done, because there’s still the mode dial, the custom menu, the custom buttons, and the function menu, and that’s where all of this pays off. Watch part two here, because once your buttons and settings are customized you will basically never need to jump back into the maze we just crawled through.
And you can skip all of it by downloading my settings file, loading it onto your camera, and having everything set up and ready to shoot:
A few more that pair with this one: the video formats guide walks you through every quality setting so you get the best image out of this camera, the memory cards guide tells you which cards to actually buy, and the overheating test answers the question everybody asks about this body. All three apply to the FX3 too, since it takes the same cards and records with the same settings.
►► Want to book more weddings? Download my free guide, and come hang out in my Learn Wedding Filmmaking Facebook Group.