
Today I want to share how to quickly and easily film with the SLOG3 picture profile in your Sony camera. So if you’re a run and gun filmmaker like me, filming weddings or documentaries where you don’t have full control over your lighting and you don’t have time to use something like a gray card, this will show you how to get great exposure very fast.
To save you time and make this picture profile easier to film with, I’ve created a set of video presets called WhoisMatt LUTs, built and tested specifically to work with SLOG3.
Can Your Camera Handle SLOG3?
This one matters, because even if your camera shows SLOG3 as an option in the menus, that doesn’t necessarily mean it’s capable of properly recording with it.
In short: if you’re using one of Sony’s newer cameras, like the a7S III, FX3, FX6 or a1, basically any Sony camera capable of recording video in 10-bit, your camera can handle SLOG3.
Now I’m walking through all of this on my a7S III, but the menus shuffle around a fair bit between bodies, so whenever you’re filming on something else I’ve done this exact same setup for the Sony a7 IV and for the FX30. Same picture profile, same exposure rules, just the right menu paths for your camera.
But if you’re filming with an older Sony camera, like the a7 III, a6600, a6500 or a6400, I would not recommend SLOG3, and I have a different picture profile I’d recommend to you instead.
Use PP8, NOT PP9!
Grab your Sony camera, in my case the a7S III, and navigate to the picture profile menu. The first thing to do is make sure the camera is set to PP8, that gamma says S-Log3, and that the color mode says S-Gamut3.Cine.
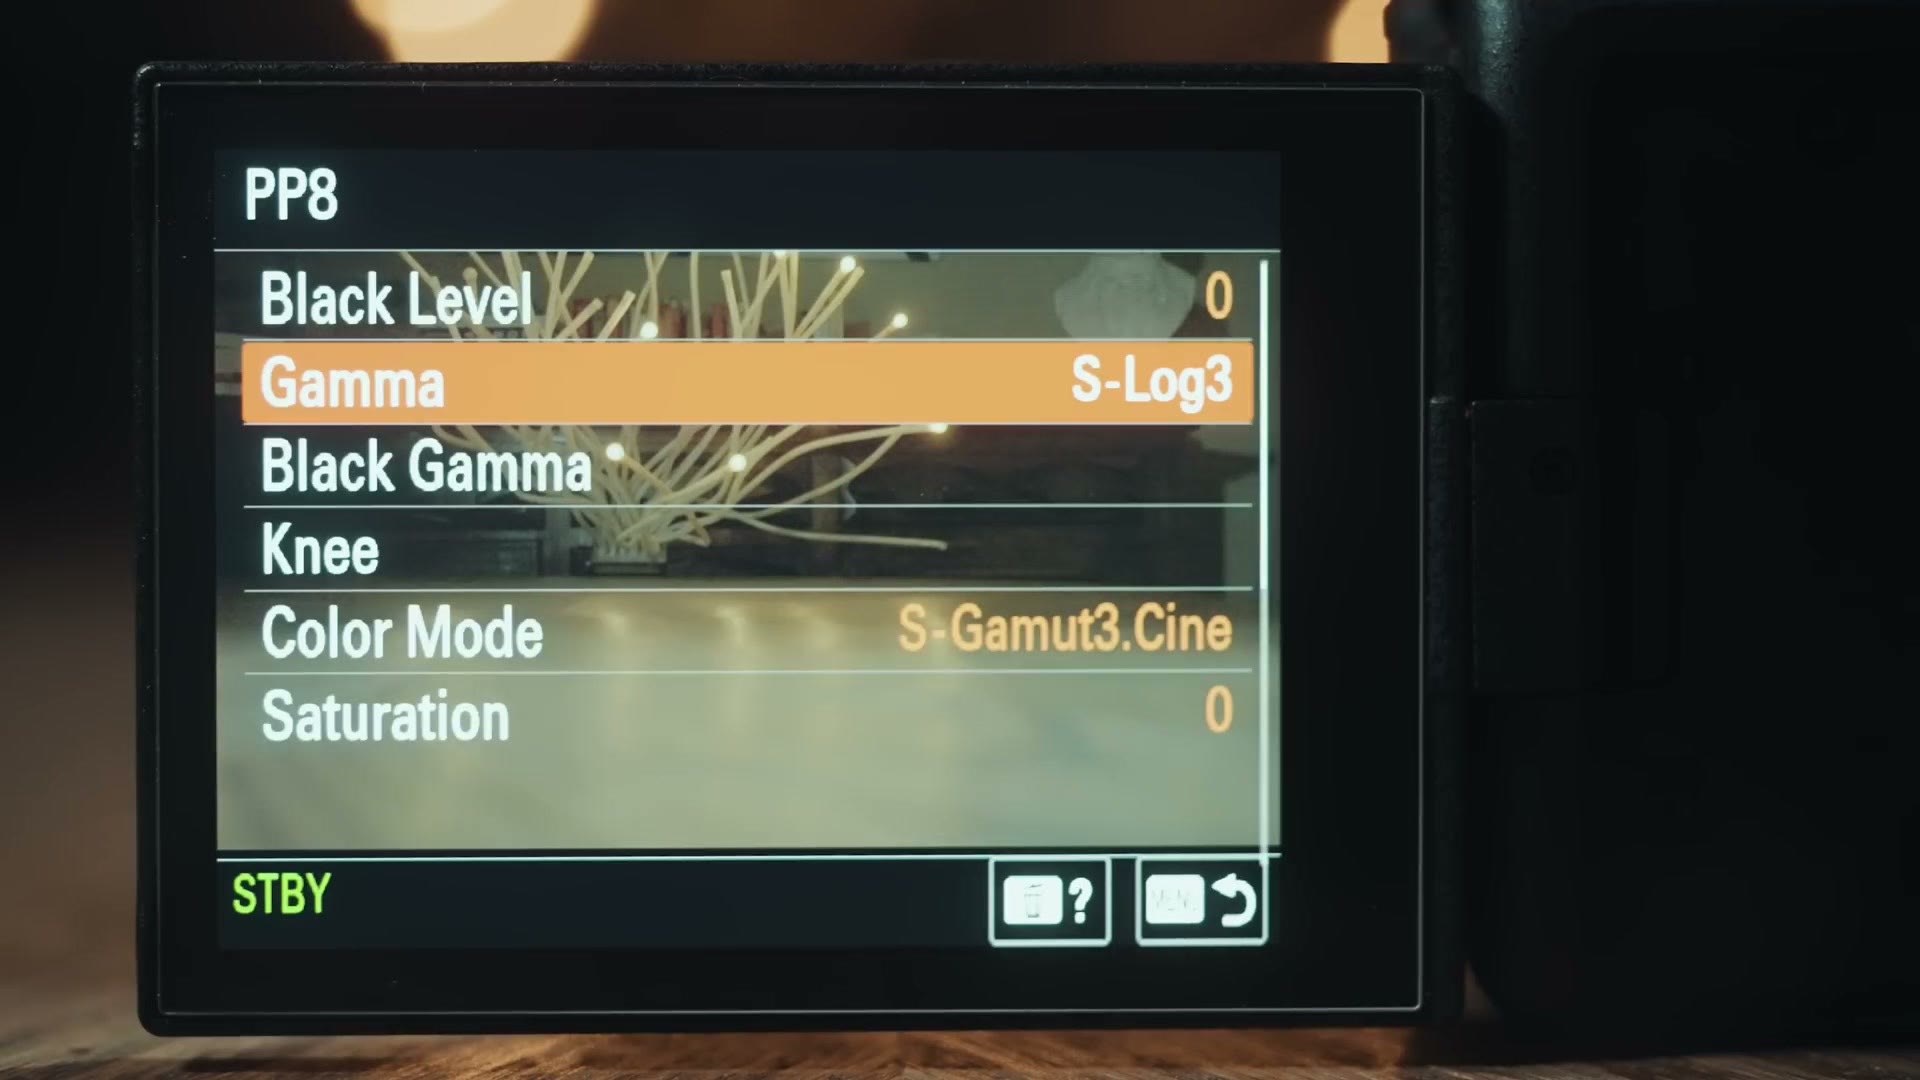
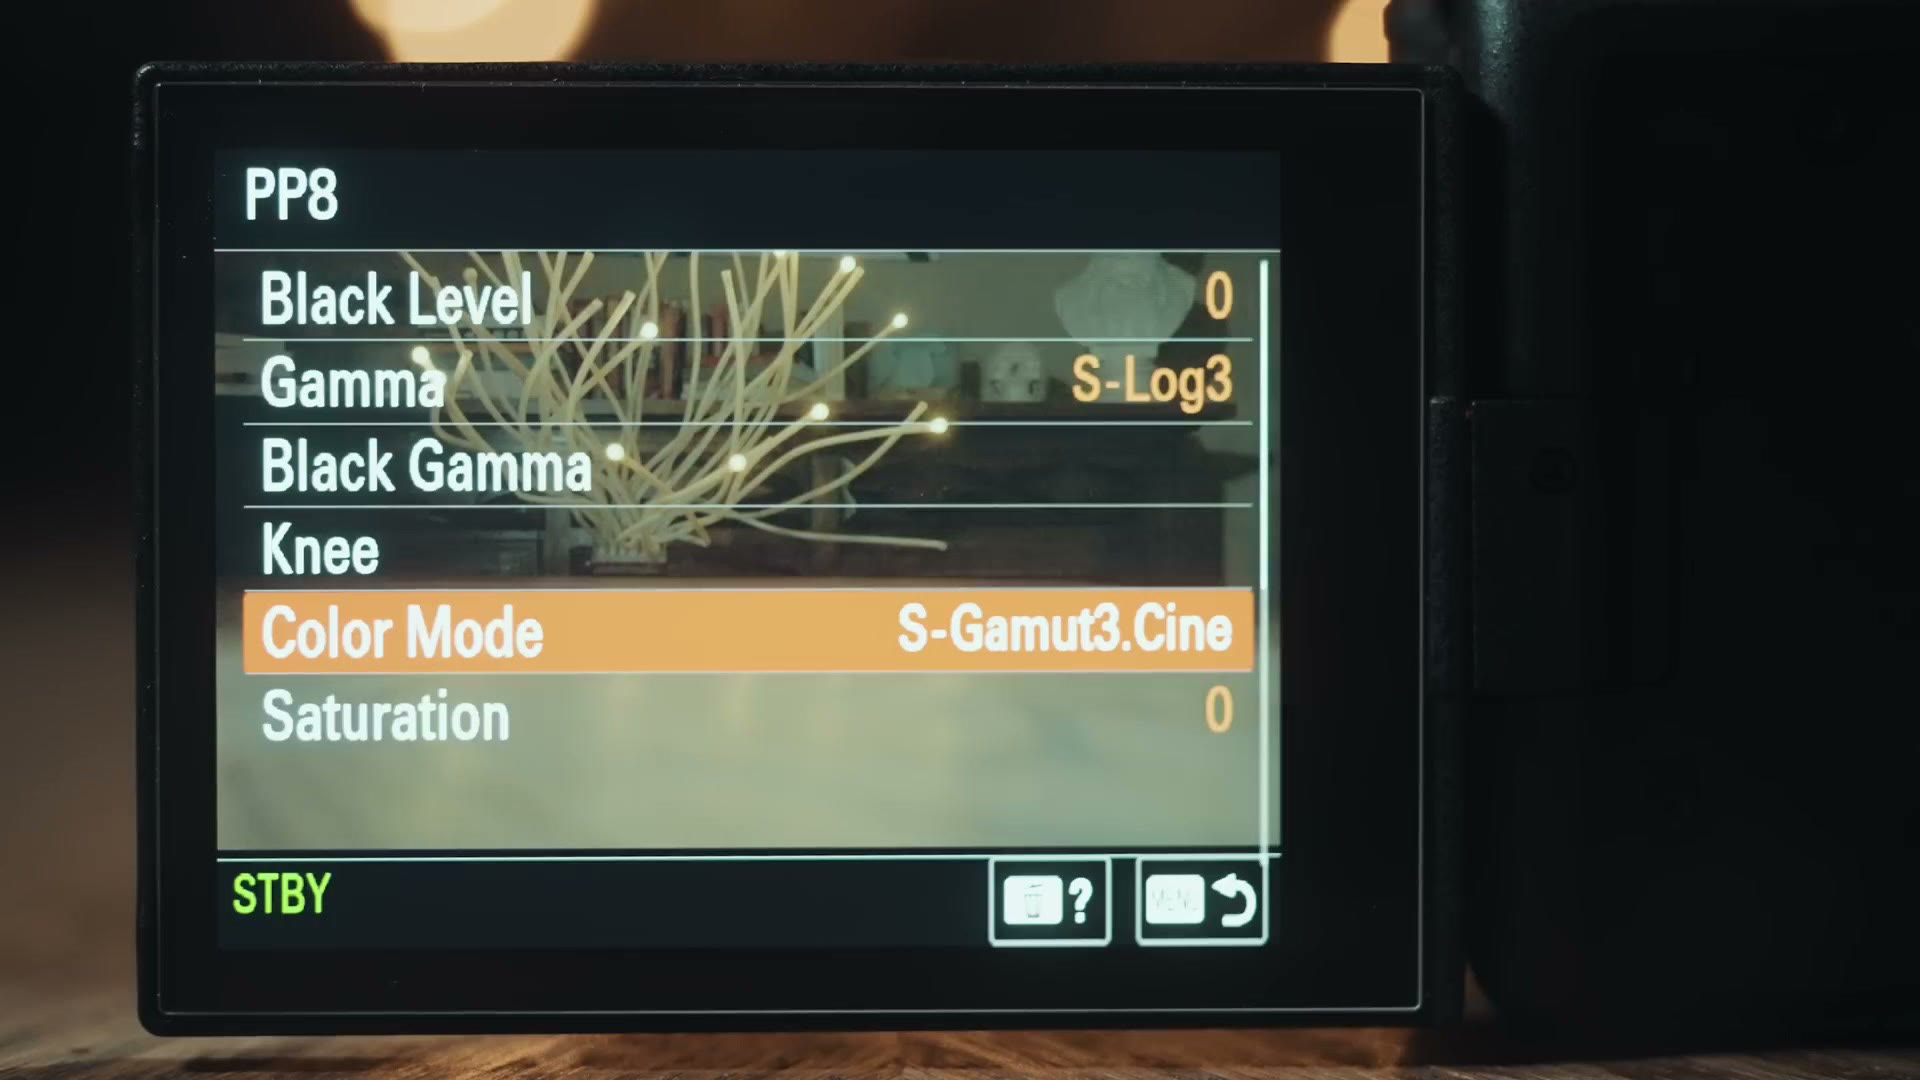
If it doesn’t say that, scroll down to Reset and reset PP8 to its default settings.
If you’ve scrolled around in there you’ll have noticed PP9 also says SLOG3, with the only difference being that its color mode says S-Gamut3 rather than S-Gamut3.Cine. There isn’t a huge difference between the two, but it is going to be easier to color grade footage filmed with S-Gamut3.Cine, which is why I recommend PP8.
Why SLOG3 Is “Noisy”
One of the biggest complaints I’ve heard from filmmakers over the years is that SLOG3 is a noisy picture profile. They record footage in SLOG3, then when they color grade it the image looks really noisy, almost like the camera is at a high ISO even when the ISO is set quite low.
If that has happened to you, the reason you’re seeing that noise even at low ISOs is that you have not exposed SLOG3 properly.
Unlike a standard picture profile that already has saturation and contrast baked in, SLOG3 is a log profile, meaning it’s flat, and you’re going to add that contrast and saturation later when you color grade.
How To Expose SLOG3
This may seem a bit counterintuitive, but you actually want to overexpose your footage when filming. Then when you color grade, you bring the exposure back down as you add contrast and saturation.
The reason many filmmakers see noise in their SLOG3 is that they’re doing the opposite: filming too dark and then bringing the exposure up, which is what introduces noise.
That said, whenever you’re shooting on one of Sony’s cinema cameras like the FX3 or FX6, there’s a completely different way of handling your exposure called CINE EI, and I broke that whole thing down in its own guide here. Same SLOG3, very different approach.
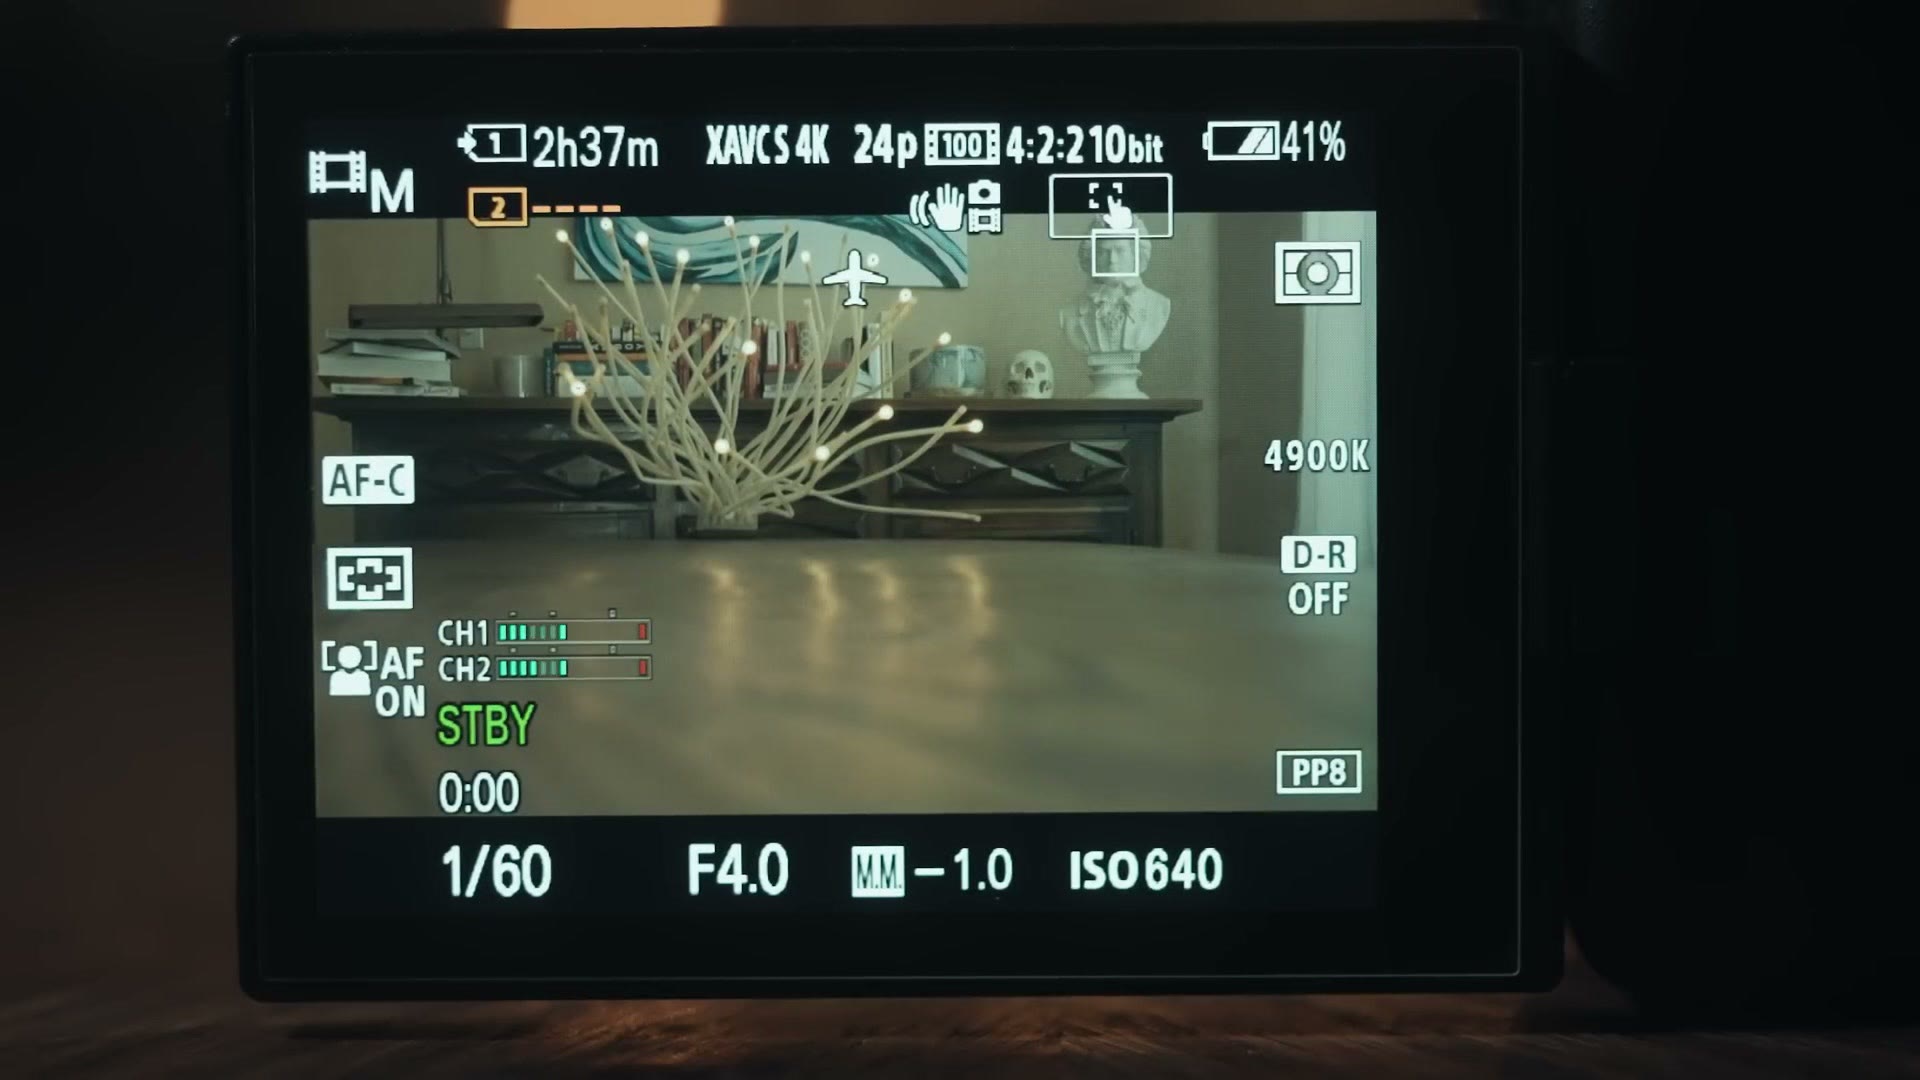
At the bottom of your camera screen you’ll see your shutter speed, your aperture, and then the letters MM and a number. MM stands for multi metering, and it tells you how bright the image your camera is recording is. If your camera doesn’t say MM there, open the menu, go to Exposure/Color, Metering, and set your metering mode to Multi.
With a traditional picture profile you’d want that number to read 0.0, meaning the image isn’t over or underexposed. Minus 1.0 means one stop under. Plus 1.0 means one stop over.
But we’re shooting SLOG3, so you’re going to want your metering to read between 1.7 and 2.0 stops over. This is going to look bright, but I promise you this is how your SLOG3 footage will look its best.
Also be careful, because when I say 1.7 to two stops over, make sure that two isn’t blinking. If it’s blinking, that means it’s more than two stops over, and that’s too bright.
Why I Love Zebras (Not The Animal)
To help you make sure you aren’t overexposing, I’d highly recommend using zebras. Not the African animal. The zebras setting on your camera, which puts black and white stripes on the overexposed parts of your image.
You do need to calibrate them to work properly with SLOG3. If you’ve read my Sony menu setup and custom buttons guides, or downloaded my a7S III settings preset, your zebras are already set up for SLOG3.
If not, here’s how. Go to the menu, Exposure/Color, Zebra Display, and for Zebra Level go down to C2 so you can set a custom level. Press right, select Lower Limit, press right again, and change the number to 94+. Then make sure Zebra Display itself is turned on.
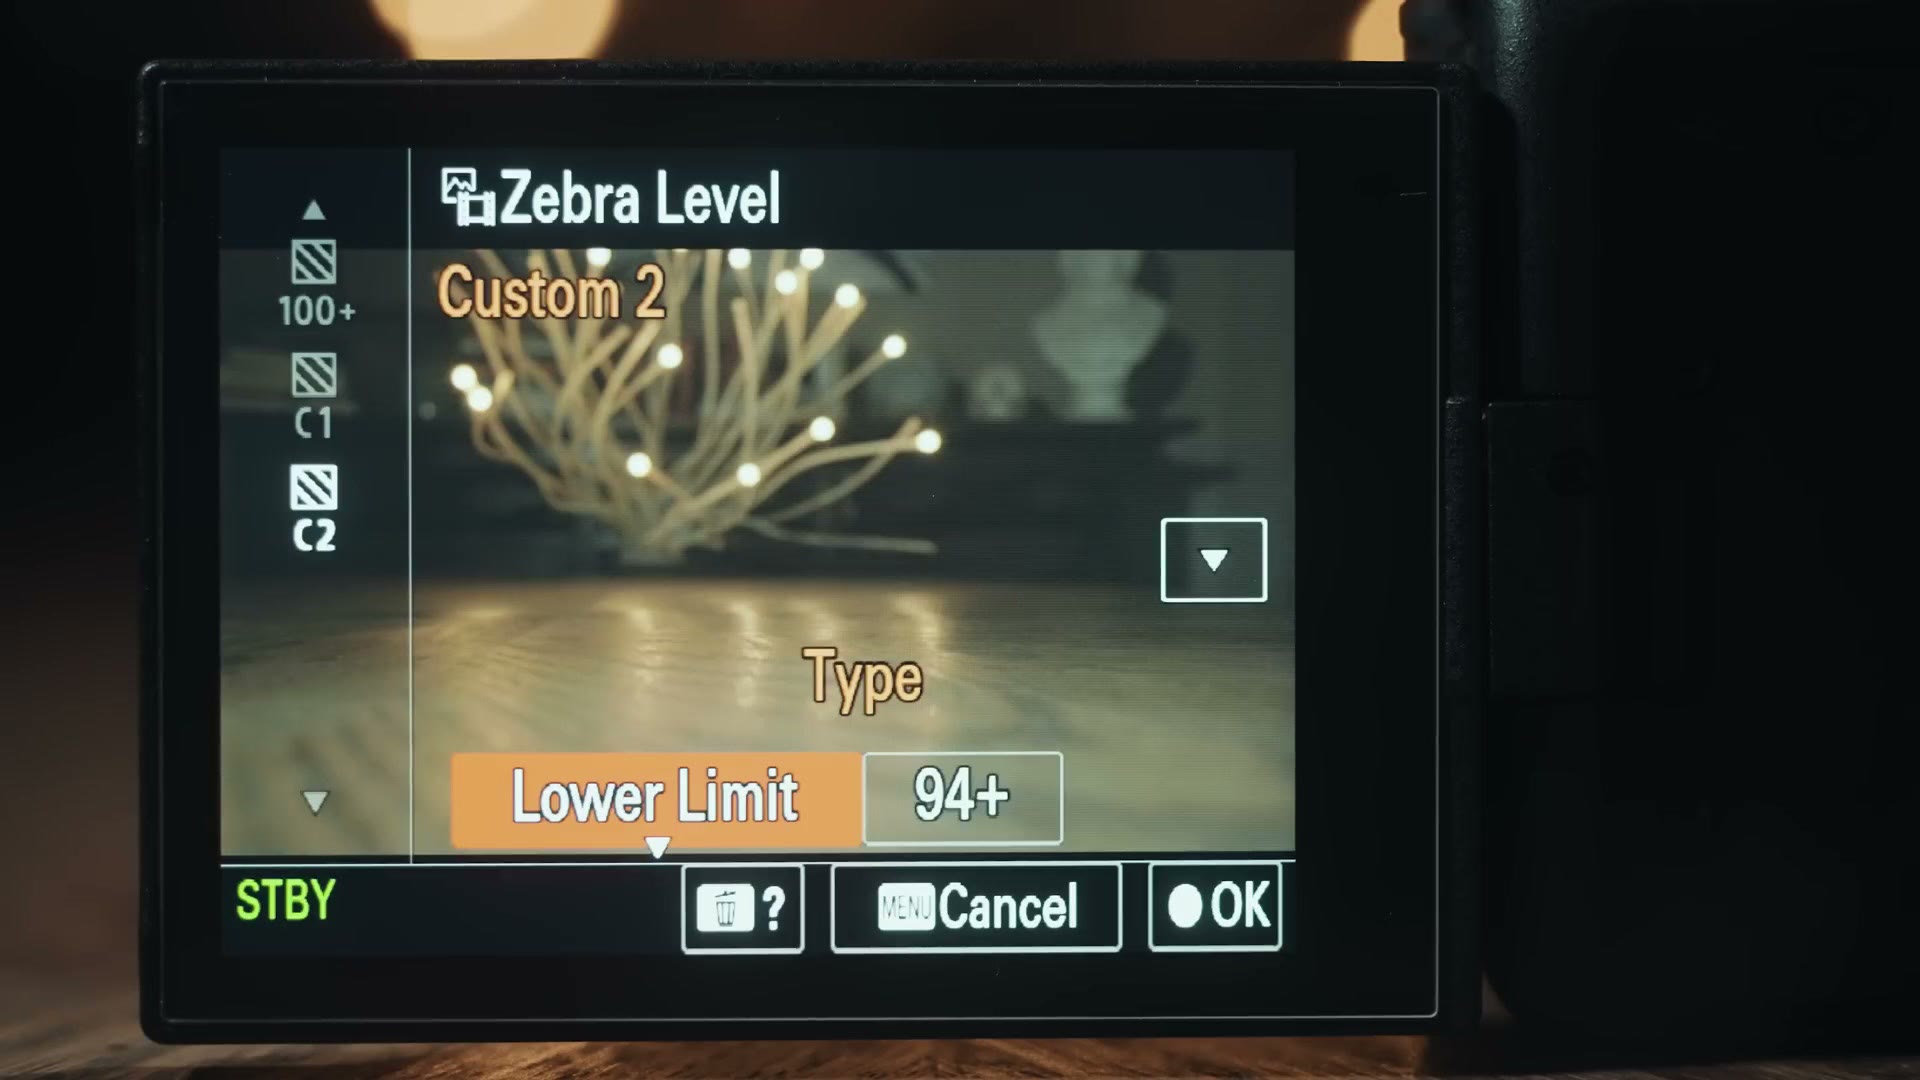
As you bring your exposure up, either with aperture or ISO, you’ll see zebra lines appear on the overexposed parts of the image. 94+ is the number that matches the maximum brightness SLOG3 footage can handle before it clips the highlights, overexposes them, and they cannot be recovered.
So while you’re filming, first look at your metering and make sure it’s between 1.7 and two stops over, then look for zebras. If they show up, that could be an issue, but it really comes down to what you’re filming. If you’re filming a person standing in front of a sunset with bright sun and clouds behind them, you’ll probably see zebras in the background, and that’s okay. But if you’re seeing zebras on the person’s skin, your footage is definitely too bright and your exposure needs to come down.
I’d highly recommend filming some test shots with people lit by different sources. As you get experience watching your metering and zebras, you’ll get a good idea of how the camera exposes and what looks good.
Very Important ISO Rules For SLOG3
Turn your ISO up and your footage gets brighter. Turn it down and it gets darker. But there are two very important things to keep in mind with ISO and SLOG3.
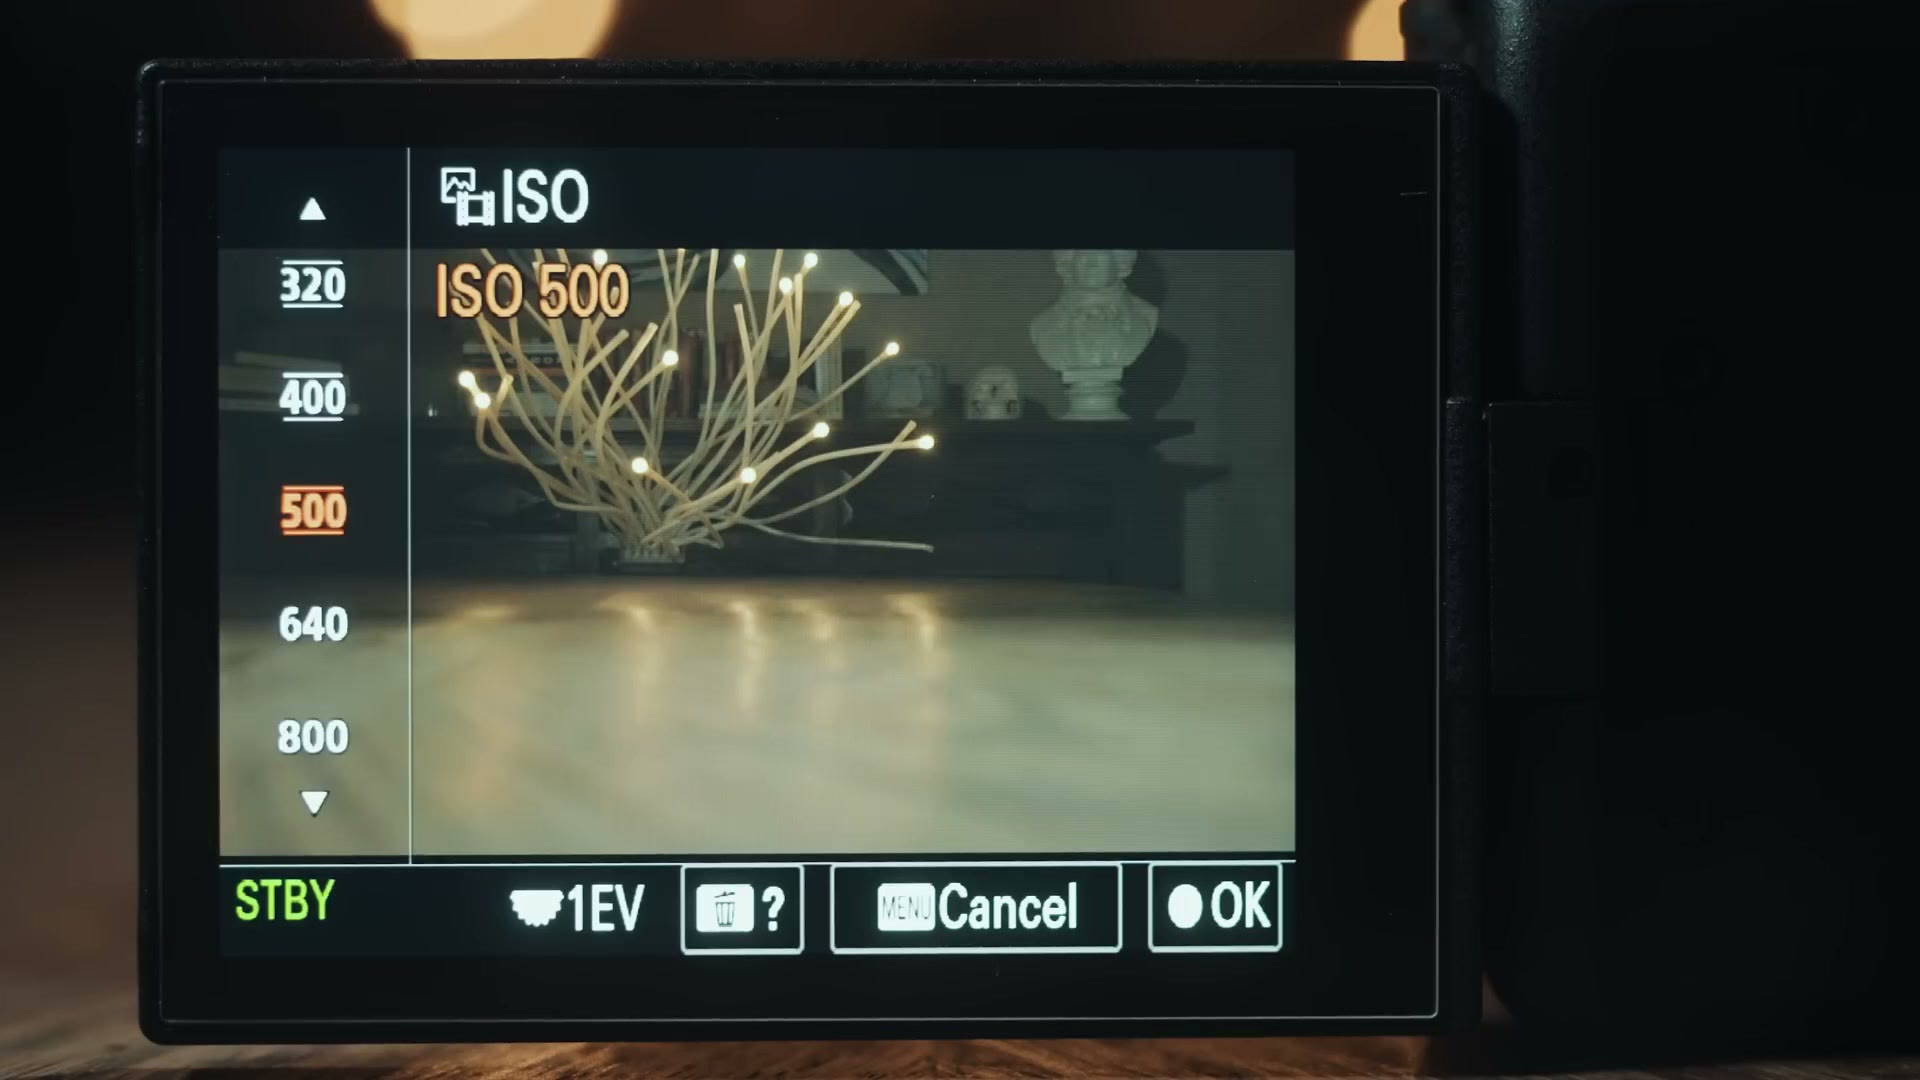
Looking at the ISO menu on my a7S III, I can set the ISO all the way down to 160, but all of the ISOs from 160 to 500 have lines above and below the numbers. When we get to ISO 640, those lines go away. That’s because for the a7S III, and its cinema camera variant the FX3, the recommended base ISO when recording SLOG3 is 640, the ISO Sony recommends if you want to maximise the dynamic range and quality you’re getting.
You can go lower if you want. But you’re going to have two problems if you do.
The first is obvious. Filming at ISO 640 with zebras showing where the image is overexposed, drop to ISO 500 and the zebras are gone. Below the base ISO, zebras no longer work and the camera cannot tell you which parts of the image are overexposed.
The second is harder to see while filming, and arguably worse. Below base ISO, the camera starts to electronically clip your highlights at a lower level. At 640 the histogram only starts to overexpose once the zebras appear at 94 IRE and the metering says more than two stops over. Do the same thing at ISO 160 and the histogram starts clipping much sooner, losing a ton of dynamic range and completely destroying the image. And strangely, the metering still reads 1.7 to 2.0 stops over even though the highlights are completely gone.
So in short: below base ISO you have no zebras and your metering is no longer accurate. I would never recommend it. Adjust your aperture, adjust your shutter speed, and consider investing in an ND filter before you drop your ISO.
A7S III, FX3 & FX6 ISOs To Avoid
These three cameras all share roughly the same sensor, and that sensor has what’s known as a dual native ISO: two ISOs where the camera looks its best and gives you the cleanest footage. That pair changes depending on the picture profile, but in SLOG3 they are ISO 640 and ISO 12800.
We’ve covered 640. ISO 12800 matters just as much, because while it’s a relatively high ISO, it is also incredibly clean with virtually zero grain.
Here’s my a7S III with the ISO cranking up. It gets brighter, and it also gets noisier.
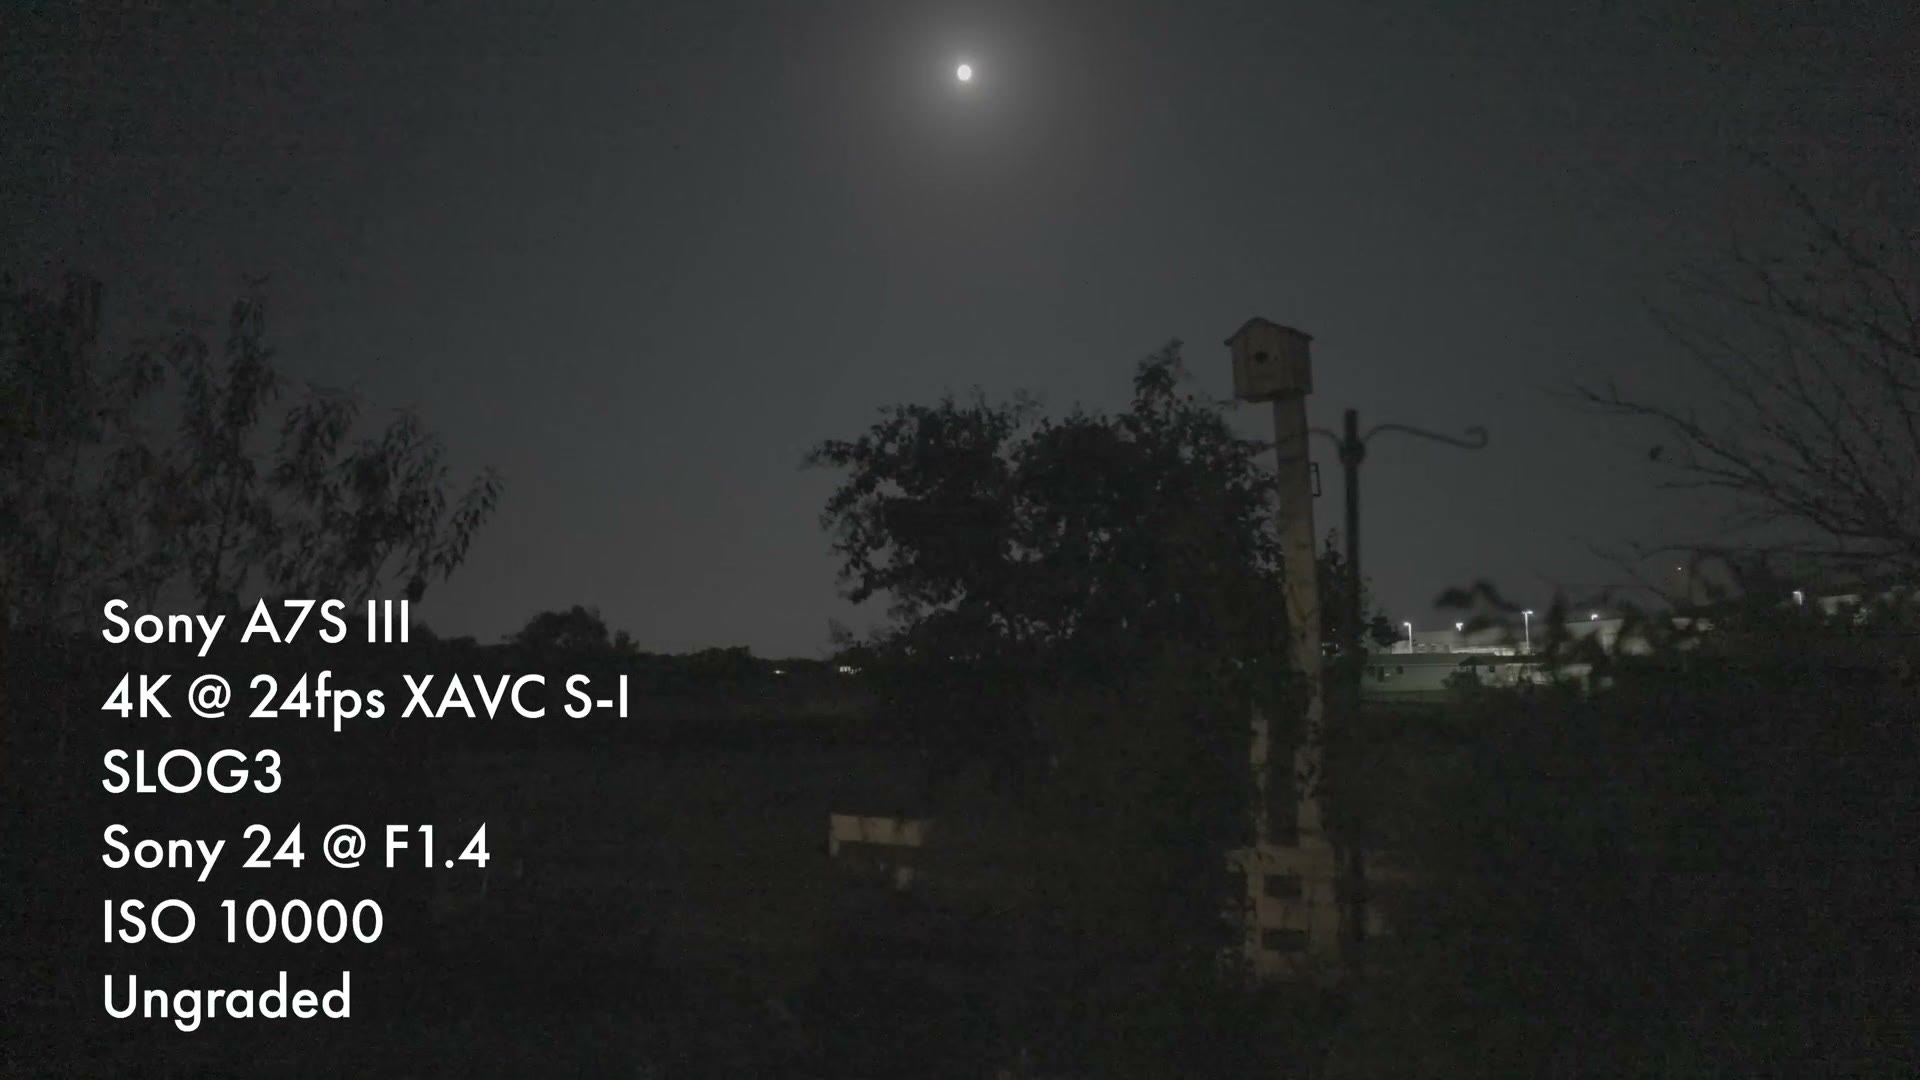
And then you switch it to 12800, and bang.
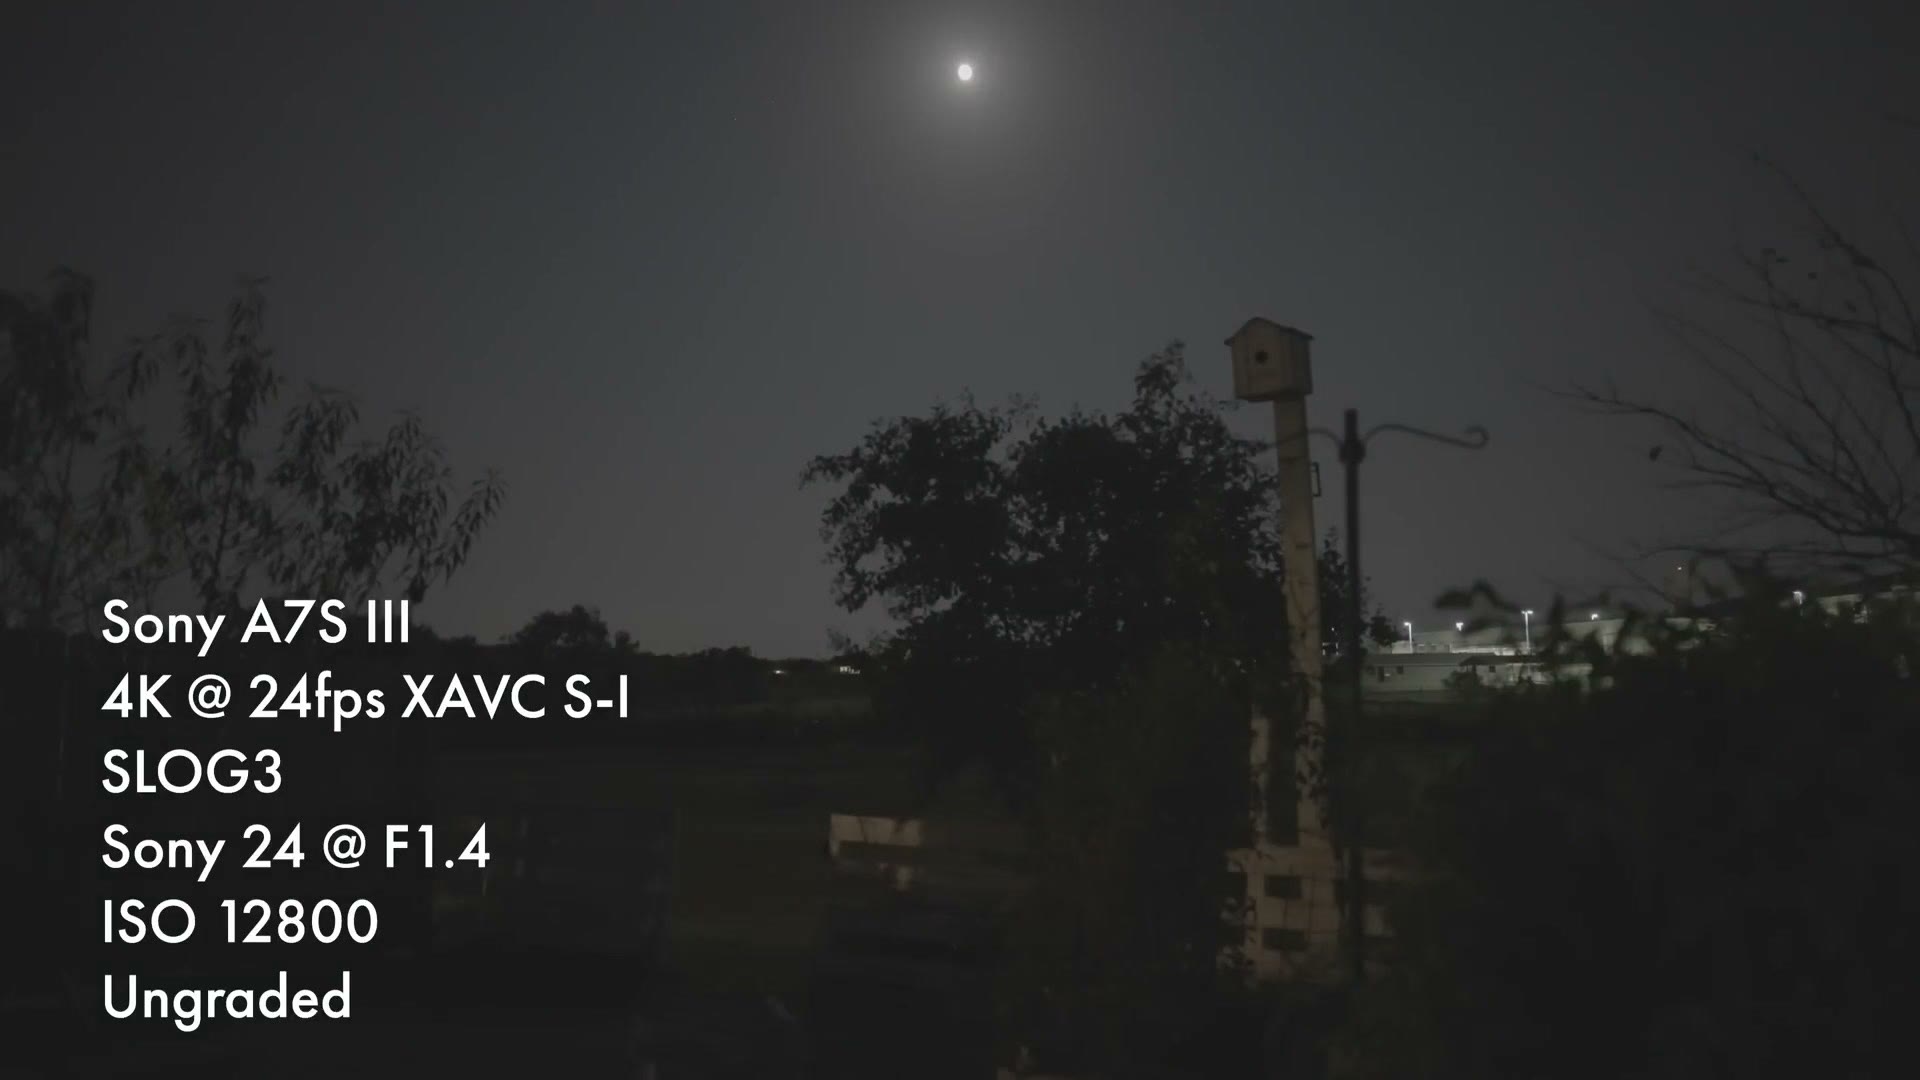
Clean. So as a final rule of thumb, avoid the noisier ISOs in between, namely ISO 6400 to 10000. If you’re shooting at ISO 5000 and you need to brighten things up a bit, skip a few stops and go straight to 12800 so your image is cleaner.
Gamma Display Assist Is Awesome
One last tool, and this one will really help you when it comes to white balancing SLOG3 properly.
Open the menu, go to Setup, Display Option, set Gamma Display Assist Type to Auto if it isn’t already, and turn Gamma Display Assist on.
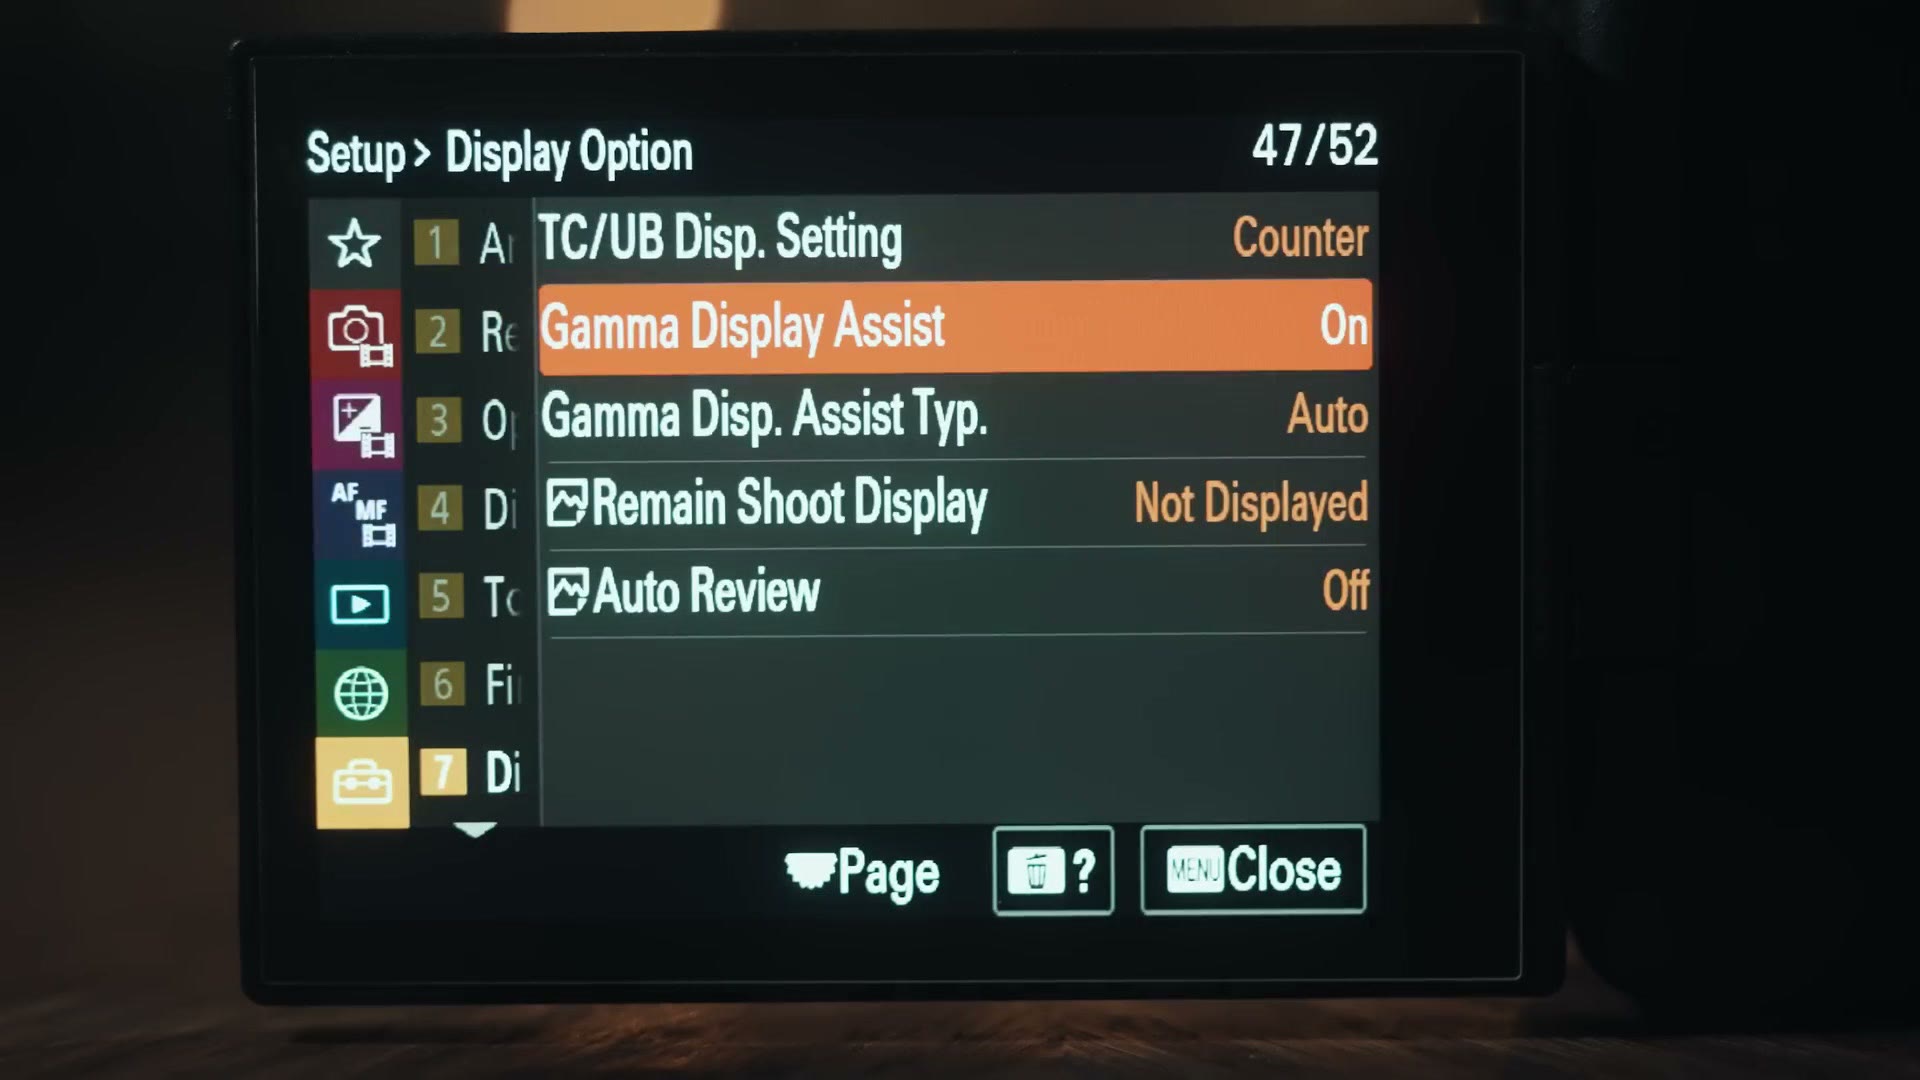
Your camera will now show you a preview that adds contrast and saturation, showing you roughly what SLOG3 will look like once you’ve graded it. To be clear, this is just a preview. Your recorded footage is still flat and desaturated.
It’s also going to be a big help with white balance. Because SLOG3 is so desaturated, it can be difficult to tell whether your white balance is set properly, especially in a mixed lighting scenario like a wedding. I have Gamma Display Assist mapped to a custom button, so with one press I can raise the saturation and check that my colors aren’t looking too warm or too cool.
And that is how to film in SLOG3 quickly and easily. If you want to go further, there’s how to color grade SLOG3 without LUTs, how to grade it with LUTs, and if you’re wondering whether you should be shooting this at all, SLOG3 versus S-Cinetone and how to film in S-Cinetone.
Also, if you happen to be a wedding filmmaker like me, you probably want to book more couples and film more weddings. To help you out with that I’ve created a free guide with practical steps you can take right now. It’s a completely free gift to you.