
My name is Matt Johnson, and this is my fast filmmaking setup for the Sony a7 IV. The goal here is simple: get every setting you actually need sitting at your fingertips, so you almost never have to dive into the menus while you are working. If you film weddings, documentaries, or anything else where you have to move fast, this one is for you.
Before we start, if you want to skip the whole thing, you can download my a7 IV settings file, load it onto your camera, and immediately have all of these settings. It is completely free. My gift to you. But if you would rather understand why each setting is what it is, keep reading, because I am not just going to tell you what I use.
This is part one of two. This one walks through every menu in the camera. Part two is much faster and covers the mode dial, custom buttons, function menu and custom menus, which is the part that keeps you out of these menus 95% of the time. You are going to love that one.
Grab your a7 IV and follow along.
Set Your a7 IV To Video Mode
First, with the camera on, set it to video mode using the film camera icon on the mode dial. Press the little button at the bottom of the dial and slide it over to the movie icon.
This matters more than it sounds like it does, because the a7 IV changes the entire menu depending on whether you are in photo or video mode. Everything below assumes you are in video.
While you are there, set the camera to M, for manual.
You will notice the first menu icon at the top is a gray star called My Menu. That is a fully customizable menu for the settings you need most, and it is covered in part two. For now we are skipping down to the red camera icon underneath it.
Red Camera Menu
Image Quality
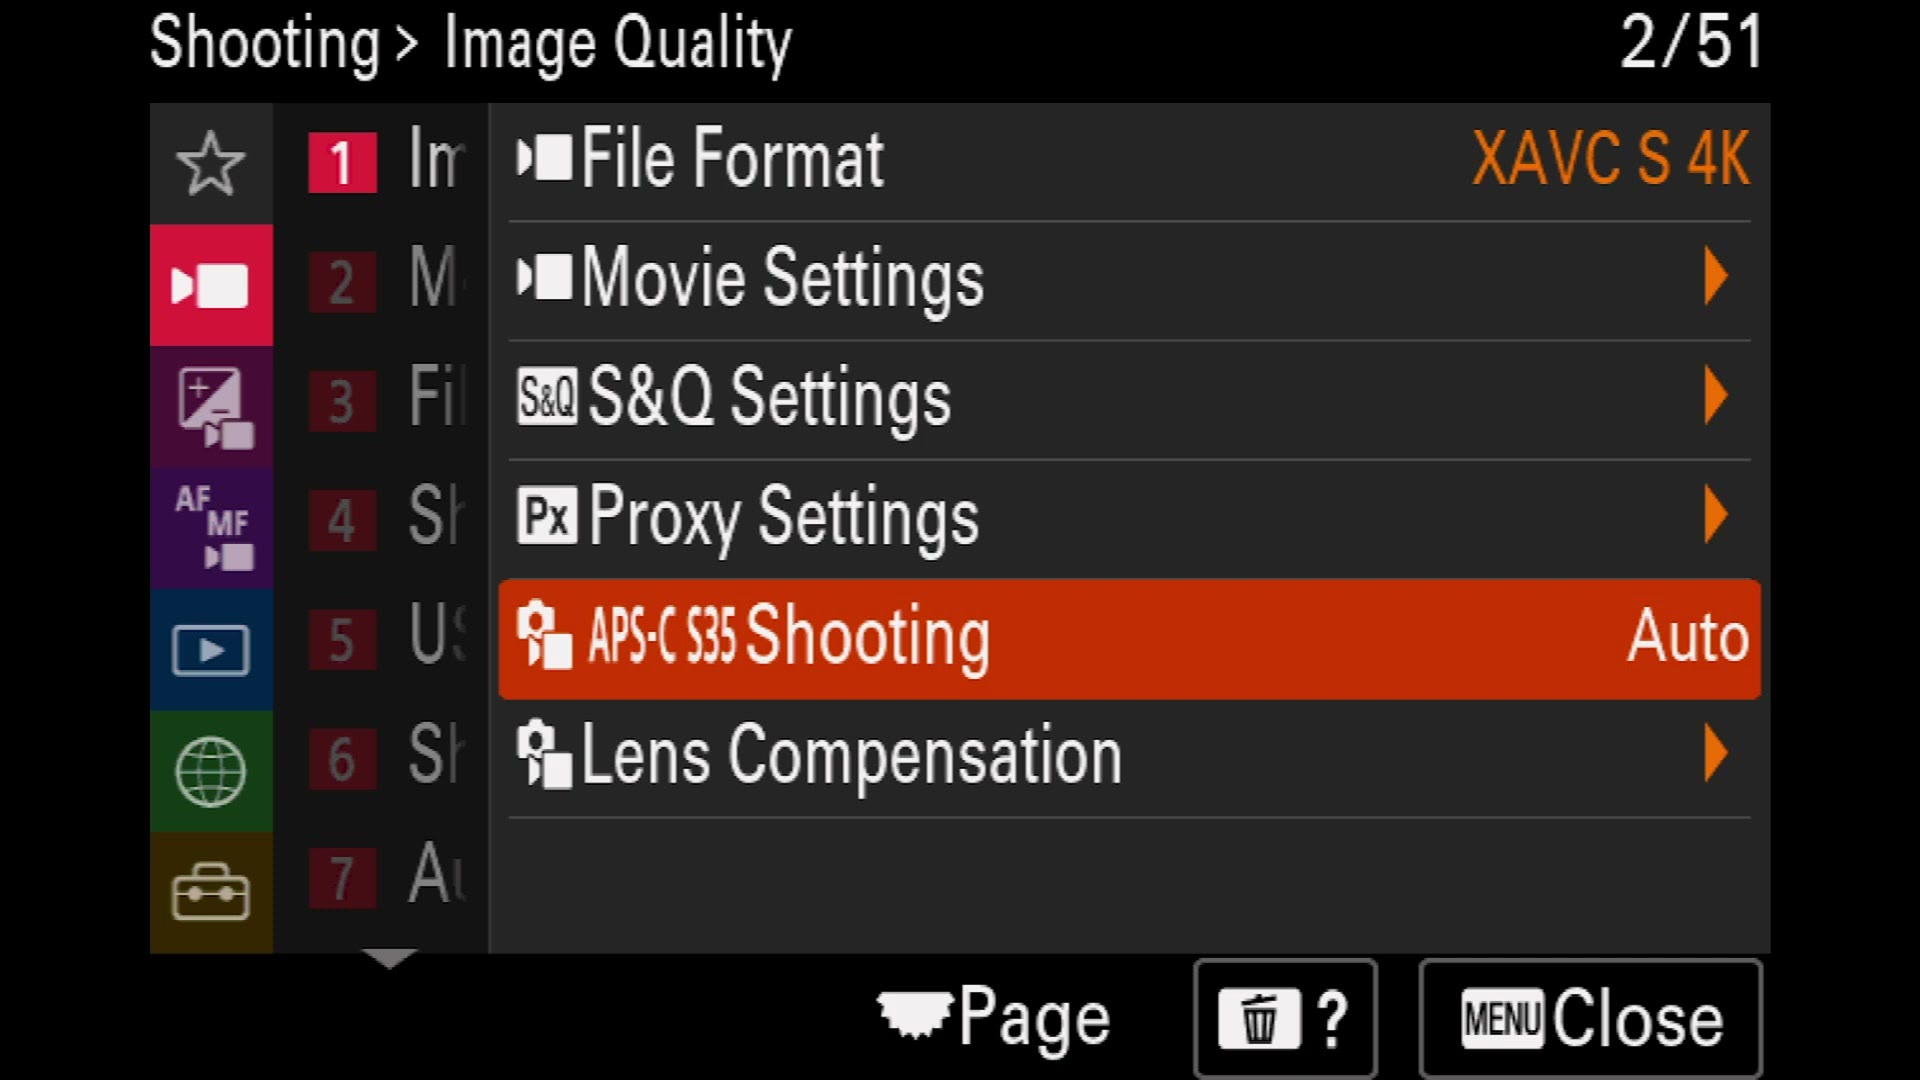
Go to File Format and select XAVC S 4K.
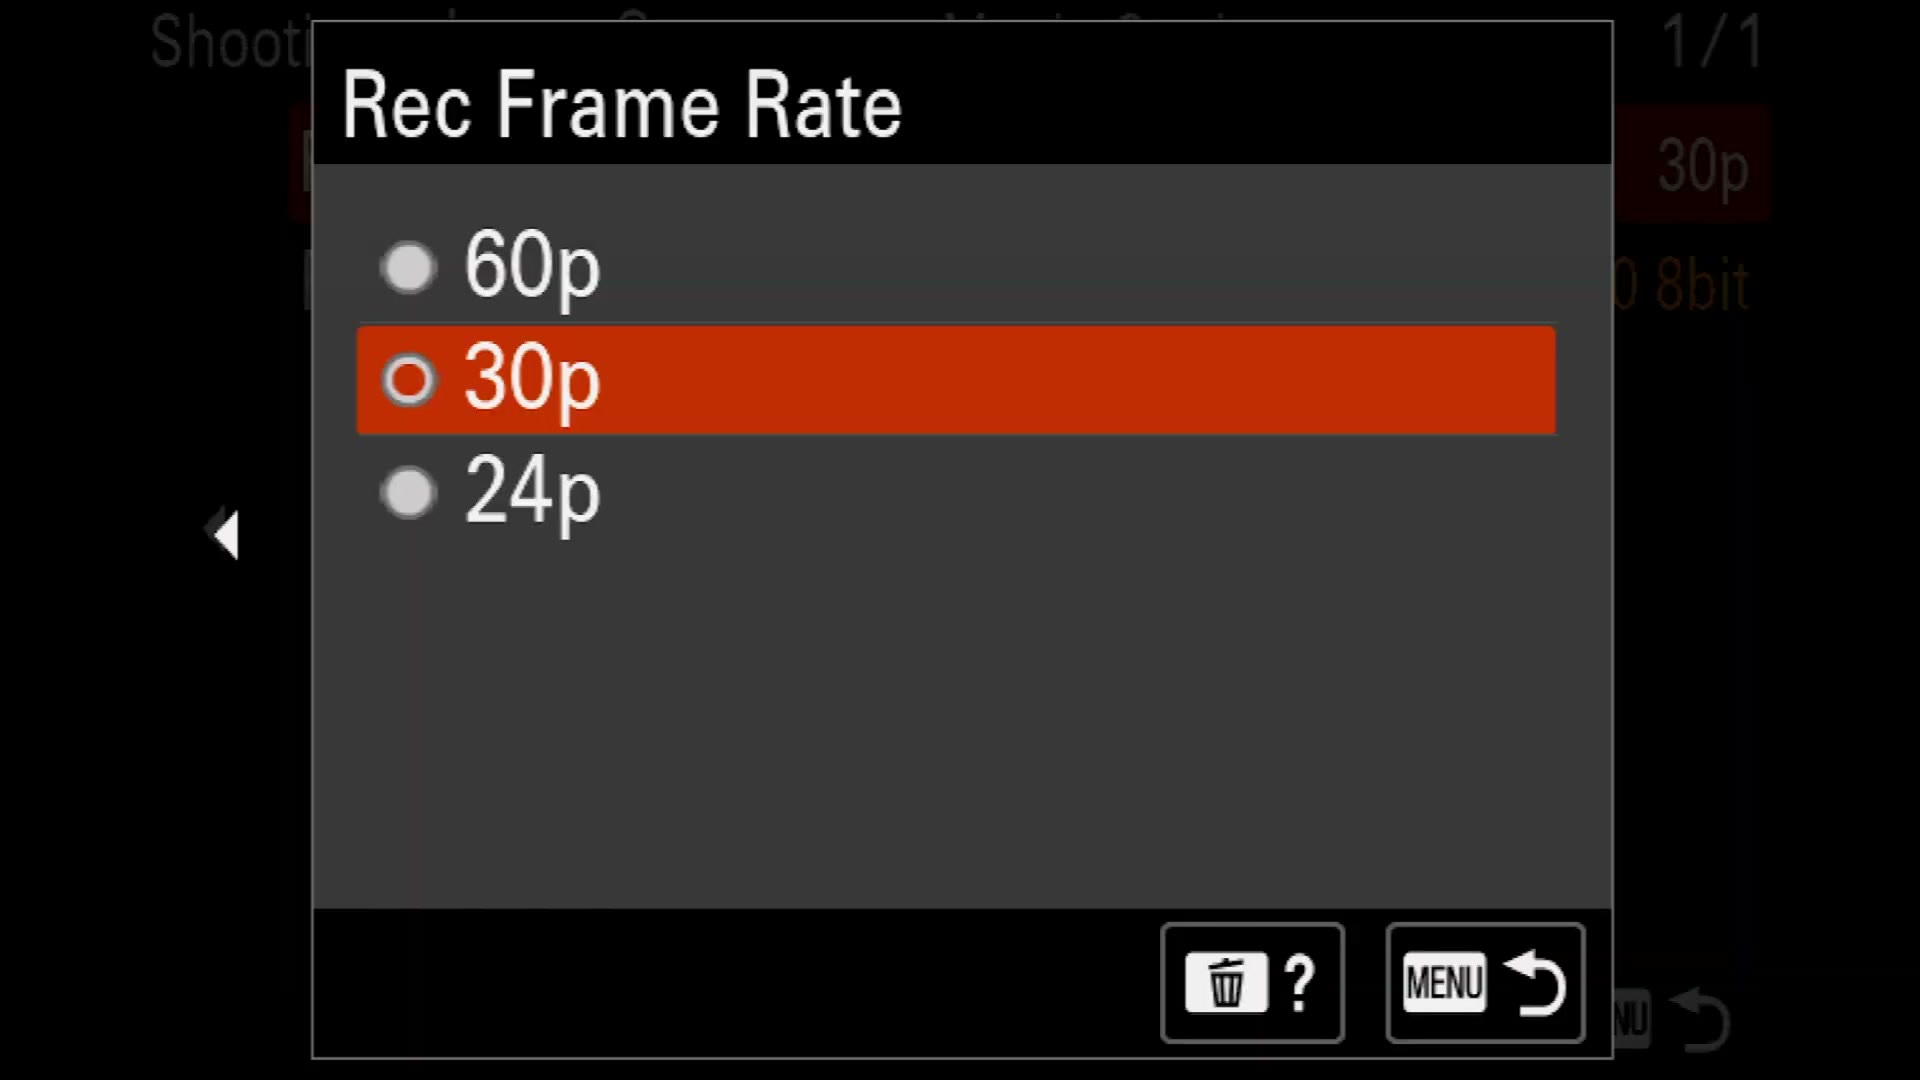
Then in Movie Settings, set your recording frame rate to 24p and your Record Setting to 100M 4:2:2 10bit.
You have other options in here, obviously, and I made a whole video breaking down what all these formats actually mean. It was made for the a7S III, but those settings apply to the a7 IV as well.
S&Q Settings. S&Q is great if you want the camera to slow footage down internally. The problem is that the camera does not record audio when you do that, so I never really recommend it. Slow your footage down in your editing software instead.
Proxy Settings. If you want your edit to run smoothly, the a7 IV can record proxies internally while it films, which saves you a lot of time later. On the editing side, here is my full proxy workflow for Premiere Pro, including how to handle slow motion footage.
APS-C S35 Shooting. This mode is incredible, because it crops in on your sensor 1.5 times. That gets you two things. First, if you own an APS-C lens that does not normally work on a full frame body, you can mount it, set this mode, and the camera crops automatically. Second, if you just want more reach, your 50mm becomes a 75mm. For now, leave it on Auto.
Lens Compensation. This one is actually super important. You can ignore the top three items, but down at the bottom you will find Breathing Comp.
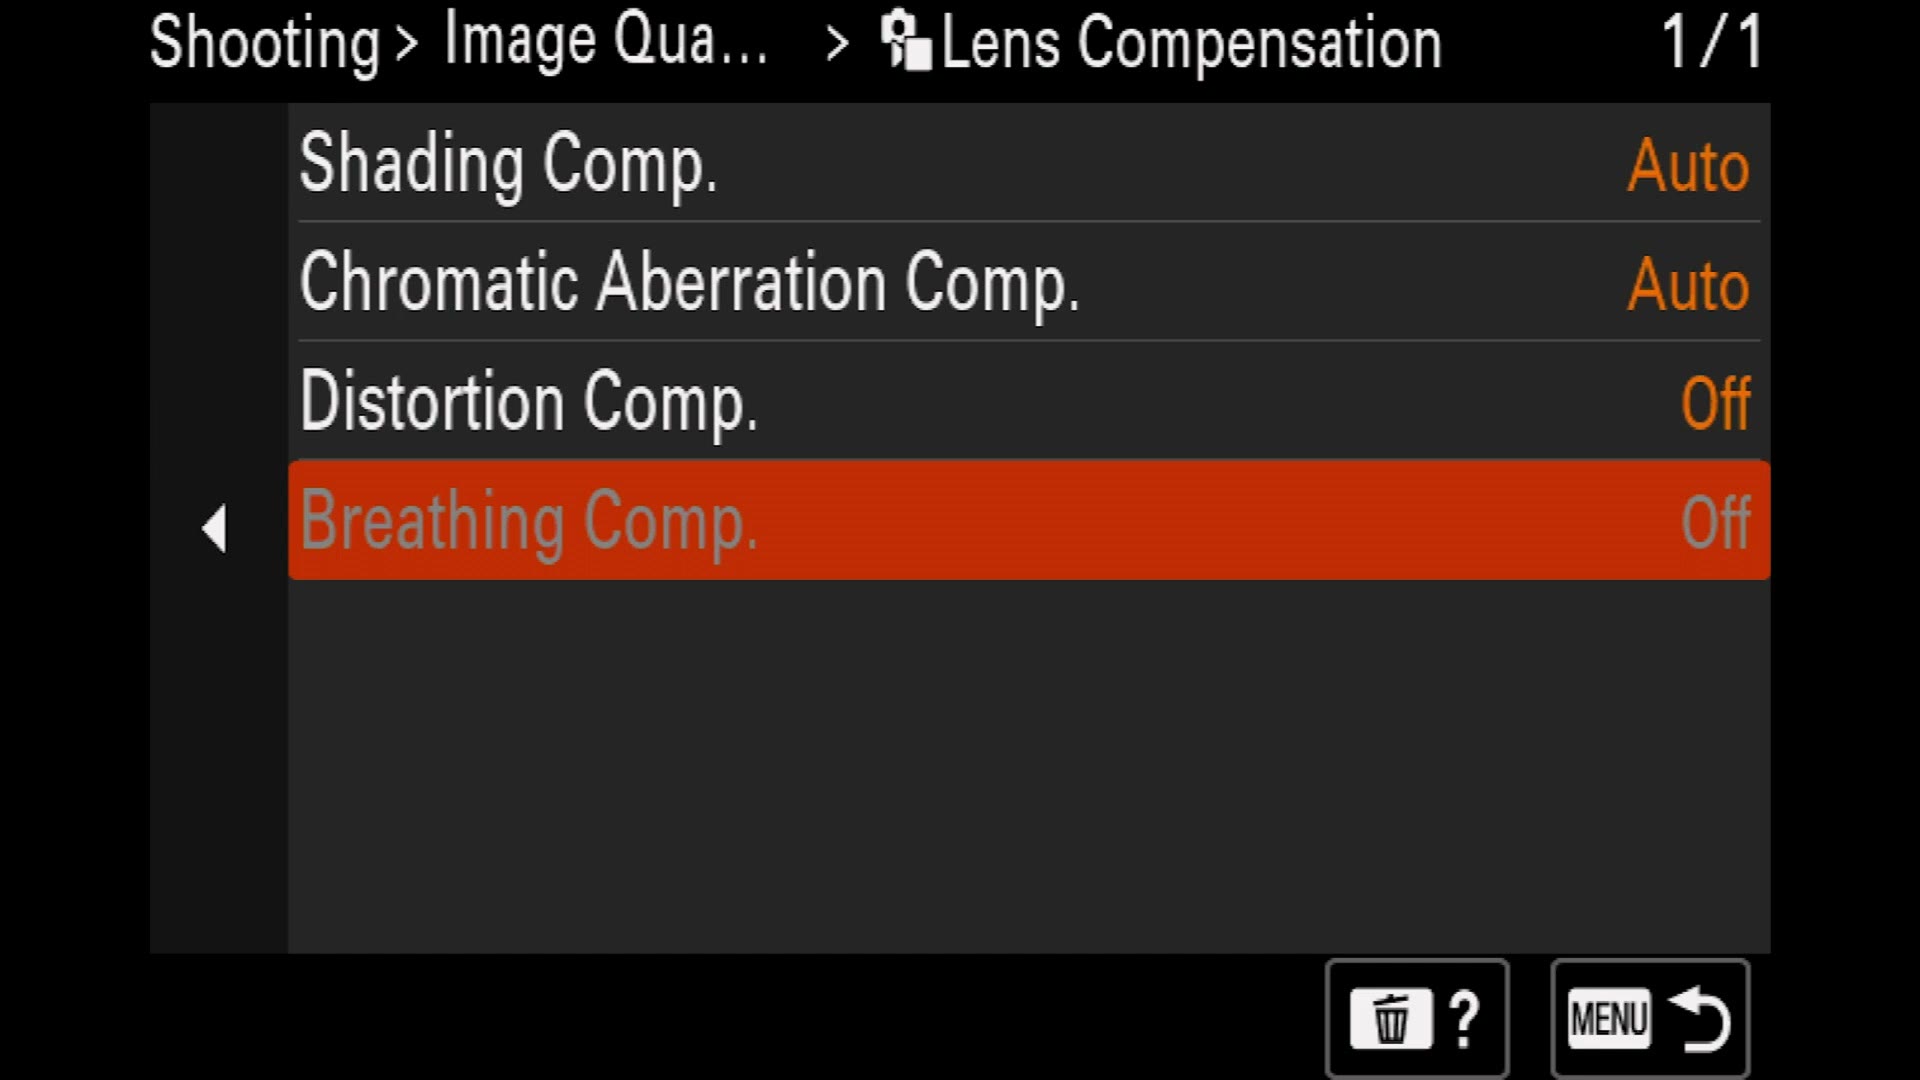
On my camera it is grayed out, because the lens I have mounted does not support it. But if you have a native Sony lens, especially one of the newer ones, you can turn breathing compensation on and it removes the lens breathing you are seeing. If your footage has that subtle zoom in and out feeling every time the focus changes, this fixes it by cropping the sensor slightly. It is pretty darn awesome, and I love it.
Media
Format does exactly what you think. Know where it is, because you are going to use it constantly.
Rec. Media Settings is where you choose whether the camera writes to one card or two. I always recommend setting recording media, for both photo and video, to Simult. Recording. That guarantees you have a backup if a card fails, and a card failing at a wedding is the kind of day you do not recover from.
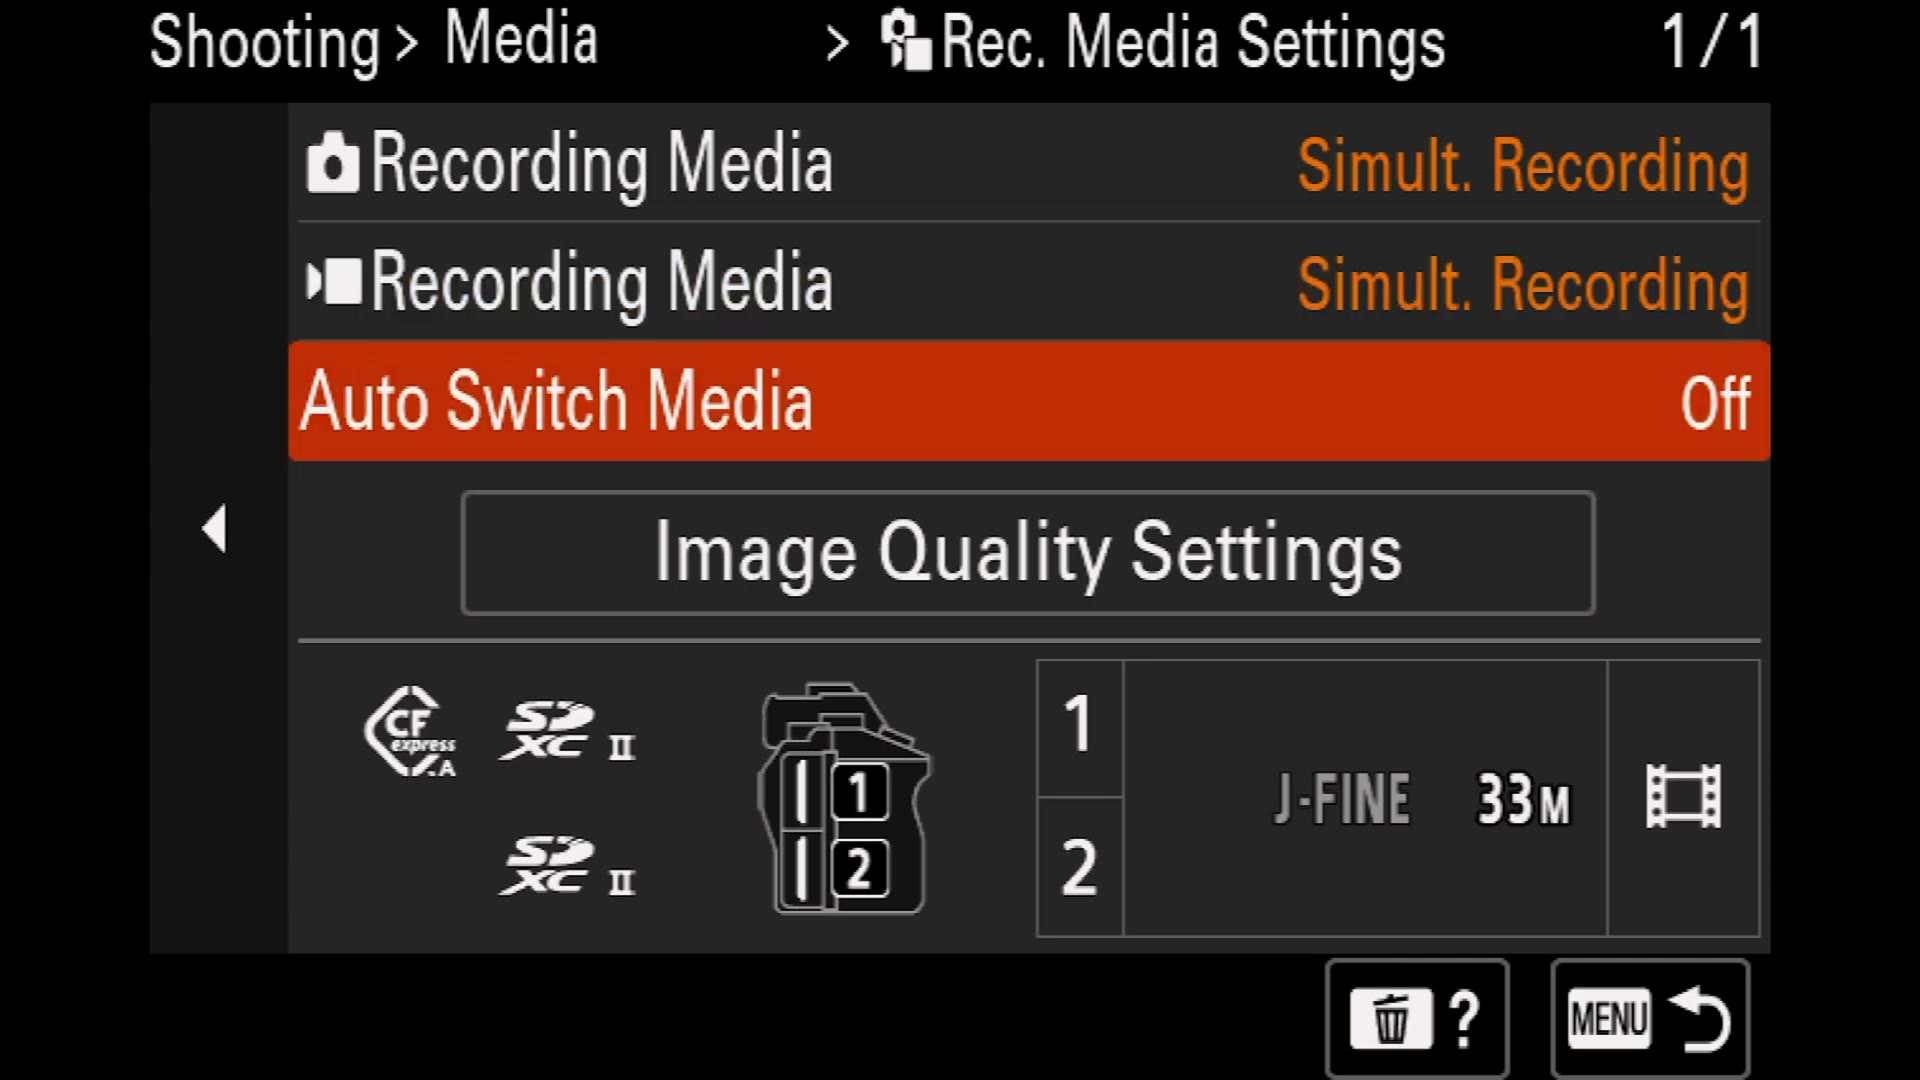
Also turn Auto Switch Media on, so that even if you only have one card in the camera, you can still start recording.
File
File Settings is more useful than it looks. Leave File Number on Series, because otherwise the camera resets the file number every single time you format a card, and then you end up with a pile of clips that all share the same name. Series makes it much less likely two cameras hand you the same filename, which makes editing easier.
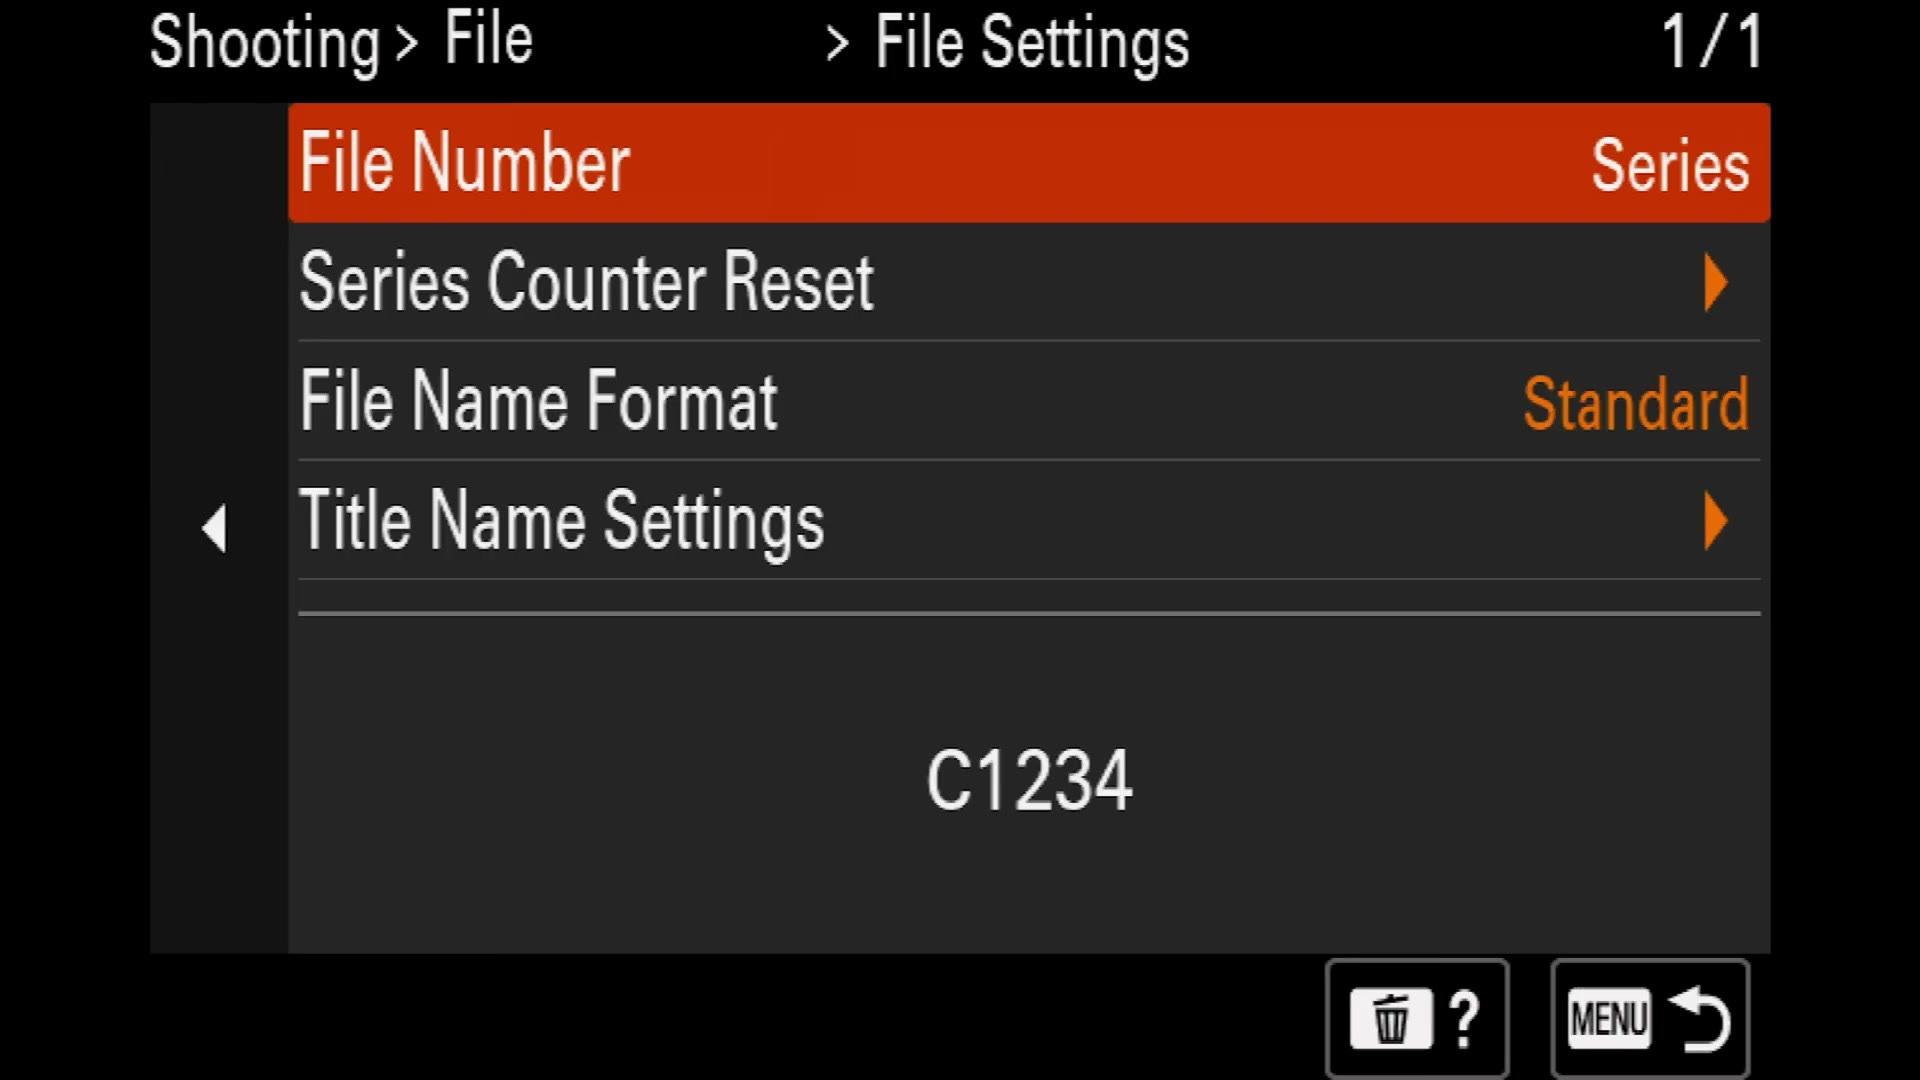
Underneath that is File Name Format, where you can change how clips are labeled. You can even switch it to Title and name the files yourself. So if this particular camera is the one shooting the ceremony, you can name its files “ceremony” and know at a glance in the edit which footage is which. Very useful. I leave it on default.
Shooting Mode
Very, very important. For Exposure Ctrl Type, this is where you tell the camera you want manual.
Manual mode? Do I want manual mode? Yes. You always want manual mode.
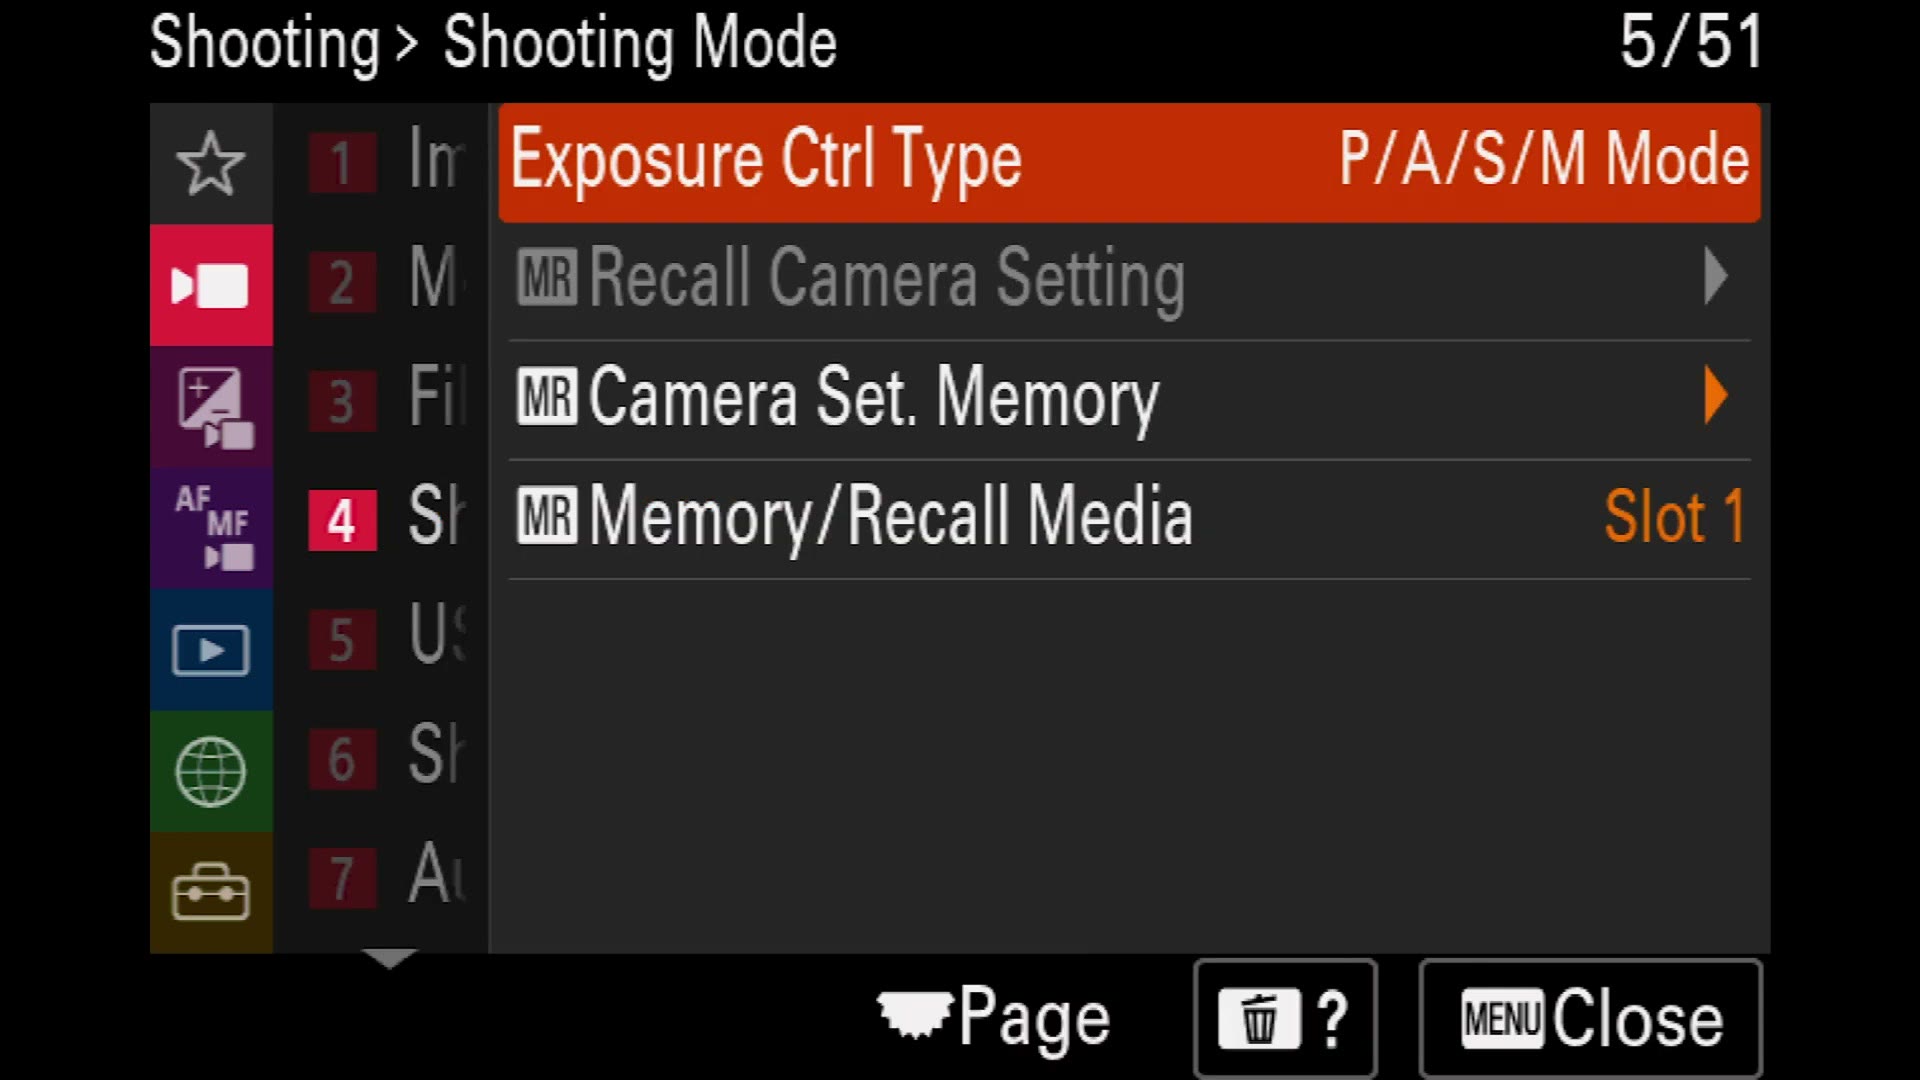
It will offer you Flexible Exposure Mode. You do not want that. Keep it on P/A/S/M Mode, because that is the one that contains M.
Below that are Recall Camera Setting, Camera Set. Memory and Memory/Recall Media. All three of those are covered in part two. Ignore them for now.
USB Streaming, Shutter and Silent
USB Streaming is new for Sony, and it lets you use the camera as a webcam over a single USB cable, which is very useful. Resolution, frame rate, and whether the camera can still record while streaming, all live in here.
Silent Mode Settings is really only useful for photo. Ignore it.
Release w/o Lens should be Enabled. If you use non-native lenses, the kind with no electronic connection to the body, and this is disabled, the camera will refuse to record because it does not believe there is a lens attached. You are standing there going, no, I promise you there is a lens. Enable this and the camera records anyway.
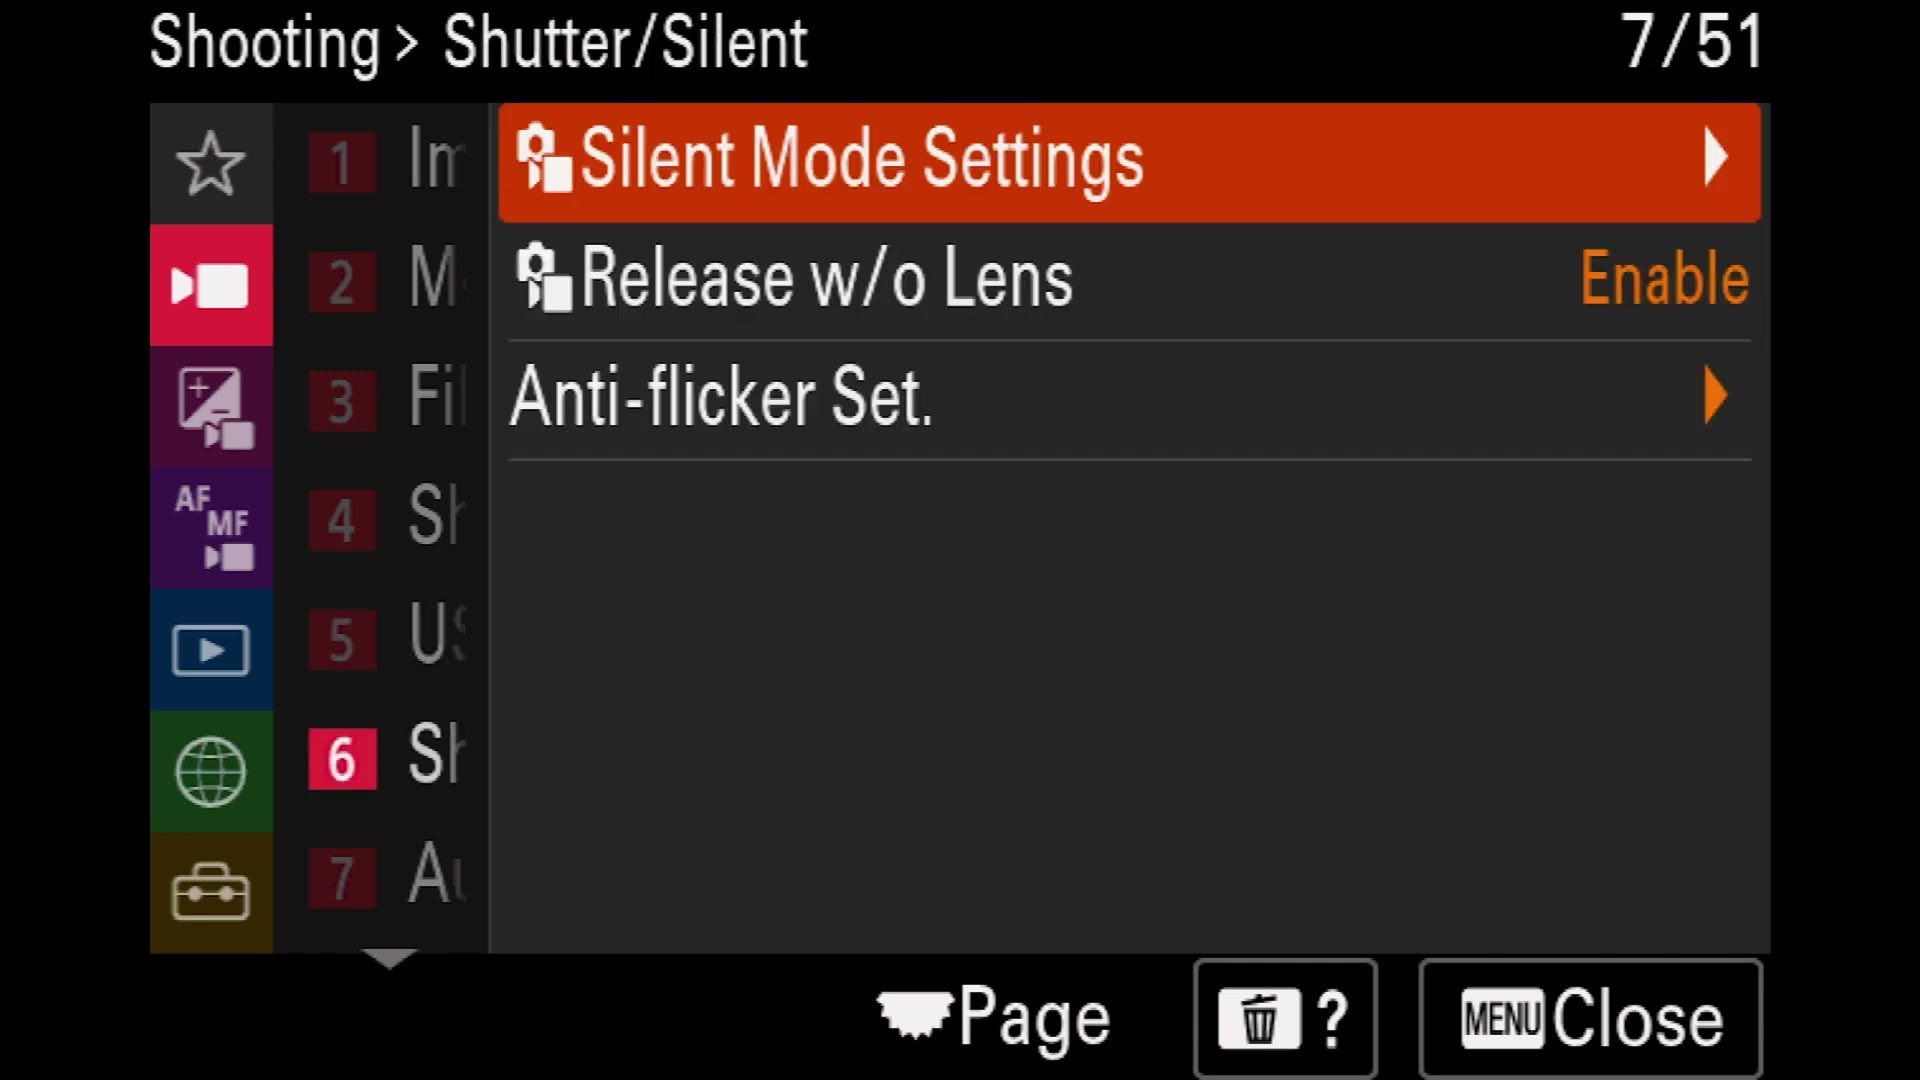
Anti-flicker Set. is also new. Turn on Variable Shutter and you can go into Variable Shutter Set and dial the shutter angle rather than the shutter speed, so instead of jumping between 1/50, 1/60, 1/100, you can fine tune it far more precisely. If cheap flickering lights are wrecking your footage, this lets you dial the flicker out in camera. I would not leave it on all the time, but keep it in your back pocket.
Audio Recording
All of this is important.
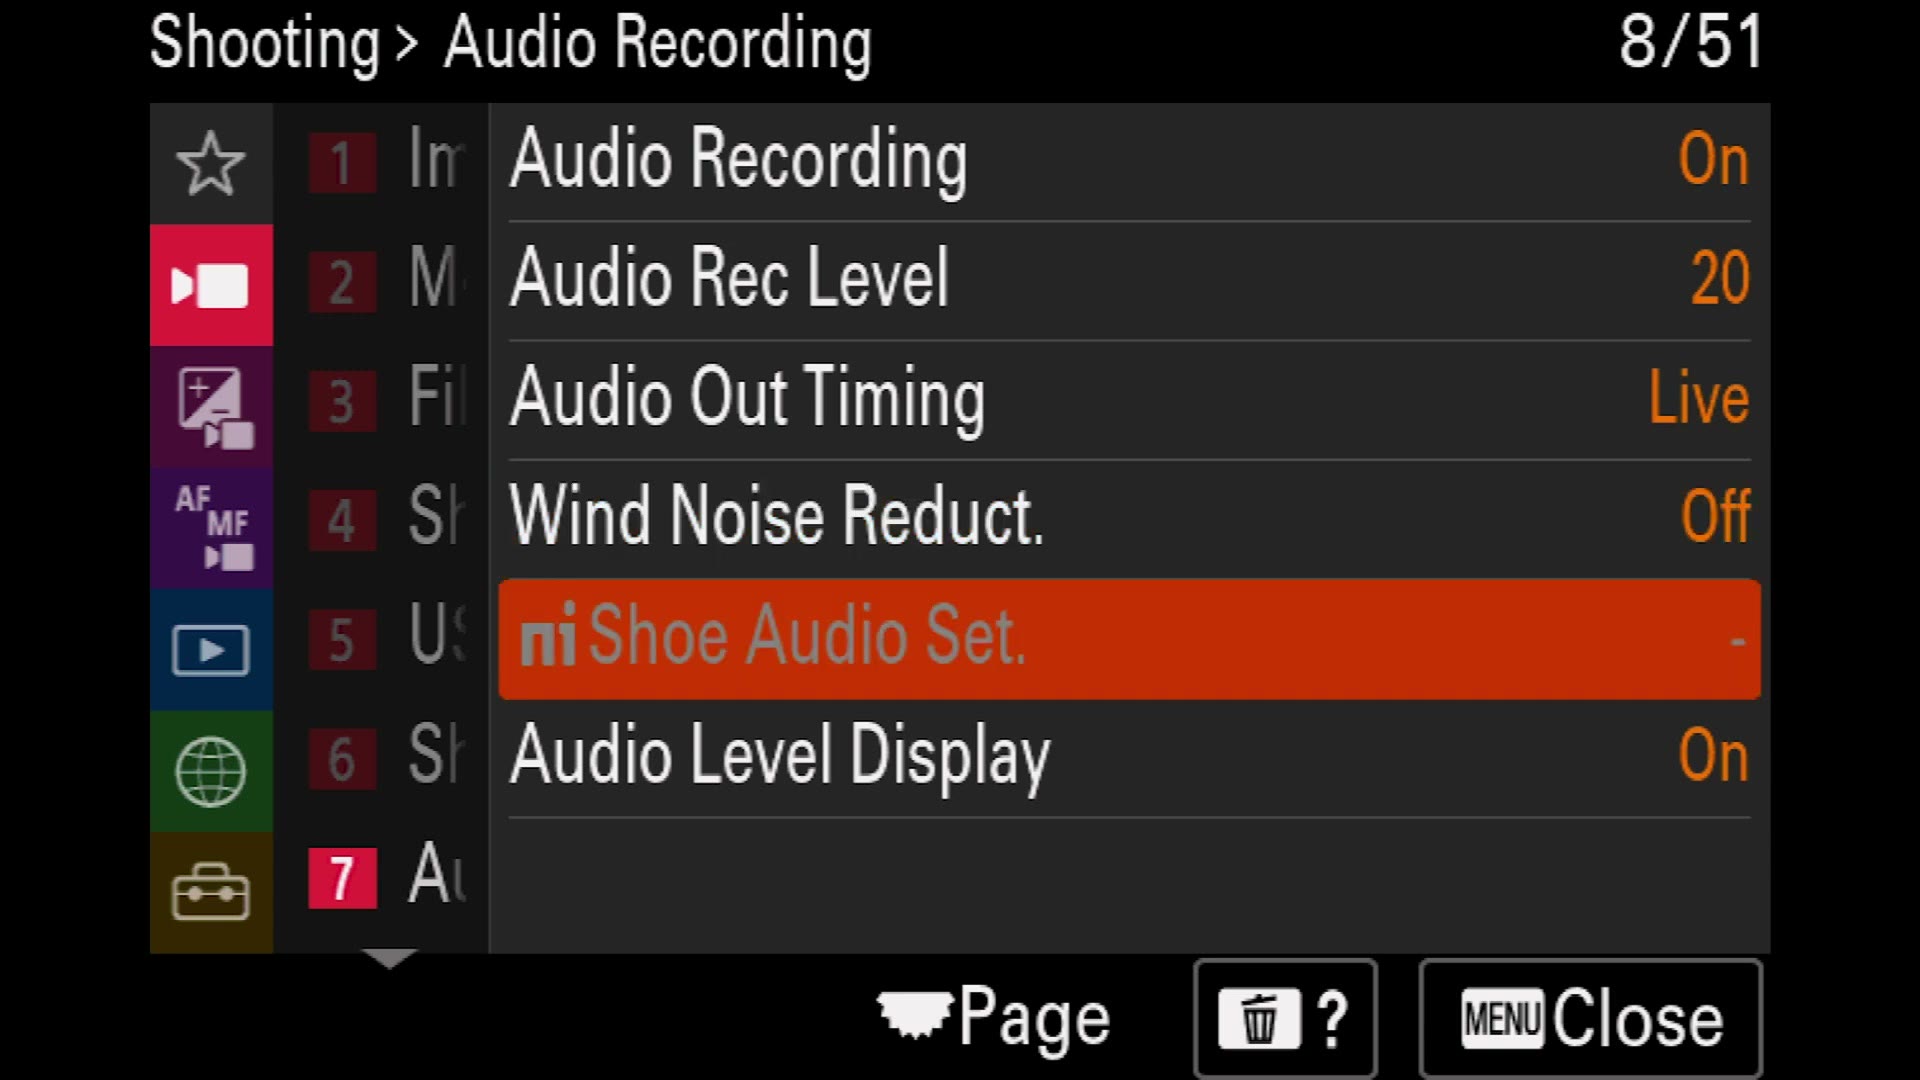
- Audio Recording: On. It would be bad if it was not on.
- Audio Rec Level. Set this to whatever suits you. I would recommend a minimum of around 20, but it depends on what you are doing and whether you have a microphone plugged in.
- Audio Out Timing: Live by default. If you are monitoring through an external recorder like an Atomos and the lips are not matching the audio, switch this to Lip Sync and it delays the signal slightly so the two line up. You probably will not need it, but it is good to know where it is.
- Wind Noise Reduct.: Off. Do not leave this on auto. You never really know how aggressive the camera is going to get about whether it thinks there is wind, and it can genuinely mess with the audio you are recording. Leave it off, remember where it lives.
- Shoe Audio Set. only comes alive if you have a Sony microphone connected electronically through the hot shoe.
- Audio Level Display: On, always. You always want to know whether your camera is recording audio.
Below that is timecode, and there are a lot of timecode settings. If you use timecode, that is where it lives.
Image Stabilization
This is IBIS, in-body image stabilization, where the camera physically moves the sensor around to keep your footage stable despite your shaky hands.
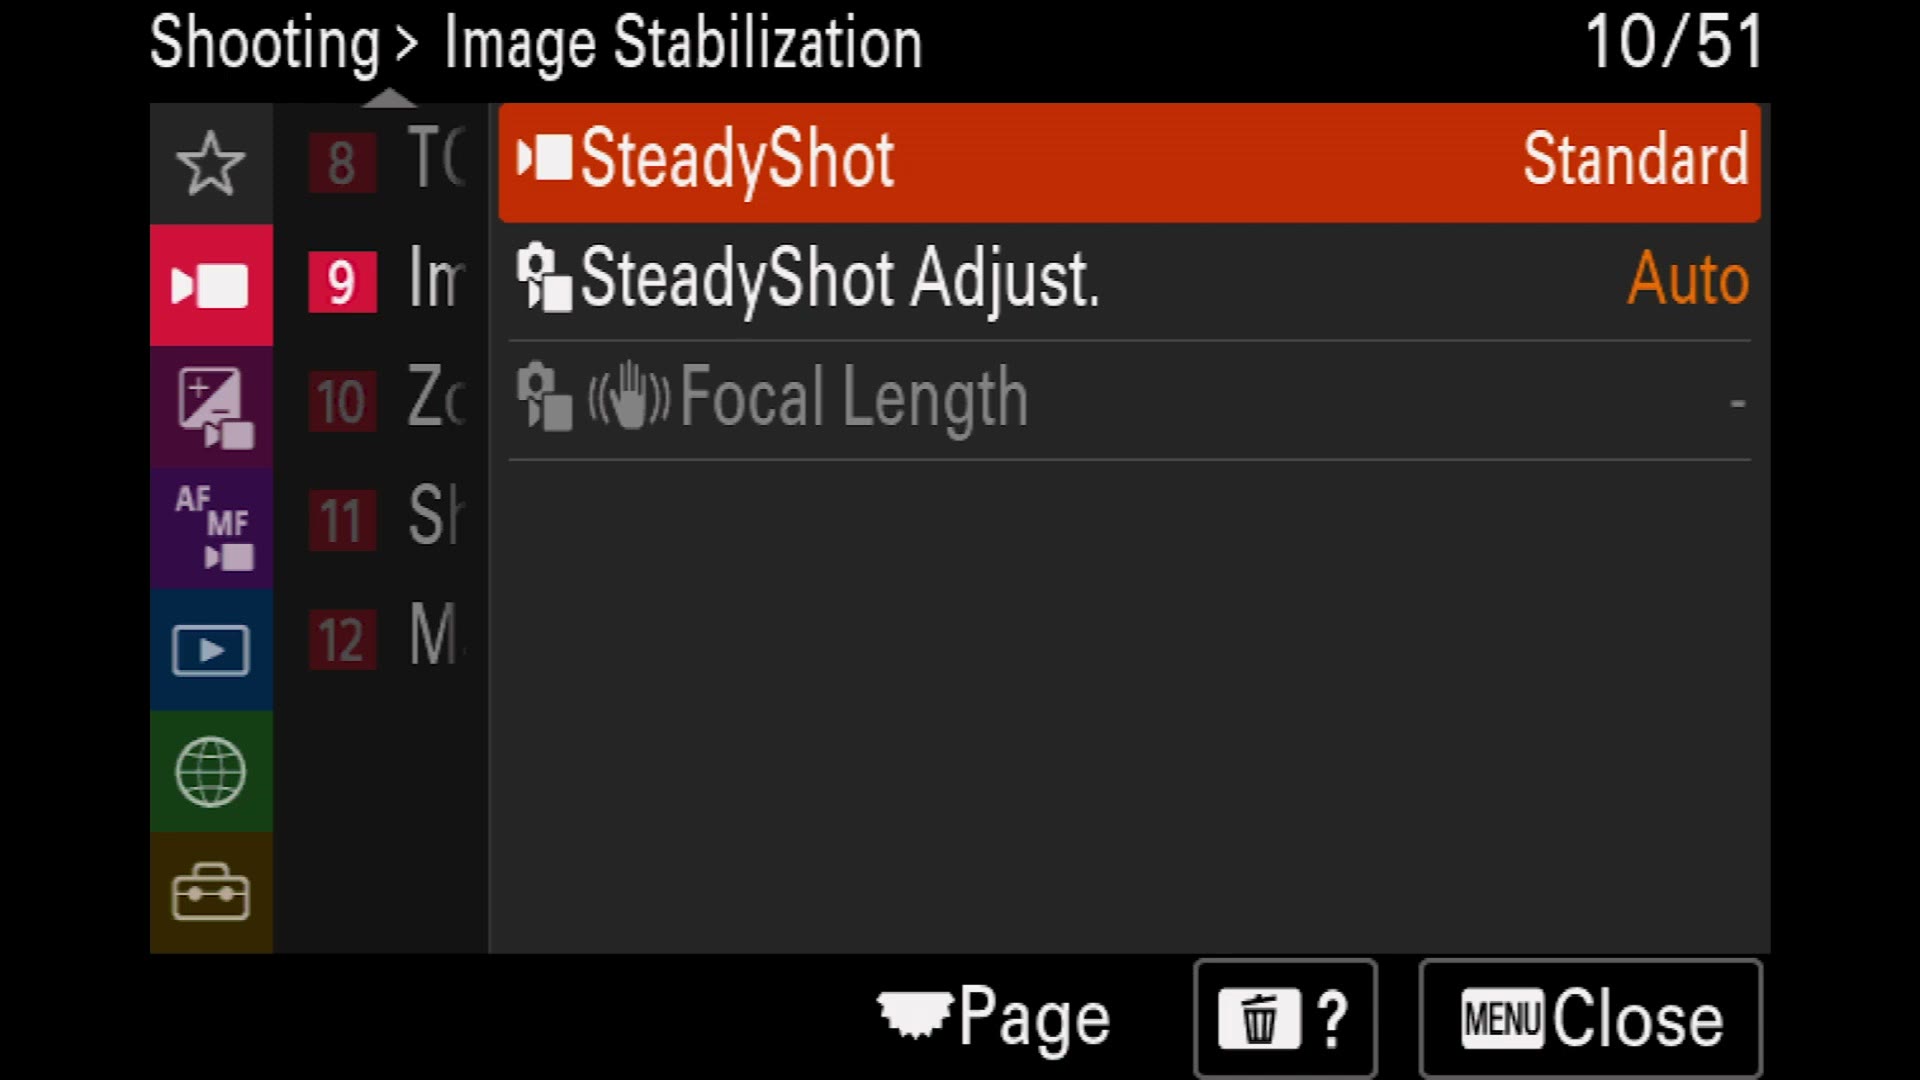
SteadyShot can stay on Standard, but you can also set it to Active, which applies a 1.1x crop and gives you noticeably more stable footage. Part two shows you how to reach this with a couple of button presses instead of coming in here.
SteadyShot Adjust can stay on Auto. But if you are using a non-native lens that does not talk to the camera electronically, come in here, switch it to Manual, and set the focal length to match whatever is actually mounted.
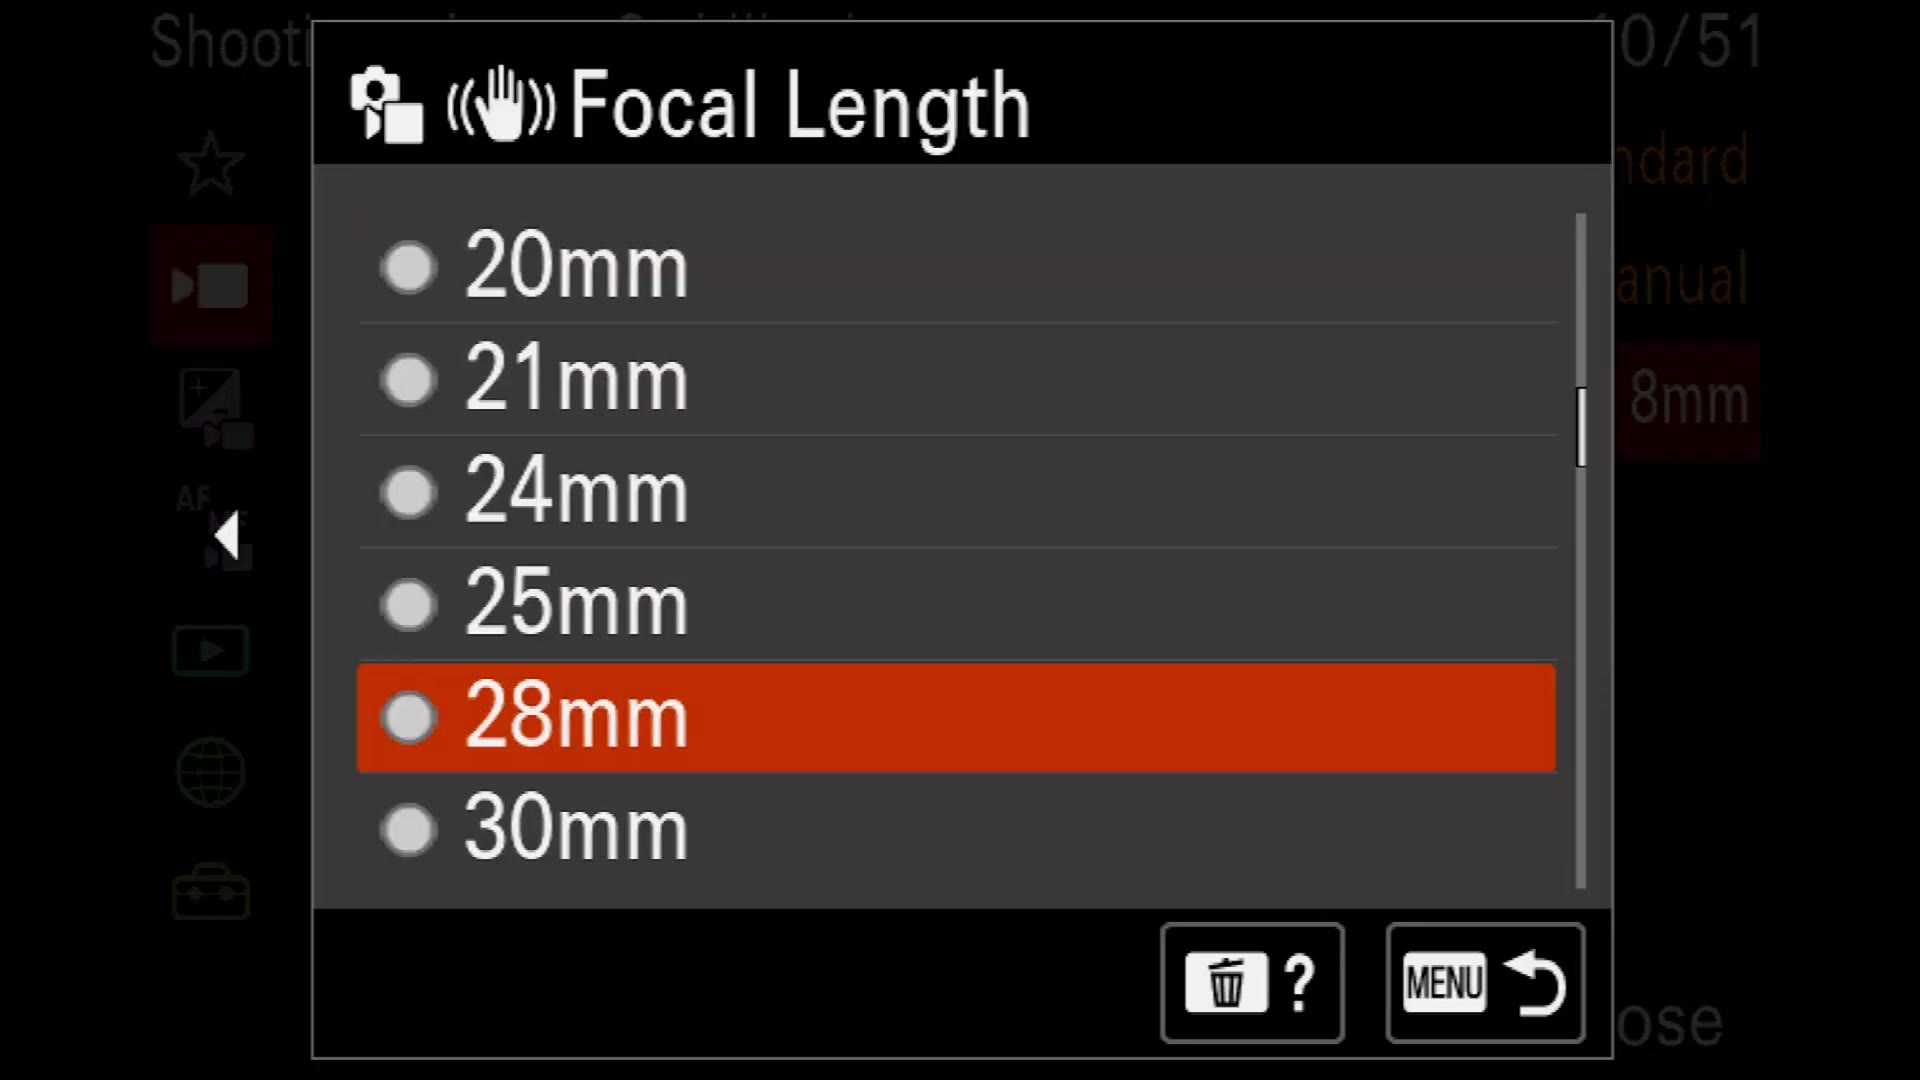
The reason this matters: if the camera does not know the focal length of your lens, the IBIS is out there compensating for a completely different lens, and that can add shake to your footage rather than removing it. Which is really bad. So dial it in manually with a non-native lens, or leave it on auto and forget about it.
Zoom
By default Zoom is disabled unless you have a Sony lens with electronic zoom. But go down to Zoom Range and change it from Optical Zoom to Clear Image Zoom, and now the Zoom setting works.
And check this out: you can zoom in and out on a prime lens. I am not zooming the lens, I am zooming in camera, and it does not really lose much quality. Pretty darn legit. Part two shows you how to put this on a button so you can do it while filming.
Custom Key Zoom Speed and Remote Zoom Speed control how fast that zoom moves, either from a custom button or from a remote if you use one.
Shooting Display
Here is where you turn on a rule of thirds grid, a square grid, or a diagonal and square grid, if you want composition help while you film.
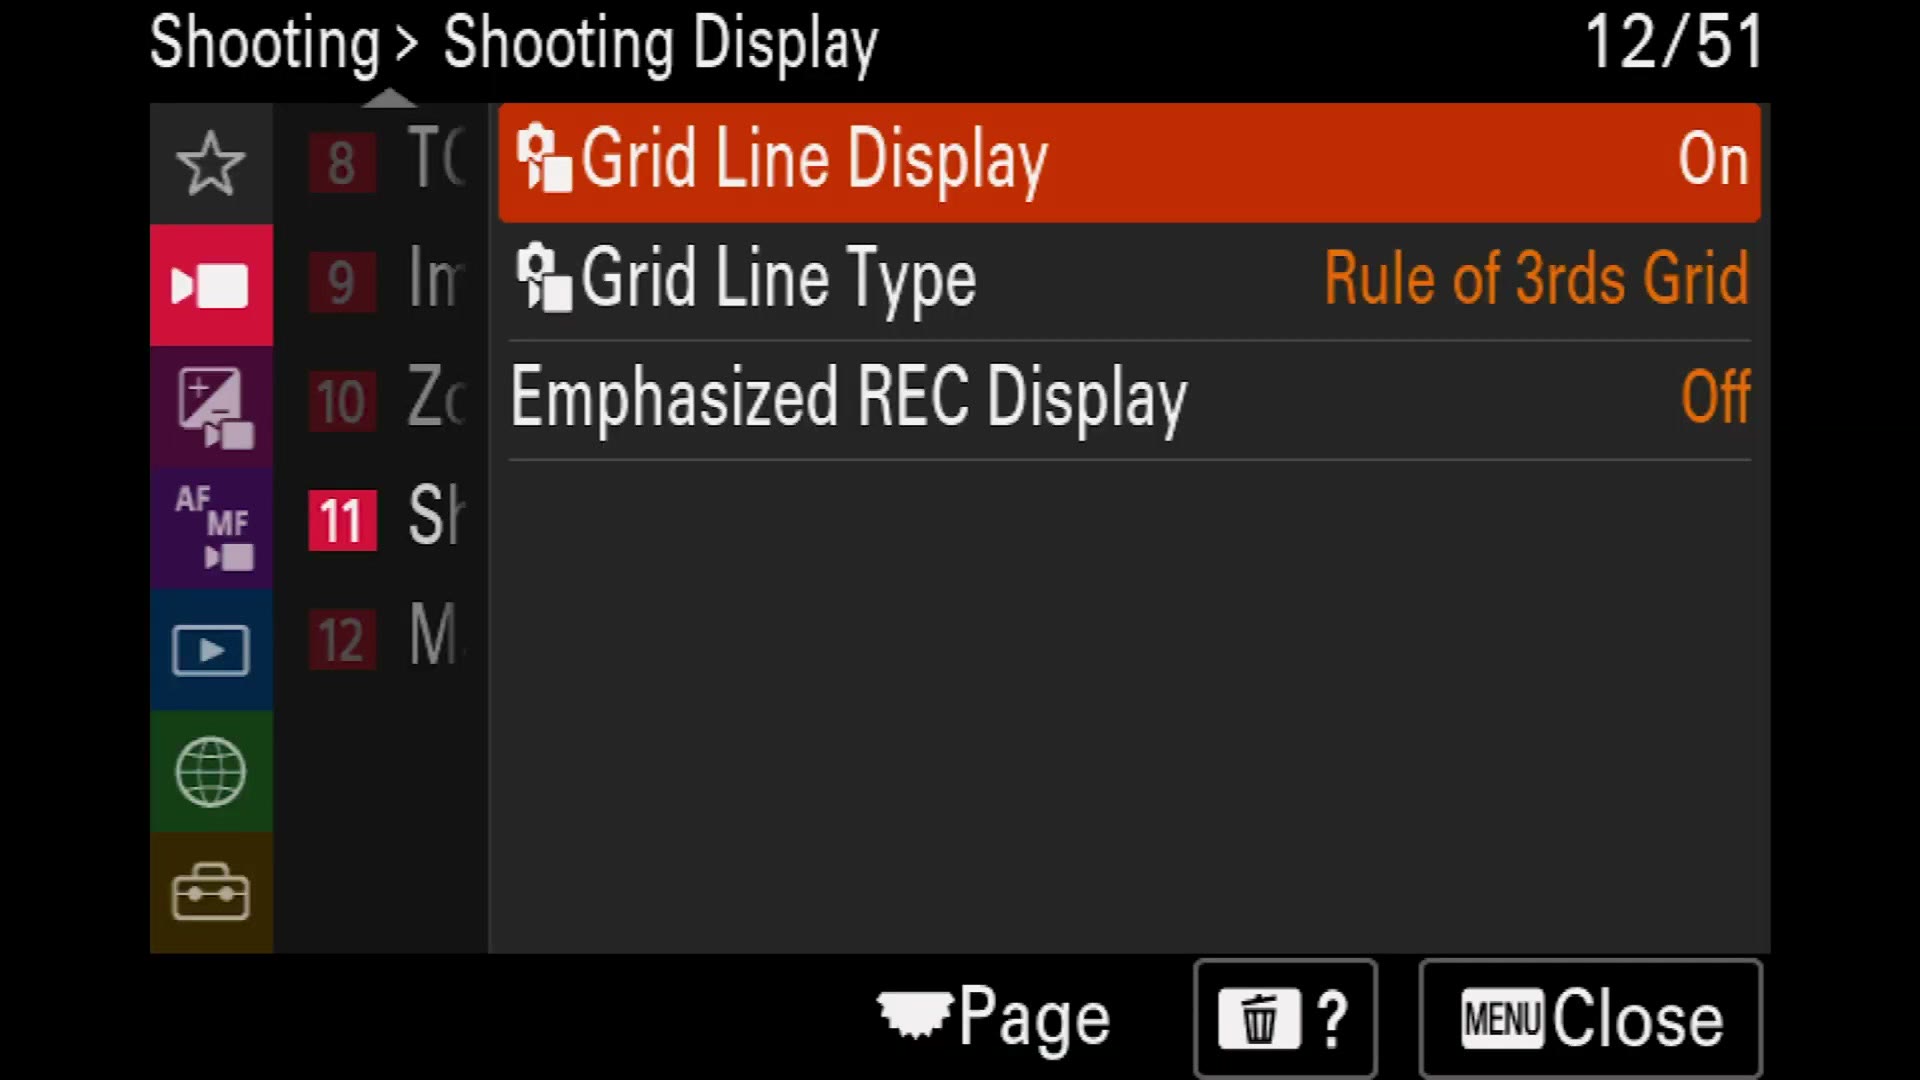
And then, one of my absolute favorite settings, and I was so glad when Sony started including it: Emphasized REC Display. Always set this on.
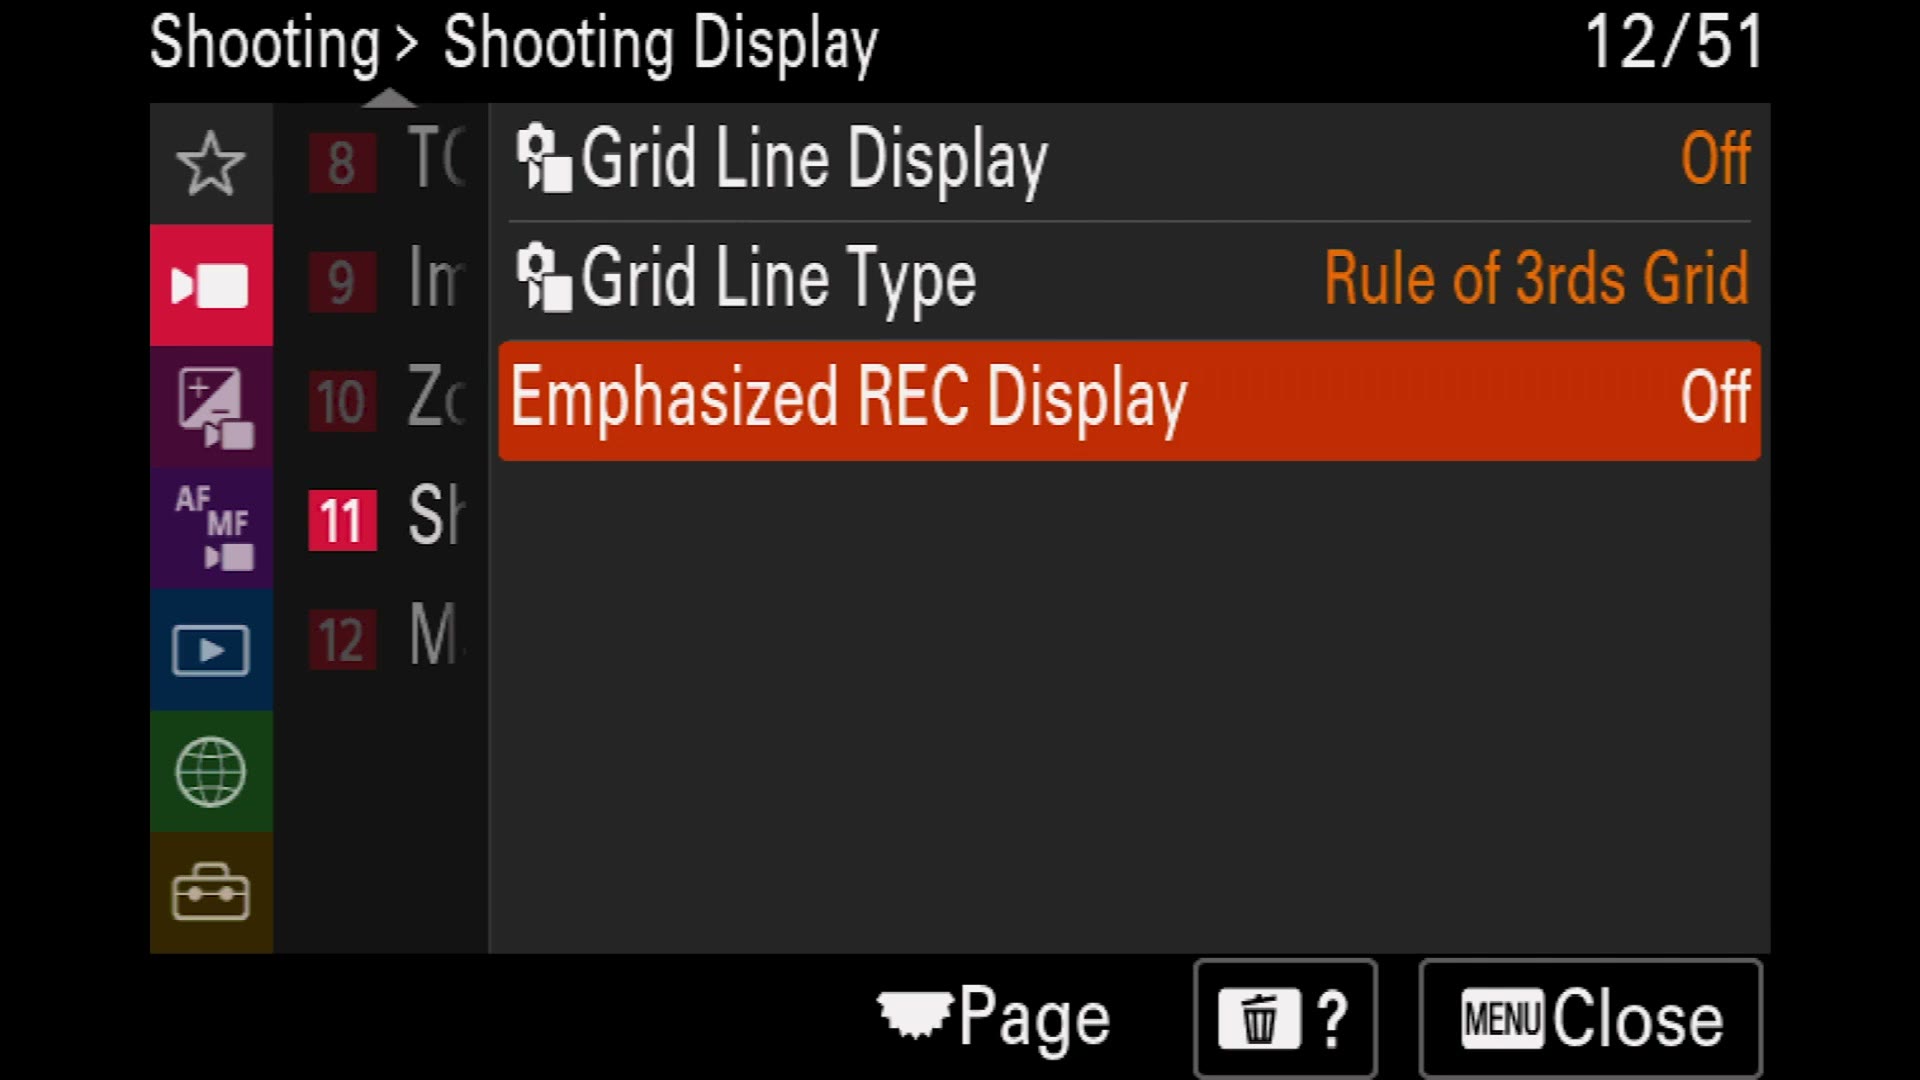
What it does is put a big red box around your entire screen whenever the camera is actually recording. This is going to be so helpful if you are like me and you occasionally forget to press record, or press it twice so you think you are rolling and you are not. It is terrifying when that happens. This way you glance down, see the giant red box, and know. Believe me, I have been filming before, not seen that box, and had that “oh no” moment. Always turn it on.
Marker Display
This one is super cool. If you tend to deliver in a 2.35:1 crop, the cinematic bars on the top and bottom, go to Aspect Marker, pick the ratio you want, and turn Marker Display on.
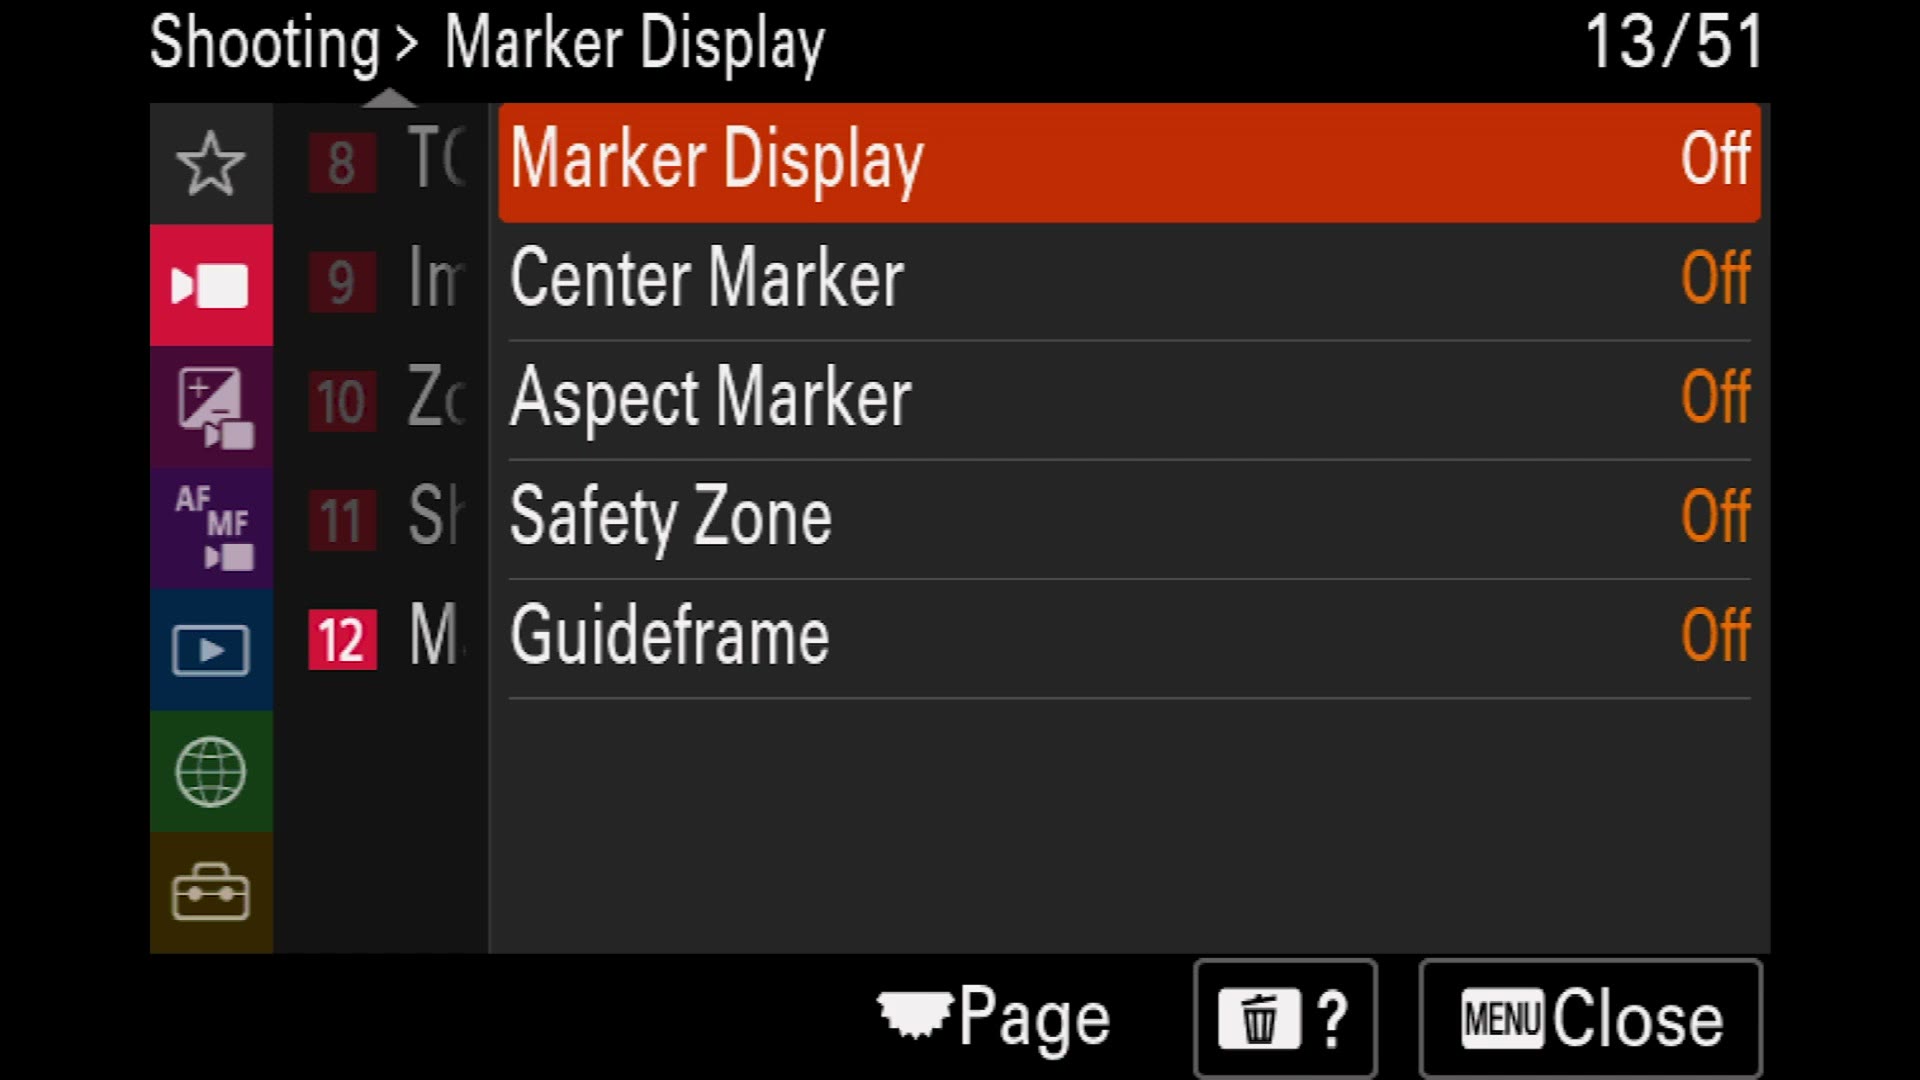
Now while you are recording you get white lines showing you exactly where your crop is going to land, so you can keep everything that matters inside it. Super useful. There are other options in here, safety zones and guide frames and so on, but I would not worry about those. Part two shows you how to toggle the marker display on and off quickly.
Exposure/Color Pink Menu
Exposure
First setting you see is Auto Slow Shutter, which automatically changes your shutter speed in a dark room. And, well. If you are filming video, you want everything manual. You do not want the camera doing this. It makes things weird and it makes coloring your footage a nightmare.
Turn it off. Never turn it back on.
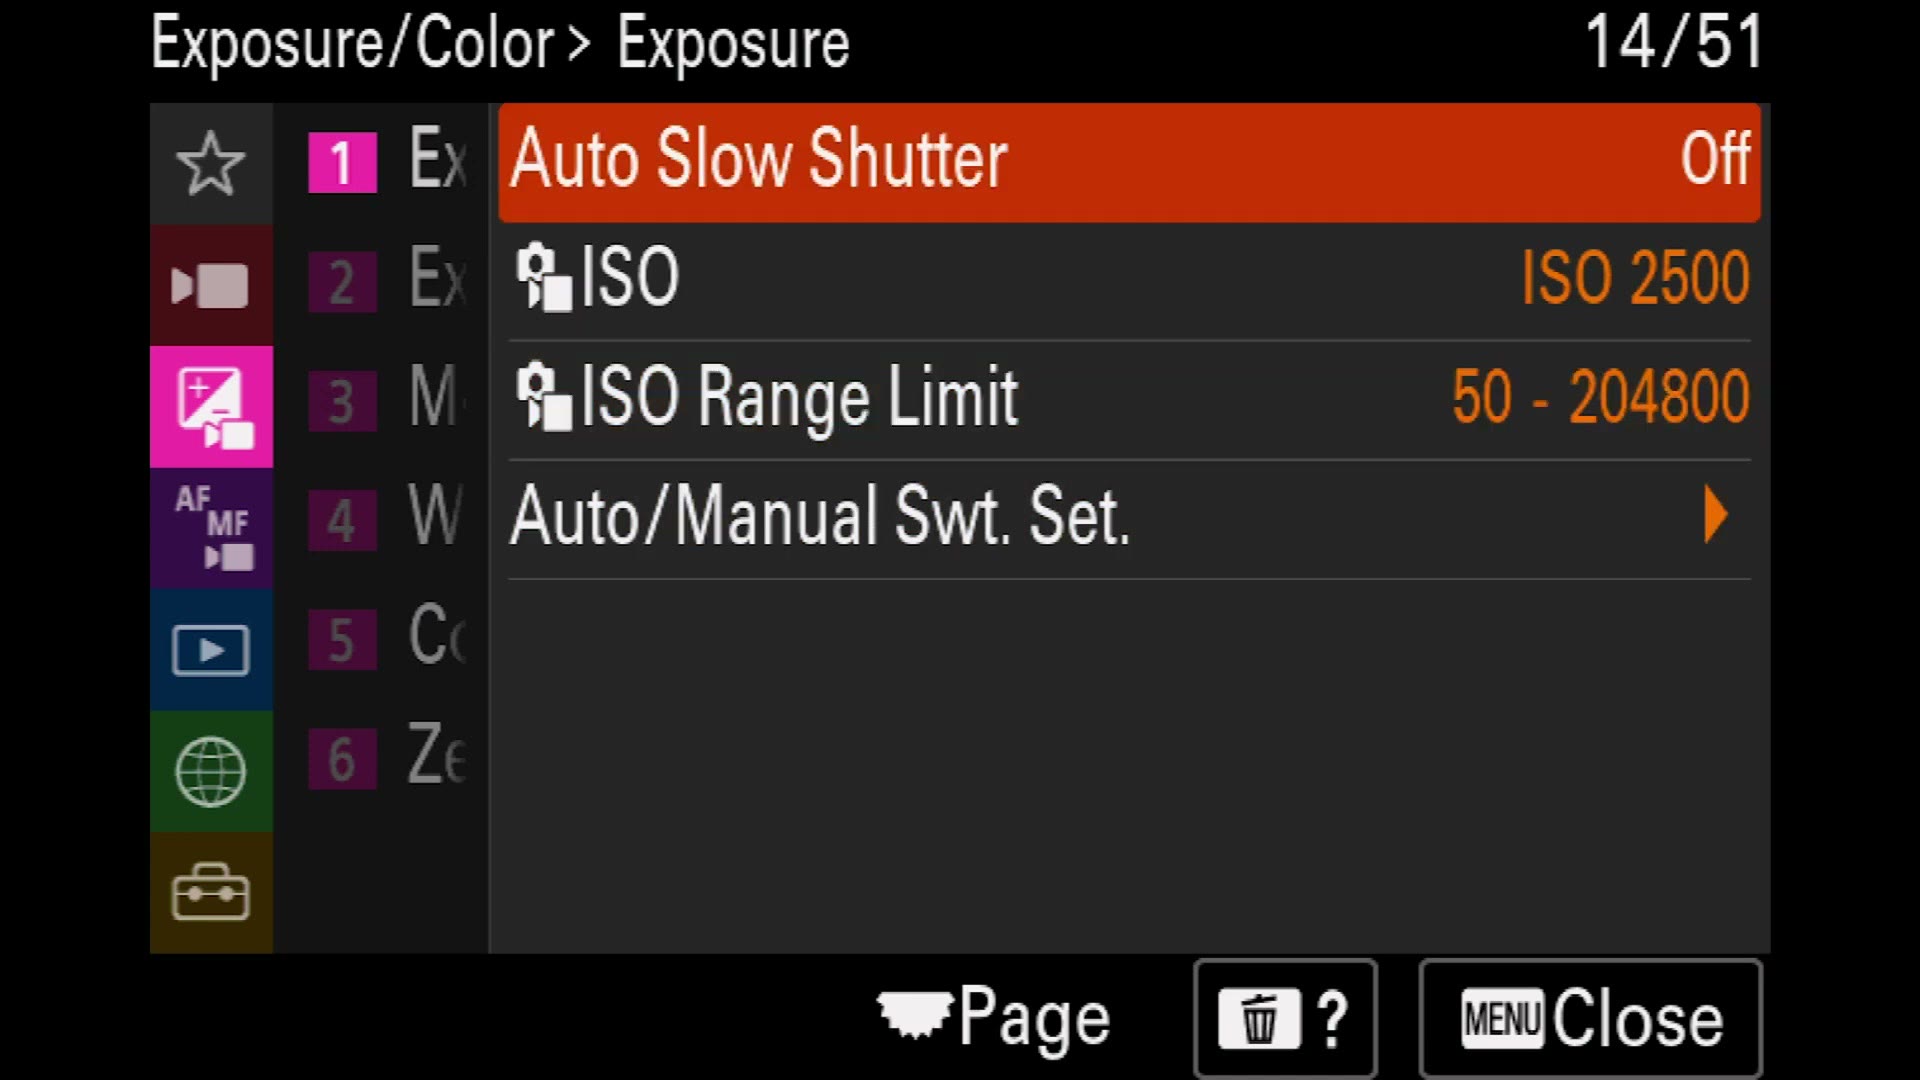
ISO, ISO Range Limit and Auto/Manual Swt. Set. are all in here too, but I use the shortcut button on the back for ISO, so I would not worry about any of them. Same with the whole Exposure Comp. section, since you are dialing exposure manually.
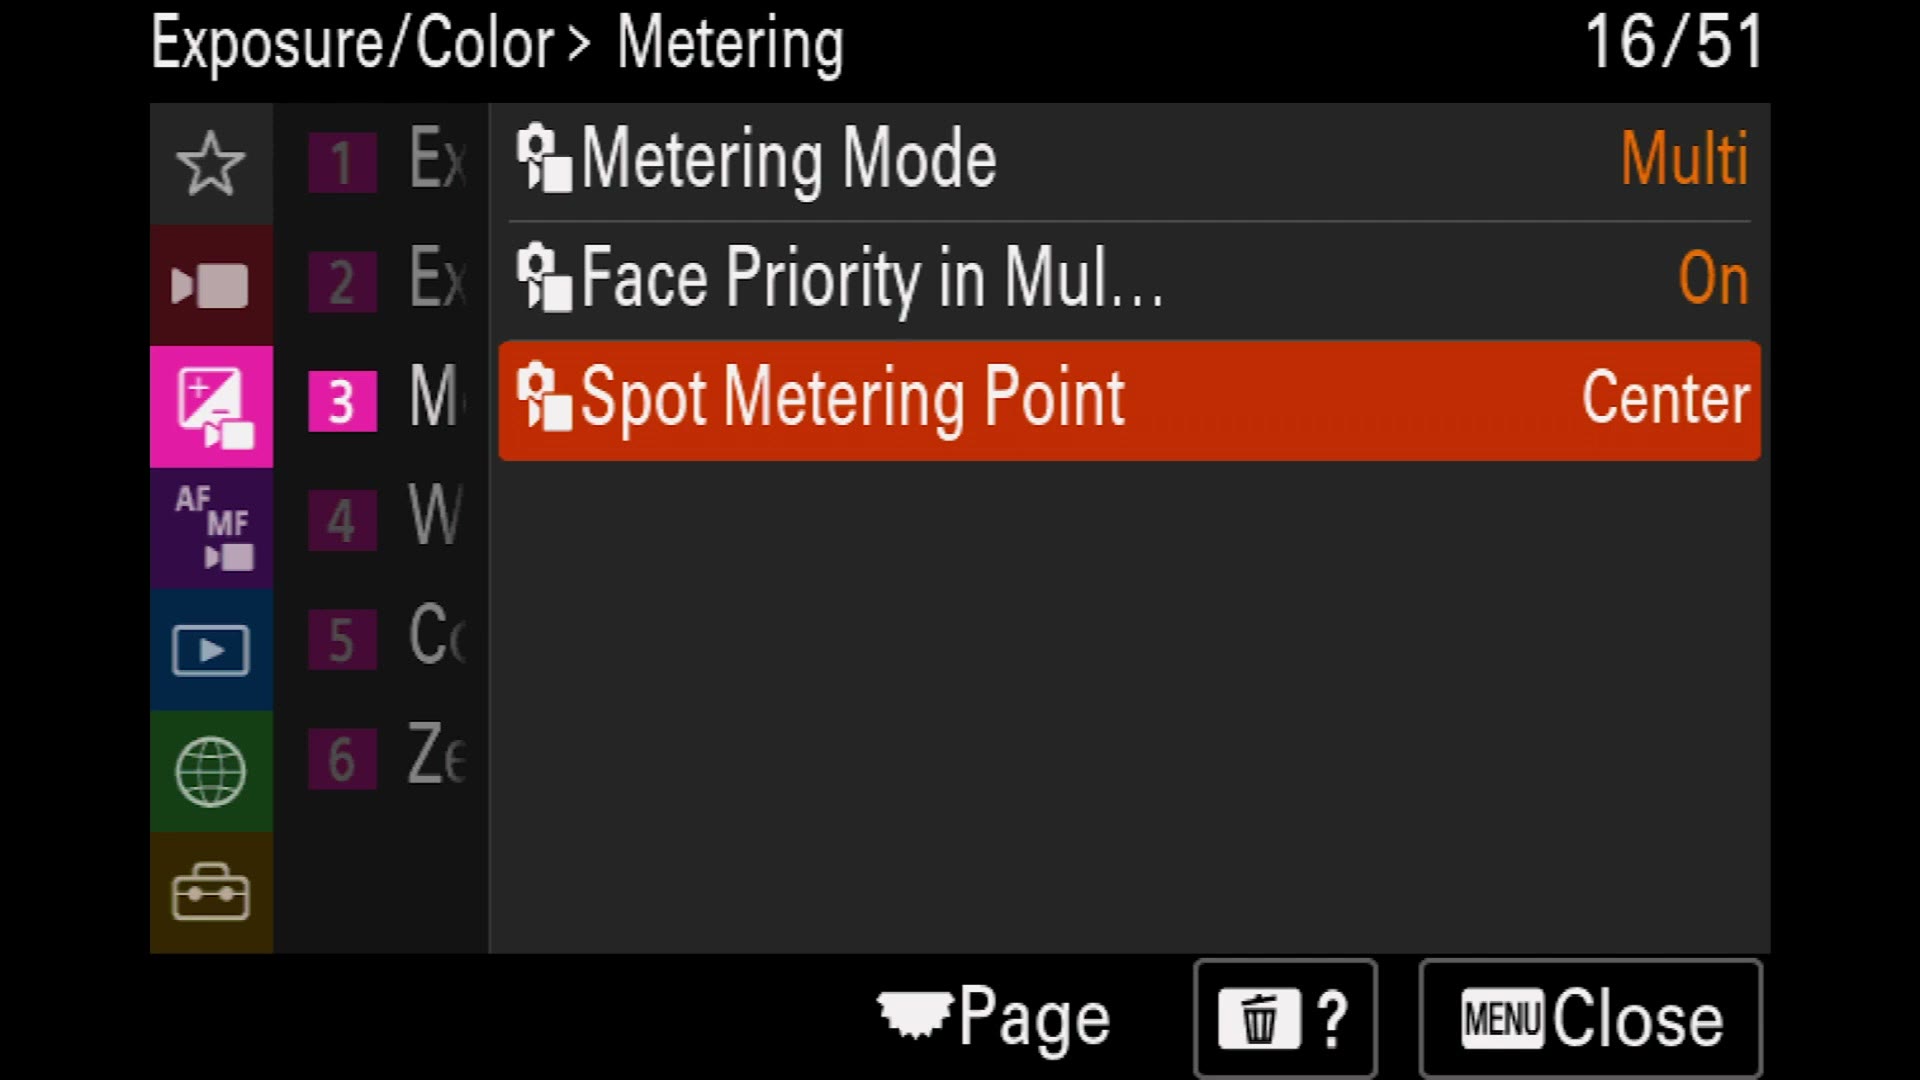
Metering
Believe it or not, this is one of my favorite sections in the whole menu. I love metering.
Metering is how the a7 IV tells you what exposure you should be at. Set Metering Mode to Multi, leave Face Priority in Multi Metering on, and leave Spot Metering Point at Center. You can set that last one to Focus Point Link, which meters wherever you tap on the screen, which is pretty cool, but center is fine.
Why does this matter? Look at the bottom of the screen on the back of the camera. Next to your shutter speed and your f stop you will see MM and a number somewhere between -2.0 and +2.0. That is your exposure meter. Mine here says -0.3, meaning I am three tenths of a stop underexposed.
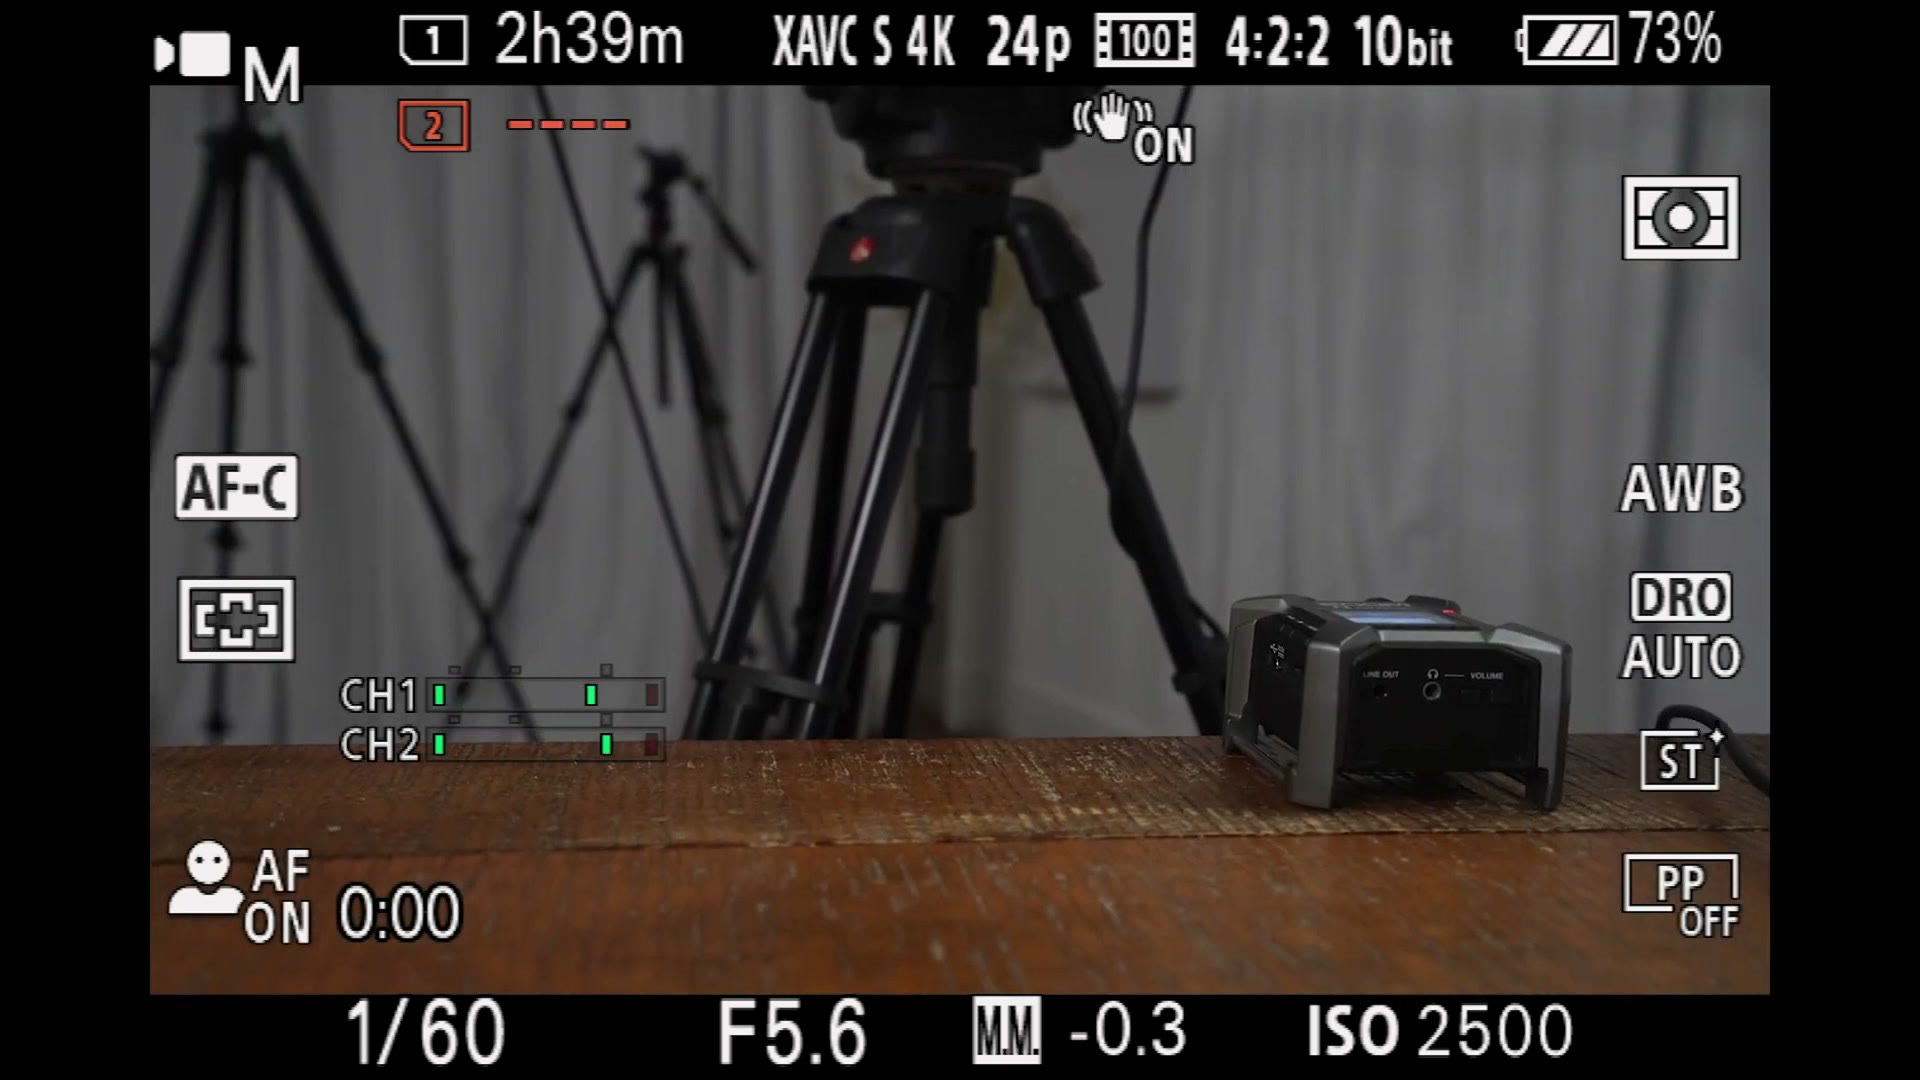
That number lets you tell at a glance whether you are over or under. I love this setting. And leaving face priority on means that whenever the camera sees a face in the scene, it prioritizes telling you the exposure of that face, which is exactly what you want, because getting skin tones exposed correctly is the whole job.
White Balance
Wow, this is arguably one of the most important settings on the camera.
By default it is on Auto. You do not want auto. We do not want auto. Let’s get away from auto.
Scroll down to the K where it says C.Temp./Filter, press right, and dial your white balance in manually by Kelvin value. You can go really cool one way, really warm the other. By default let’s sit around 5000, which is a fine place to be.
As a bonus, press right again and you get the white balance adjustment grid, where you can push green or magenta into your white balance and really dial your colors in.
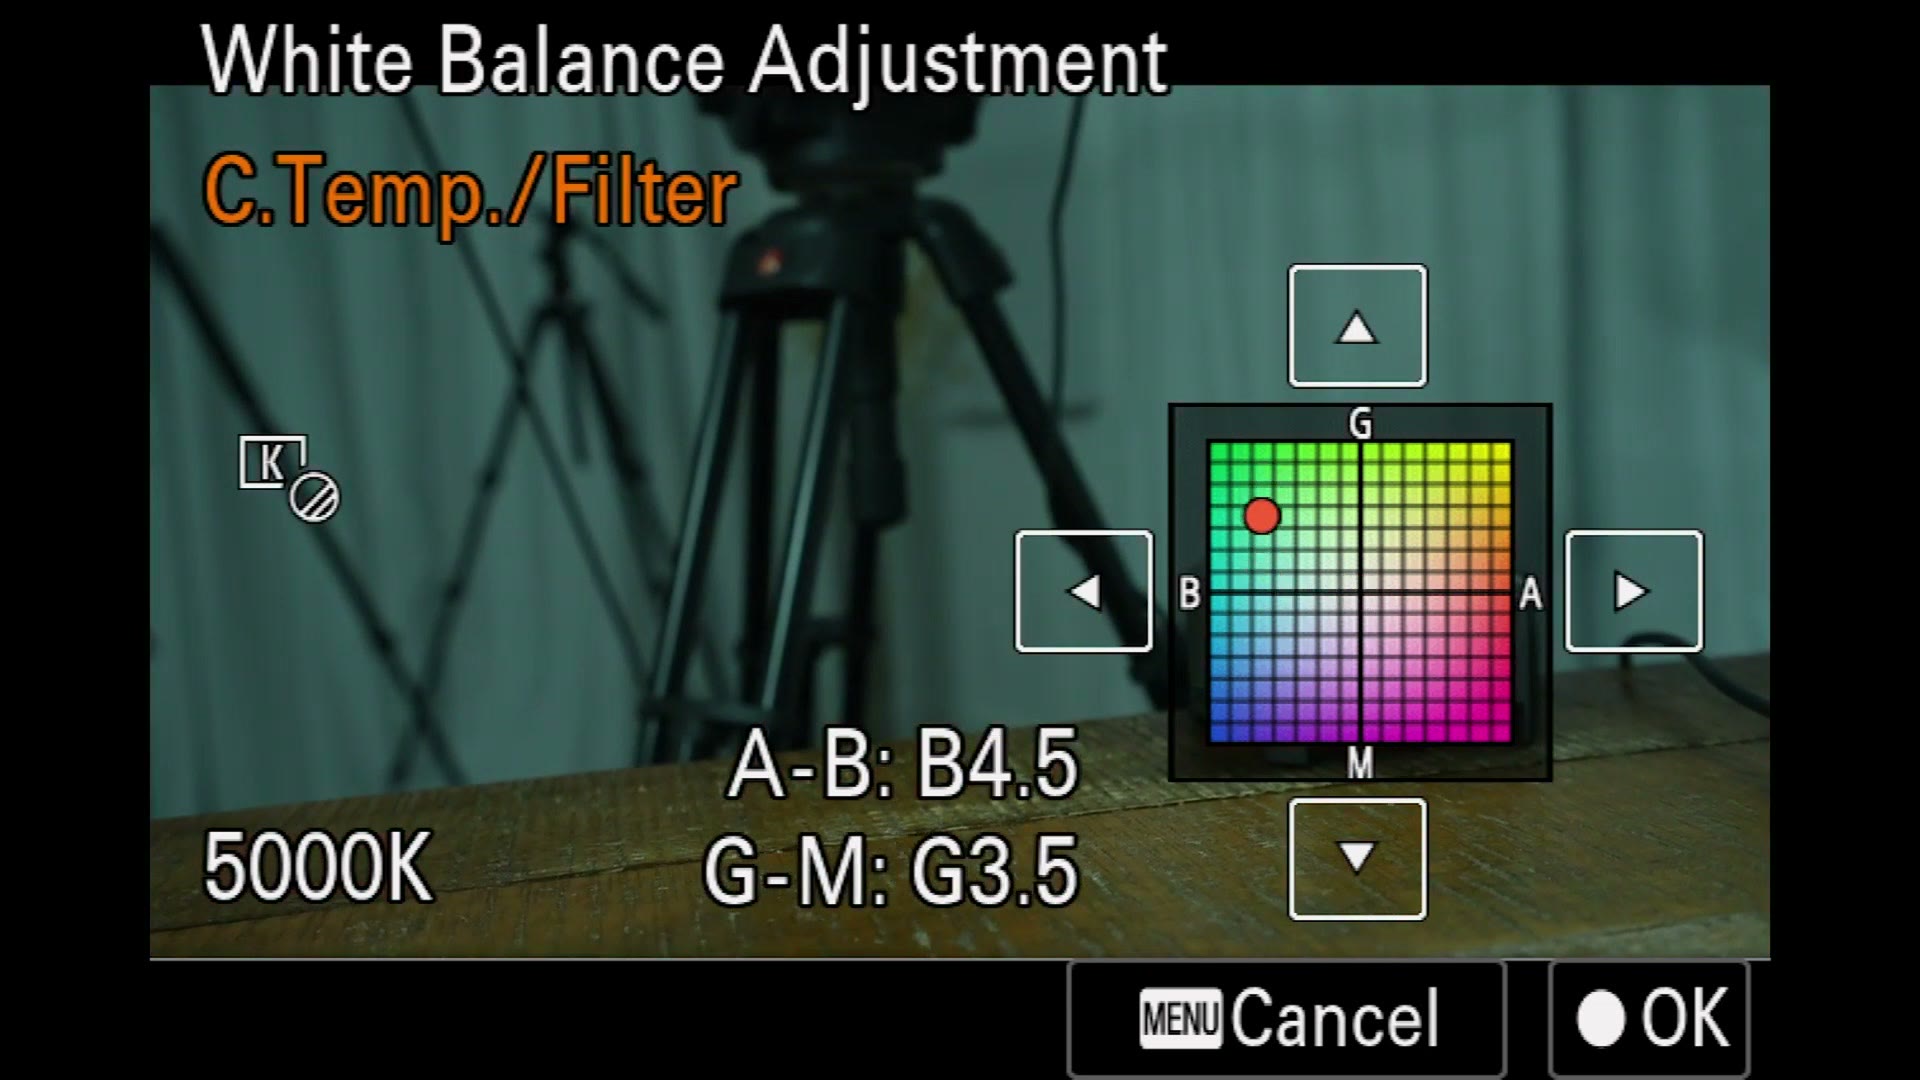
Priority Set in AWB does not matter, because you are setting white balance yourself.
But Shockless WB is such a cool feature and I absolutely love it. Set it to 3.
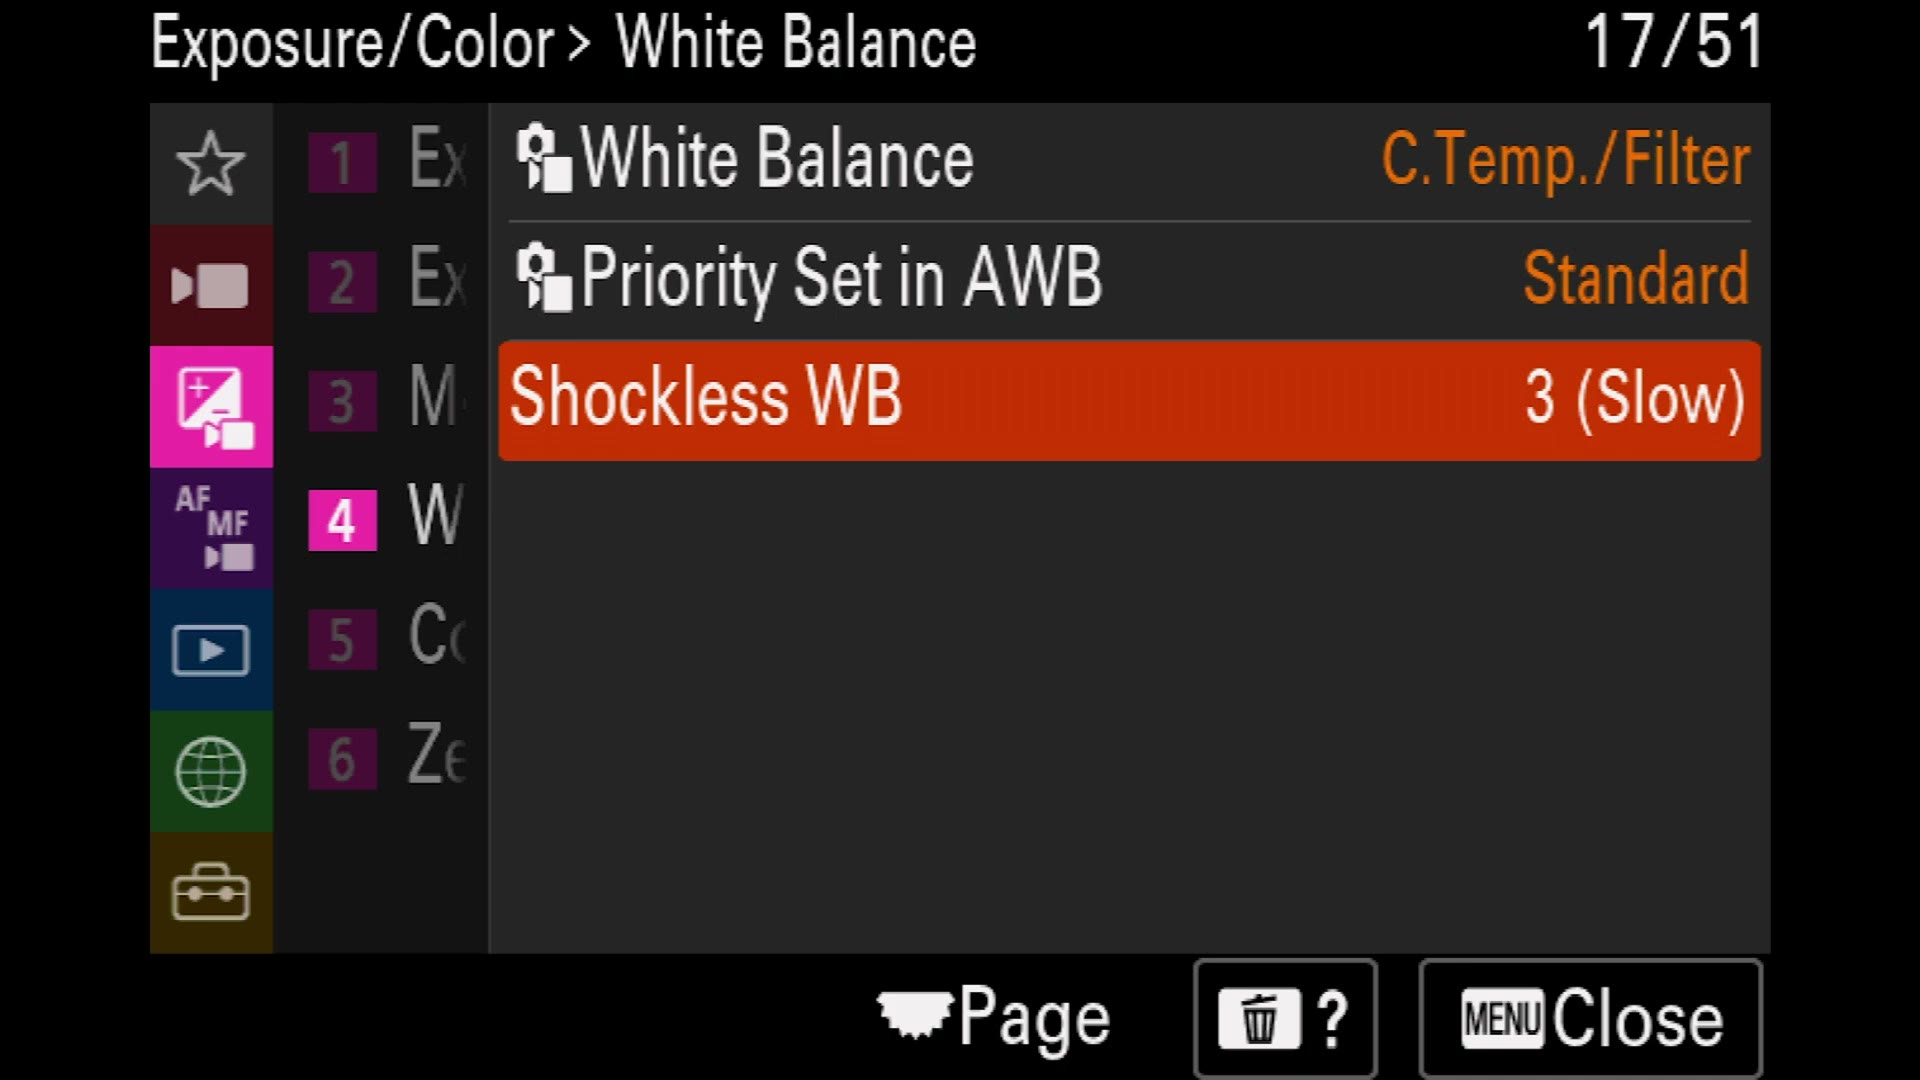
Here is what it does. If you change your white balance mid recording and this is set to 1, the a7 IV snaps to the new value instantly, and it looks abrupt and distracting. Set it to 3 and the white balance moves gradually and smoothly instead. So you can adjust while rolling and your audience never notices. Shockless WB, set to 3, have a great day.
Color/Tone
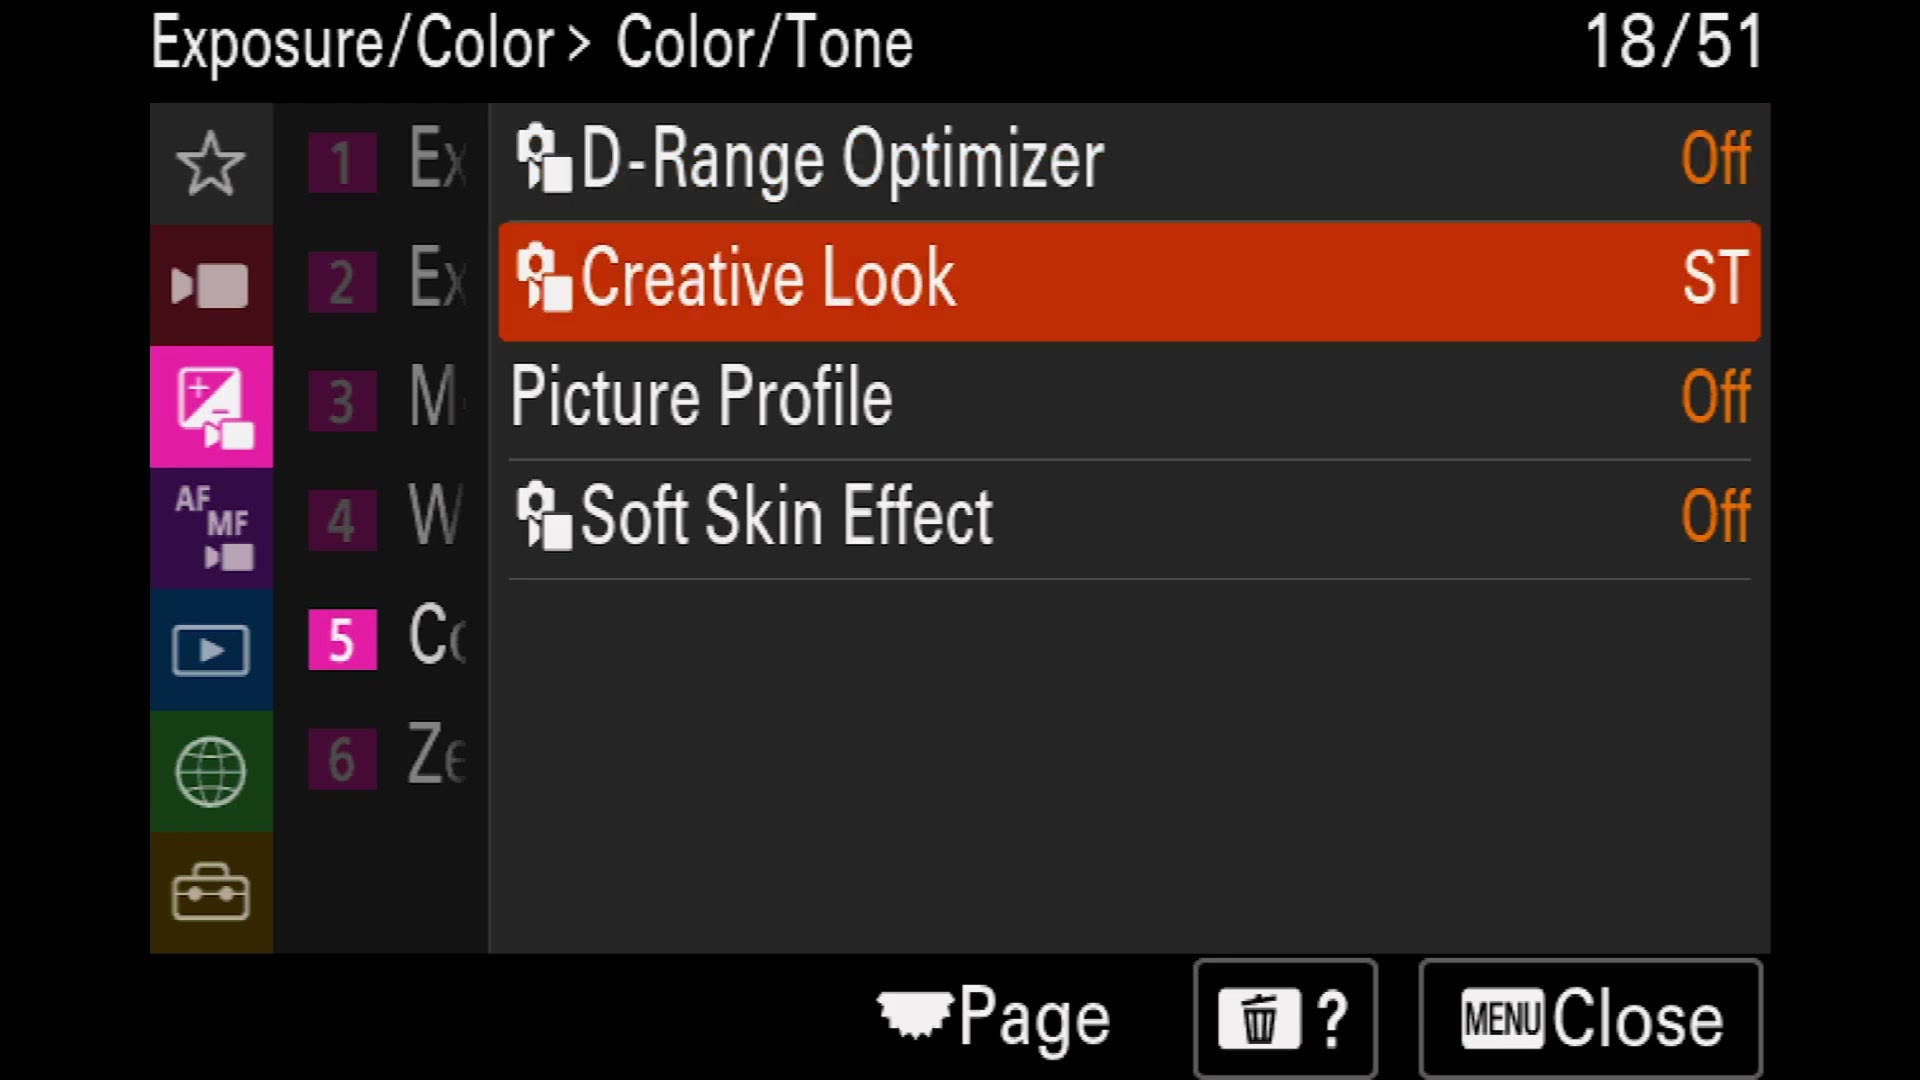
- D-Range Optimizer: Off. The only time DRO really helps is when you have exposed improperly, and I always recommend exposing properly. Leave it off.
- Creative Look: ST (standard). The other options in here are all really weird looking. Sepia. Everybody loves sepia. No we do not. Leave it on standard. You do not want to play in the Creative Look toolbox.
- Soft Skin Effect: Off. It is a skin smoothing effect with low, medium and high settings, and it is genuinely interesting if you film yourself. I have got some wrinkles, I might need to fix that. Personally I would leave it off, but try it and see.
Where you do want to play is Picture Profile, which gives you eleven profiles to choose from. What you want is PP8, S-Log3.
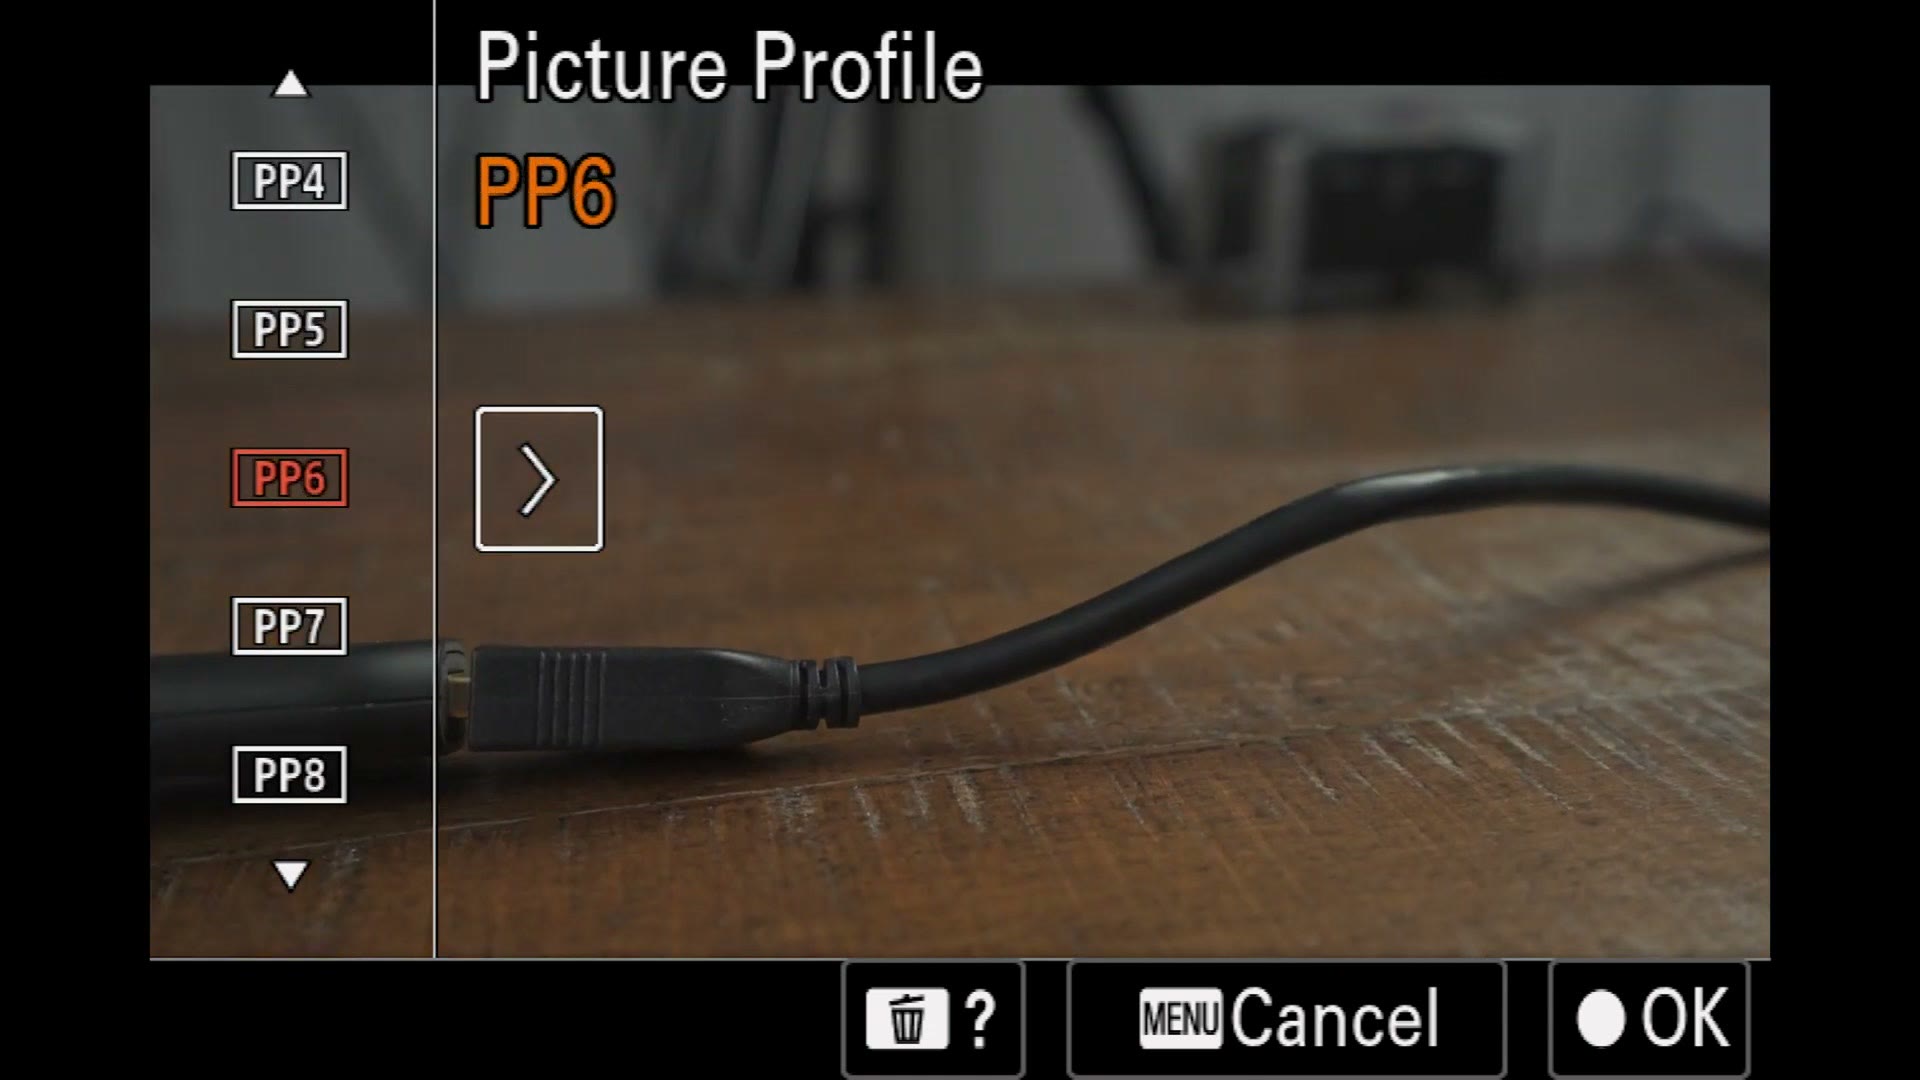
I made a full guide on filming in S-Log3 with the a7 IV, which covers how to expose it, where to put your zebras, and the two ISOs worth living on.
Zebra Display
Another one of the most important features on this camera. Turn Zebra Display on, then set your zebra level, which controls where the stripes appear over the overexposed parts of your image.
The level you want depends on the picture profile you are in. For S-Log3, go into Zebra Level, down to Custom 1, change it from STD+Range to Lower Limit, set it to 94+, and press the center button to save it.
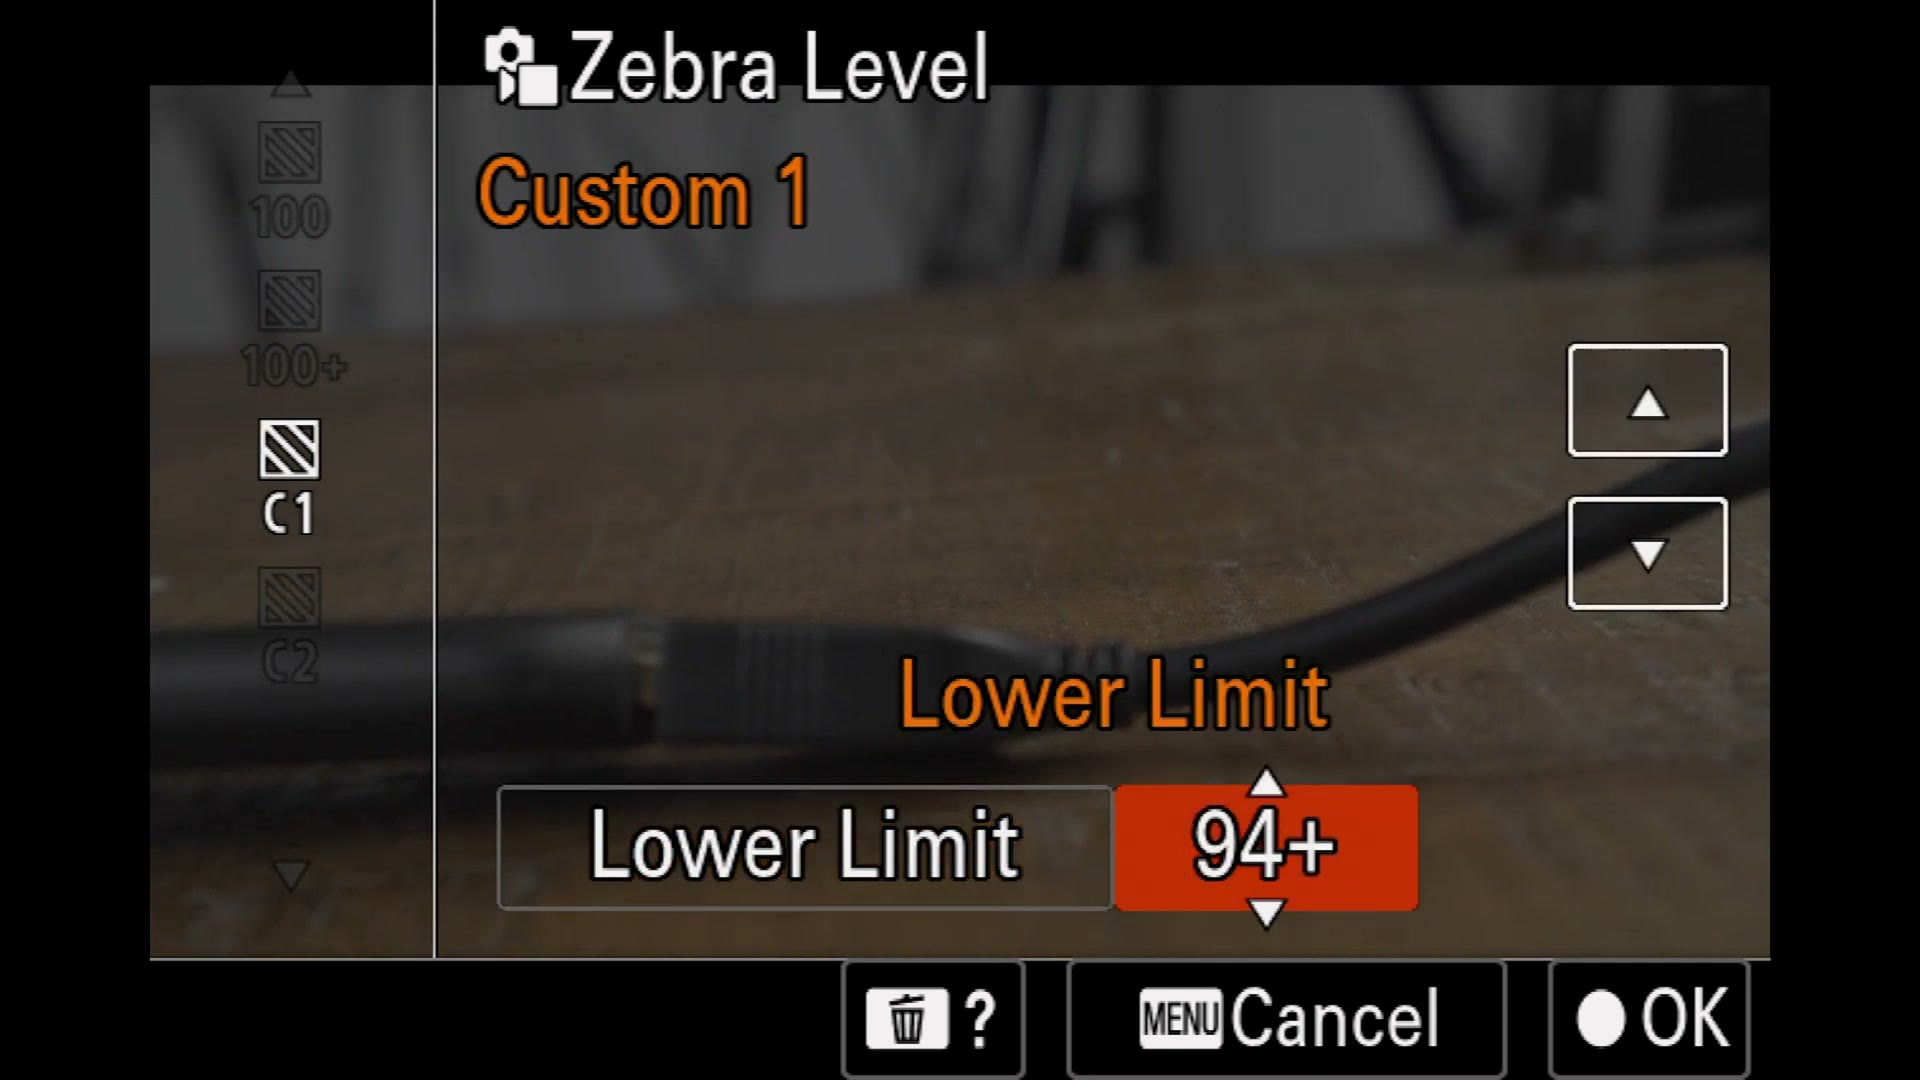
And incidentally, if you just download my settings file, all of this is already done and you never have to remember any of it.
AF/MF Menu
The purple menu. Autofocus and manual focus, and there are a ton of options in here.
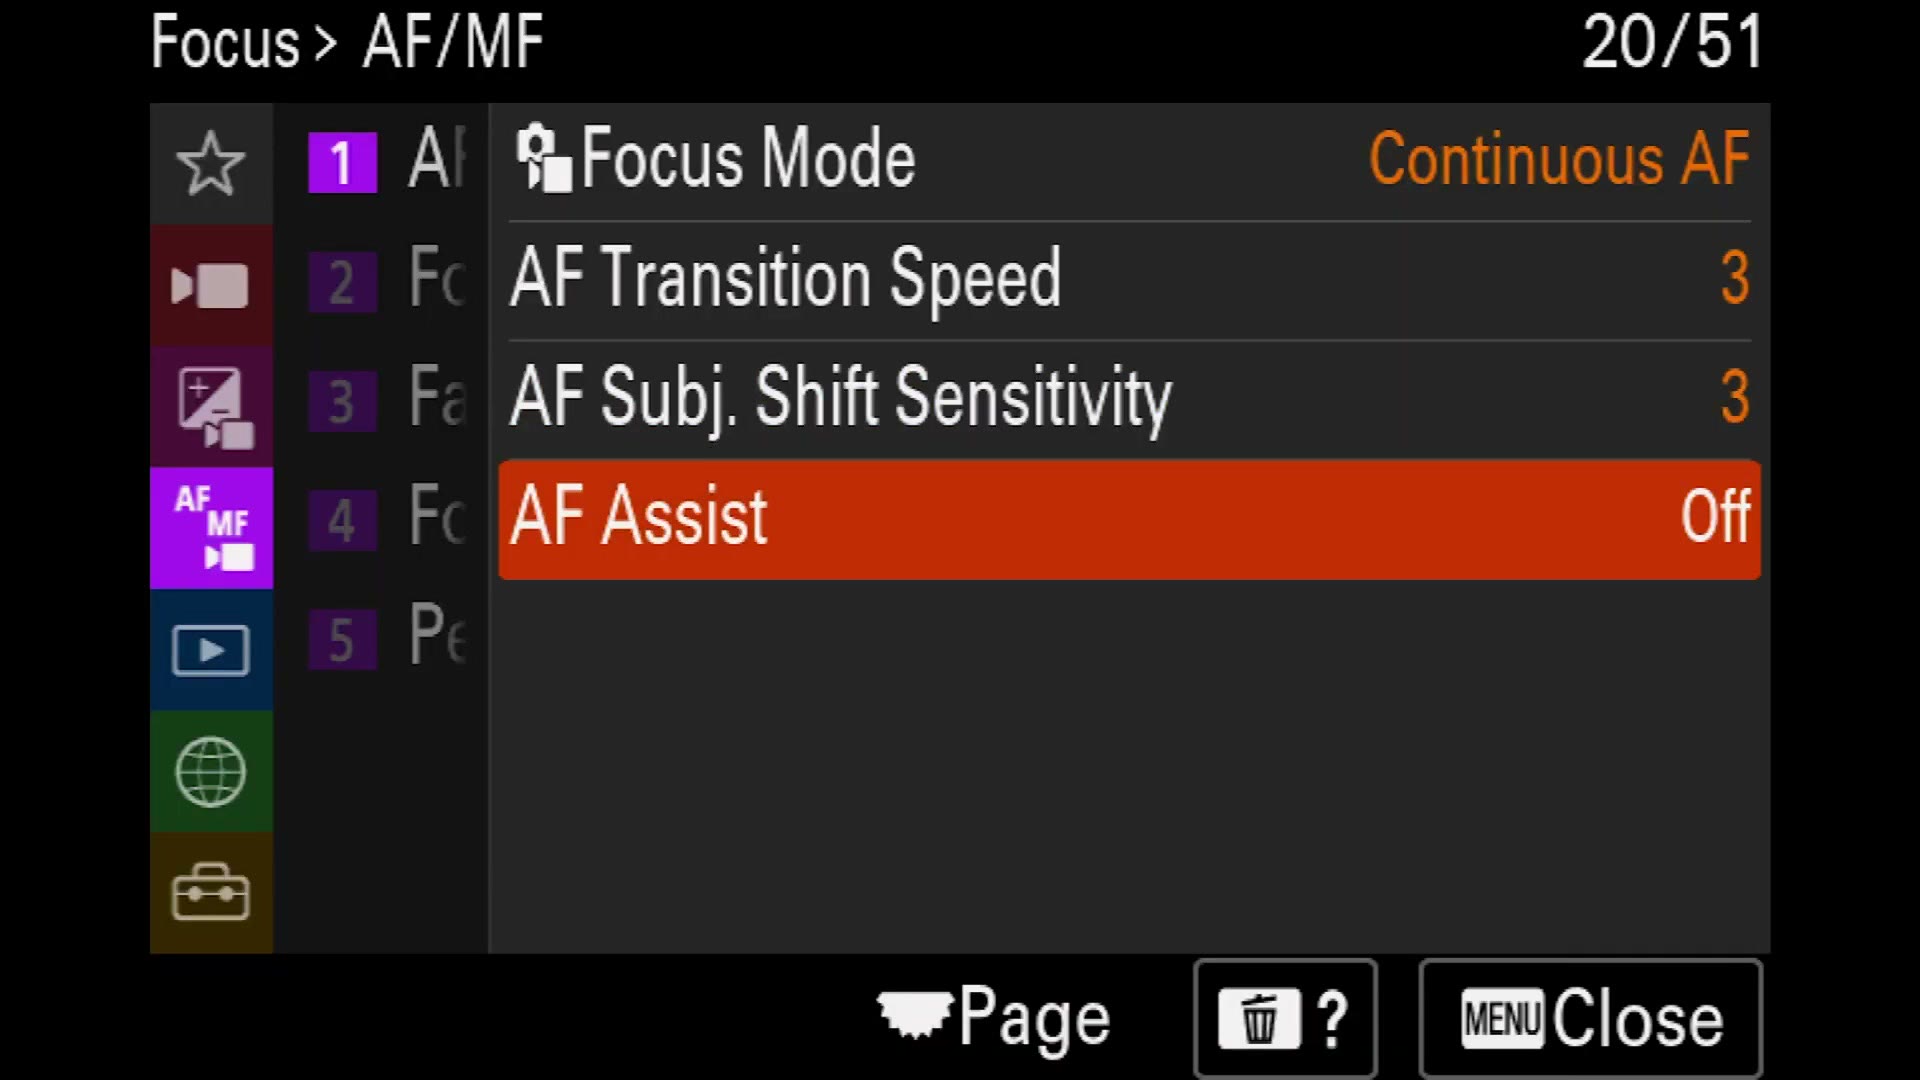
- Focus Mode: Continuous AF. Autofocus on the a7 IV is genuinely good, even on continuous.
- AF Transition Speed: 3. This controls how fast the camera racks from one subject to another. Play with it and see what looks right to you. I have found 3 usually looks pretty good.
- AF Subj. Shift Sensitivity: 3. This is how sticky the autofocus is. Set it to 1 and the camera locks onto a subject and stays there. Set it to 5 and it will jump from person to person quickly. I go with 3 as a good middle. If your focus looks too jumpy, drop it to 1 or 2.
- AF Assist: Off by default. This is new. Turn it on and you can grab the manual focus ring at any time and override the autofocus. It is pretty cool and worth playing with, I just leave it off.
- Focus Area: Wide. And because we chose wide, you can ignore Focus Area Limit and everything under it.
For Face/Eye AF, leave Face/Eye Prior. in AF on.
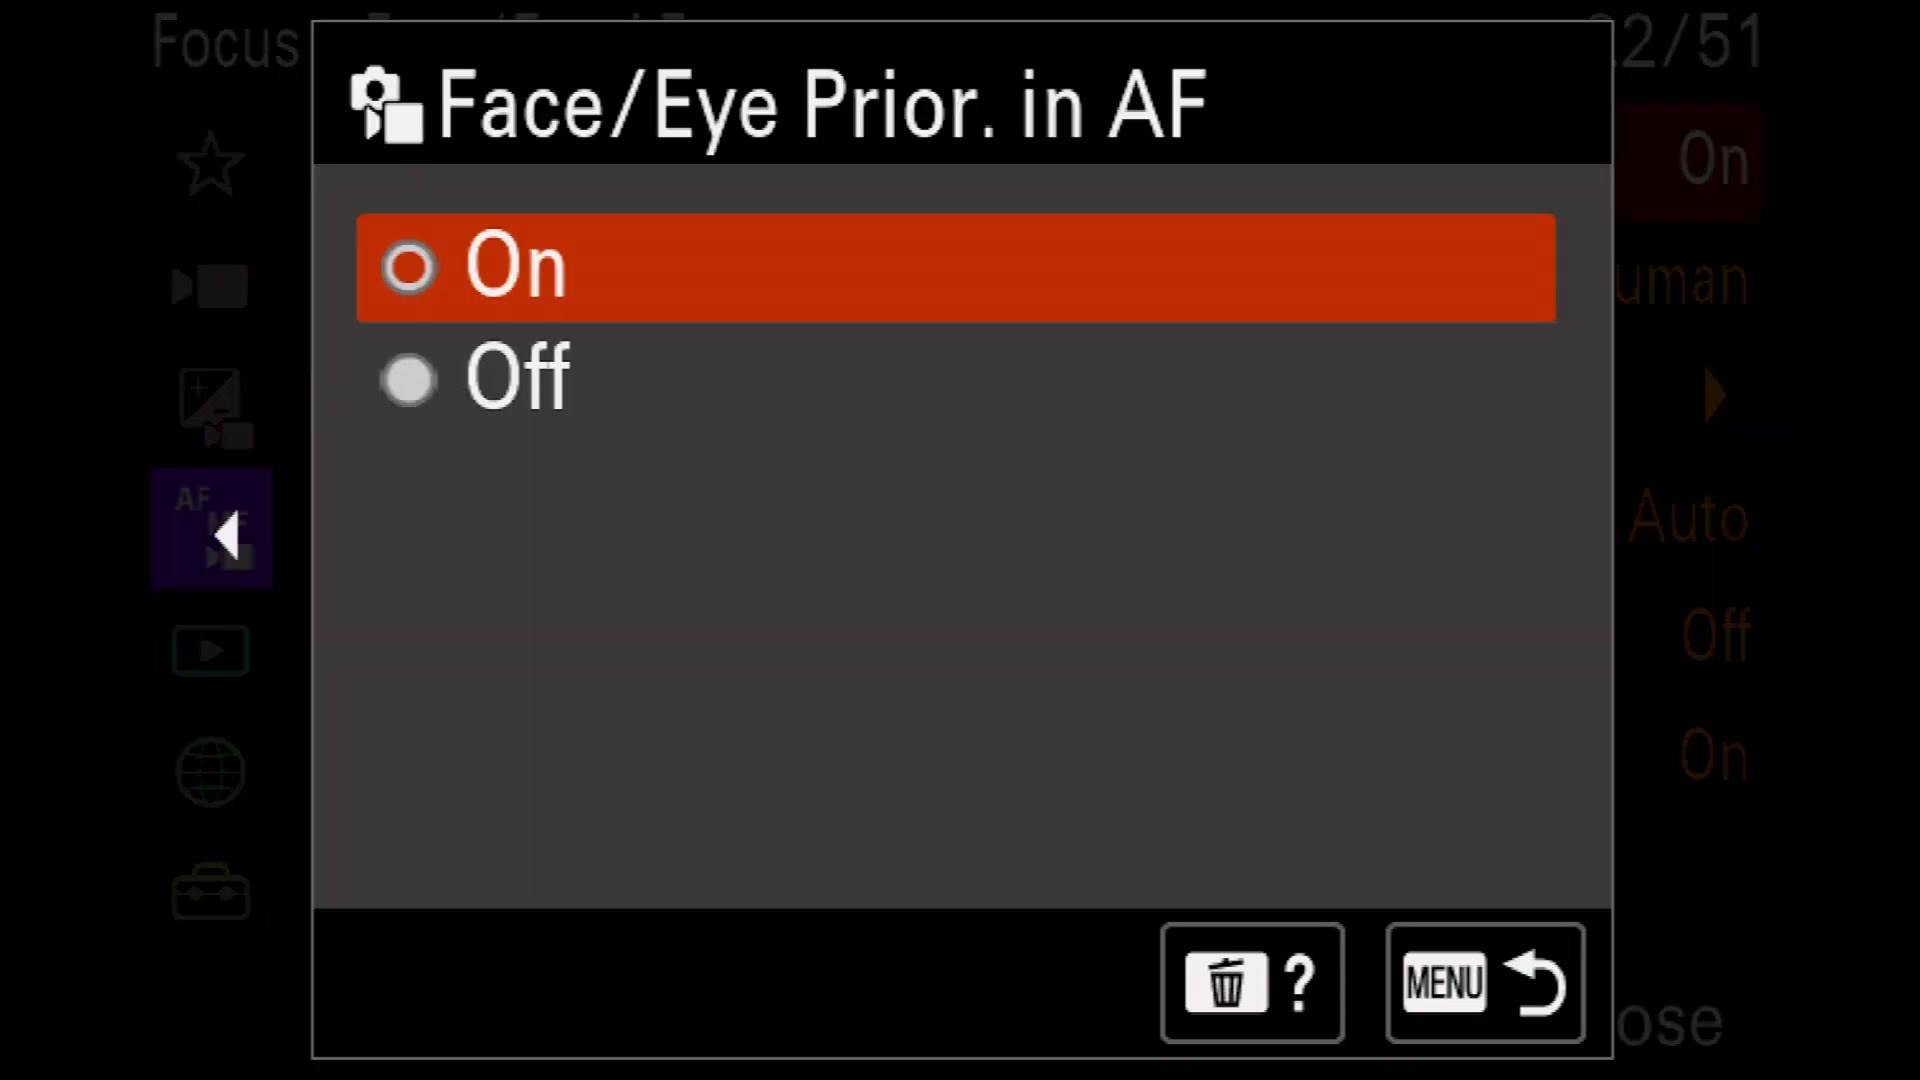
Set Face/Eye Subject to Human unless you are filming animals or birds, in which case it is right there. Leave Right/Left Eye Select on Auto, though if you are filming someone at a very specific angle and you need the camera locked to one particular eye, you can force it. And turn Face/Eye Frame Display on, which puts a little white box around your subject’s eyes so you can tell at a glance that you are actually in focus.
Then there is the Focus Map, which is new, and whoa.
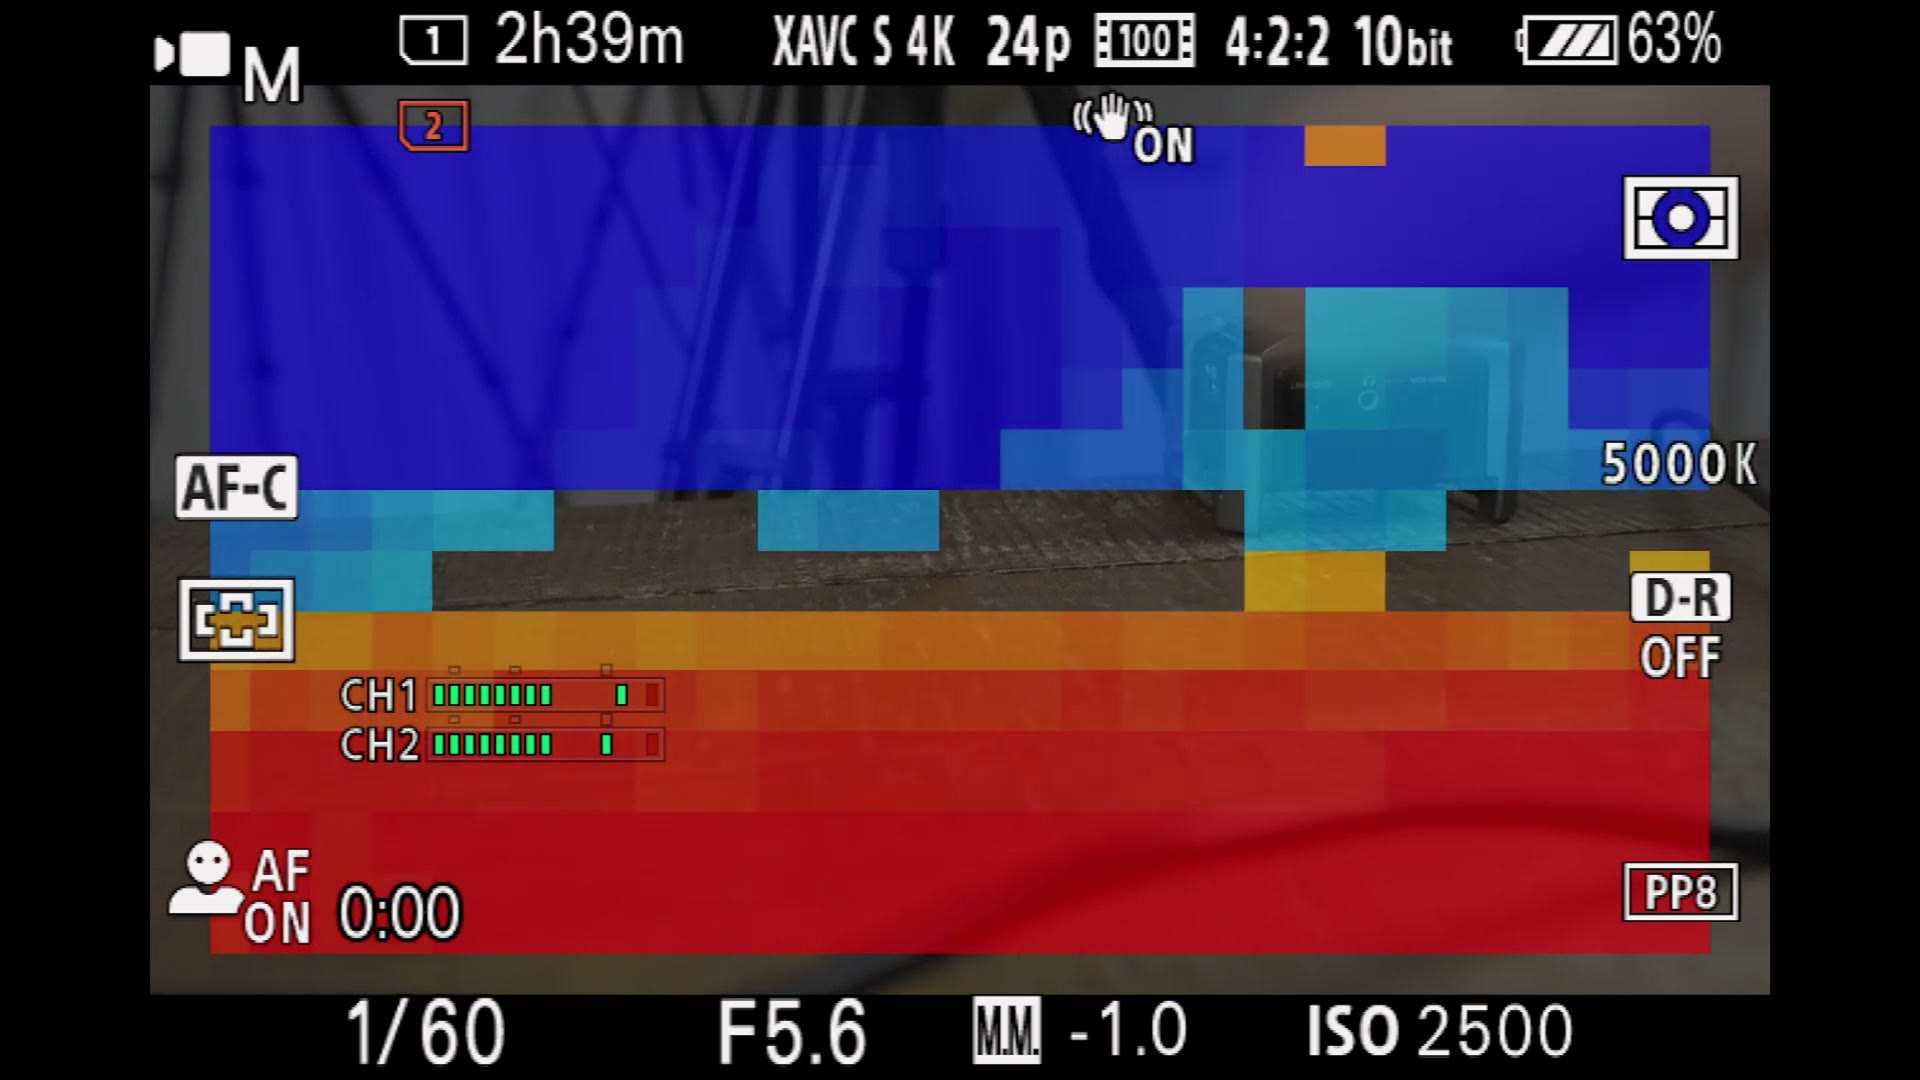
Blue is what is out of focus behind your subject, red is what is out of focus in front of it, and clear is what is actually in focus. If you pull focus manually, it is a really great way to see exactly where your depth of field is sitting. That said, I would leave the focus map off by default, because otherwise you have a screen full of strange colors and it becomes hard to actually film.
Focus Magnifier lets you punch in to confirm focus. Set Focus Magnif. Time to No Limit, and set Initial Focus Mag. to x4.0.
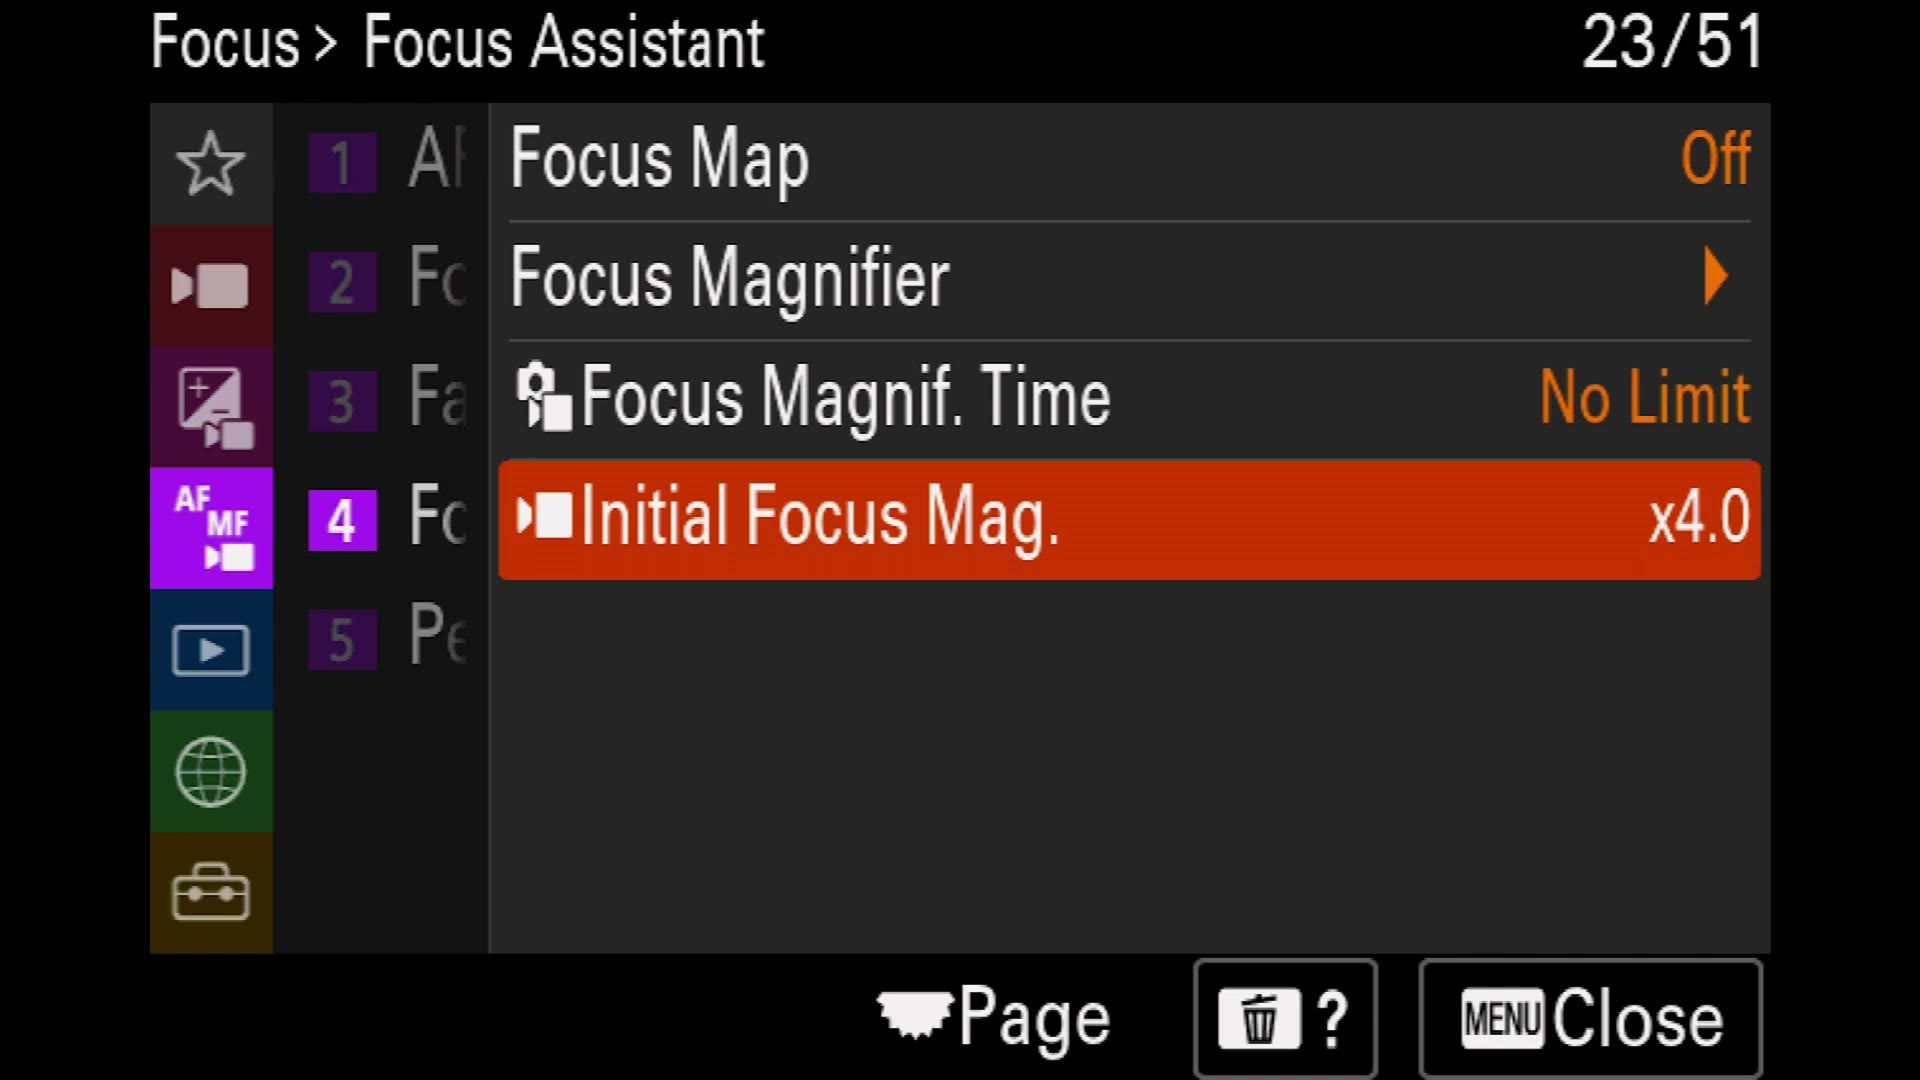
We put this on a custom button in part two, and starting at x4 instead of x1 saves you a button press every time you check focus. I always recommend saving a button press here and there.
Peaking Display is genuinely useful if you focus manually. You can set the level to high, mid or low, and change the color from white to red, yellow or blue. I leave peaking off, but that is where it lives.
Playback Menu
The blue menu, and most of it you can move through quickly.
Playback Media lets you pick which card you are reviewing clips from.
Protect and Rating are both a bit useless for video. Protect stops a clip being deleted by the trash can button, but formatting the card wipes it anyway. Rating only works for photos. Move along.
Delete does exactly what it says, and I recommend you never delete video files this way. I have read horror stories of people deleting clips off a card in camera, corrupting the file structure, and losing everything. That is just terrifying. Format the card in camera before every shoot instead, which wipes it cleanly and makes sure the file structure is correct every time.
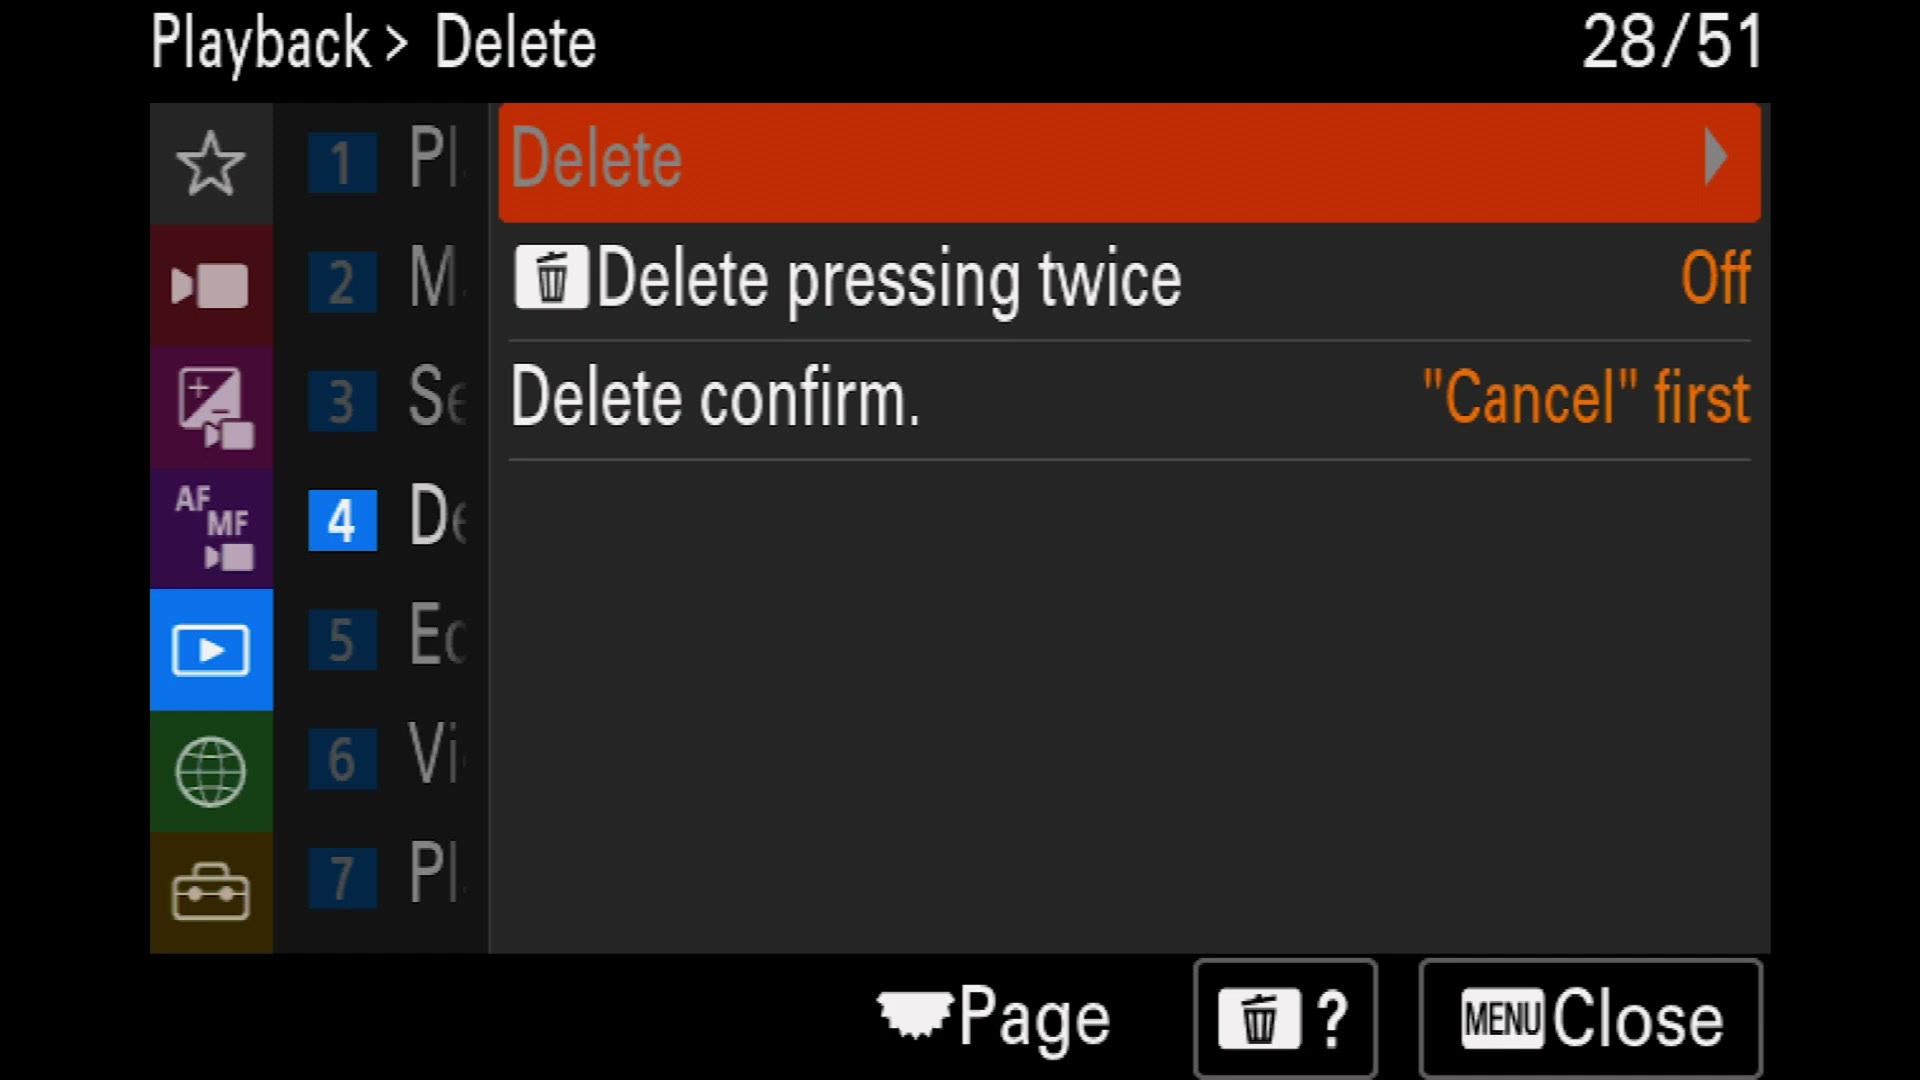
The a7 IV adds a feature where pressing delete twice deletes whatever you are looking at. That is terrifying. Leave Delete pressing twice off. And leave Delete confirm set to “Cancel” first, so the highlighted option is cancel and not delete.
Under Edit, the only tool worth knowing about is Rotate. Here is why you will need it. The a7 IV has a built in gyroscope, so hold the camera horizontally and it films horizontal, hold it vertically and it films vertical. Which sounds great for TikTok and Instagram. But say you are filming a reception, everybody is dancing, you are handheld, and you press record while the camera is down at your side as you bring it up. The camera goes oh, we are filming vertically, cool, and now all your footage is sideways and you are standing there going what is wrong with this. Good news is you can rotate it back, either in camera here or in your editing software.
Related: set Display Rotation to Off. To be clear, the camera will still film vertically if you hold it that way, but at least the screen will not flip on you too.
And Image Jump Setting lets you set a dial to scroll ten clips at a time instead of one by one, which speeds up reviewing footage on the camera if that is something you do. I leave mine on one by one.
Network Menu
The green globe. There are a ton of options in here for connecting your phone to the camera, transferring clips, using the phone as an external monitor. I do not really recommend any of it. It can be slow and I never do it.
What I would concern yourself with is down under Bluetooth: turn Bluetooth Function off, and under Network Option, turn Airplane Mode on.
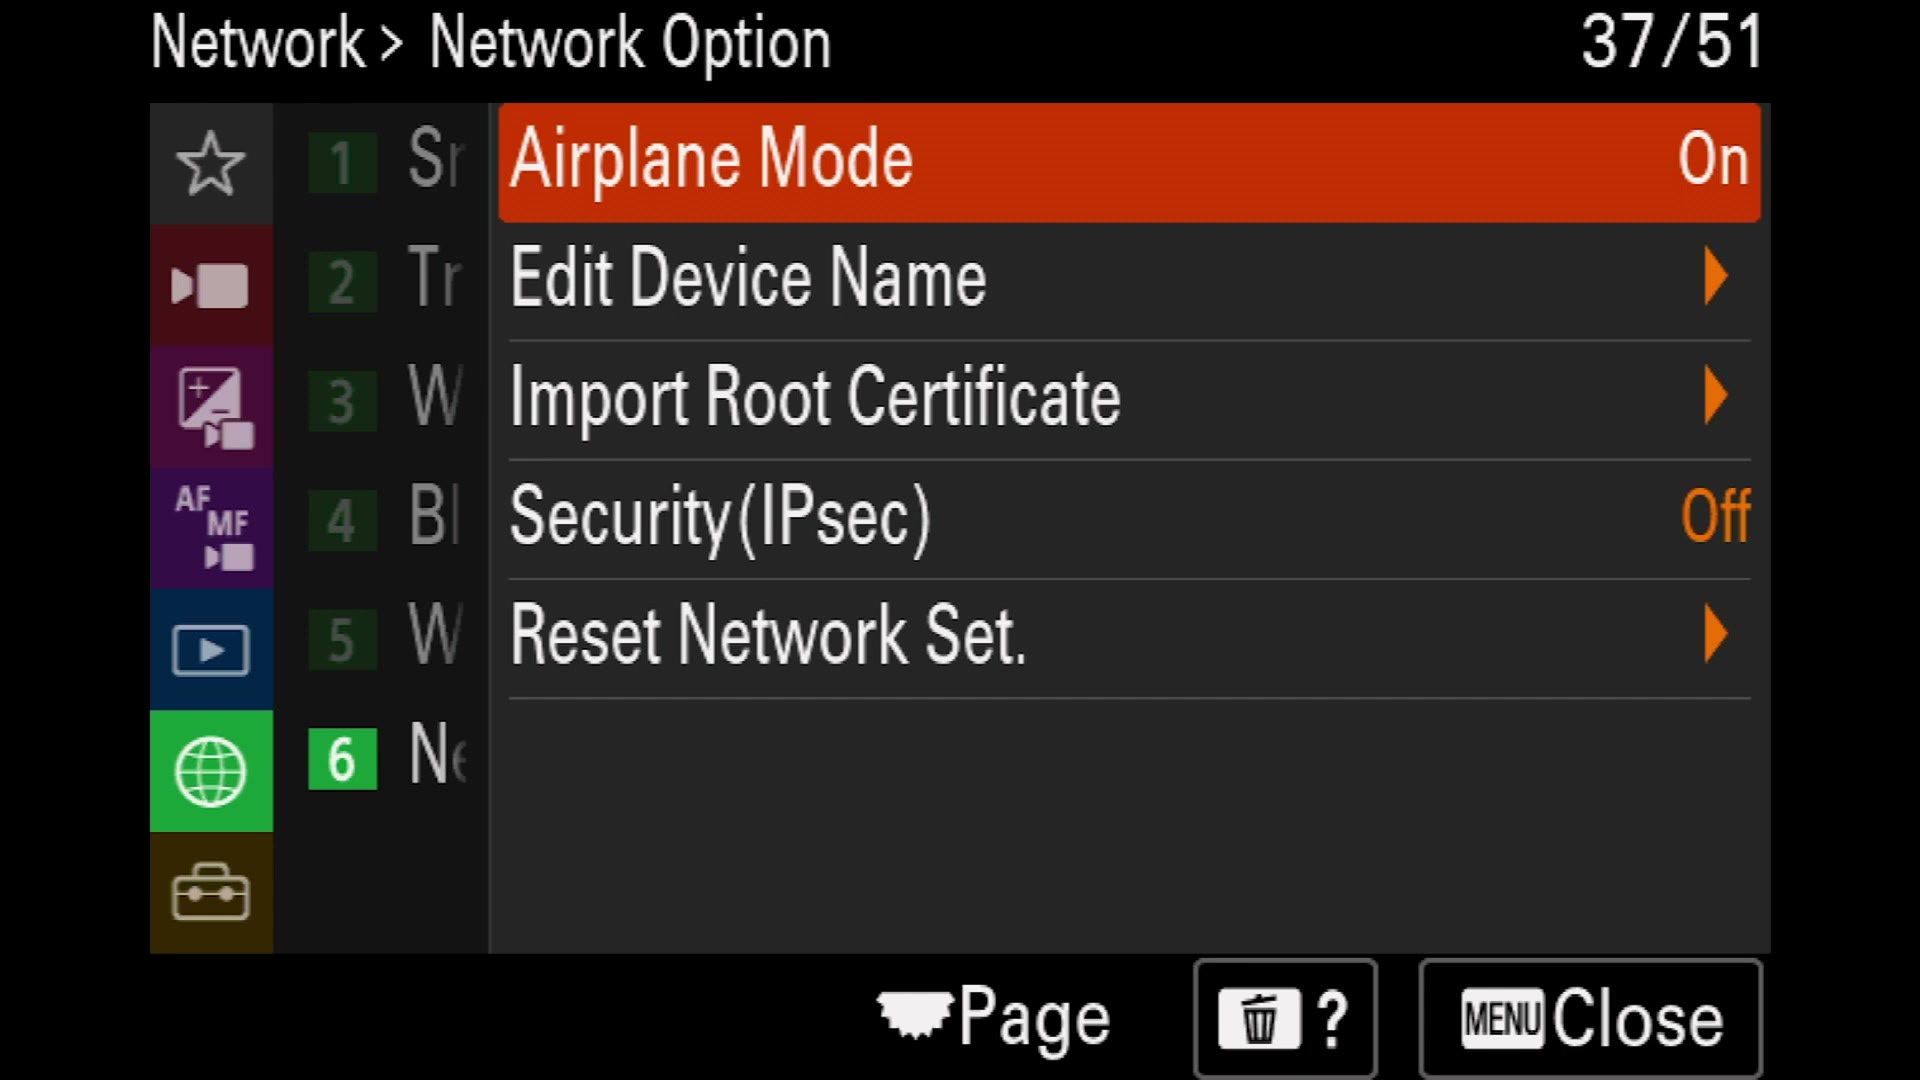
That saves you a bit of battery, because the camera stops constantly reaching out trying to connect to things. Every bit of battery life helps.
Setup Menu
The yellow toolbox, and there are a ton of settings in here, a lot of them genuinely important. So we have to cover them.
Area/Date, and the NTSC vs PAL thing
Language, date and time zone are obvious. NTSC/PAL may not be.
Sony built the a7 IV to work worldwide, and there are two video standards. NTSC is what you use in the United States, PAL is what you use in Europe. Here is what that means for you as a filmmaker: if you ever notice your camera will only record 100 frames per second instead of 120, or it is offering you 50 and 25 instead of 60 and 24, and you are going huh, that is because your camera is set to PAL. Come in here and change it.
Just be aware that if you are in a PAL country and you force NTSC, you may see flickering in your footage. Test it and see what works where you are. In general: US, NTSC. Europe and elsewhere, PAL.
Reset/Save Settings
Setting Reset puts the camera back to factory. If you ever get stuck, or you have changed a pile of things and the camera is behaving strangely and you are upset about it, come in here, reset, and start over. I have done this more times than I would like to admit.
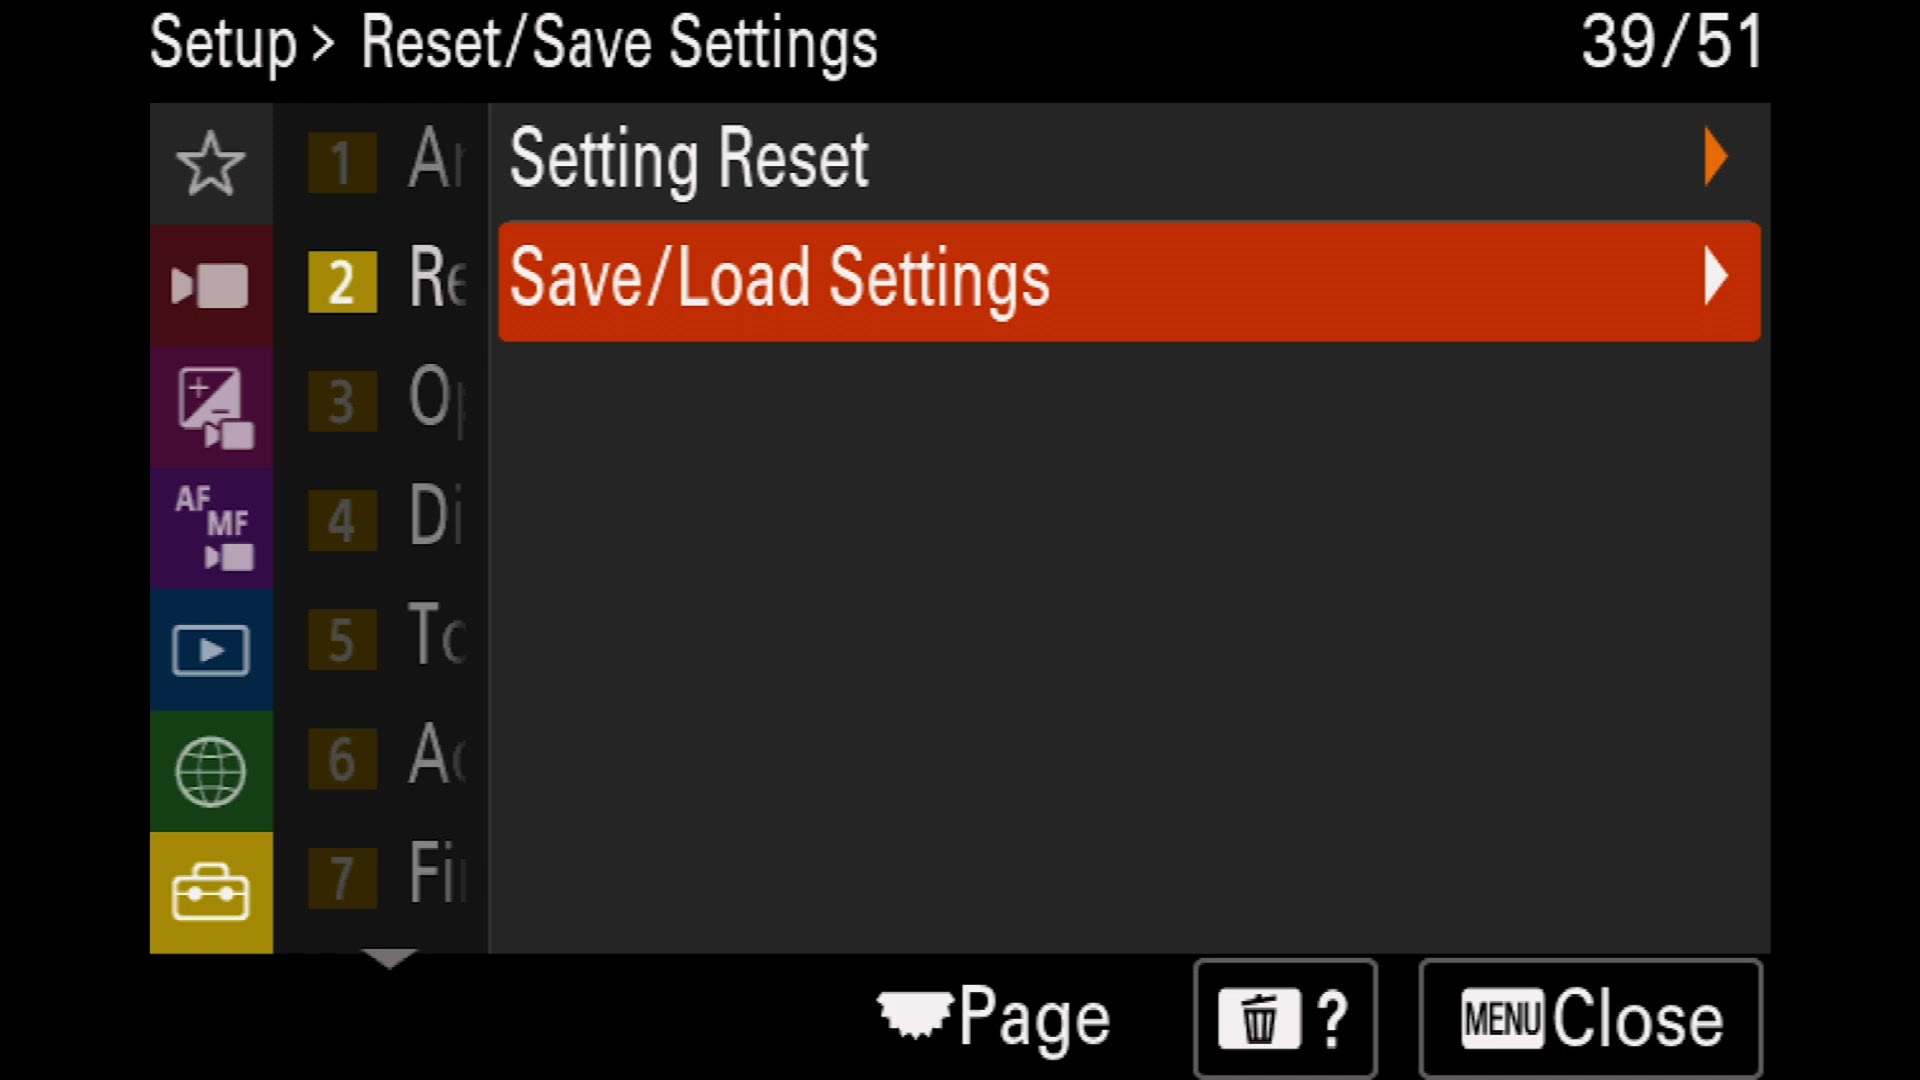
Save/Load Settings is one of my favorite features Sony added to their newer cameras. You can save your settings to a memory card, put that card in another camera, and apply them instantly. This is also exactly how you load my a7 IV settings file onto your camera and have everything in this article done in about thirty seconds.
Operation Customize is where all the button customization lives, and that is the entire subject of part two.
Screen display and REC w/ Shutter
Screen Display Settings controls what information appears around the edges of your screen. I leave all of it enabled, but it is yours to trim.
REC w/ Shutter. Turn this on. What it does is let you press the shutter button to start recording video instead of reaching for the little red record button. It is really useful and I love having it right there under my finger, so I always turn it on.
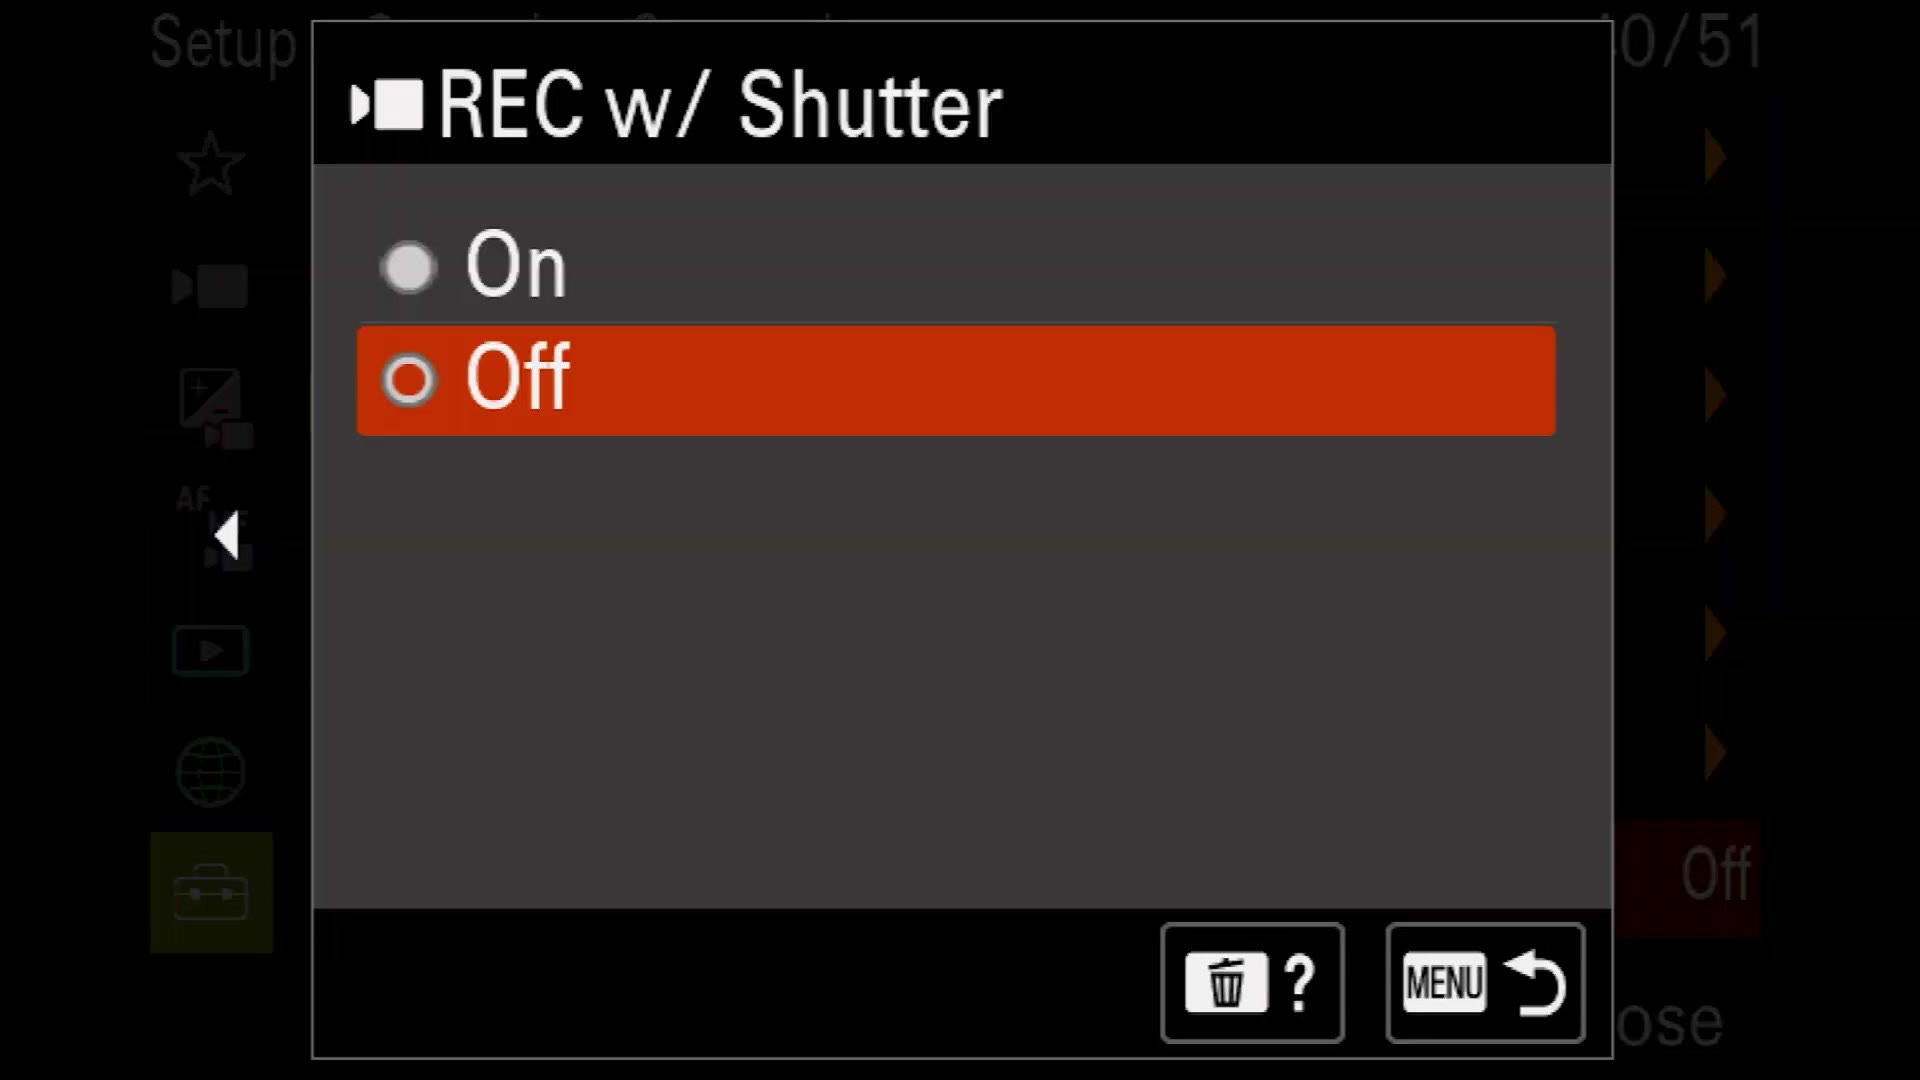
Touch Operation, leave it on, so you can tap the screen to pull focus with native Sony lenses.
Finder/Monitor
This is really, really important.
Select Finder/Monitor is set to Auto by default. There is a tiny infrared sensor next to the viewfinder, so when you bring your face up, the camera switches from the rear screen to the EVF. Sounds great, right?
In practice it is not so great, because every time your hand goes near it, or you reach for a button, the camera goes oh, viewfinder! And you are going no, I am shooting video, I want the monitor on the back.
So set it to Monitor (Manual).
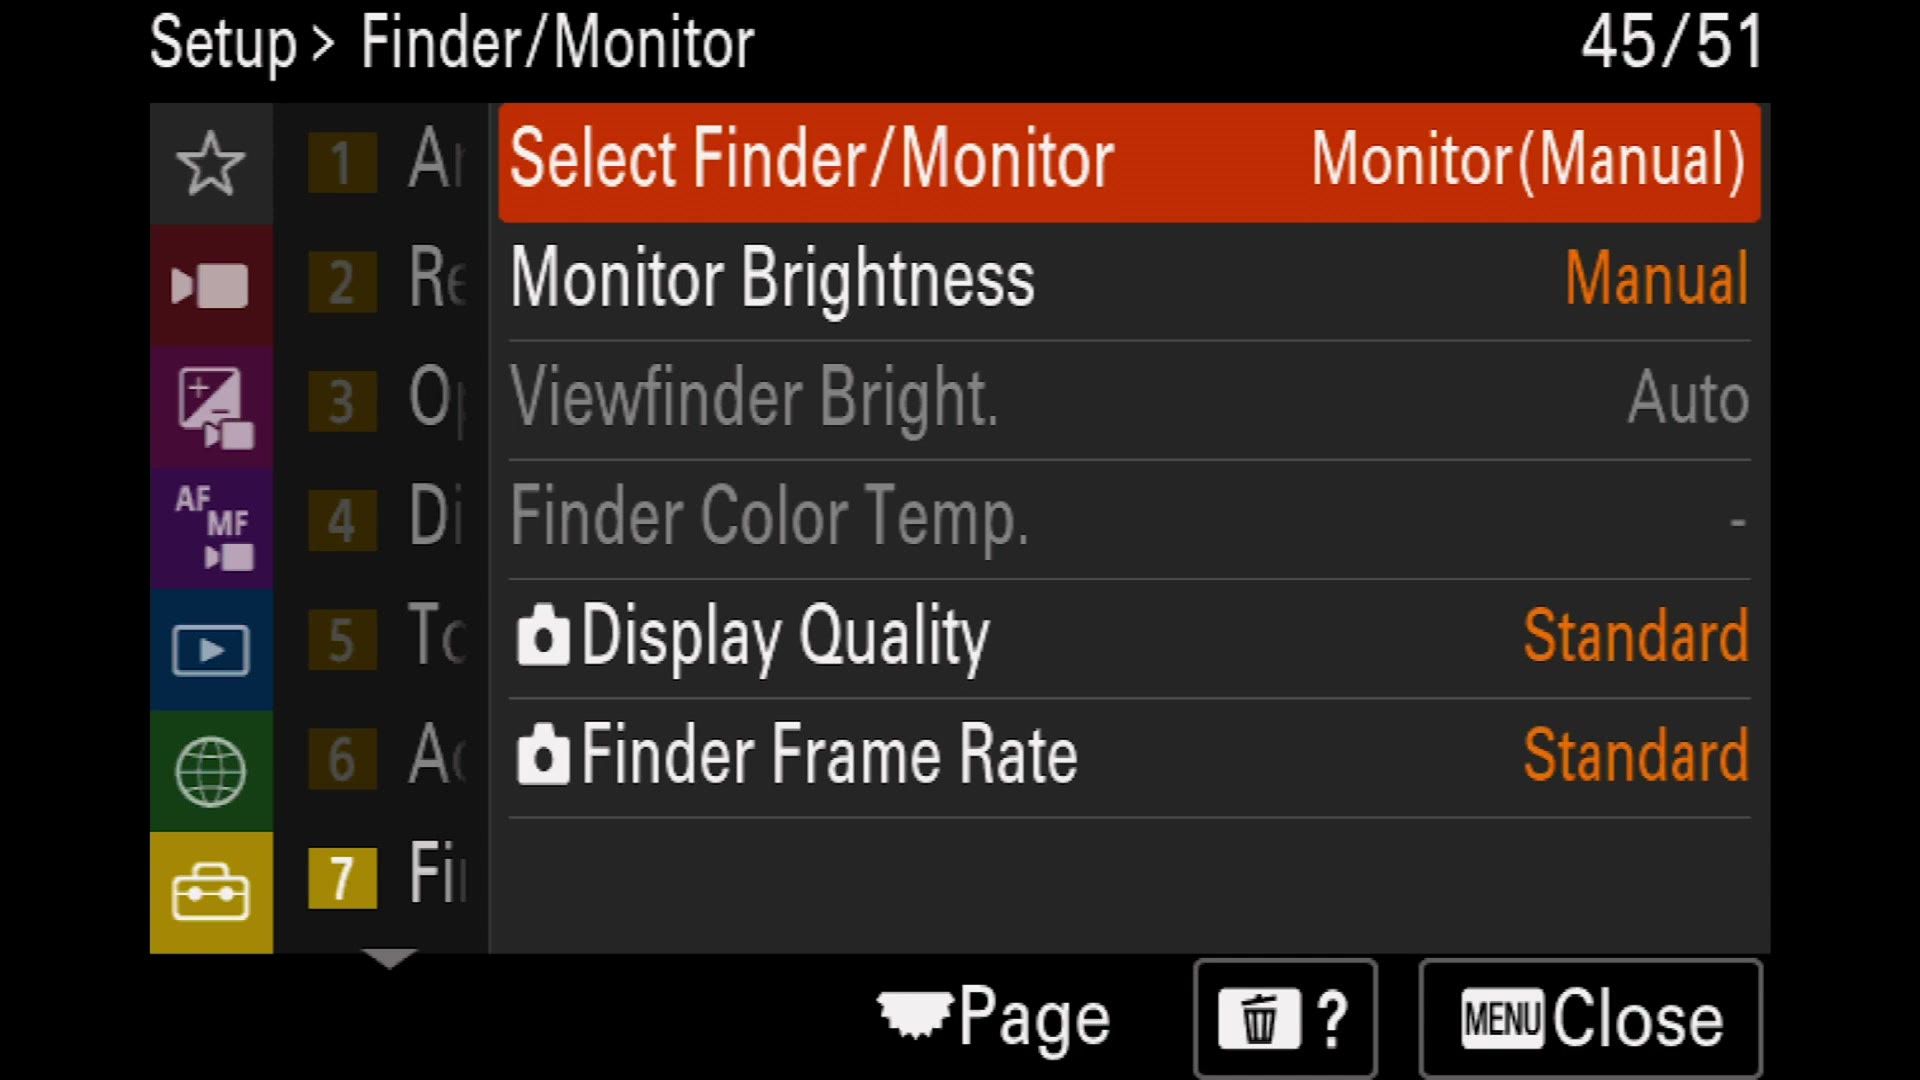
And do not worry, part two sets up a custom button that swaps between the monitor and the viewfinder instantly whenever you actually want the EVF.
Monitor Brightness defaults to Manual. Set it to Sunny Weather, which cranks the screen so you can actually see it outdoors. Very useful feature. I leave viewfinder brightness on auto and finder color temp at zero.
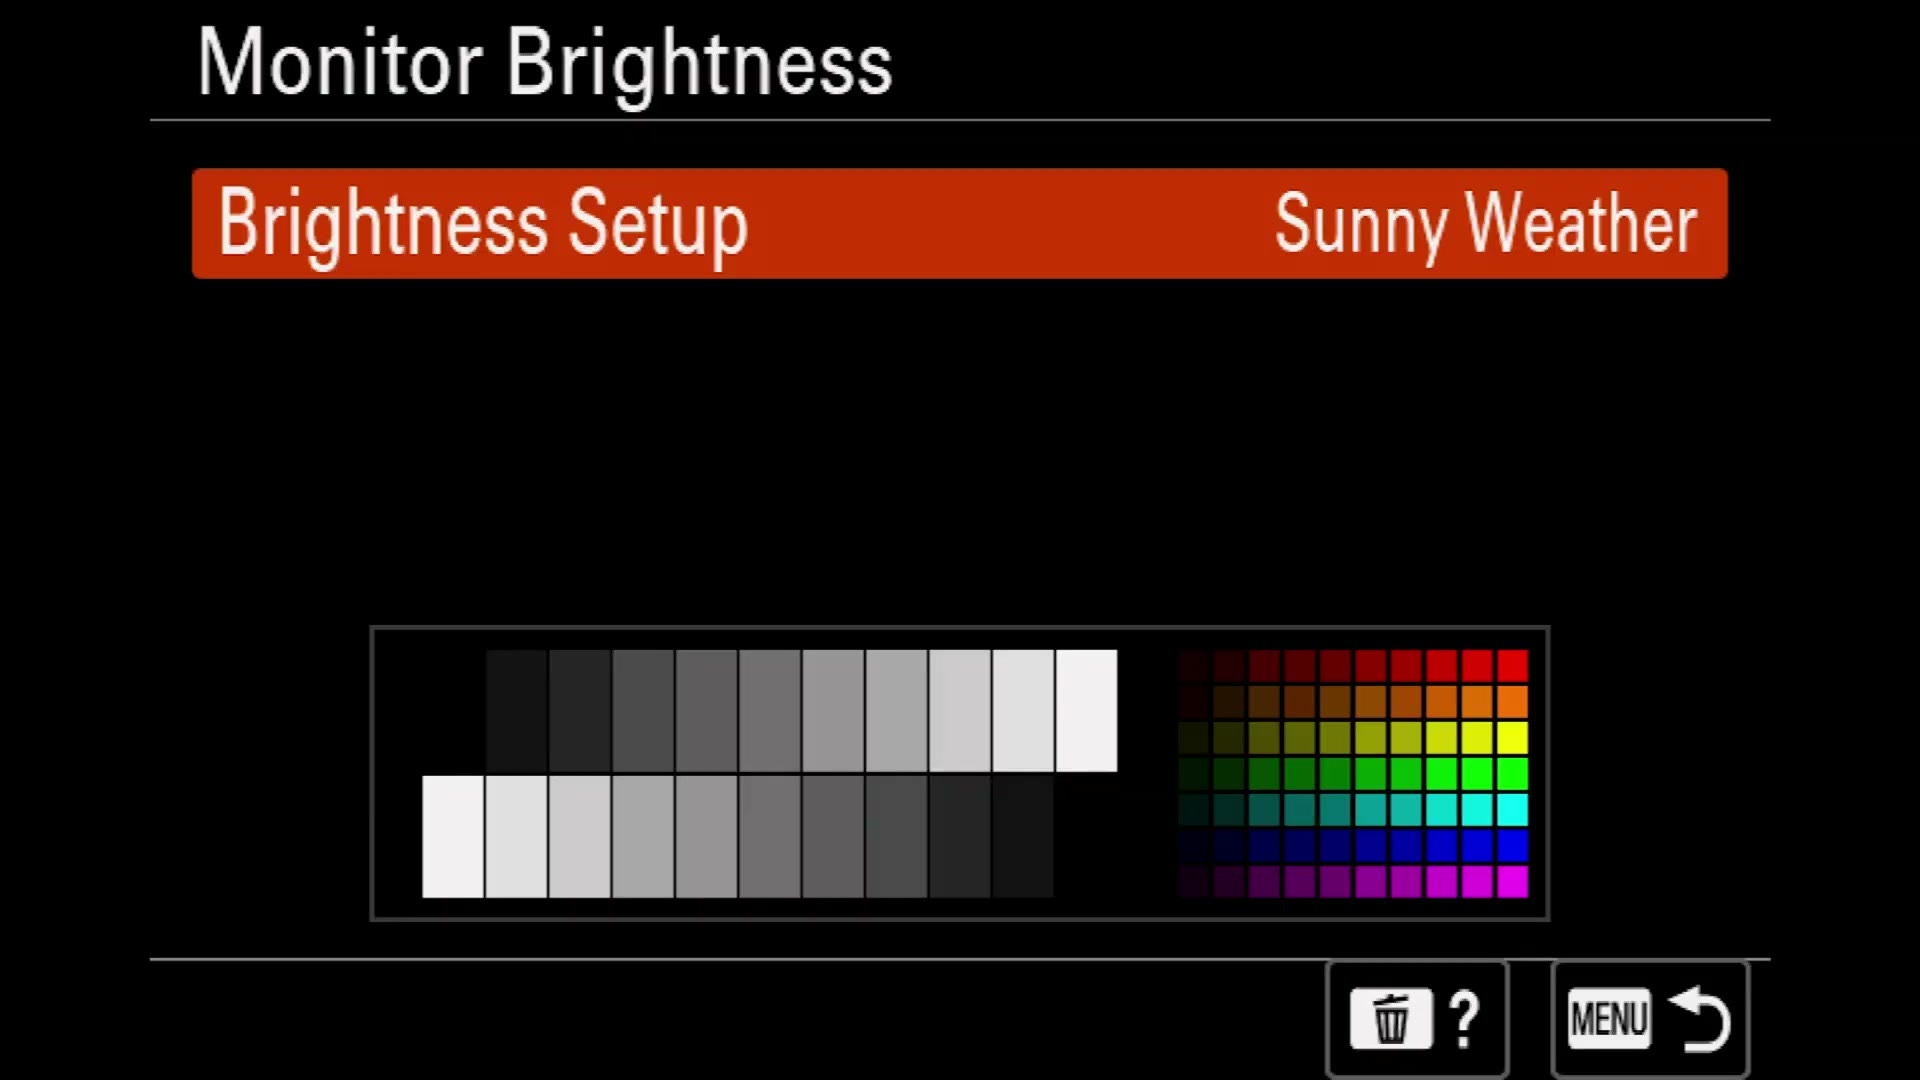
Display Quality: Standard. You may be thinking no, I want high, I want quality. But what this setting actually controls is the refresh rate of the little preview monitor on the back. It has nothing whatsoever to do with the quality of the video you are recording. Leaving it on standard gets you better battery life. Same with Finder Frame Rate.
Display Option and Power Setting
Timecode settings live here, along with Gamma Display Assist, which is very useful when you film in S-Log3. I leave it off by default, because part two puts it on a custom button. Gamma Disp. Assist Typ. can stay on Auto.
Remain Shoot Display and Auto Review are photo settings. Ignore them.
In Power Setting Option, Auto Monitor OFF is also photo, ignore it. But Power Save Start Time matters. I leave it at one minute, so the camera powers down after a minute of not recording and saves you battery. If you need the camera to stay awake, you can set it to off.
Power Save by Monitor defaults to Both Linked. If you are running an external recorder, change this so the camera does not fall asleep on you while you are using the external monitor.
The overheating setting almost everybody gets wrong
This is one of the most important settings in the entire camera, and I see so many people get it wrong.
By default, Auto Power OFF Temp. is set to Standard. You are always, always going to want to change it to High.
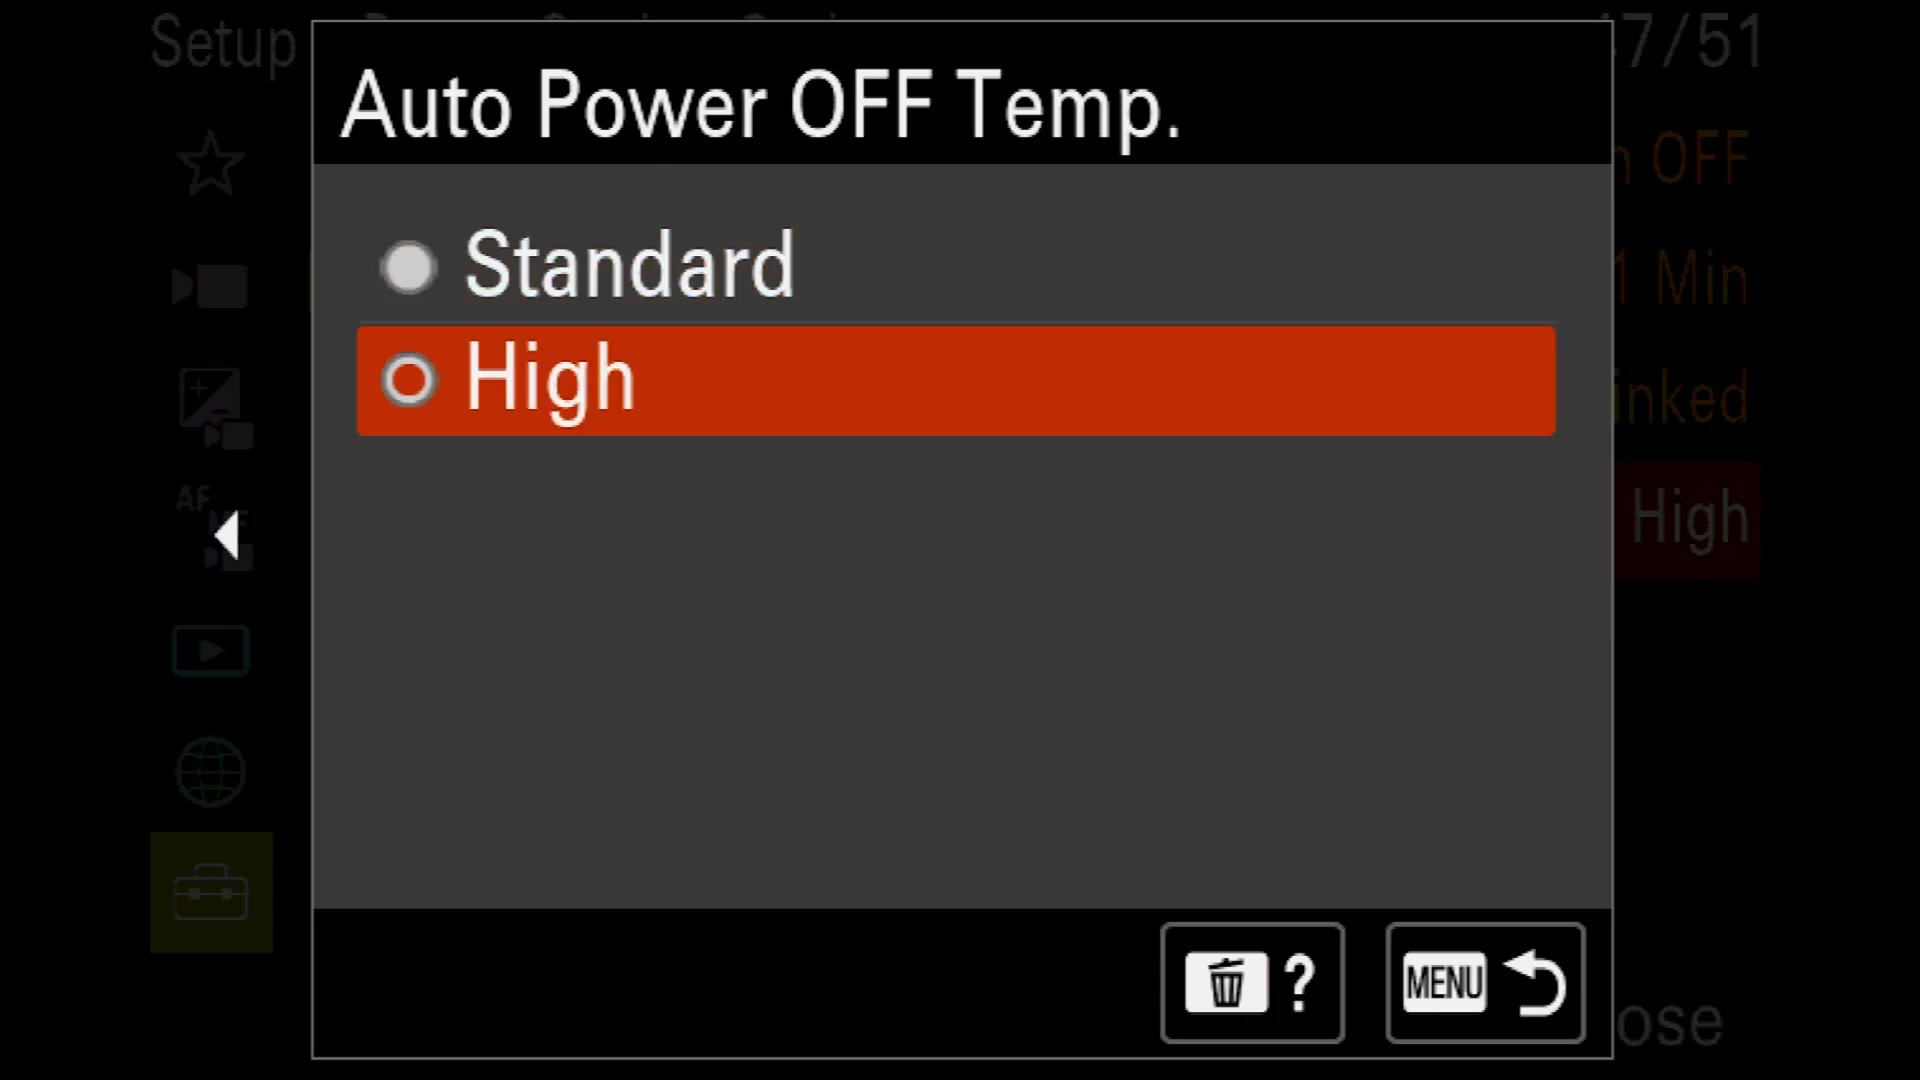
Sony ships it on Standard because they do not want the camera getting too hot to the touch. But hot to the touch is relative, and you are not going to get burned by this thing. My camera is pretty warm right now because it has been on this entire time, and it is fine. Setting it to High lets the camera run considerably hotter before it quits on you, which is exactly what prevents an overheating shutdown in the middle of a ceremony. Always have this enabled.
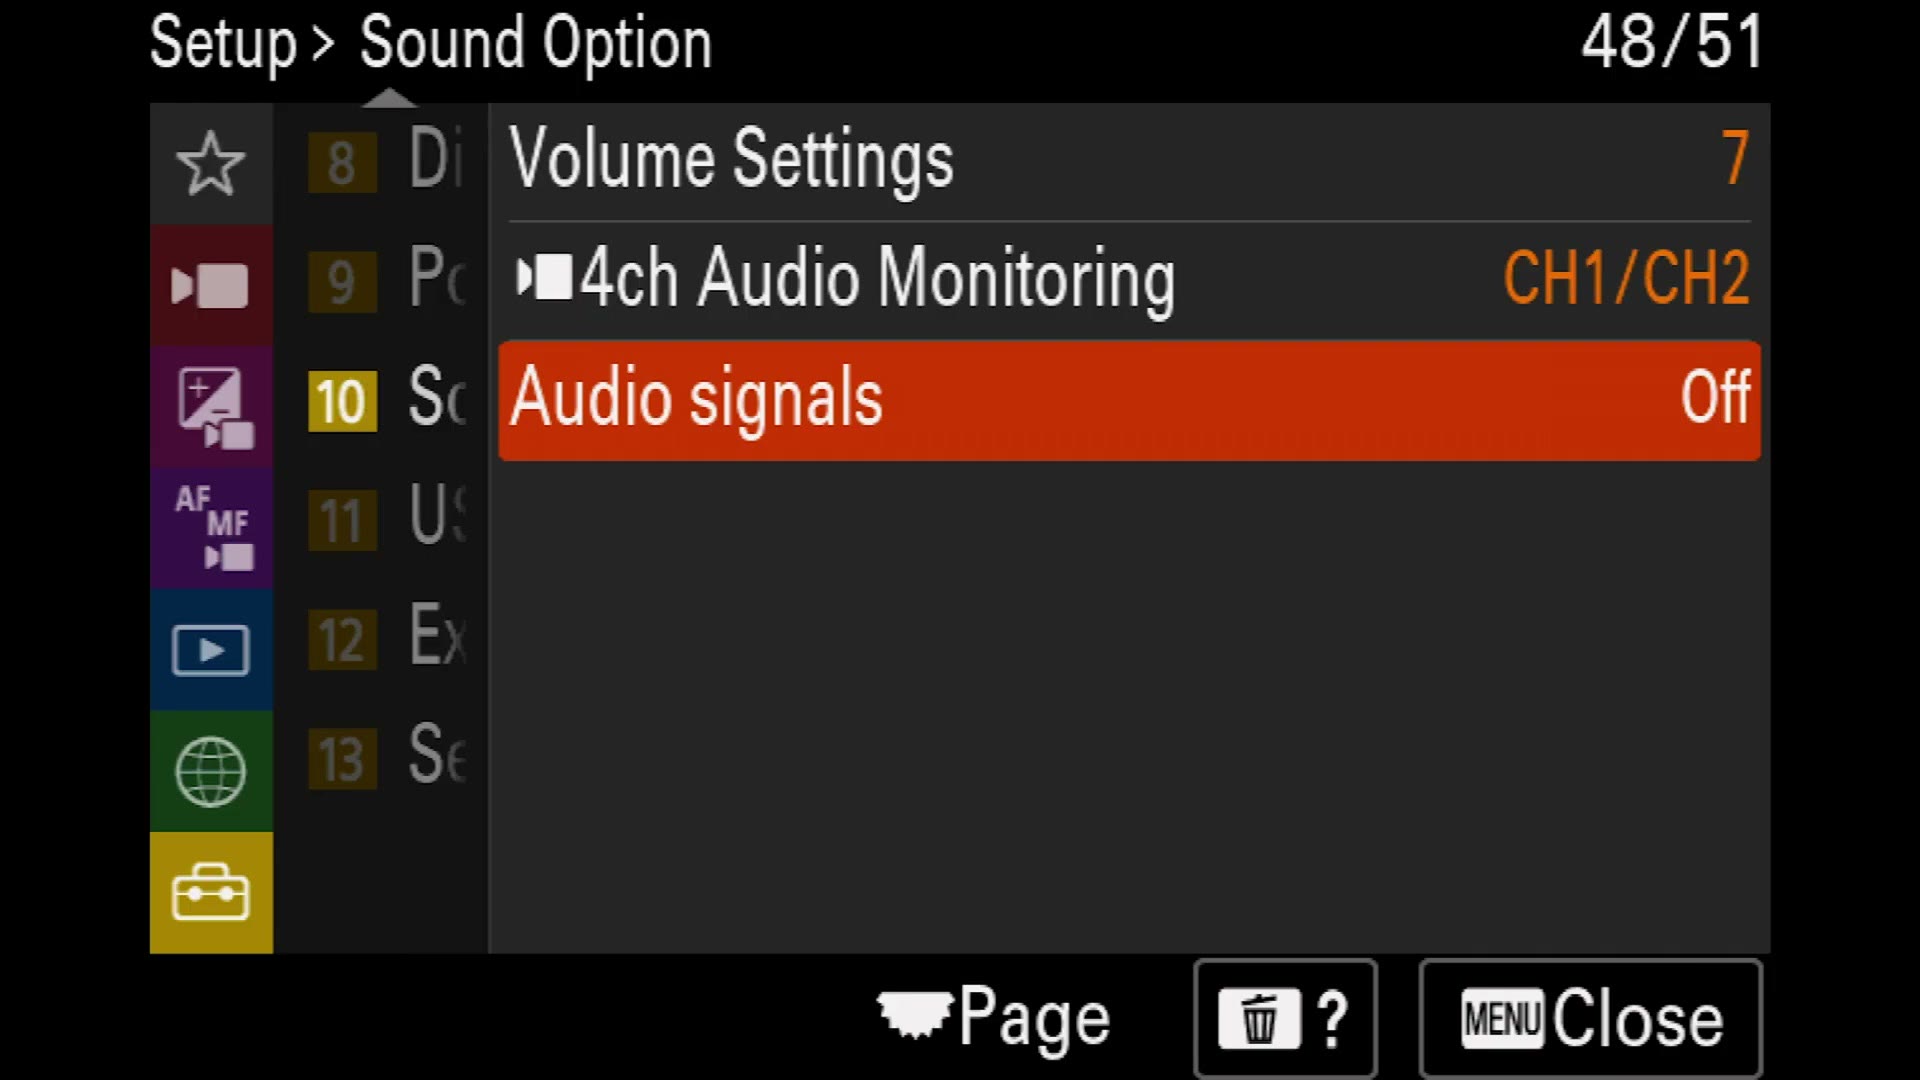
Sound Options
Volume Settings controls playback volume through the speaker or your headphones. I leave it at 7.
The a7 IV also does 4ch audio monitoring if you are running an XLR adapter, which is pretty cool, but by default leave it on CH1/CH2.
And then Audio signals. This one is so important and so annoying. By default the a7 IV makes little chimes every time you press record and every time you stop. Doo doo doo doo. I hate it. It is terrible.
Go into Audio signals, turn that off, never turn it on again.
USB and External Output
Leave USB Connection Mode on “Select When Connect”, USB LUN Setting on Multi, and definitely turn USB Power Supply on. That lets you power the a7 IV over its USB-C port, which means you can run it virtually indefinitely. Pretty awesome.
External Output is where you set up HDMI, whether you are going into a capture card or an external monitor. Auto is fine for most of it.
But there is one important note here. HDMI Info. Display is on by default, which means whatever external monitor you connect will show all of your camera settings overlaid on the image.
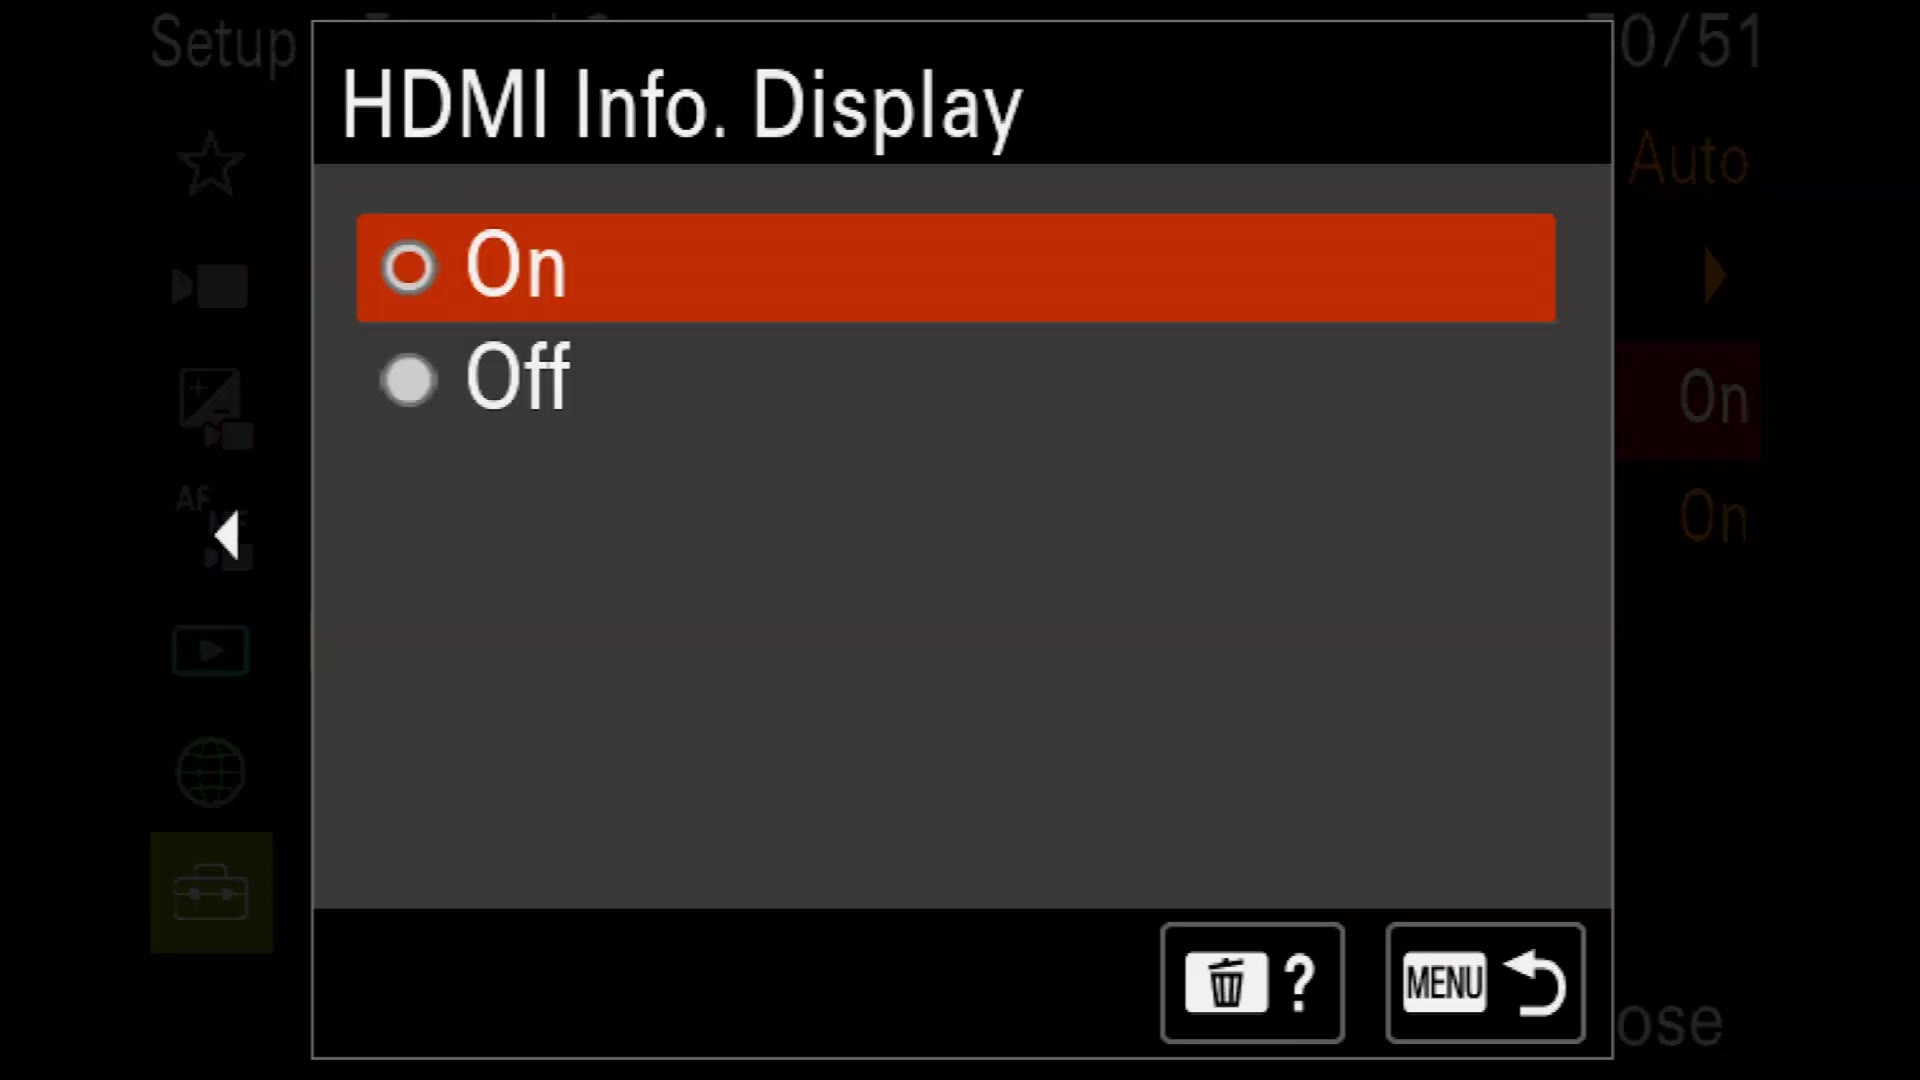
I have literally seen people who did not know that record an entire wedding through an external recorder with all the settings burned into the frame, with nothing recorded in camera as a backup. That was a nightmare. They had to crop in hard to hide the overlays and it was horrible. So if you use an external monitor, come in here and make sure HDMI Info. Display is off.
The last section
Video Light Mode is for lights that connect to the camera’s hot shoe, set to power link or record link or standby. I am not a big fan of on camera lights, so I do not use it, but that is where it is.
Anti-dust Function. Go in here and turn Shutter When Power OFF on. The camera will warn you not to leave it pointed at a strong light source and not to touch the shutter. Yeah, yeah, yeah. Turn it on.
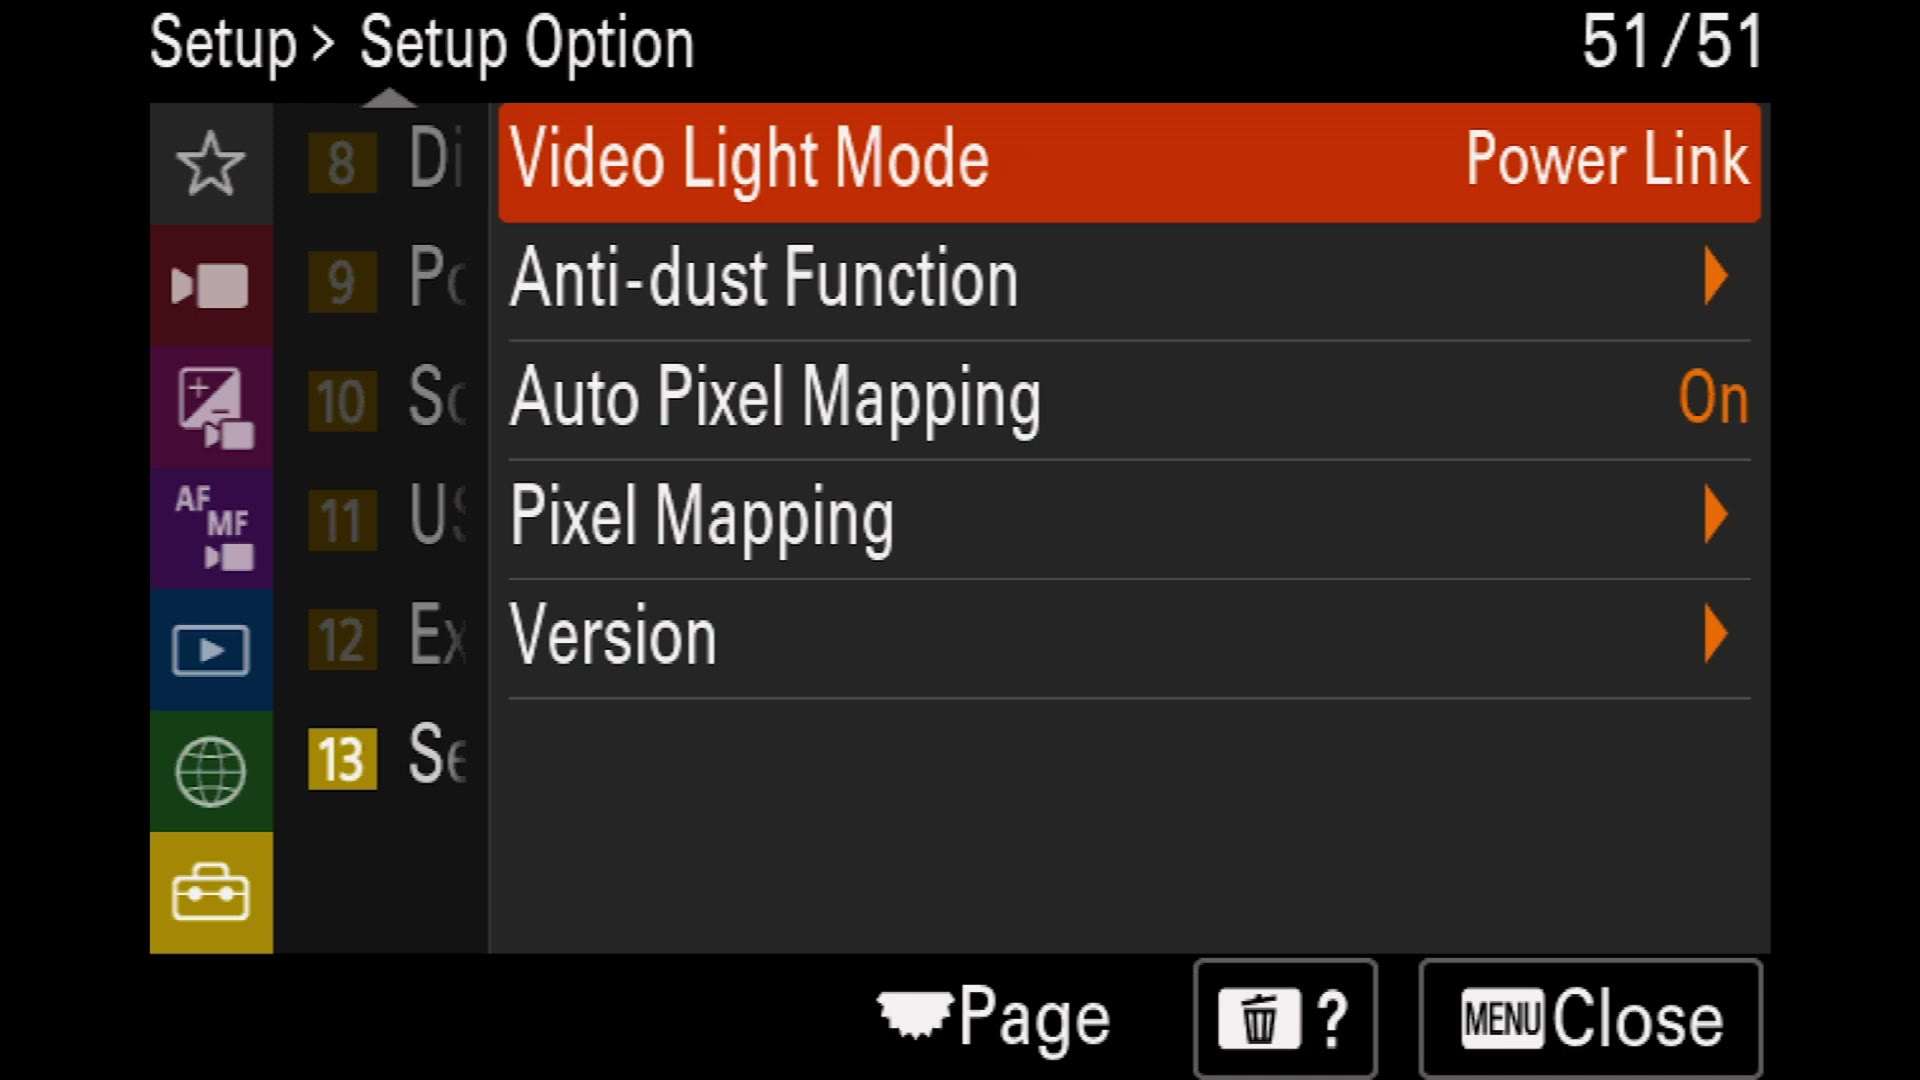
What it does is close the shutter over the sensor whenever you power the camera down, which protects it from picking up dust every time you swap lenses. This is an amazing feature and I wish every camera on the planet had it.
Finally, Version tells you your firmware version, and Software Update is how you install a new one off a memory card.
Download My Free a7 IV Settings Preset File
That is every setting you need to change in the menus to get your a7 IV up and running.
But there is so much more to do. There is the mode dial, the custom menu, the custom buttons, the function menu. Do not worry. Part two covers all of it, and you are going to love it, because once your buttons are customized you will basically never need to walk back into the maze we just went through.
And do not forget, you can skip both articles entirely if you want. Download my a7 IV settings file, load it onto the camera, and you immediately have all of these settings and all of the custom buttons from part two already done. It is completely free and it will save you a ton of time.
A few other things worth having:
- My a7 IV memory card guide, which walks you through exactly which cards to buy, and the a7S III, FX6 and FX3 version.
- How to film in S-Log3 on the a7 IV, which is the natural next step after PP8.
- Sony video formats explained, if XAVC S versus XAVC HS versus XAVC S-I is still a mystery.
- My a7S III overheating test, which is what that Auto Power OFF Temp setting is really about.
- Sony a7 IV vs a7S III for wedding filmmakers, if you are still choosing.
- My color presets, my filmmaking courses, and my full gear list.
Thanks so much for reading, and have a great day!