
This is the second half of my run and gun filmmaking settings for the Sony a7S III and FX3. The first one was a deep dive through every menu on the camera. This one is the payoff, because it covers the mode dial, the custom buttons, the function menu and the custom menu, which is where the settings you actually use stop living in the menu system and start living under your thumb.
If you film weddings or documentaries or anything else where you have to shoot fast, this is how you stop being the person going, hold on, I know that setting was here somewhere. No. It’s going to be right there.
Two things before we start. If you haven’t read part one, the menu setup, start there, because everything here builds on top of it. And more importantly, if you want to save yourself the time, I’ve made settings files you can download for free, load onto the camera, and skip the whole thing: the a7S III settings preset and the FX3 settings preset. Load one of those and you immediately have every setting I’m about to describe.
Custom Buttons Setup
Custom buttons are what most people think of whenever they think of customizing a Sony camera. The body is covered in buttons labeled C1, C2 and so on, where the C stands for custom. What’s cool is that basically every button on the camera is customizable, not just those.
That said, you don’t necessarily want to change a button that’s already labeled something, because if you ever borrow a friend’s camera it can make using it a major pain. So we aren’t going completely crazy here. We’re making some nice tweaks.
First, make sure the mode dial is on the film strip. This is a video about filmmaking settings, so the camera needs to be in video mode. Open the menu, scroll down to the yellow toolbox, go to subheading three, Operation Customize, and at the top you’ll see two things: Custom Key Setting with a picture next to it, and Custom Key Setting with a film strip next to it.
Why two? Because the a7S III is really nice about letting you set different behavior for photo and video. We want the film strip one.
Whenever you open it, everything is going to say Follow Custom with a picture icon, because the camera wants you to set your photo custom keys and then have video inherit them. We’re not doing that. We only want to touch video.
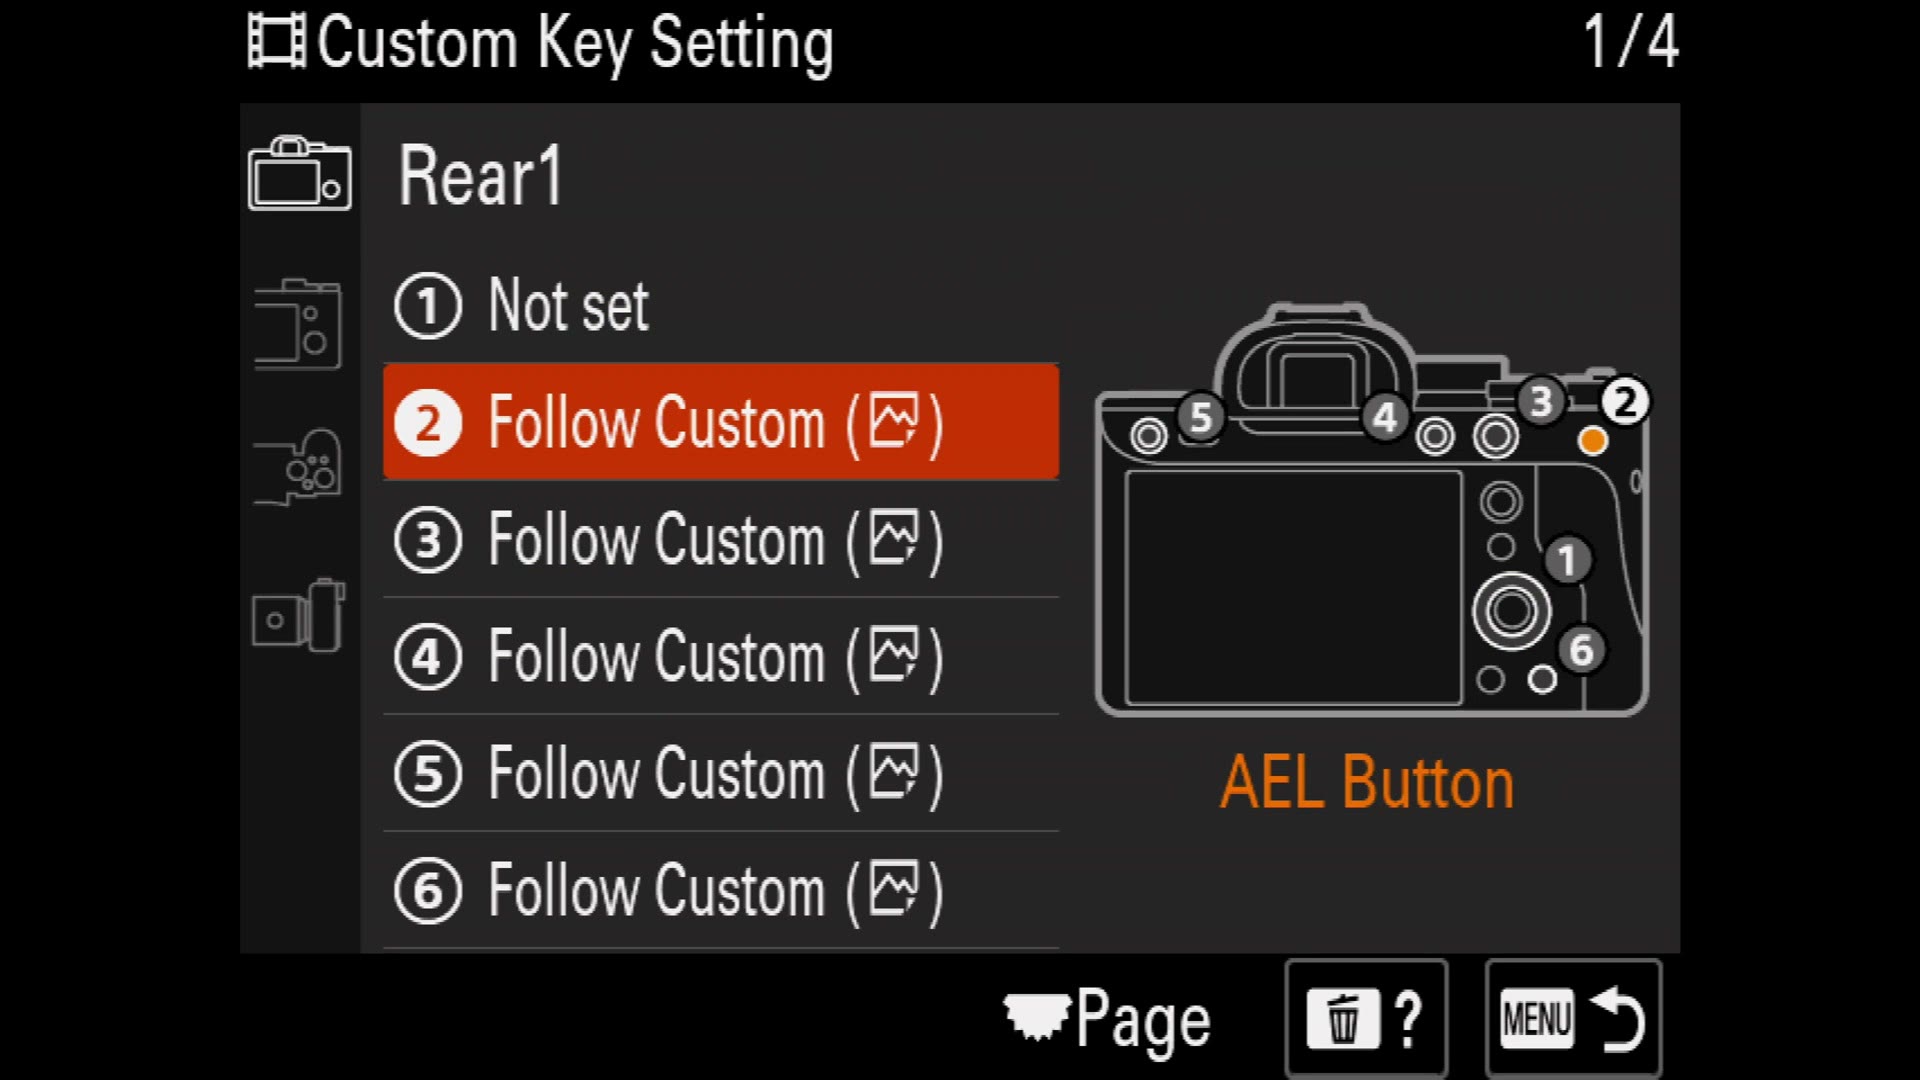
Under Rear1, the first custom button is the scroll wheel on the back. I don’t like having that set to anything at all, because it’s way too easy to bump the wheel and shift a setting without noticing, so I change it to Not Set.
Second is the AEL button. Set that to Zebra Display Select, so you can turn zebras on and off with a single press. Great for checking whether a shot is overexposed.
Third is the AF ON button, and I’m a big fan of keeping buttons close to how they’re labeled, so I set that to AF/MF Selector Toggle. That makes going from autofocus to manual focus one button press, which is awesome whenever you find yourself fighting the autofocus.
Button four is C1, and this one is important. I have mine set to White Balance so I can press it and immediately change the camera’s white balance. But if you’re coming from an a7 III, you’ll remember that this button is the record button on that body, so if you shoot both, set C1 to Movie Record instead and keep the two cameras consistent. It’s genuinely disorienting otherwise.
Option five is C3, and I have that on SteadyShot so I can toggle between standard and active stabilization. On a gimbal, standard is plenty. Handheld and still getting shake, active makes a real difference.
Option six is C4, not an explosive, this won’t blow up your camera, just another custom button. Mine is set to Zoom, so pressing C4 lets me use Sony’s Clear Image Zoom to punch in and recompose in camera.
Onto Rear2. The first custom button in this section is the multi selector, the little joystick. You use it with your thumb to move around the menu, but you can also press in on it, and that press is a custom button. Mine is set to Metering Mode, which lets me flick between multi and spot metering to double check the exposure.
The center button, the middle of the control wheel, is a good one. I have it set to Focal Length, which lives under Image Stabilization. If you’re someone like me who uses a lot of adapted lenses, making sure the in-body stabilization knows the focal length of your lens matters a lot, and this way I can tell the camera in about a second.
The left button on the control wheel I set to Gamma Display Assist Select. If you often shoot in a flatter picture profile, that lets you toggle the camera’s built-in gamma display assist on and off so you can preview roughly how the image is going to look after it’s graded.
The right button is already labeled ISO, so we leave it on ISO.
Then the down button, which is one of my favorite tweaks on this whole camera. Change it to Finder/Monitor Select. If you remember from part one, one of the things I really hate about this camera is that it automatically switches from the monitor to the viewfinder whenever something gets near the eyepiece. Setting the down button to switch manually means the camera only switches when you say so. Filming outdoors, bright sun, can’t see the monitor? Bring it to your eye, press down, you’re shooting through the EVF.
On the Top page, the first custom button is the dedicated record button, which should already say Movie Shooting. Leave it. The only reason to change it is if you set C1 to be your record button earlier, in which case you now need somewhere to put white balance, and this is the button for it.
Last one is C2, and I love having mine set to Focus Magnifier. Whenever you need to punch in and check focus, especially on a manual lens, it’s one press away.
There’s also one more custom button available on the lens itself, though only on certain Sony lenses. By default it’s Focus Hold, which is nice, because it’s right there under your fingers and it stops your focus drifting. If your lens doesn’t have one, don’t worry about it.
Mode Dial Setup
Look at the top of the camera and you’ll see 1, 2 and 3 on the mode dial. These are presets you can customize, and they let you change things like resolution and frame rate virtually instantly. Easily one of my most used features on this camera.
Same as before, put the mode dial on the film strip while we set them up. For the actual video settings I’m using the frame rates and bit rates from my video formats guide, so tweak these if you want something different.
For preset one: menu, red camera icon, Image Quality, File Format, and select XAVC S 4K. Then under Movie Settings set Record Frame Rate to 24p and Record Setting to 100M 4:2:2 10-bit.
This preset matters most for any clip where I need the audio, so a ceremony, toasts, a letter reading. I want people’s lips to match the words they’re saying, which won’t happen if you record at a higher frame rate and slow it down later. Everybody talks slow and we don’t want that.
Back out of the menu. Shutter speed to 1/50, which is double the frame rate. Aperture to f/4 or f/2.8, because I wouldn’t leave it wide open, a little stop down is good. White balance to 5500 Kelvin, which looks great for outdoor daylight, though obviously tweak it indoors. And ISO 640, which is the base ISO for S-Log3, though yours may differ depending on your picture profile and your light.
Now save it. Menu, Shooting Mode, Camera Set. Memory. You’ll see 1, 2, 3 and then M1 through M4 across the top. The 1, 2 and 3 are the ones on the mode dial. Press the center button on slot one and the camera says Registered.
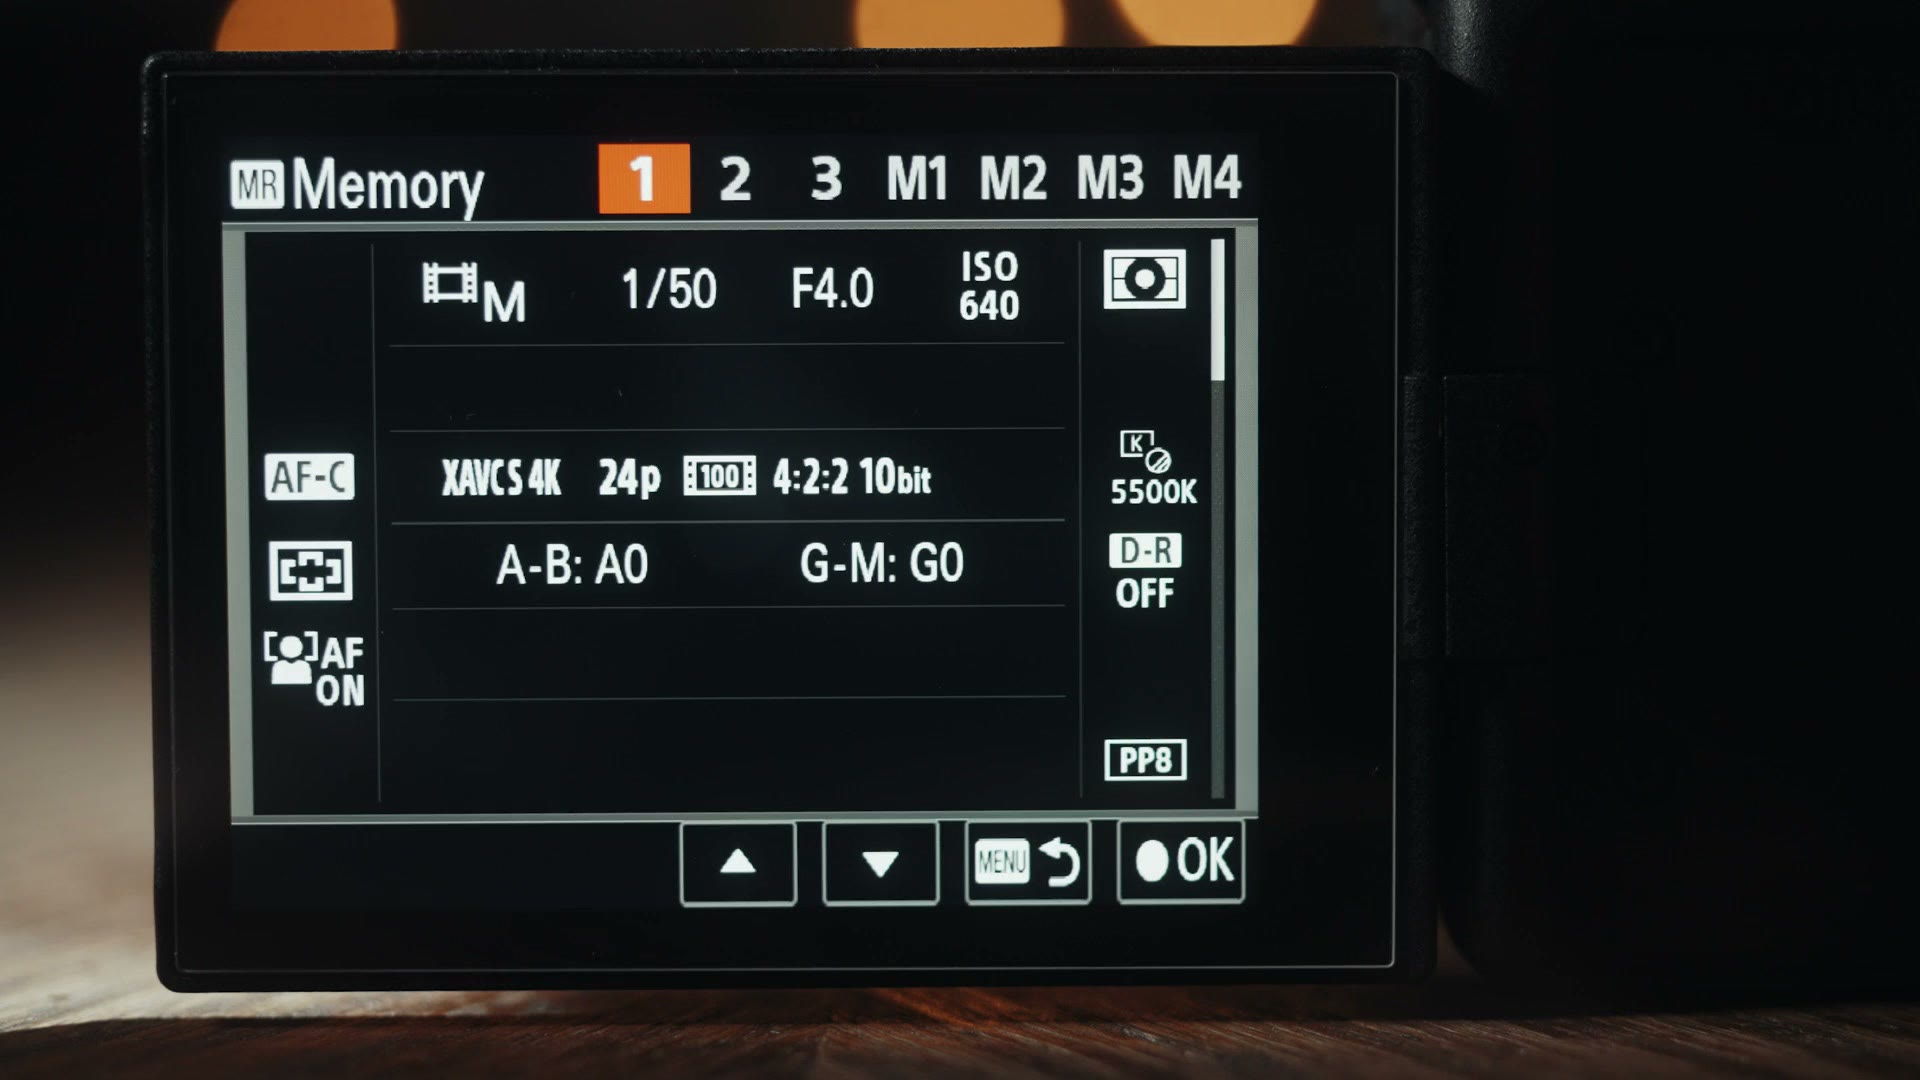
Here’s where it gets really cool. Turn the mode dial from the film strip to 1, a menu pops up showing exactly what you saved, press in, and tadah. 4K, 24 frames, 4:2:2 10-bit, shutter, aperture, everything, ready to shoot. Can you see why I love this?
Let’s make it better. Back to the film strip, back into Image Quality, change Record Frame Rate from 24p to 60p and make sure Record Setting says 200M 4:2:2 10-bit. Back out, and the only other thing to change is shutter speed, because you always want it at roughly double your frame rate. 1/50 ain’t gonna cut it here. Go to 1/125. Then Camera Set. Memory again, slot two, registered.
And preset three: this camera does 4K at 120 frames per second, so we should definitely do that. Film strip, Image Quality, Movie Settings, 120p, and make sure Record Setting says 280M 4:2:2 10-bit. Shutter up to 1/250. Save to slot three.
Now check it. Preset one, 4K 24. Preset two, 4K 60. Preset three, 4K 120. All saved, all ready, so you only need minor tweaks as you shoot through the day. It is awesome.
One side note. You noticed those M1 through M4 slots. I would not bother with those, because they’re saved to your memory card rather than to the camera, which means formatting the card deletes them and you get to build them all over again. Stick to 1, 2 and 3, which live in the camera’s own memory.
Function Menu Setup
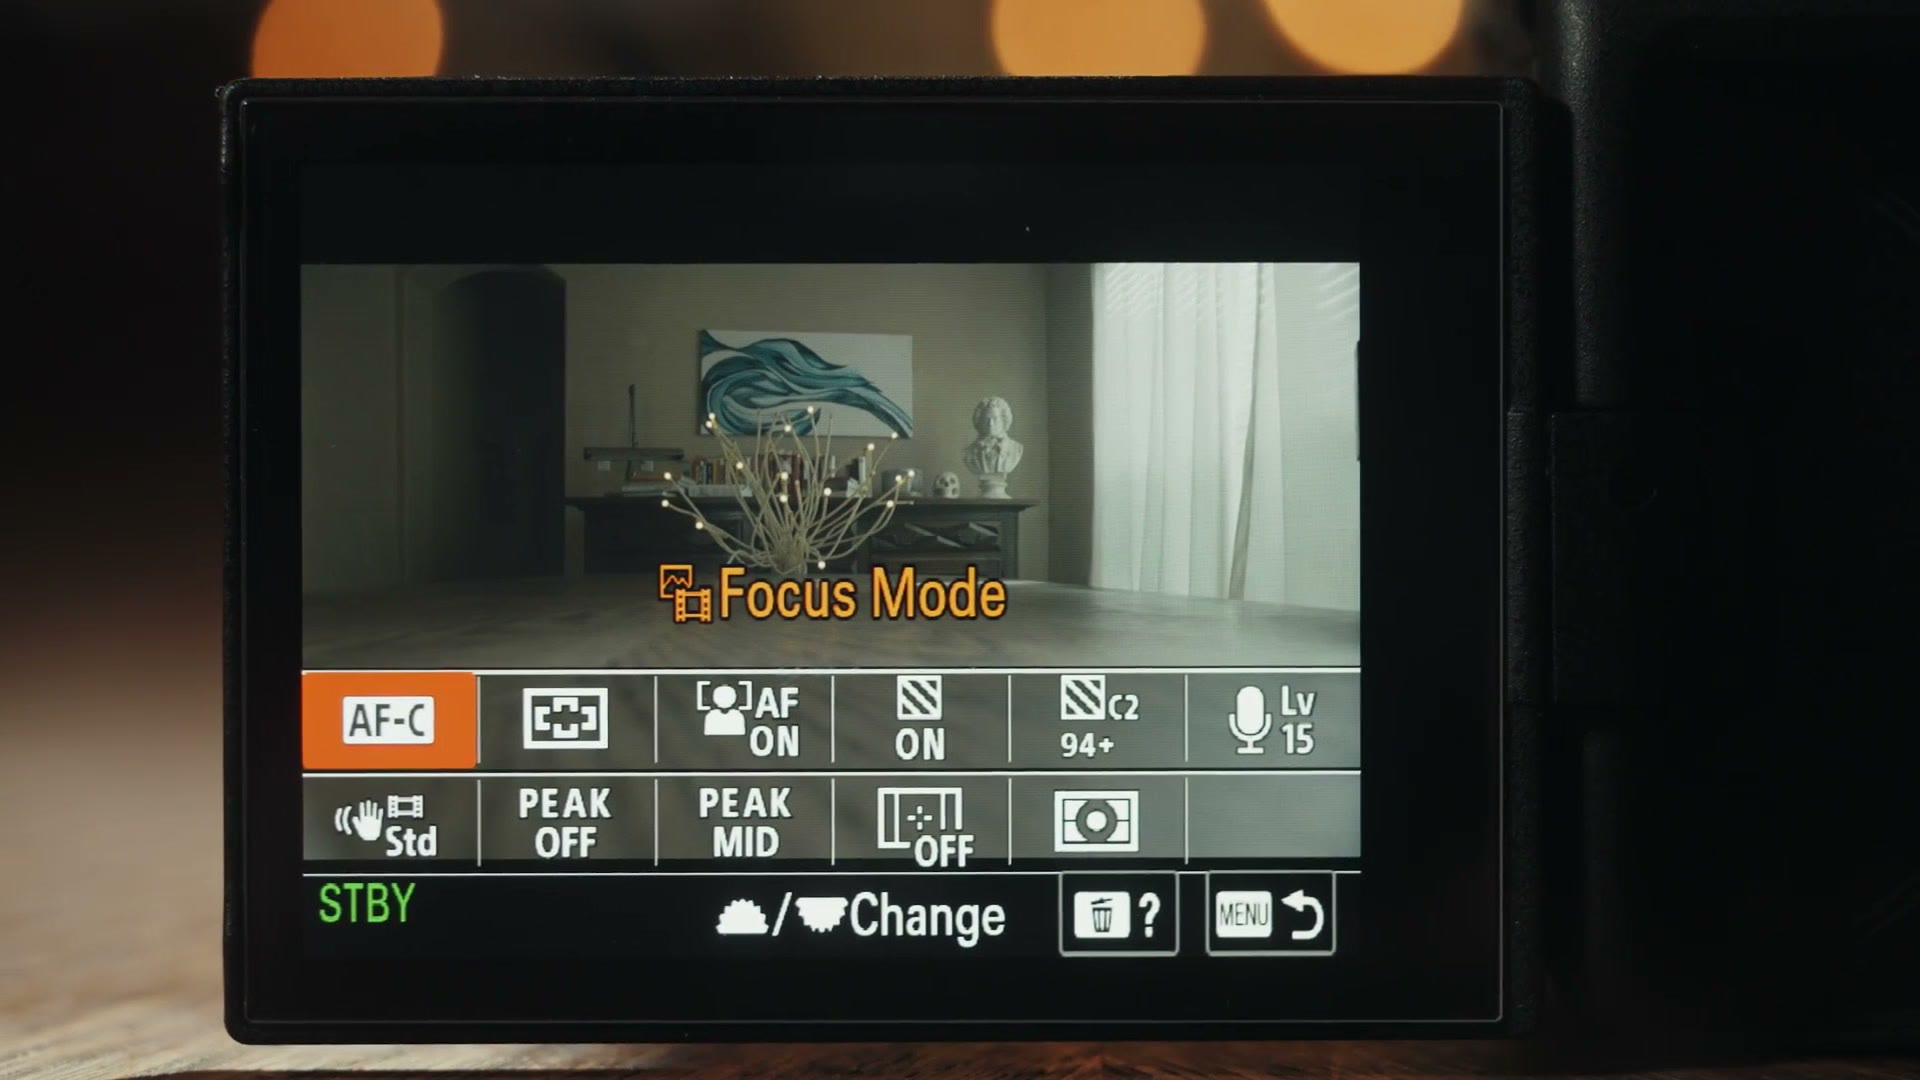
Press the Fn button on the back and up comes the function menu. It’s a really good visual menu, quick to get to, and especially helpful if you’re someone who forgets what your custom buttons do. You can build in some redundancy here, plus reach settings that don’t have a spare button.
To customize it: menu, toolbox, Operation Customize, Fn Menu Settings. Same as the custom keys, the camera gives you separate photo and video versions, so pick the one with the film strip, and again make sure the camera itself is set to the film strip too. That part matters.
Whenever you get one set up, I put together Sony a7 IV Custom Buttons Setup Guide | Fast Filmmaking Settings For The Sony a7 IV Part 2 and Sony FX30 Custom Buttons Setup Guide | Fast Filmmaking Settings For The Sony FX30 Part 2 so you can get dialed in fast.
Top row, left to right. Slot one, Focus Mode, so you can toggle autofocus and manual focus. It’s the same job as one of the custom buttons, but I find it genuinely nice to have as something you can see rather than just remember. Slot two, Focus Area, so you can pick wide or zone or whatever you need. Slot three, Face/Eye AF, then Face/Eye Priority in AF. That one is great whenever the camera keeps grabbing somebody’s face and you want it to focus on the tree behind them instead, which does happen.
Slot four, Zebra Display, so you can toggle zebras quickly. I prefer to leave mine on, but sometimes I really want to see the image without them. Slot five, Zebra Level, right underneath it in the menu. I don’t change my zebra level often, but occasionally I want to know at what level part of an image starts to blow out, and this gets me there fast.
Slot six, and this is very important, Audio Rec Level, from the audio recording section. You need to be able to change your levels as you go without stopping to dig.
Bottom row. Slot one, SteadyShot, under Image Stabilization, so you can turn stabilization on and off and get at active mode, which crops in slightly on the sensor but can give you noticeably steadier footage. Slot two, Peaking Display, from the focus section, so you can toggle the peaking lines while checking focus. Slot three, Peaking Level, in case you need to change the intensity.
Slot four, Marker Display, from the red camera menu, so if you’re using 2.35:1 borders for that cinematic aspect ratio you can flick them on and off. Slot five, Metering Mode. Yes, it’s already on a custom button, but I like being able to look at it. And slot six is a bonus, so put whatever you want there. Honestly I think the other eleven cover nearly everything, so if nothing comes to mind, set it to Not Set and it just won’t appear.
My Menu Setup
Even with the mode dial, the custom buttons and the function menu all set up, you’ll still need to get into the menus occasionally. Thankfully Sony gives you My Menu, a custom menu that contains only what you put in it. I’ve been through every menu on this camera and narrowed it down to the very few settings you actually need.
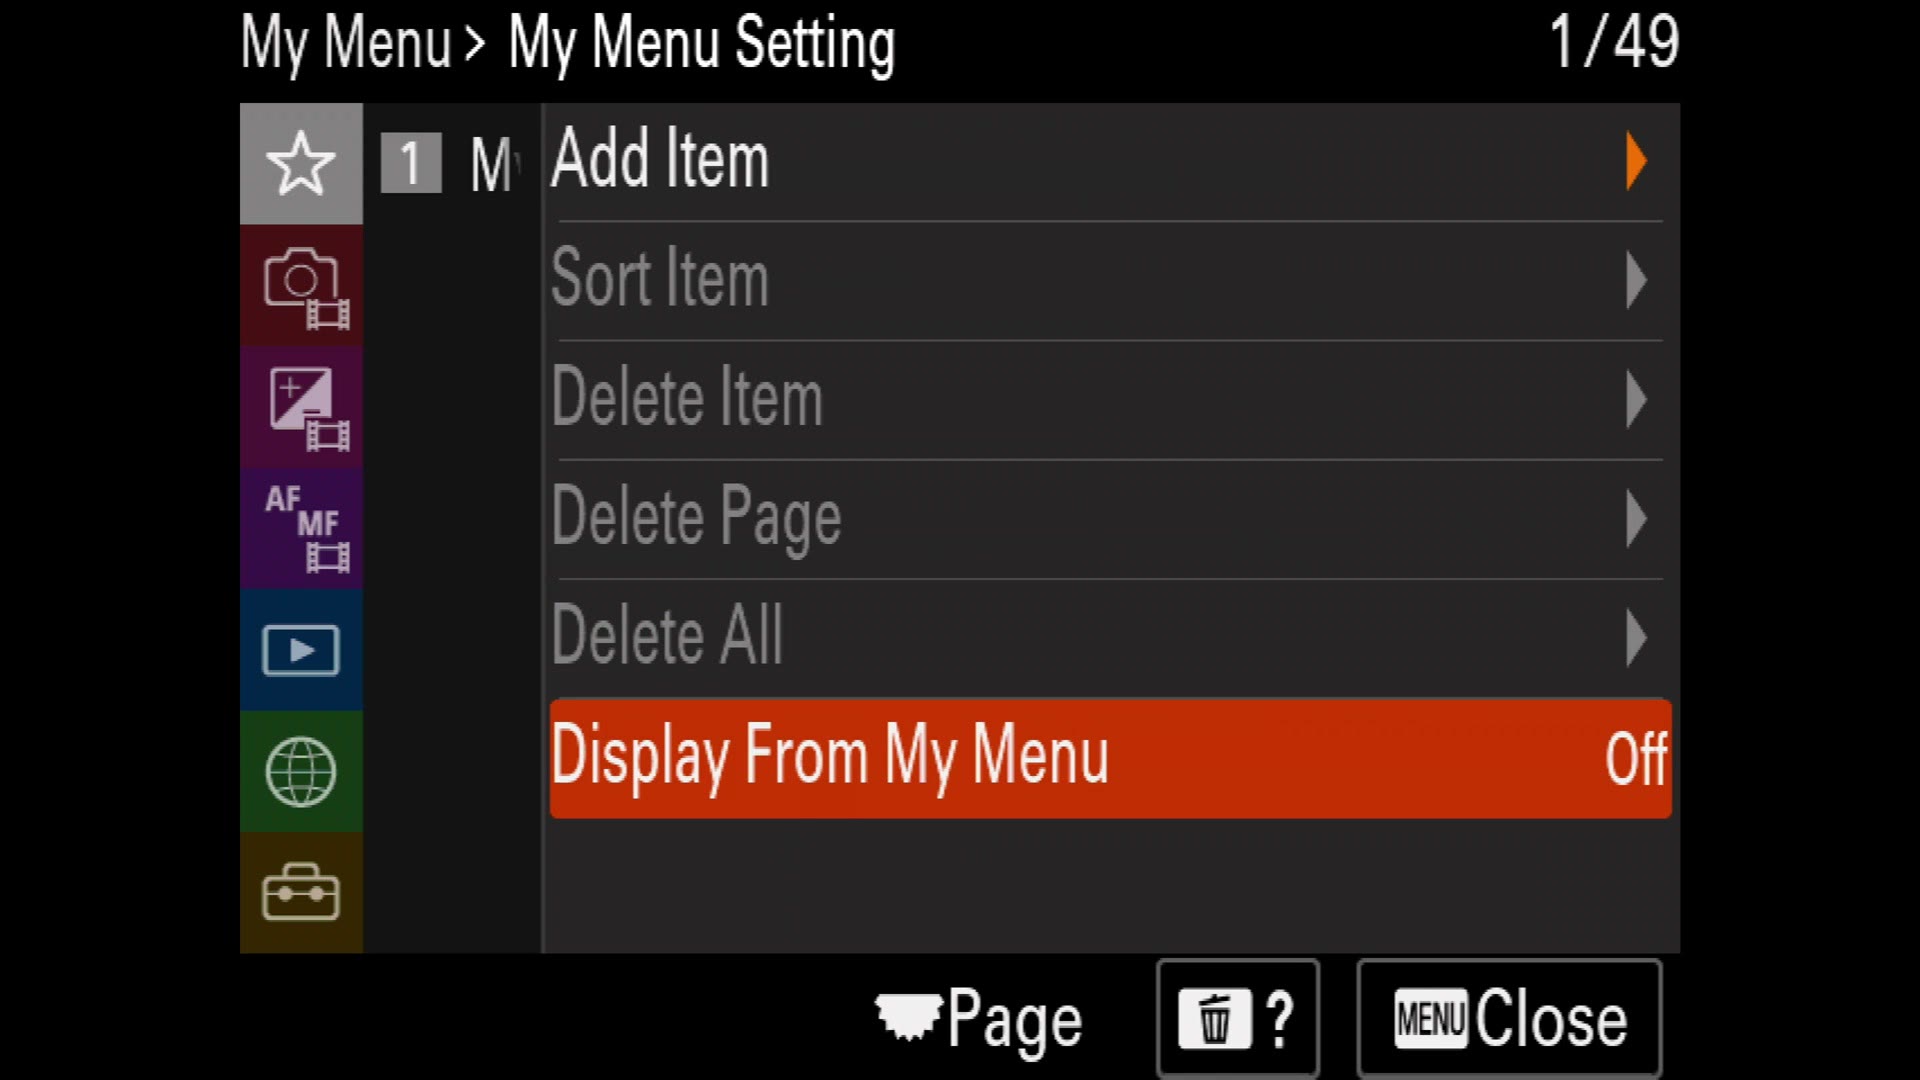
Press menu and go to the gray star, My Menu Setting. That’s where you add items. Notice there’s also an option down there called Display From My Menu, which makes the menu button always open straight to My Menu. Turn that on once you’re finished customizing. I think it’s great.
I split mine into three pages. Page one is the settings I access fairly often. Page two is the ones I need sometimes. Page three is for the genuinely dangerous stuff, which I want to be able to reach but never want to press by accident.
Page one gets three things. Add Item, then File Format, and be careful to pick the one with the film strip rather than the picture, or you’ll be looking at photo settings. Then Movie Settings, for frame rates. Then Interval Shoot Func., which is technically a photo setting but is how you shoot time lapses on this camera. I shoot a lot of them, so I like it handy. If you don’t, skip it.
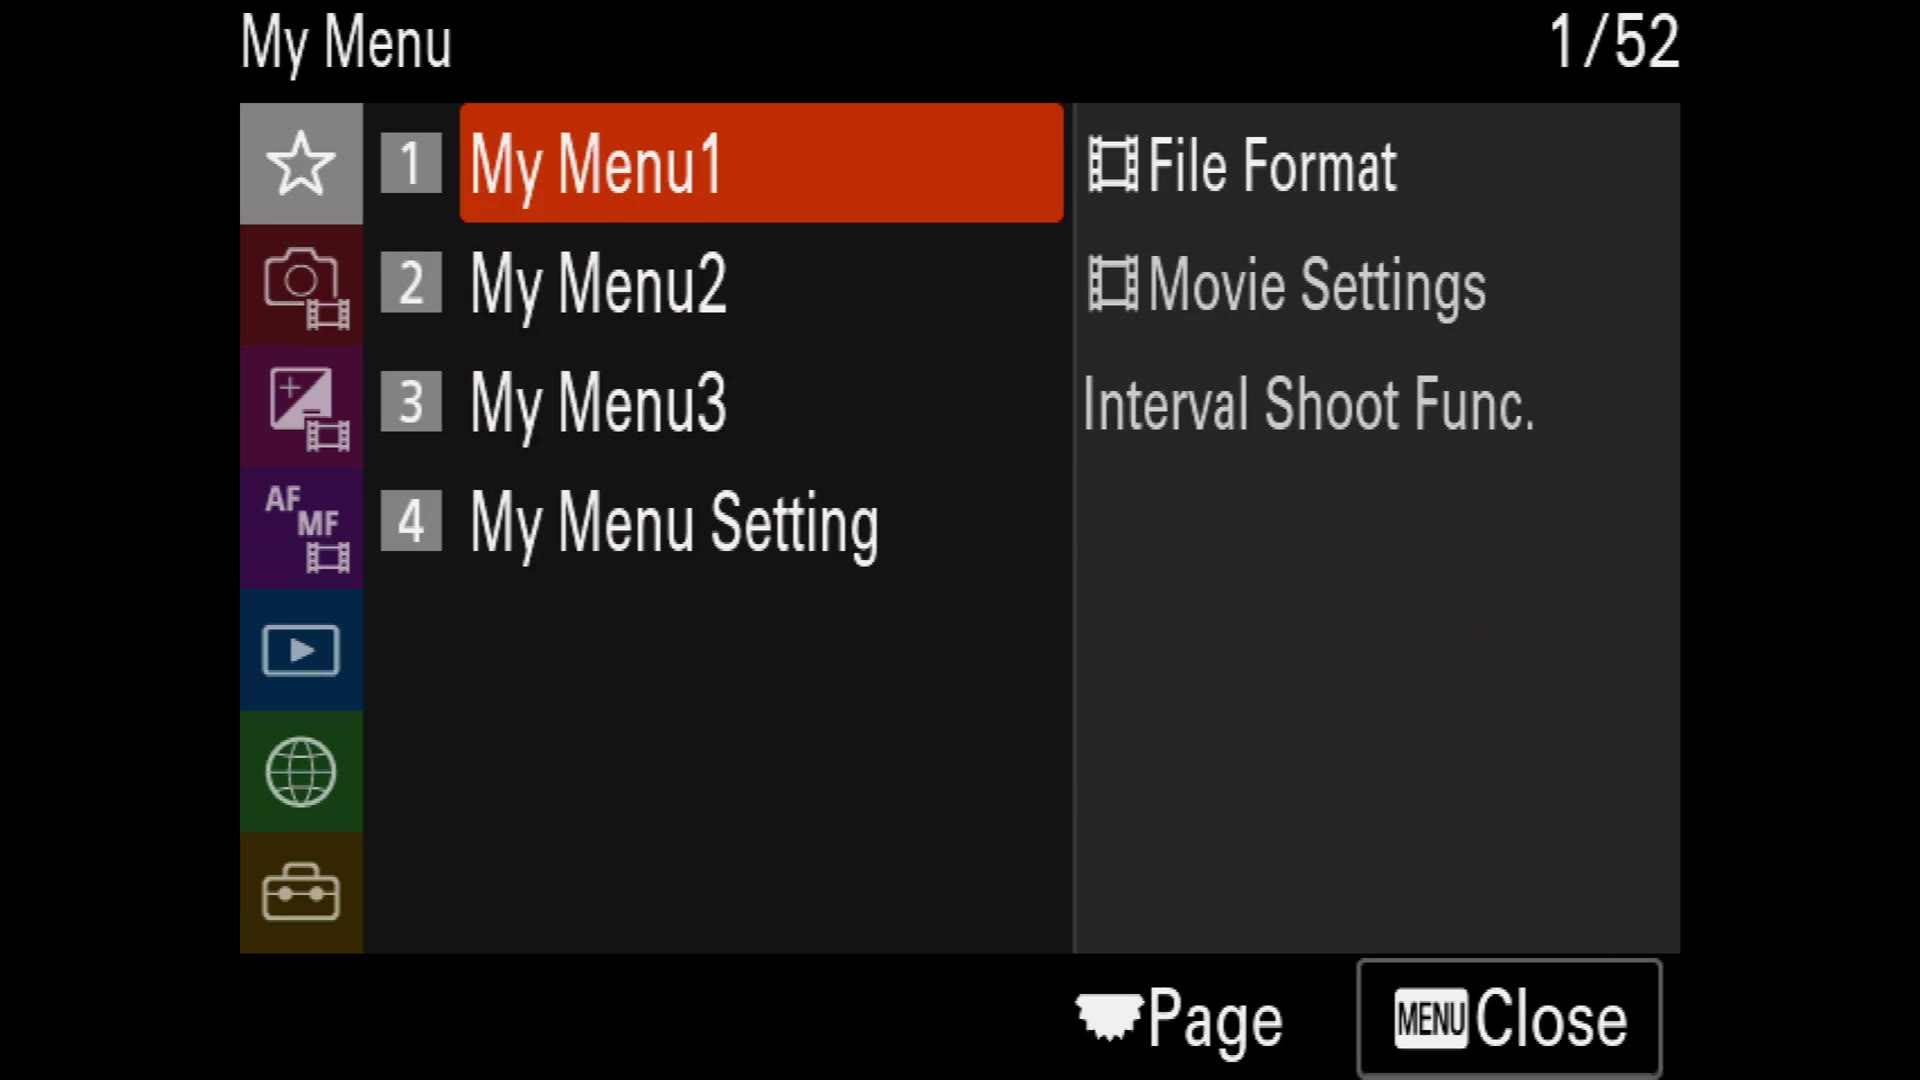
Yes, only three things on page one. Those are genuinely the only three I need that often.
Page two gets six. Rec. Media Settings, from the media section, which is where you set whether the camera records to both cards or just one. If I’m shooting something less critical, a random YouTube video say, I might only want one card. By default though, record to two, just in case something fails.
Then Picture Profile, from the pink menu under Color/Tone, because sometimes you want log and sometimes you want more saturated color straight out of camera. Then Monitor Brightness, from the toolbox under Finder/Monitor, for whenever you need to see the screen in different light.
Then Camera Set. Memory, back up in the red icon under Shooting Mode. I use this one a lot, because whenever I’m working off those mode dial presets I often want to tweak one, like changing the white balance saved into it, and this puts that a couple of presses away.
Then Custom Key Setting with the film strip, and Fn Menu Settings, both from Operation Customize. You do end up updating your buttons from time to time, and it’s nice not to hunt for them.
Page three gets exactly one thing: Format, from the red camera icon. There’s really only one dangerous setting on this camera and that’s it. I format my cards before every shoot so I want it reachable, but I do not want to bump it, then bump the camera three or four more times, and accidentally format something. That terrifies me. Giving it a page of its own is a cheap way to stay safe.
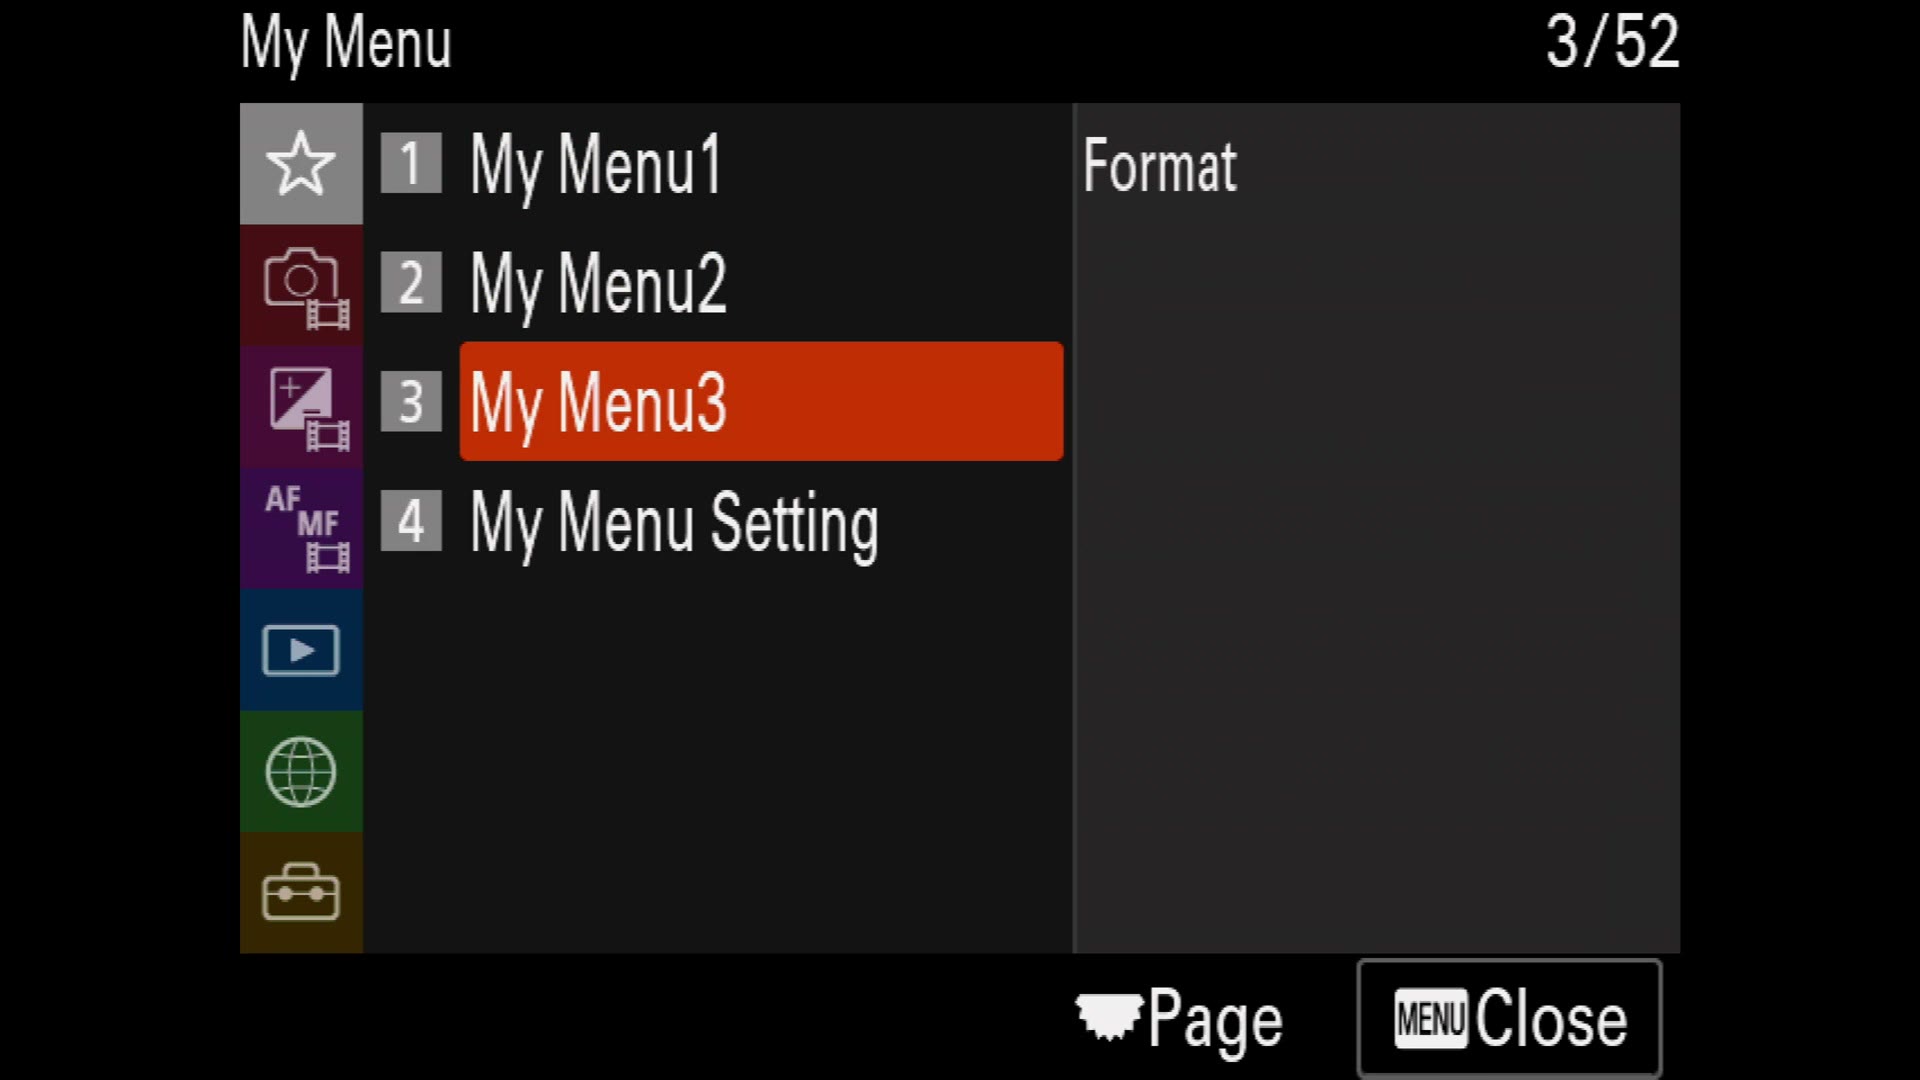
And that’s it. Between the custom menu, the mode dial, the custom buttons and the function menu, you should basically never need to go digging into the depths of this camera’s menu system again. Everything is right there.
One Last Thing
Remember you can still download my settings files for free, the a7S III preset and the FX3 preset. Even if you set all of this by hand, they’re worth having, because if you ever reset your settings or have to restore the camera to factory condition, you’d otherwise be doing this whole thing again.
If you want the rest of the series, there’s part one on the menus, the memory cards guide, the video formats guide, and the overheating test. And if you’d rather have the grade handled for you afterward, that’s what my LUTs are for.
If you want to go much deeper on this camera than a settings walkthrough can, I’ve built full guides for both bodies: the a7S III Pro Video Guide and the FX3 Pro Video Guide.