My wife Rachel has a lot of early college memories that she shared with our friend Zac over the years they spent at Texas A&M. They had a small group of friends that would get Chinese food every Thursday night at the same restaurant. He also played a key role in Rachel’s only speeding ticket, which she received while driving to meet him so he could sign a birthday card.
For me though, I didn’t meet Zac or Rachel until 2010 at a movie and smoothie party. There, I was introduced to them for the first time. Soon after, I joined the same student group they were members of – Aggie Artists. I have many memories of Zac playing the guitar, me filming something, and eventually me filming Zac playing the guitar.
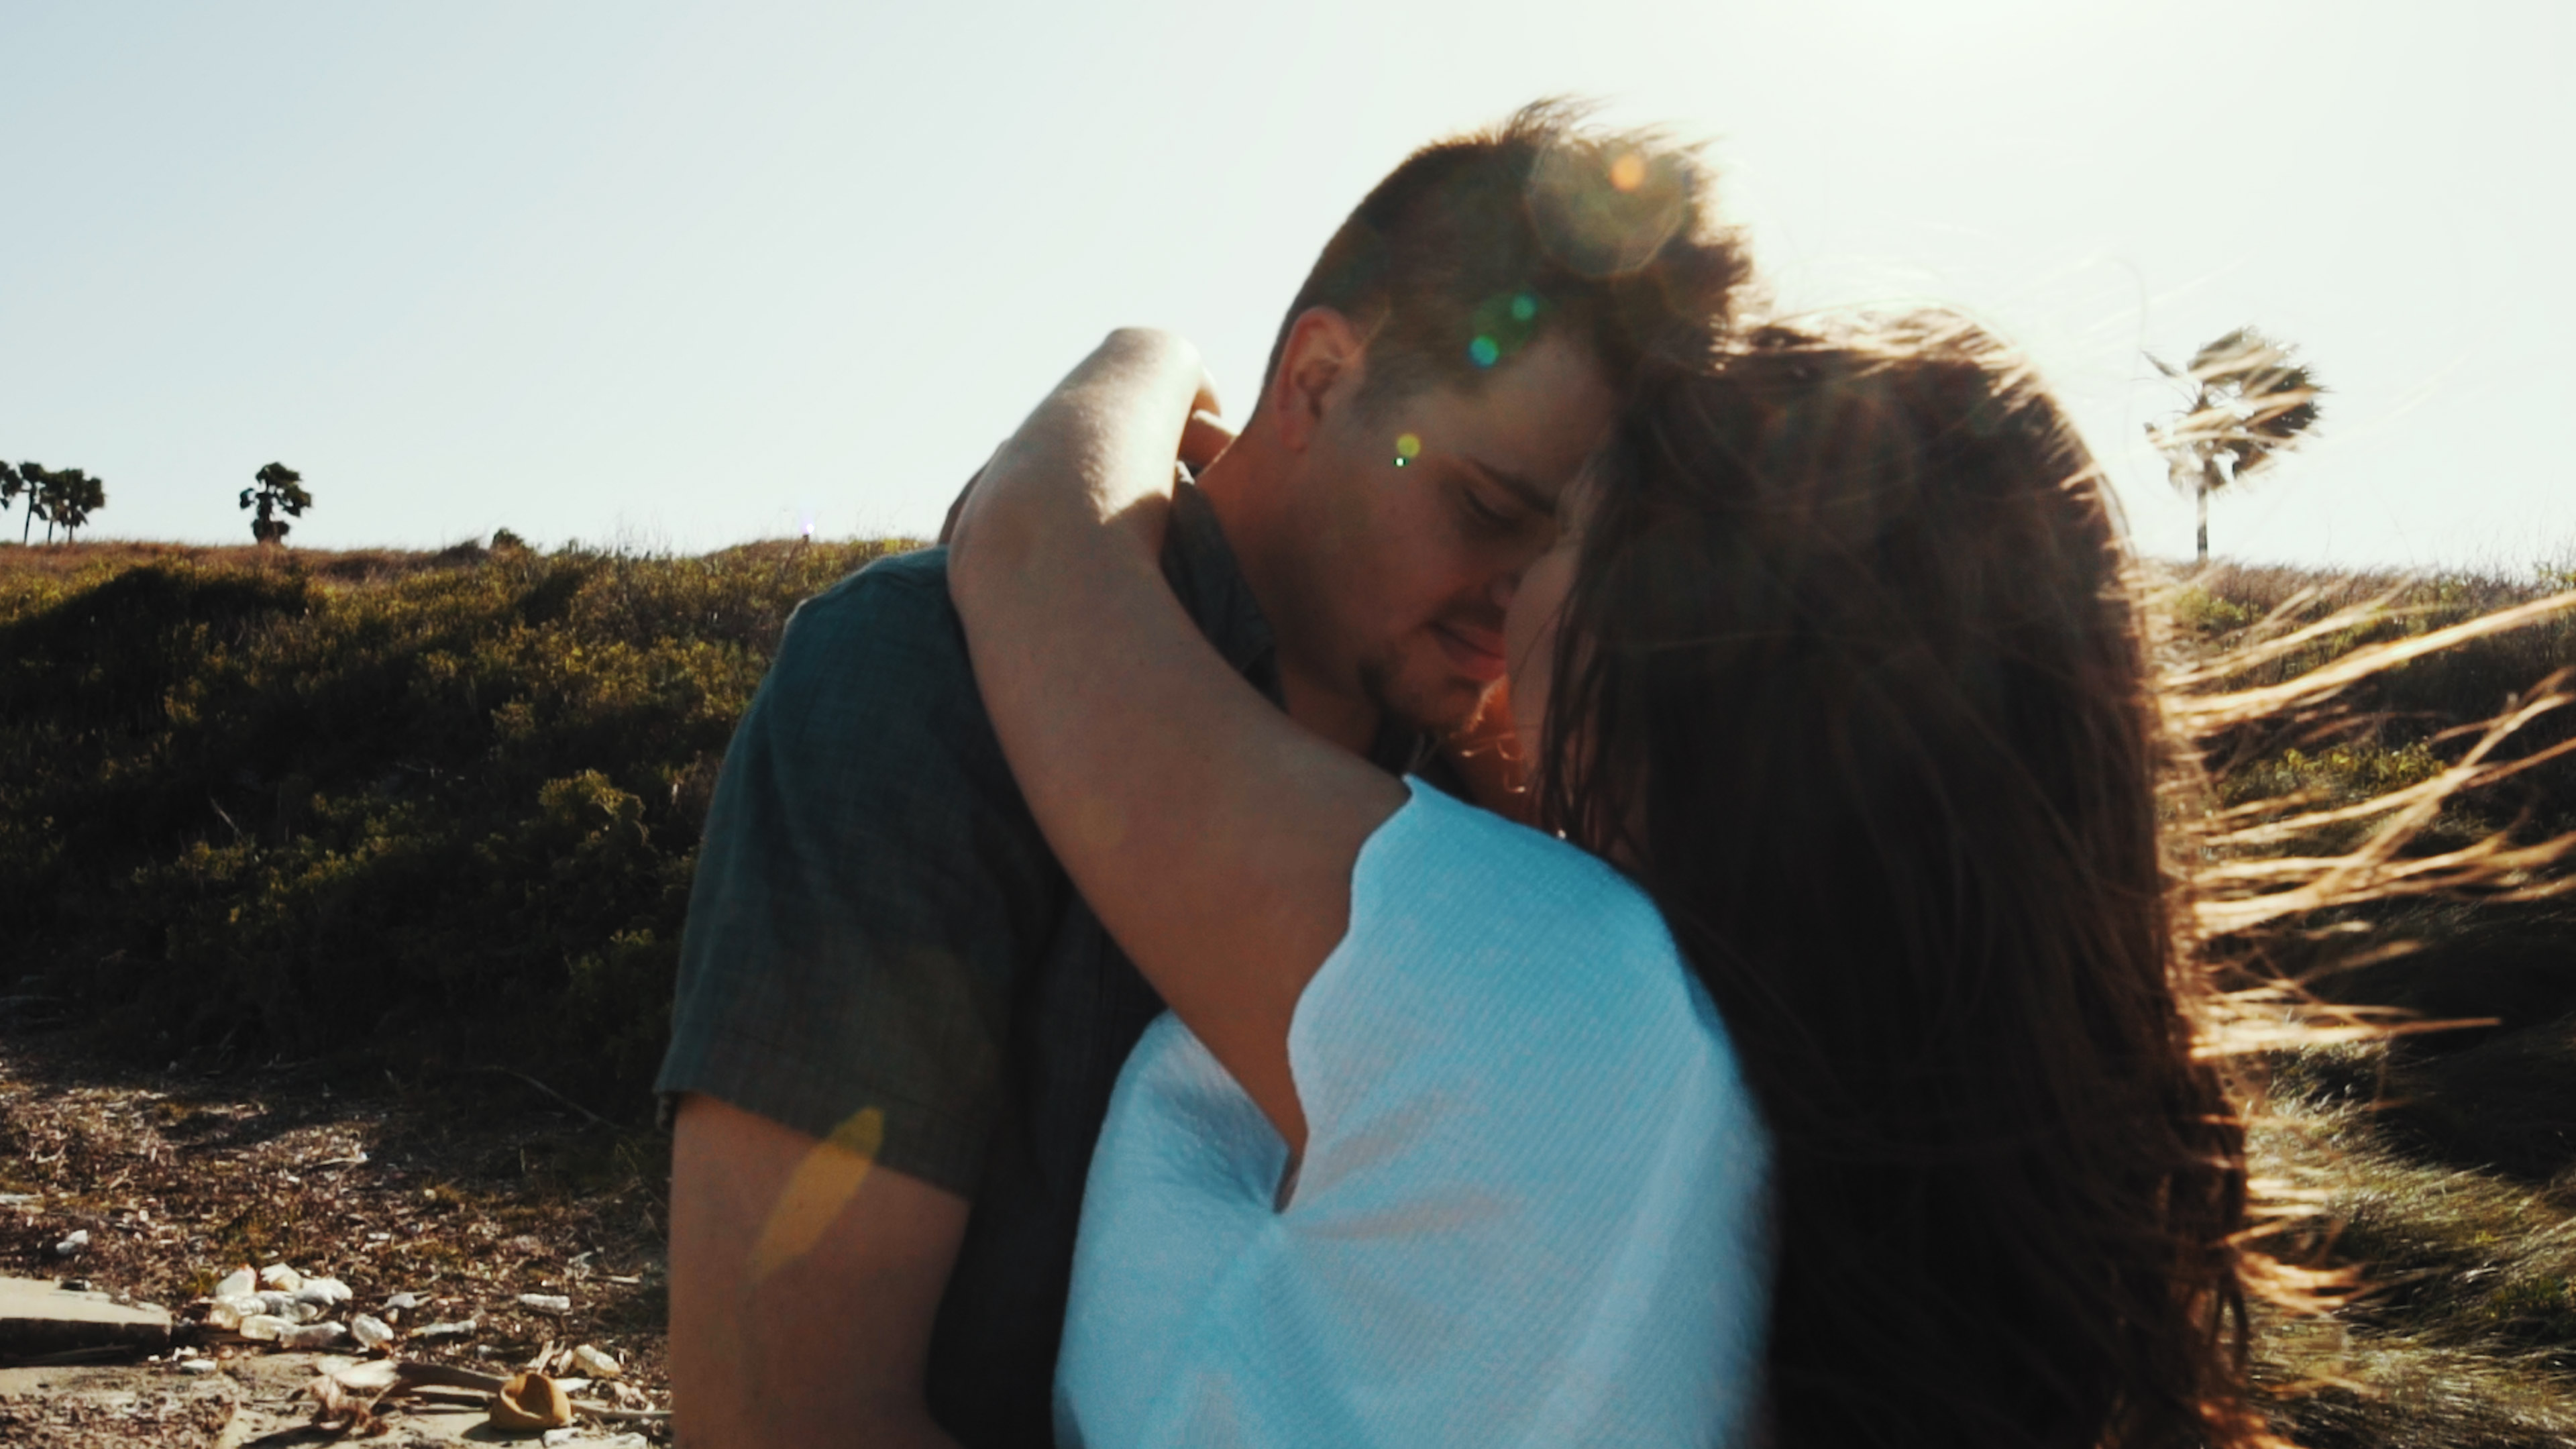
These are two of the most loving and compassionate people that we know.
Jump ahead a few years, and Rachel and I were married. Zac and Lindsey wouldn’t meet for a few more years, when at a church event in November of 2015 they were randomly assigned seats next to one another. After their first conversation, everyone knew (except for them) that there was a connection. Their relationship moved fast, but after meeting each others families they knew that somehow they “fit.”A few months of planning later, and we were there as they exchanged vows amid seaside breezes, soaring seagulls, and close friends and family.
These are two of the most loving and compassionate people that we know. When they invited us to attend their wedding rehearsal dinner, we were treated to hours of kind words spoken about them by their friends and family. The memories we have shared with Zac and now Lindsey, make us very excited for our future friendship with them as man and wife. If you’re getting married too, we would love to talk about filming your wedding.
Wedding filmmaking is, like all creative endeavors, a process that will never be perfected. Looking back at my work from two years ago, I see how far I have improved, and I am sure that when I look back on my current films in two years, I’ll see more growth as well. With that creative growth has come the desire to tell more intimate stories; stories that go beyond just a single wedding day and that encompass more about who a couple is, how they fell in love, their dreams, desires, and heart. Doing this though, requires couples that will open up, be honest, and share both the highs and the lows of their relationship.
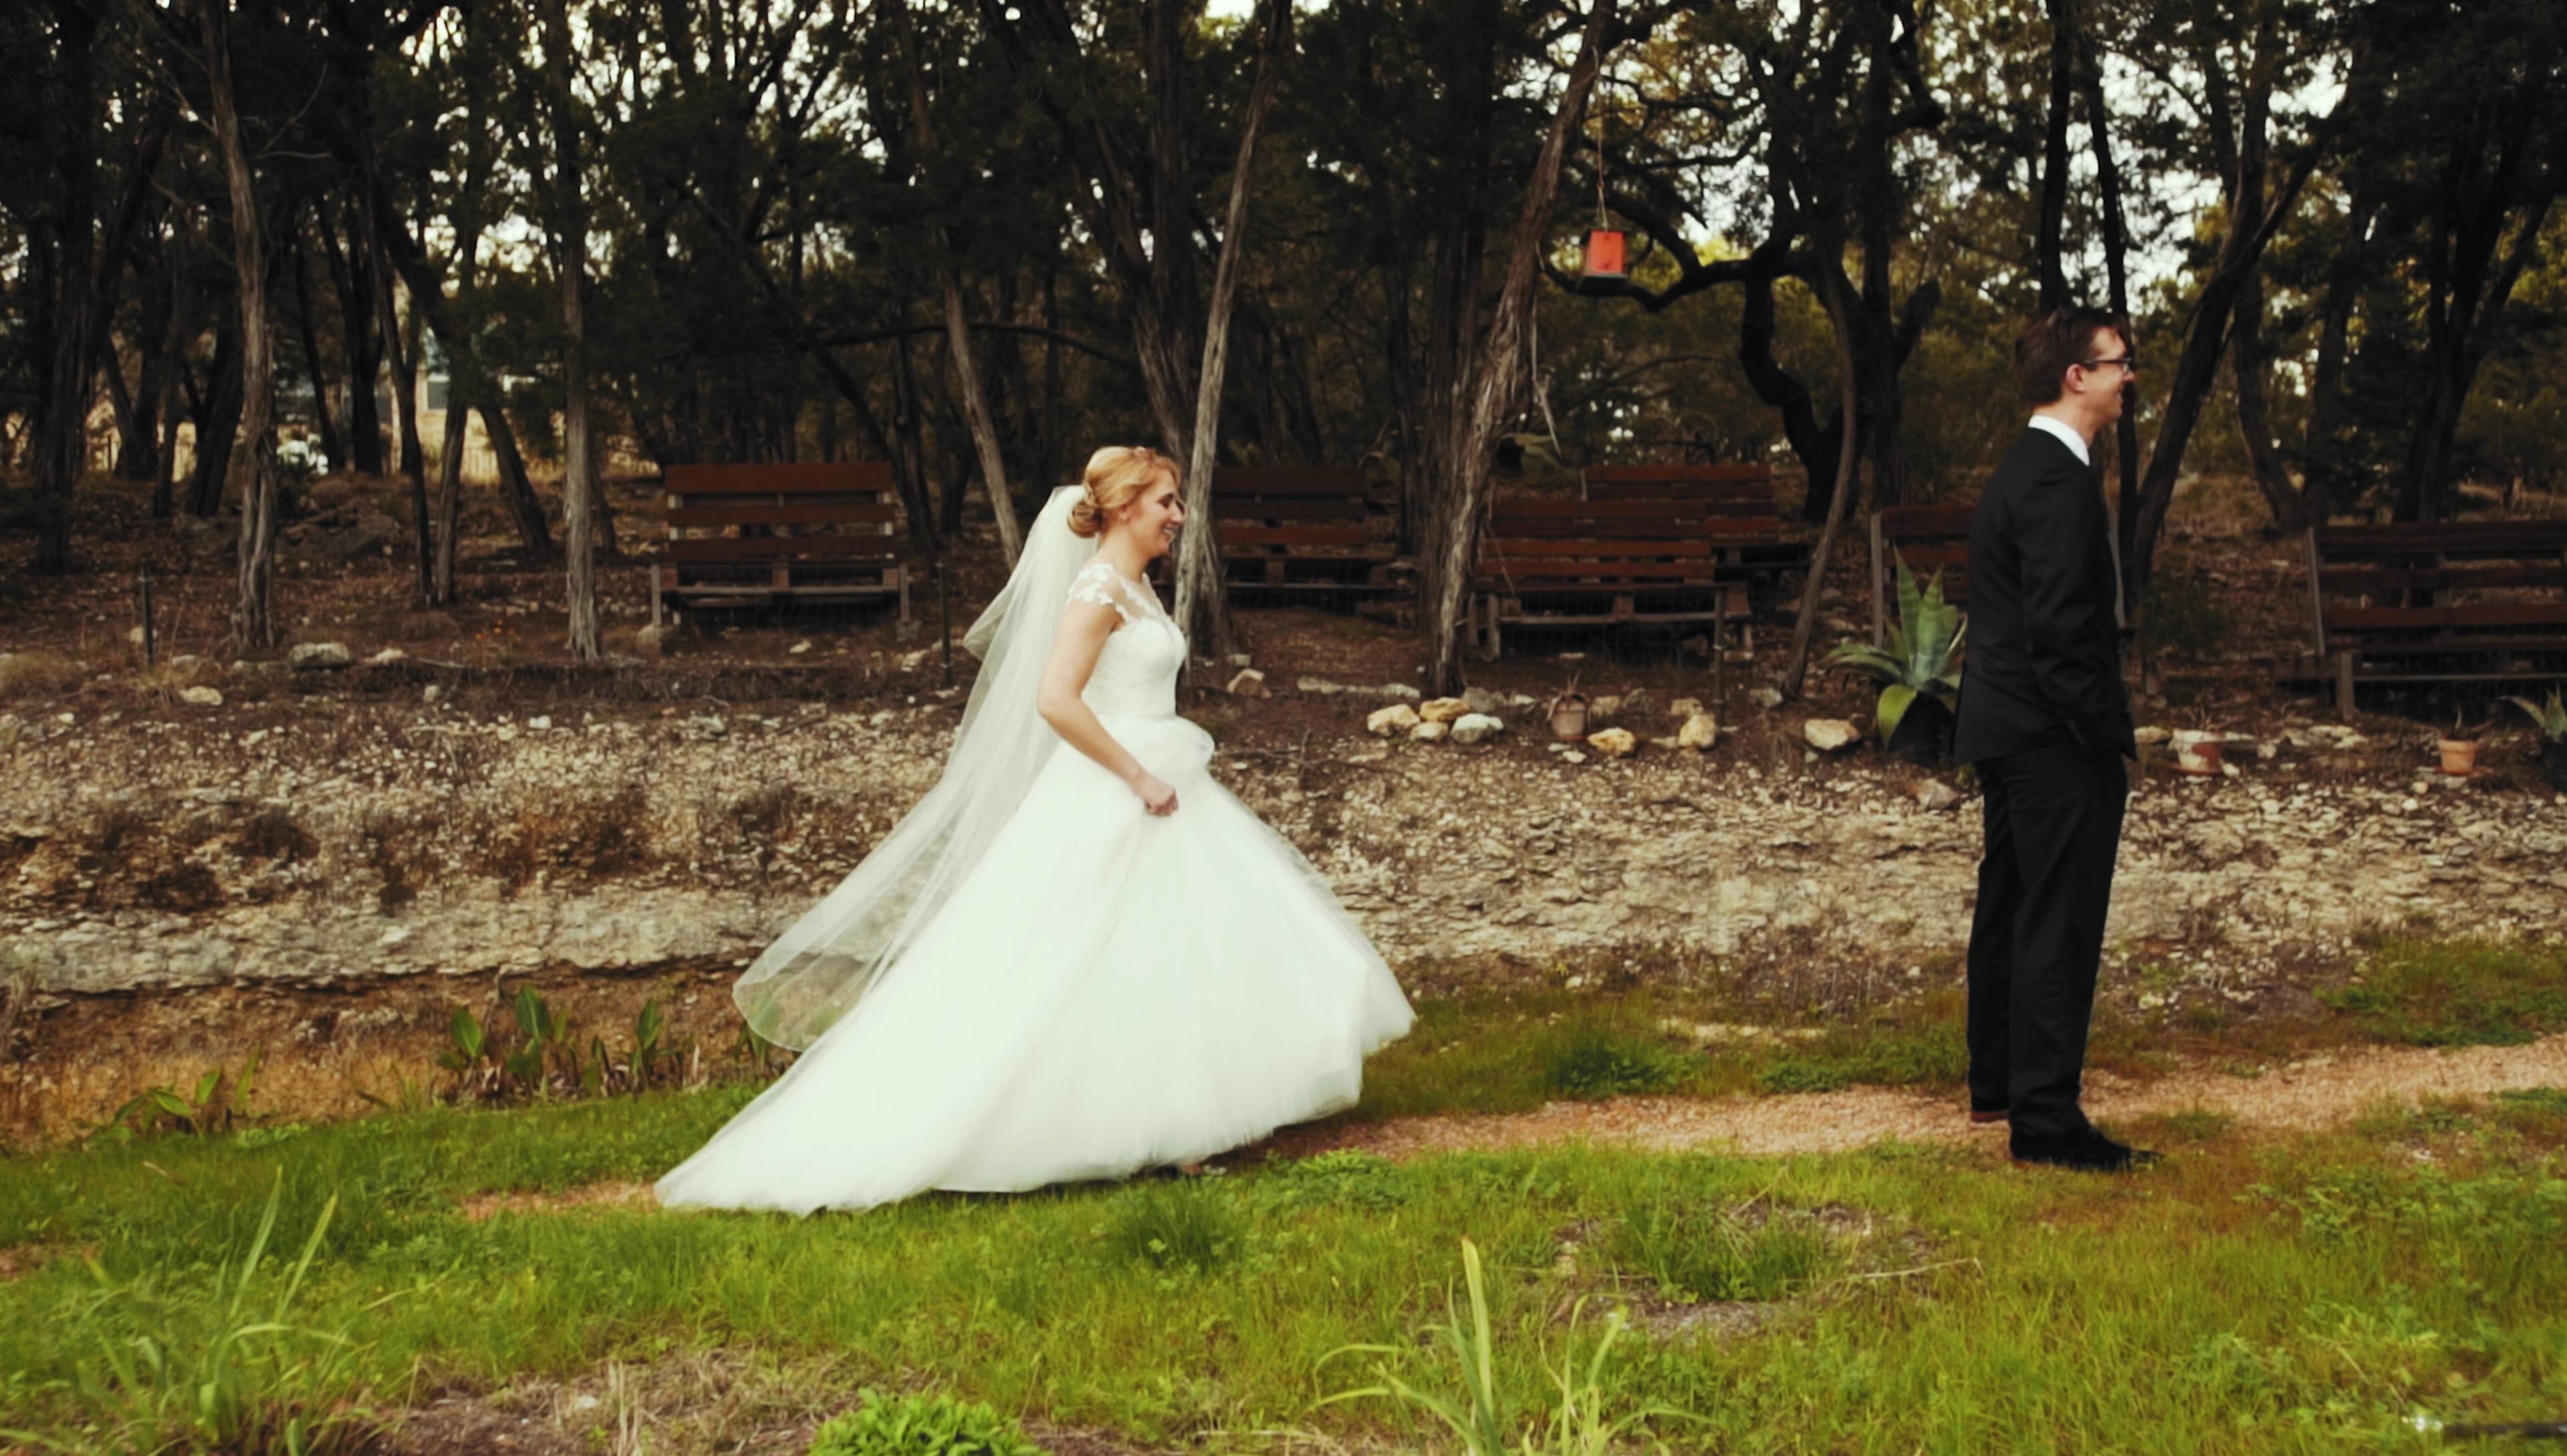
These two are the best. 🙂
Marie and Drew embodied all of those things. A two day wedding, complete with warm sunshine, bright lighting, wicked fast go-karts, peaceful hikes, and a ceremony lit only by the moon and fire, wasn’t just about the fun things they enjoy doing; it was also completely and unabashedly them. Their wedding, on their terms, about their love, told through tearful letters, long glances, and cliff-side vows.
Rachel and I are so thankful that they shared not only their wedding day, but a part of their lives with us. We would love it if you shared a part of your life with us too. If you’re getting married, please get in touch. – Matt
It’s no secret that I love drones. Ever since I flew my friend Taylor’s Phantom 2 back in early 2014 (back when DJI had no app and video was recorded with a GoPro), I knew that I would be buying a lot of these flying cameras in the years to come.
What started with a Phantom 2 of my own, recently expanded to a Mavic Pro, and now a Phantom 4 Pro. My wife says I may have a problem. I say I may have a fleet. Can I call it a fleet? I like how that sounds: Matt’s fleet of drones.
With the advent of the FAA releasing their Part 107 certification for commercial drone pilots last year, there are thousands of new licensed drone pilots taking the knowledge test and wondering which drone they should invest in. There are also thousands of reviews of the new DJI Mavic Pro out there, but none of them have answered the two primary questions I feel that professional filmmakers are asking: Is the Mavic Pro good enough for commercial filmmaking? And: If I already own a drone such as a Phantom or Inspire, should I invest in a Mavic Pro as well?
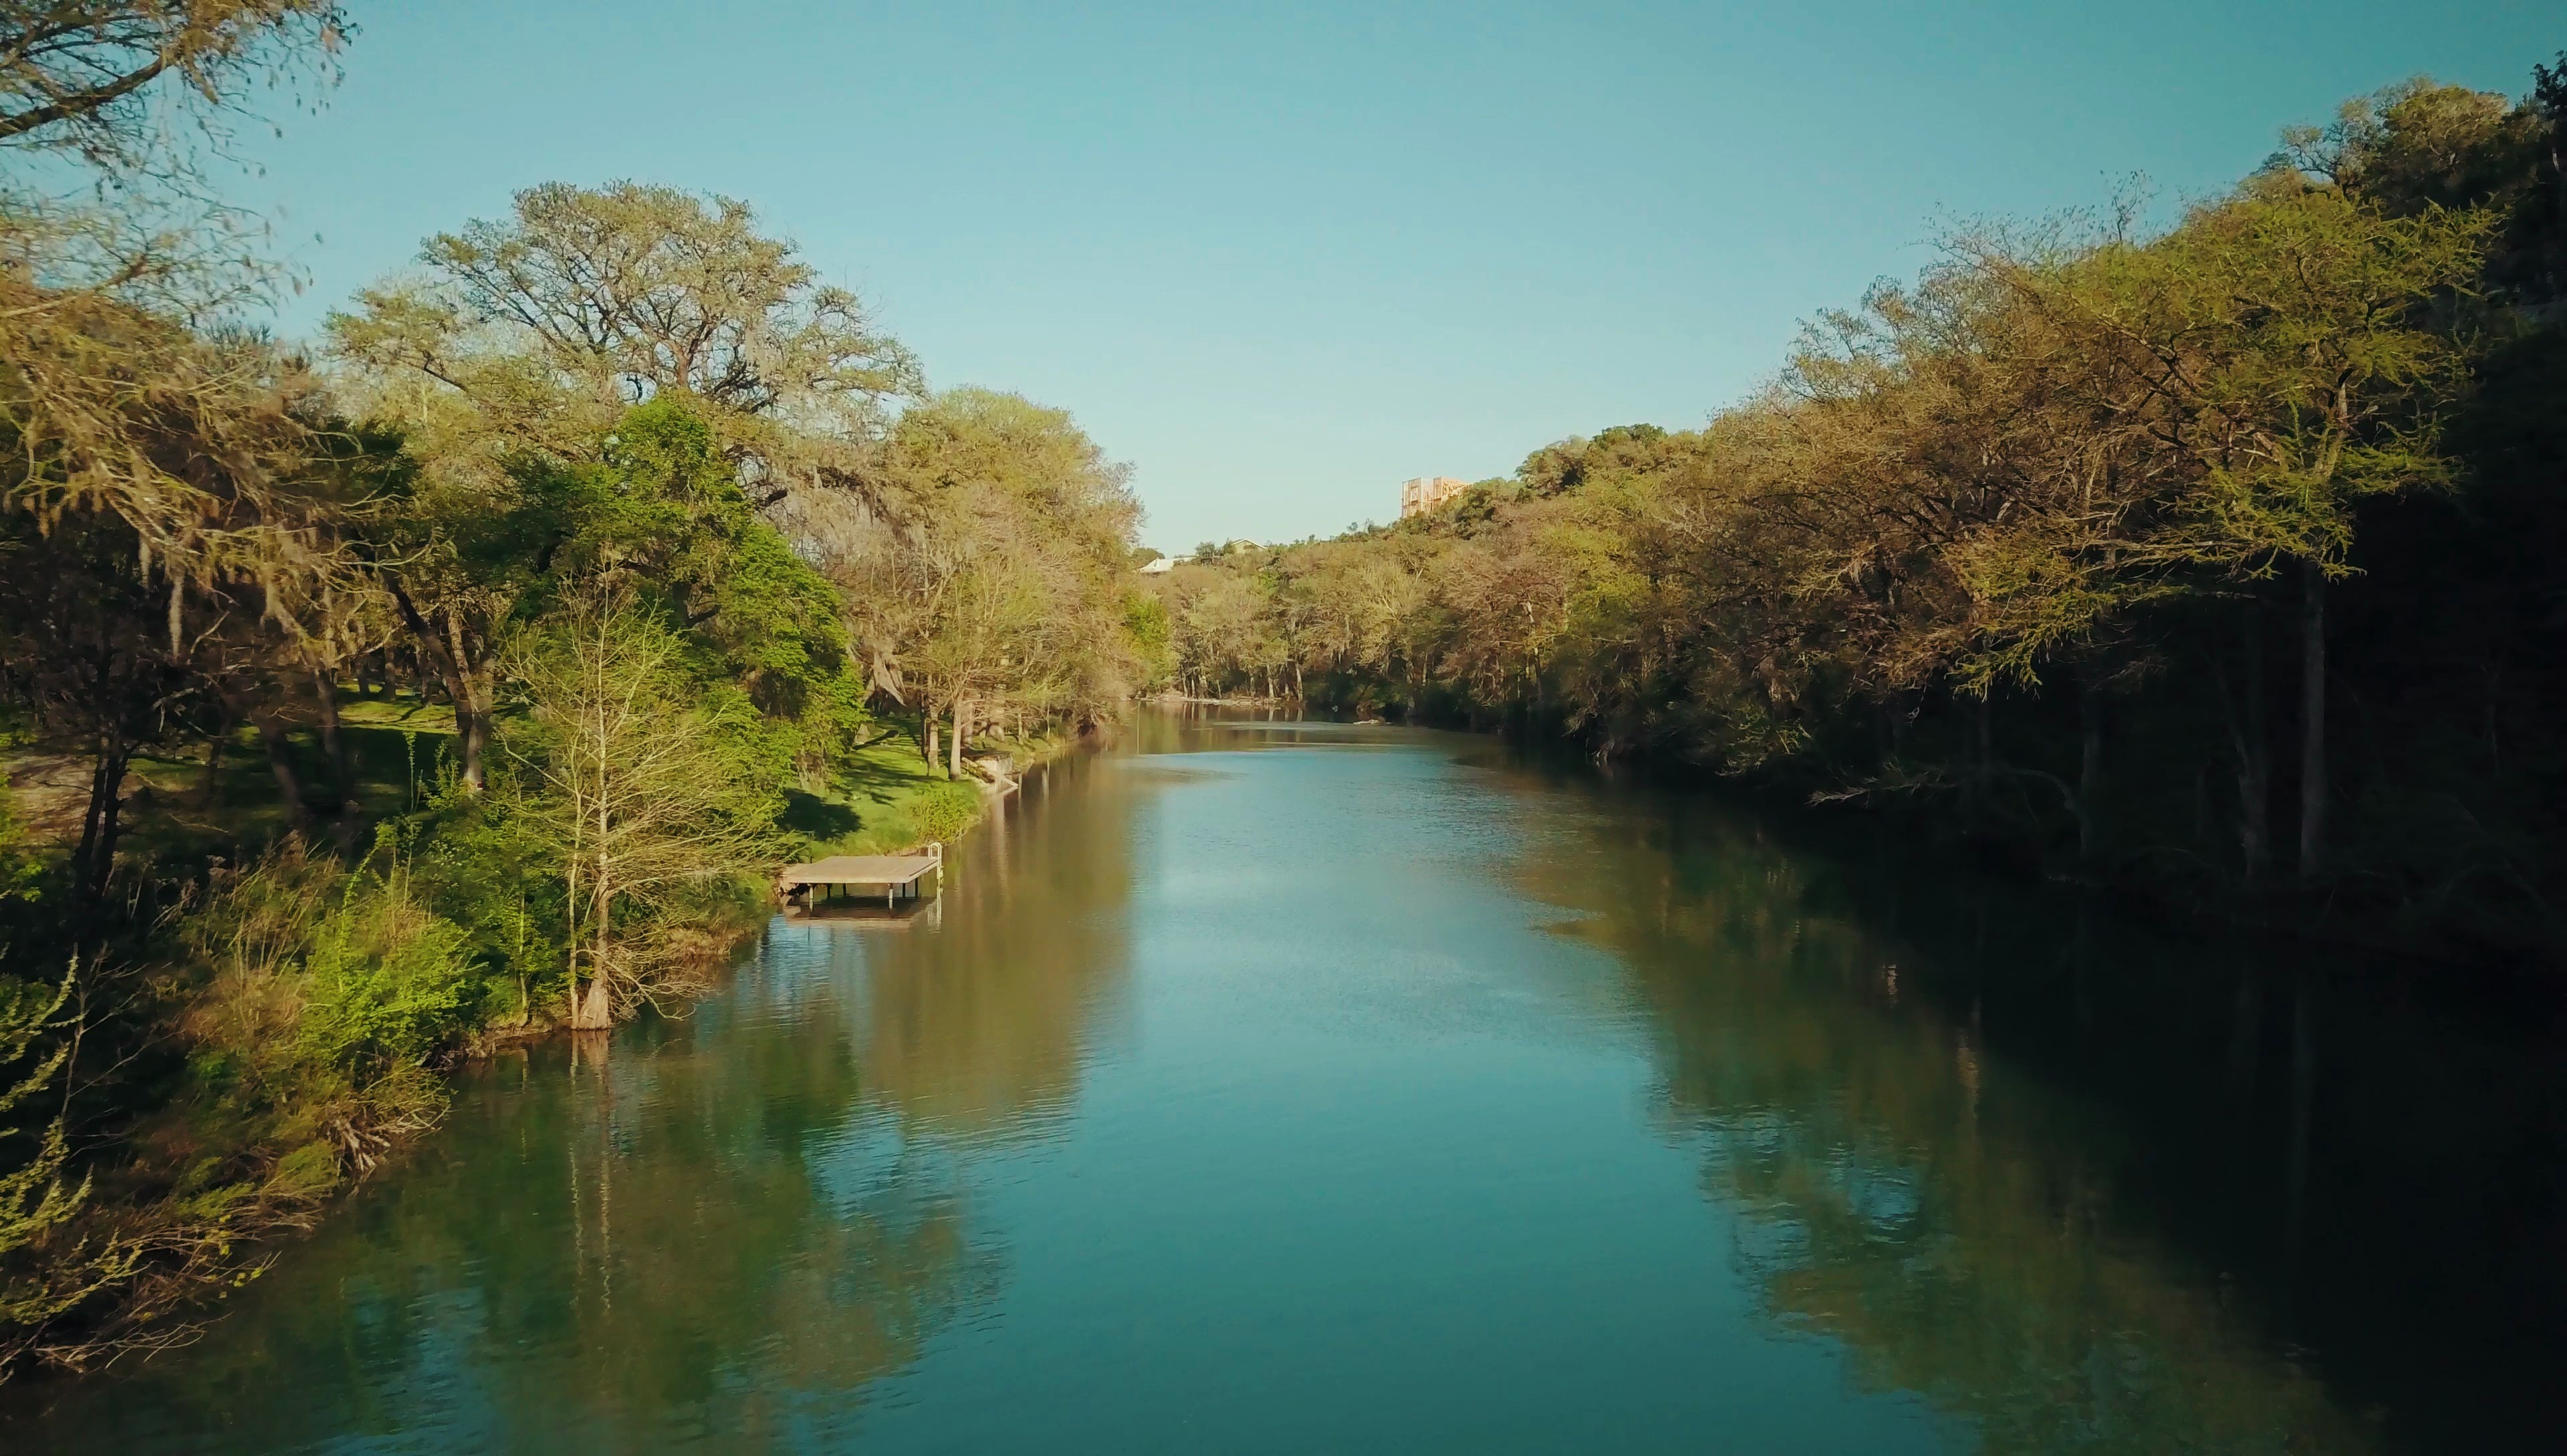
I love this drone. 🙂
In this review video, I will answer those two questions! As well as tell you:
The very best places to buy your Mavic Pro! and how to avoid having to use DJI’s sketchy repair service.
How the Mavic drone being tiny is actually an incredibly useful feature for filmmakers.
If the image quality of the Mavic Pro is good enough for commercial use (spoiler: yes, it definitely is).
5 ways to maximize the image quality of the Mavic Pro!
Incidentally, I took the FAA’s Part 107 test, passed, and made a video about how I studied, so if you are considering taking the test as well, I hope my video helps you.
Here’s my gear list with all the places to buy the Mavic + Accessories.
I am also now offering one-on-one personal filmmaker consulting! Wanna talk about cameras, lighting, or booking clients? Let’s do it!
As always, if you have any questions or comments about this review, please feel free to leave one below, or get in touch.
There are some things that you can learn by reading books and manuals, but some only come through years of experience. In my wedding tutorial vlogs, I attempt to distill all my years of knowledge into easy to understand tips and tutorials to give you a “shortcut” so you can improve quicker. My goal with these tutorials is to not only tell you how I do something, but why I do it.
Today, in the same vein as those favorite tutorials I bring you a new one, all about how I film dancing at a wedding reception. In it, I cover four key tips that should help your improve your footage of people dancing during a wedding reception. The open dance floor doesn’t have to be boring or intimidating! It can be a lot of fun, I promise.
In this video I cover:
How to interact with the couple, wedding coordinator, and DJ when preparing to film the dancing at the reception.
A way to light the dance floor and make it look incredible even when there’s awful venue lighting.
My go-to technique to get more energetic dancing shots that show how much fun the wedding guests were having.
The exact way I shoot to make editing dancing footage super easy in post (it’s almost editing itself!)
If any of that interests you, I would highly recommend checking out the video.
As always, if you have any questions or comments, please feel free to leave one below or get in touch.
Get the lights, stands, and dimmer I talked about in the video on my Kit page.
This is the second video in my tutorial series all about the video settings that I use when rendering my videos in Adobe Premiere Pro CC. While first video and text tutorial was all about my 4K export settings, this one tackles my 1080p export settings. If you are using Adobe Premiere Pro CS6, CS 5.5, or CS5, I have an earlier blog post I wrote back in 2012 detailing my 1080p export settings for those programs.
This tutorial is significantly shorter than my 4K export settings tutorial due to me not going nearly as in-depth about my reasoning for choosing the settings that I use. So if you are watching this video or reading the text tutorial below and are confused about why I am using a certain setting, I would highly recommend watching the 4K export settings video, as many of the settings that I go over are similar and include explanations.
Lastly, if you would rather read how to export your videos in 1080p instead of watch, I have included a text tutorial with screenshots below, detailing my exact export settings.
Premiere Pro handles 1080p footage easily.
My text guide for how to export 1080p video in Premiere Pro CC for YouTube and Video
First, make sure you have Adobe Premiere Pro installed. Don’t have a copy of Premiere?! Download a free 7-day trial from adobe here.
SEQUENCE PRESET SETUP
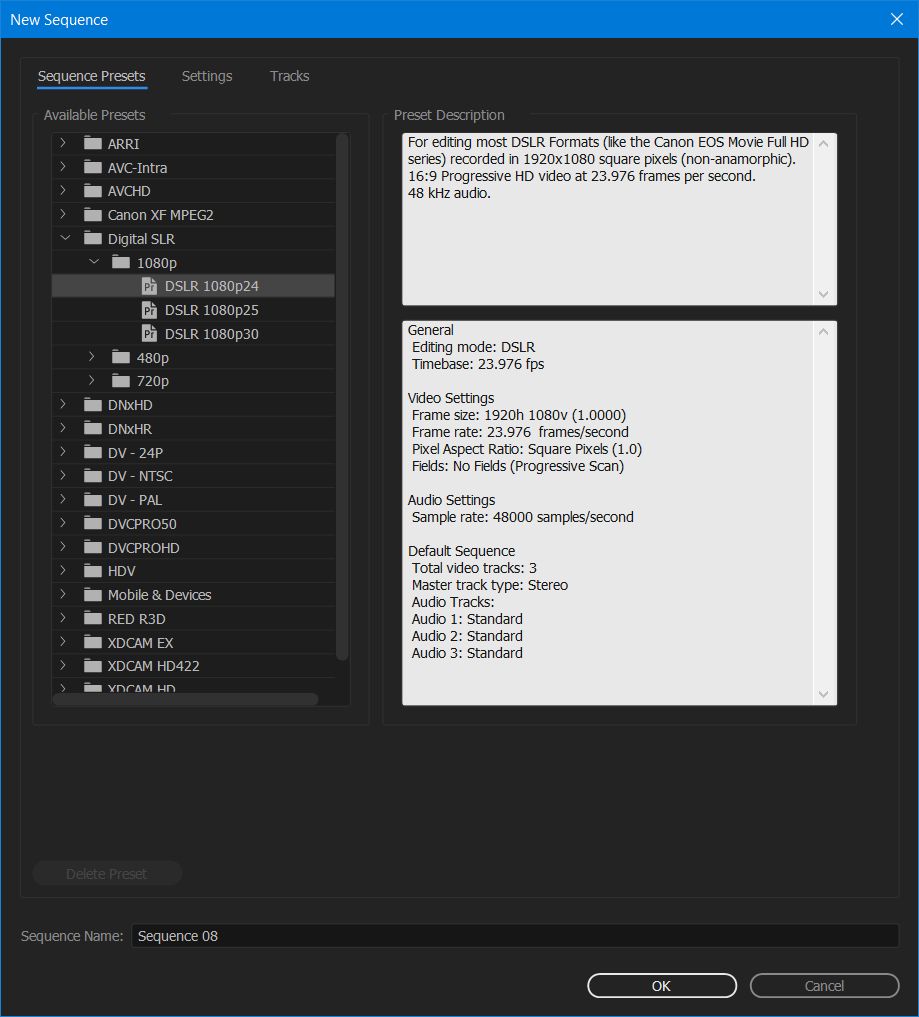
Before I get to my export settings, I need to discuss the sequence preset that I use. Premiere uses the term “sequence” to describe the timeline that you will use when editing your video. It is important to select a sequence preset that is the same as the video settings that you used when filming with your camera. You can use “Ctrl + N” or go to “File > New > Sequence” to open the new sequence dialog box. For the video clip I use in this project, I filmed in 1920×1080 resolution at 120fps with the Sony A7Sii. I then used Premiere to interpret the footage to 23.976 fps and that is what we will be exporting today. I need to select a new sequence preset that is the same as these video settings. Select Digital SLR > 1080p > DSLR 1080p24. Name your sequence in the dialogue box below, and click “OK.”
The New Sequence Preset Window
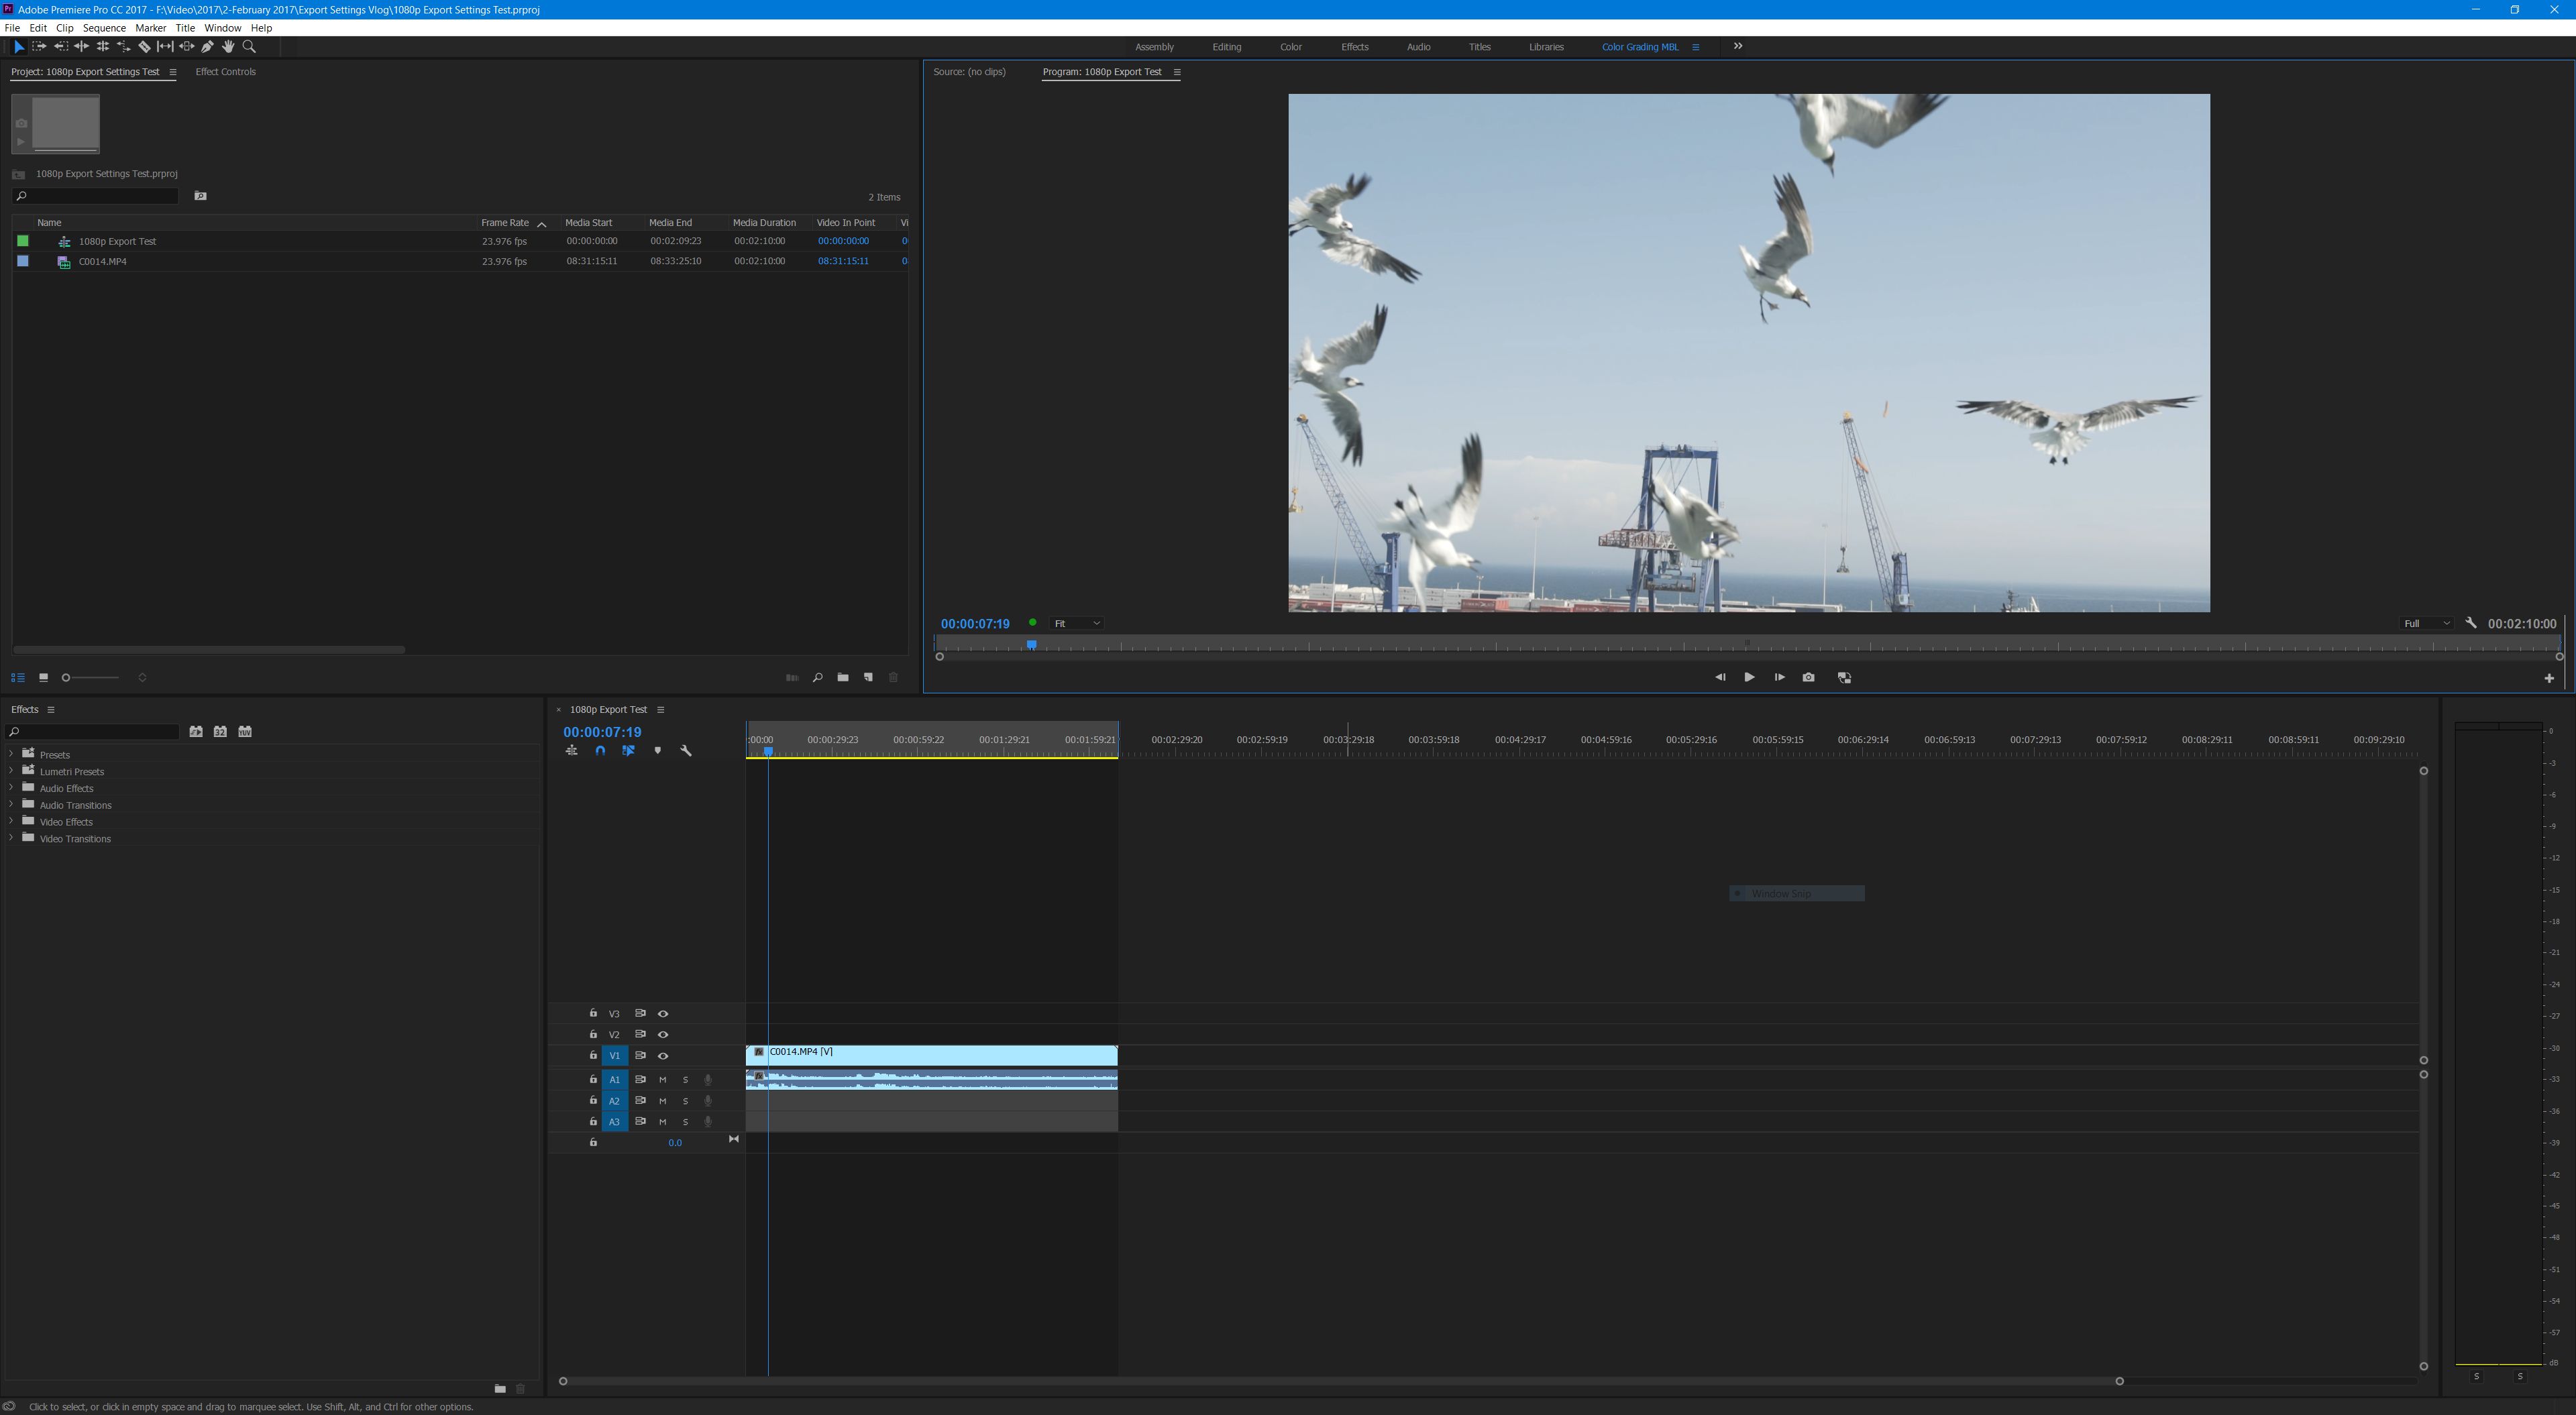
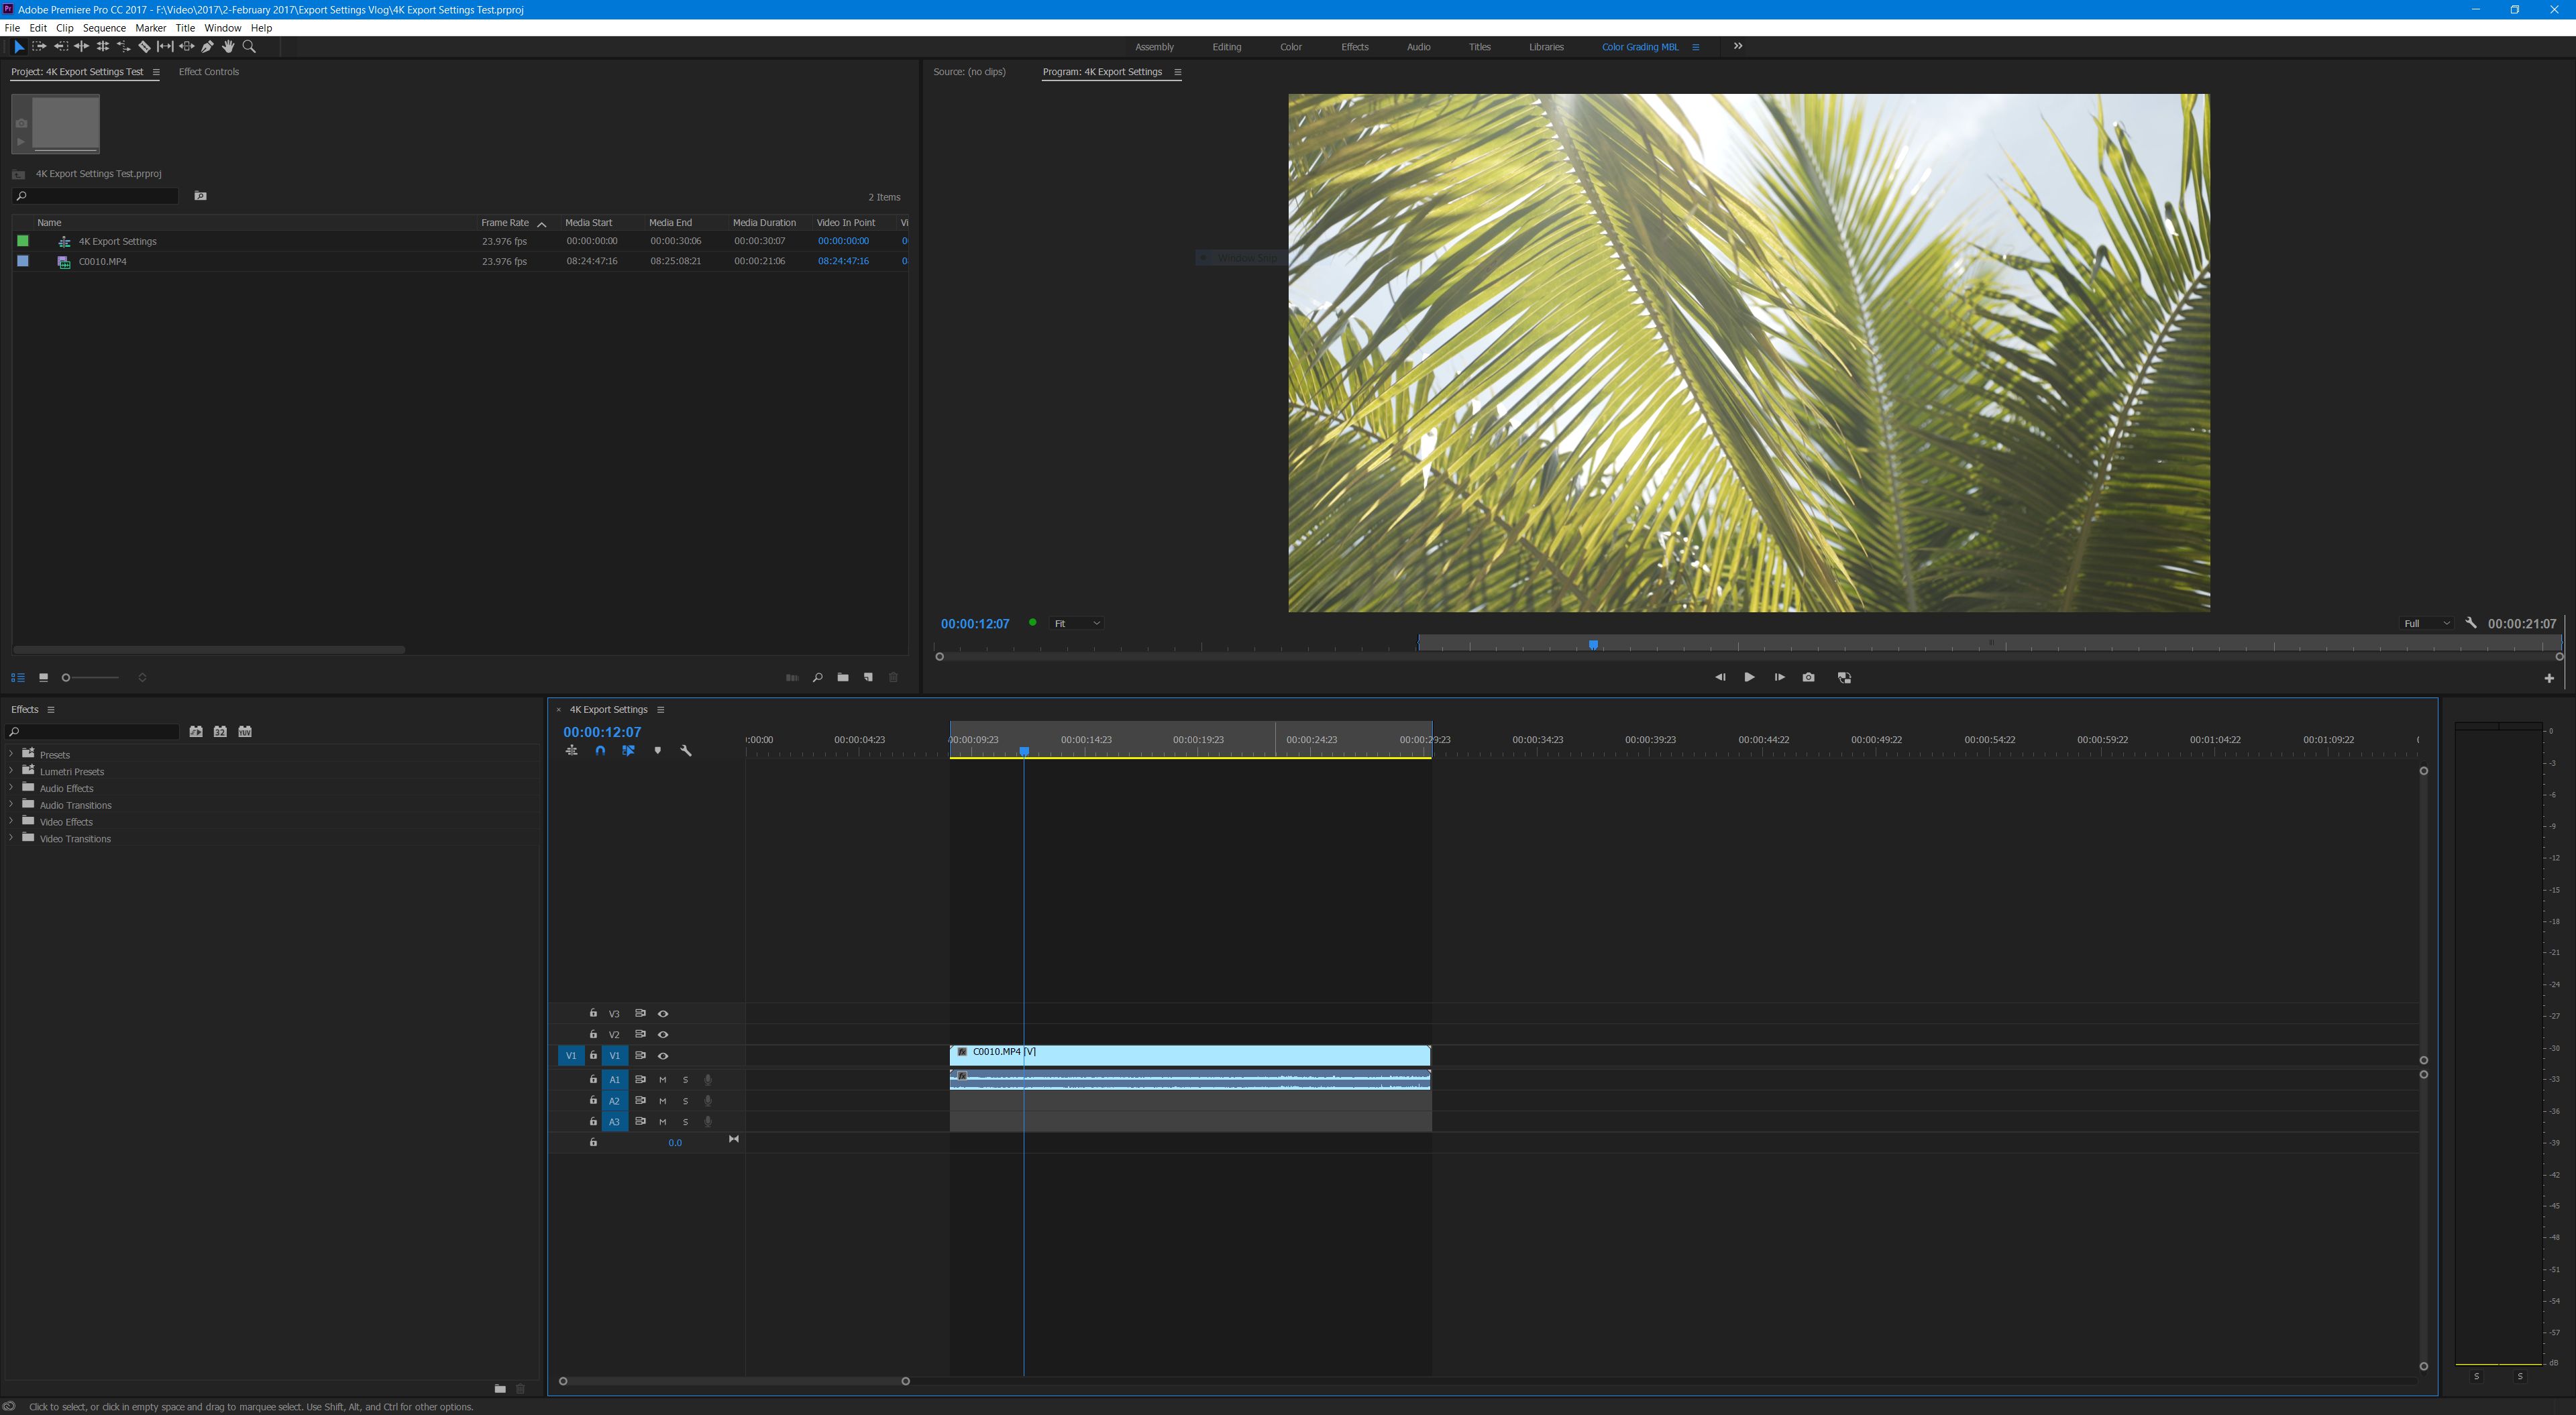
EDIT YOUR VIDEO
Your video is now ready to be edited as you would normally on the timeline. Once you have finished editing and are ready to export your video, go to the next step.
SET YOUR IN AND OUT POINTS
Once your video is edited and ready to render. You need to set your “In” and “Out” points. Do this by moving the video playhead to where you want the opening frame of your rendered video to begin and press the “I” key on your keyboard. Then move the playhead to the end of your video and select the “O” key on your keyboard. The timeline will turn a darker color where your in and out points are selected. It is now time to export your video! With the timeline selected you can either press “Ctrl + M” on the keyboard, or navigate to “File > Export > Media” in the menu.
Set your “In” and “Out” points.
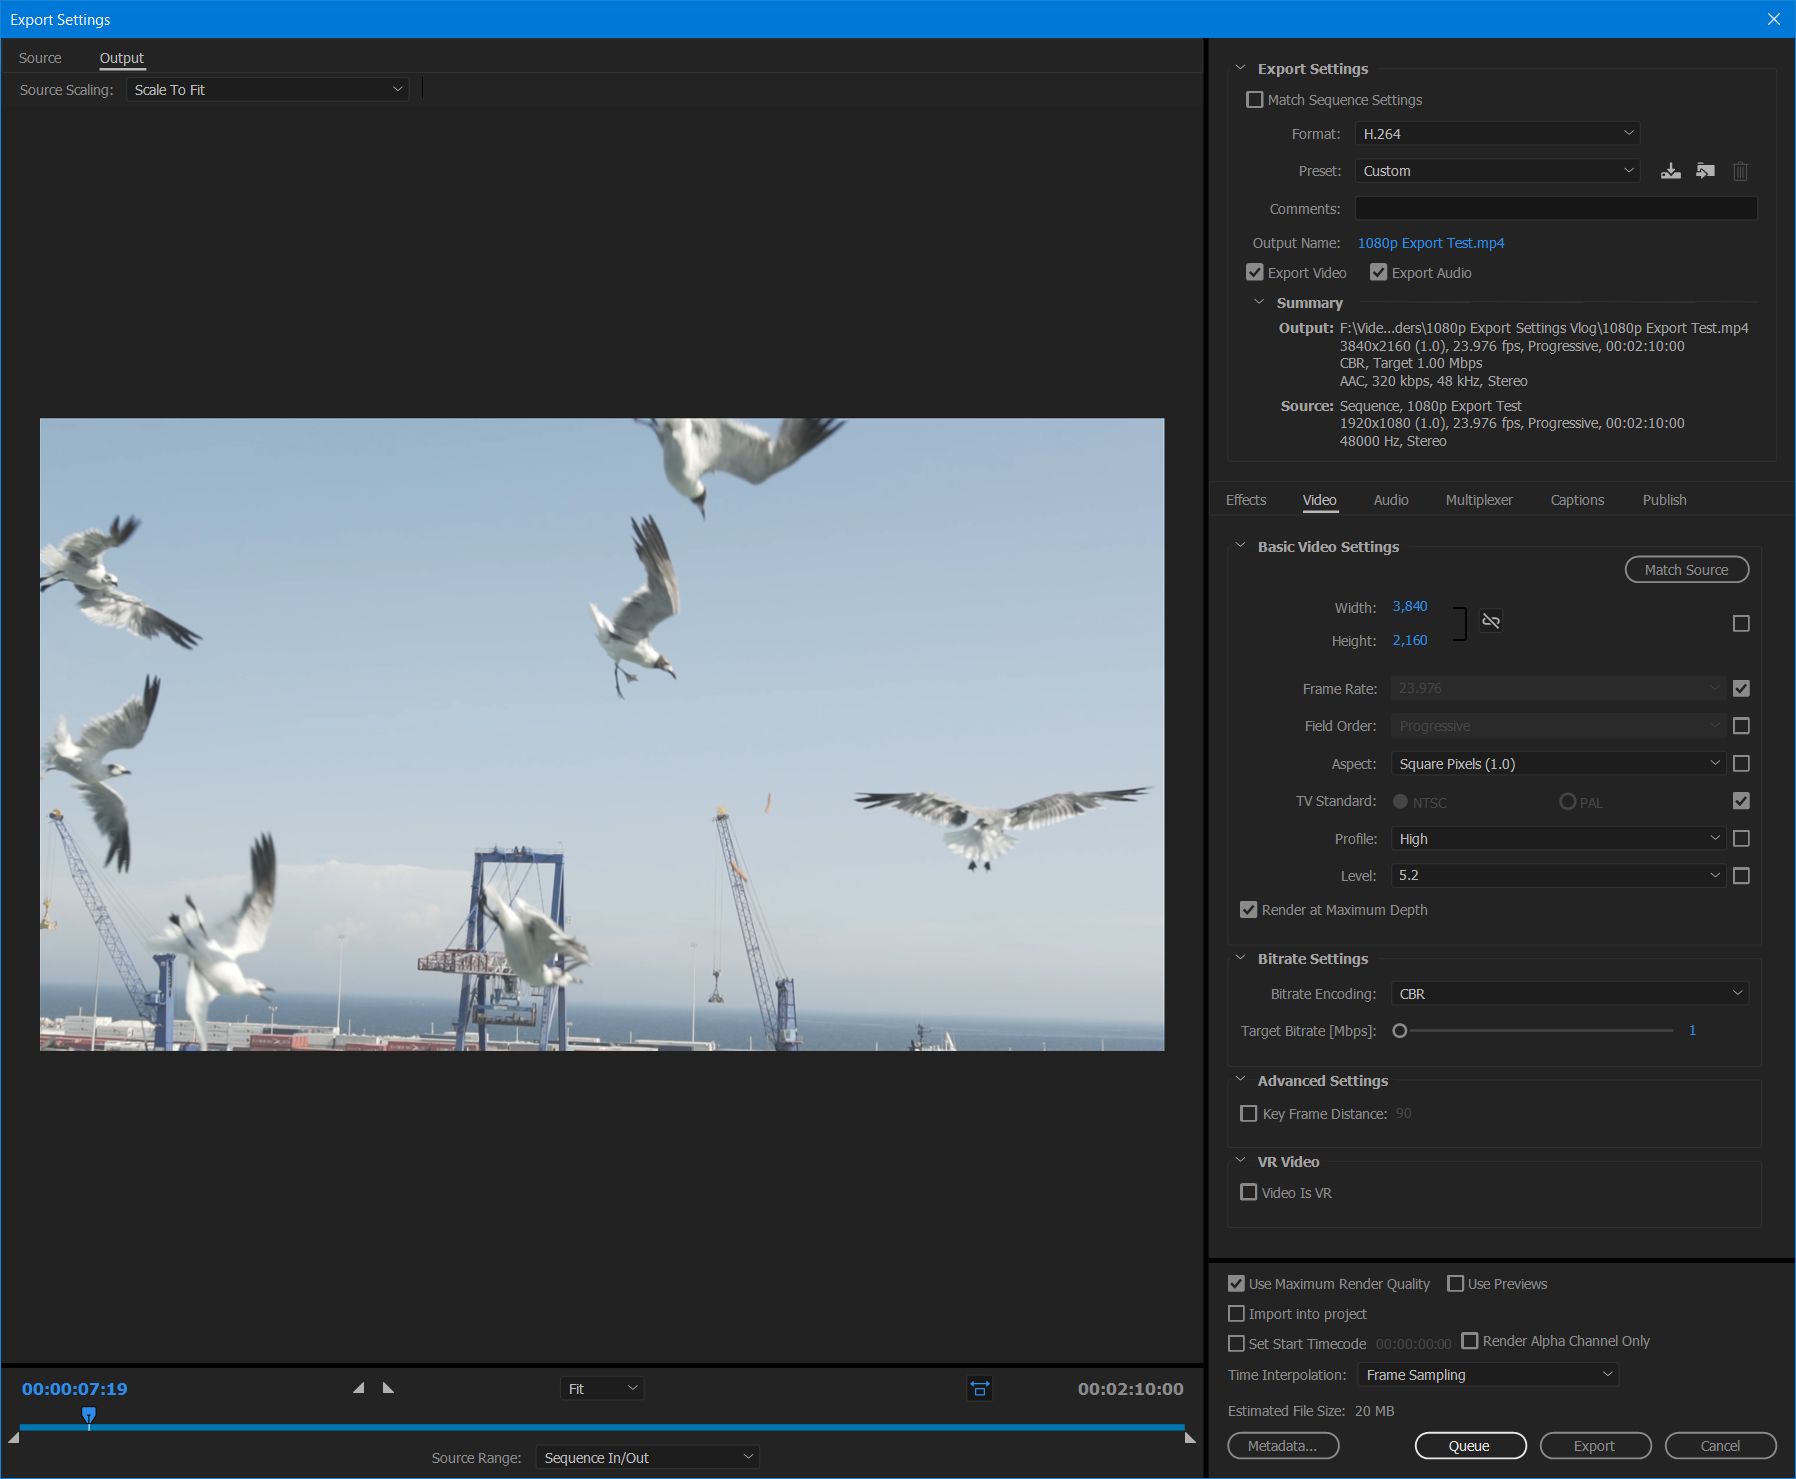
BEGIN CHANGING YOUR EXPORT SETTINGS
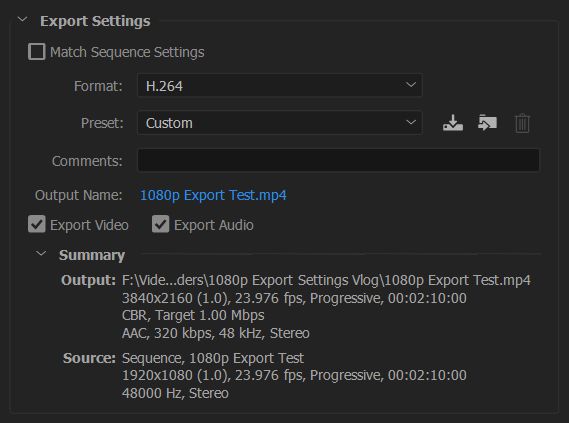
You’ve now opened the “Export Settings” dialog box and there’s approximately 3,000 settings you could change. Don’t freak out though, we’re going to tackle this one section at a time. First, under the “Export Settings” heading on the left, next to “Format” select “H.264” from the drop down menu. For Preset select, “Custom.” Click the blue text next to “Output Name” and select a name and location to save your video file. Make sure both the “Export Video” and “Export Audio” boxes are checked.
How the export settings dialogue box looks upon opening it for the first time.
The export settings heading of the dialog box.
BASIC VIDEO SETTINGS AND BITRATE SETTINGS FOR YOUTUBE, VIMEO, FACEBOOK, AND OTHER VIDEO SITES
If you are uploading your video to YouTube, Vimeo, Facebook, or any other video site, I recommend using the below settings. The file sizes will be quite large, but this will ensure that your video retains its quality when you upload it to these sites and they convert it into different formats and resolutions. Also, if you want to know my reasoning for choosing these settings, please watch my 4K export settings video.
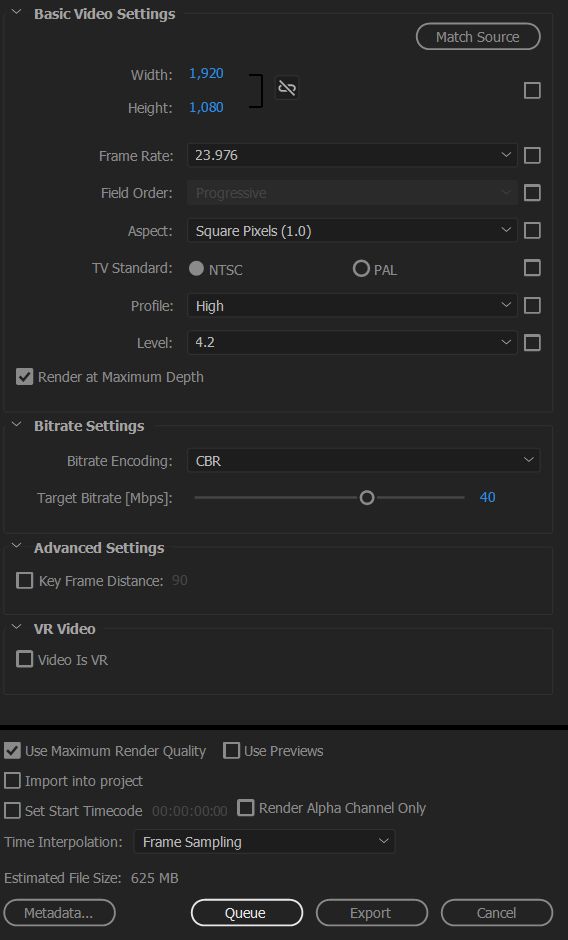
Select the “Video Tab” in the middle of the export settings dialog box and set “Profile” to “High” and “Level” to “4.2”. Then make sure your “Width” is set to “1,920” and your “Height” is set to “1,080”. Set your frame rate to “23.976”, and check the “Render at Maximum Depth.”
Under “Bitrate Settings” set “Bitrate Encoding” to “CBR” and your “Target Bitrate [Mbps] to “40.” Lastly, check “Use Maximum Render Quality” at the bottom.
HD Video export settings for YouTube, Vimeo, Facebook, etc.
BITRATE SETTINGS FOR GIVING YOUR 1080p VIDEO TO CLIENTS
If you are not planning on uploading your video to an online video site, and instead are giving it to a client, I would recommend using these bitrate settings because the file size won’t be nearly as large.
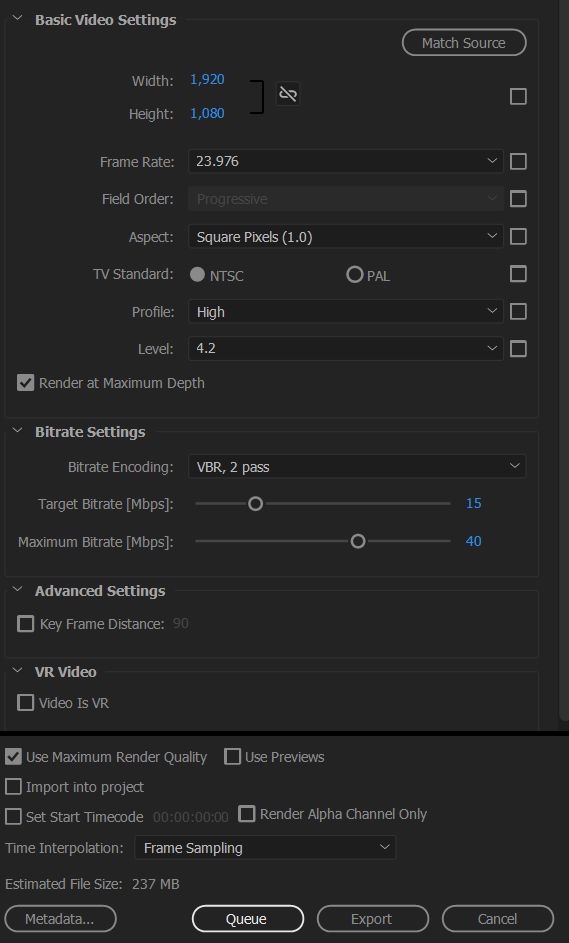
For “Basic Video Settings” use the same settings as you would if you were uploading to an online video site. For “Bitrate Settings,” change “Bitrate Encoding” to “VBR, 2 Pass.” Set “Target Bitrate [Mbps]” to “15” and Maximum Bitrate [Mbps] to “40”. Lastly, check “Use Maximum Render Quality” at the bottom.
HD Export settings for rendering your videos for clients.
CHANGE YOUR AUDIO EXPORT SETTINGS
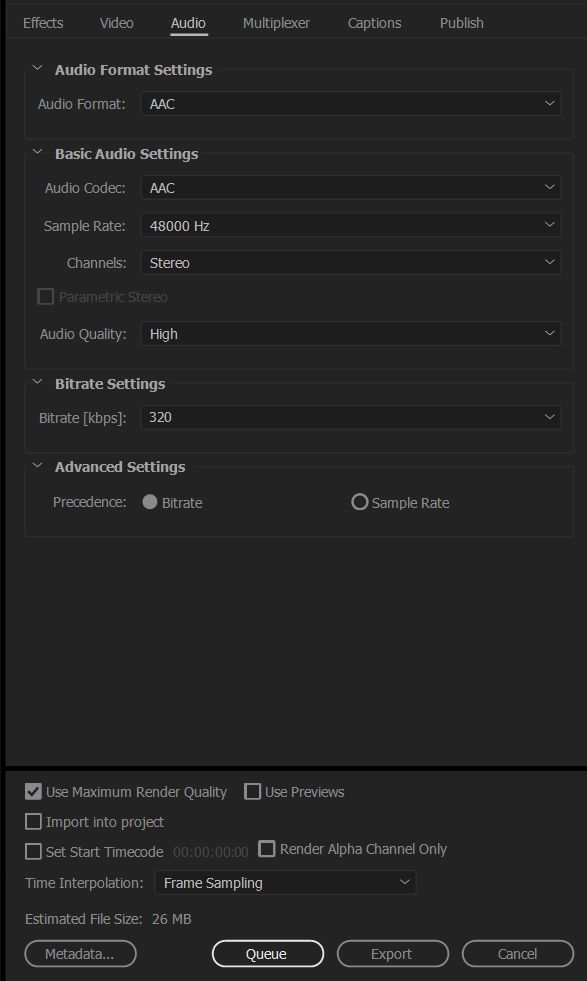
Click the “Audio” tab in the middle of the Export Settings window and for “Audio Format” select “AAC”. Under Basic Audio Settings, set the “Audio Codec” to “AAC”, Sample Rate to “48000 Hz”, “Channels” to “Stereo”, and “Audio Quality” to “High”. Lastly, for “Bitrate Settings” set “Bitrate [kbps]” to “320” and under Advanced Settings set “Precedence” to “Bitrate”.
Audio export settings.
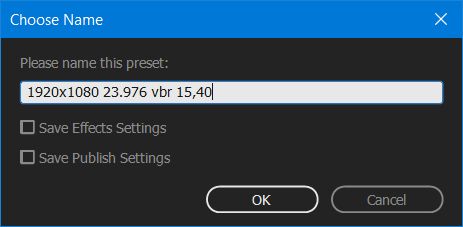
SAVE YOUR VIDEO PRESET
Now that you have created your video settings, click the down arrow icon to the right of your “Preset” at the top, and name your new Export Preset either “1920×1080 23.976 cbr 40” or “1920×1080 23.976 vbr 15,40” depending on whether you are saving the 40mbps CBR preset or the 15,40 VBR preset.
EXPORT YOUR VIDEO
You are ready to click “Queue” or “Export” at the bottom of the dialog box and render your video!
I hope this video and tutorial has been helpful to you. As always, if you have any questions or comments, please feel free to leave one below or get in touch.