I use a prism in my wedding filmmaking, and many of you have been asking why I use it, and how? Here are 4 techniques that I use to make this prism an awesome $16 investment for any filmmaker.
💡 Buy the prism here: http://amzn.to/2E9Ddhq
ART LIST – (free extra 2-months when you subscribe using this link!)
Sound Stripe – (use the coupon code “WHOISMATT” for 10% off a yearly or monthly subscription!)
Filmstro – (use the coupon code “WHOISMATT20_ANN” for 20% off all yearly licenses)
I’m required to state that I’m a part of affiliate programs for Amazon, B&H, SoundStripe, ArtList, Musicbed, and Adobe and that some of the links above are affiliate links.
Most of my ideas for tutorials come from struggles that I have experienced while learning how to edit videos. I’ll be needing to know how to do something, there’s no video or tutorial readily available, and I’ll eventually end up figuring it out on my own.
Take this tutorial for example: back in 2013 I was really getting into timelapses, shooting them all over Texas and around the country. In the process of shooting these though, I realized that my camera sensor had a lot of dust spots on it that I hadn’t noticed while filming 1080p video, but were definitely obvious in a 4K timelapse. Unlike Photoshop or Lightroom though, editing video involves moving pictures, so you can’t just clone or healing brush some dust away, because it will be immediately obvious when you hit play.
Thankfully after a lot of research, I found a tutorial on the Magic Timelapses Blog written by a guy (I think his name is Michael) back in 2010. In it, he detailed how he used After Effects to quickly and easily remove dust and sensor spots from any video. I was completely mindblown and proceeded to use this technique for years.
More recently, as I’ve been creating more video tutorials, reviews, and other helpful videos for filmmakers, I realized that this method of removing dust and sensor spots from videos is now even more necessary. With 4K video and mirrorless cameras, it is no longer a question of if you will get a dust spot, but when. My goal with this tutorial is to save you a ton of time, headache, and stress, and to show you how to quickly and easily remove dust and sensor spots using Premiere Pro. And if you have a lot of dust spots, I show you how to do it even quicker in After Effects.
As always, if you have any questions or comments about this tutorial, wedding filmmaking, or creating videos in general, please feel free to get in touch.
Save time and download my free 4K Export Preset for Premiere Pro!
Way back in 2012 I wrote a blog post about my export settings for high definition videos in Premiere Pro. That post went on to become one of the most popular posts on my site. Wanna know what the second most popular post was? My video export settings for Instagram videos in Premiere Pro.
There’s a trend here, and I realized that with the advent of 4K video, I had the opportunity to create a new text and video tutorial about the settings that I use when shooting with my Sony A7Sii. As I prepared to create this tutorial, I decided that this would be the perfect time to revisit those posts about my high definition and Instagram export settings, and create videos for them as well.
Adobe Premiere Pro CC 2017 doesn’t look very different from CS5.
My text guide for how to export 4K video in Premiere Pro CC for YouTube and Video
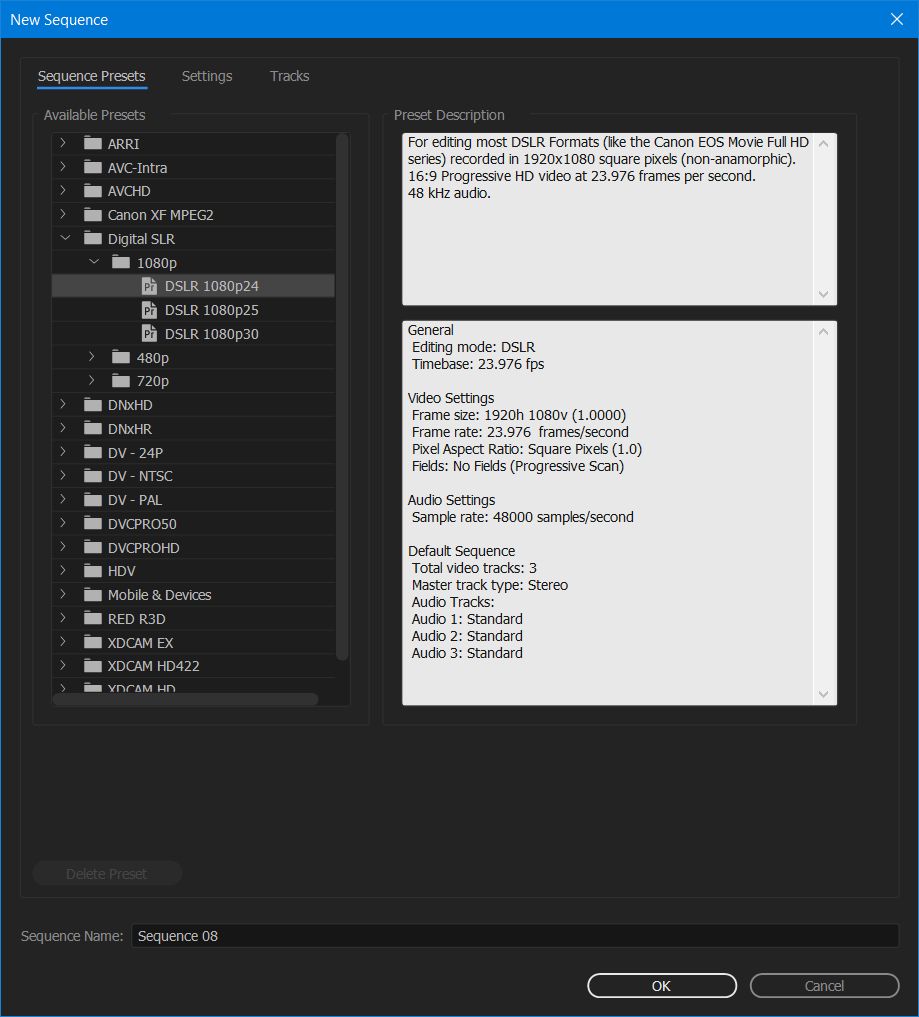
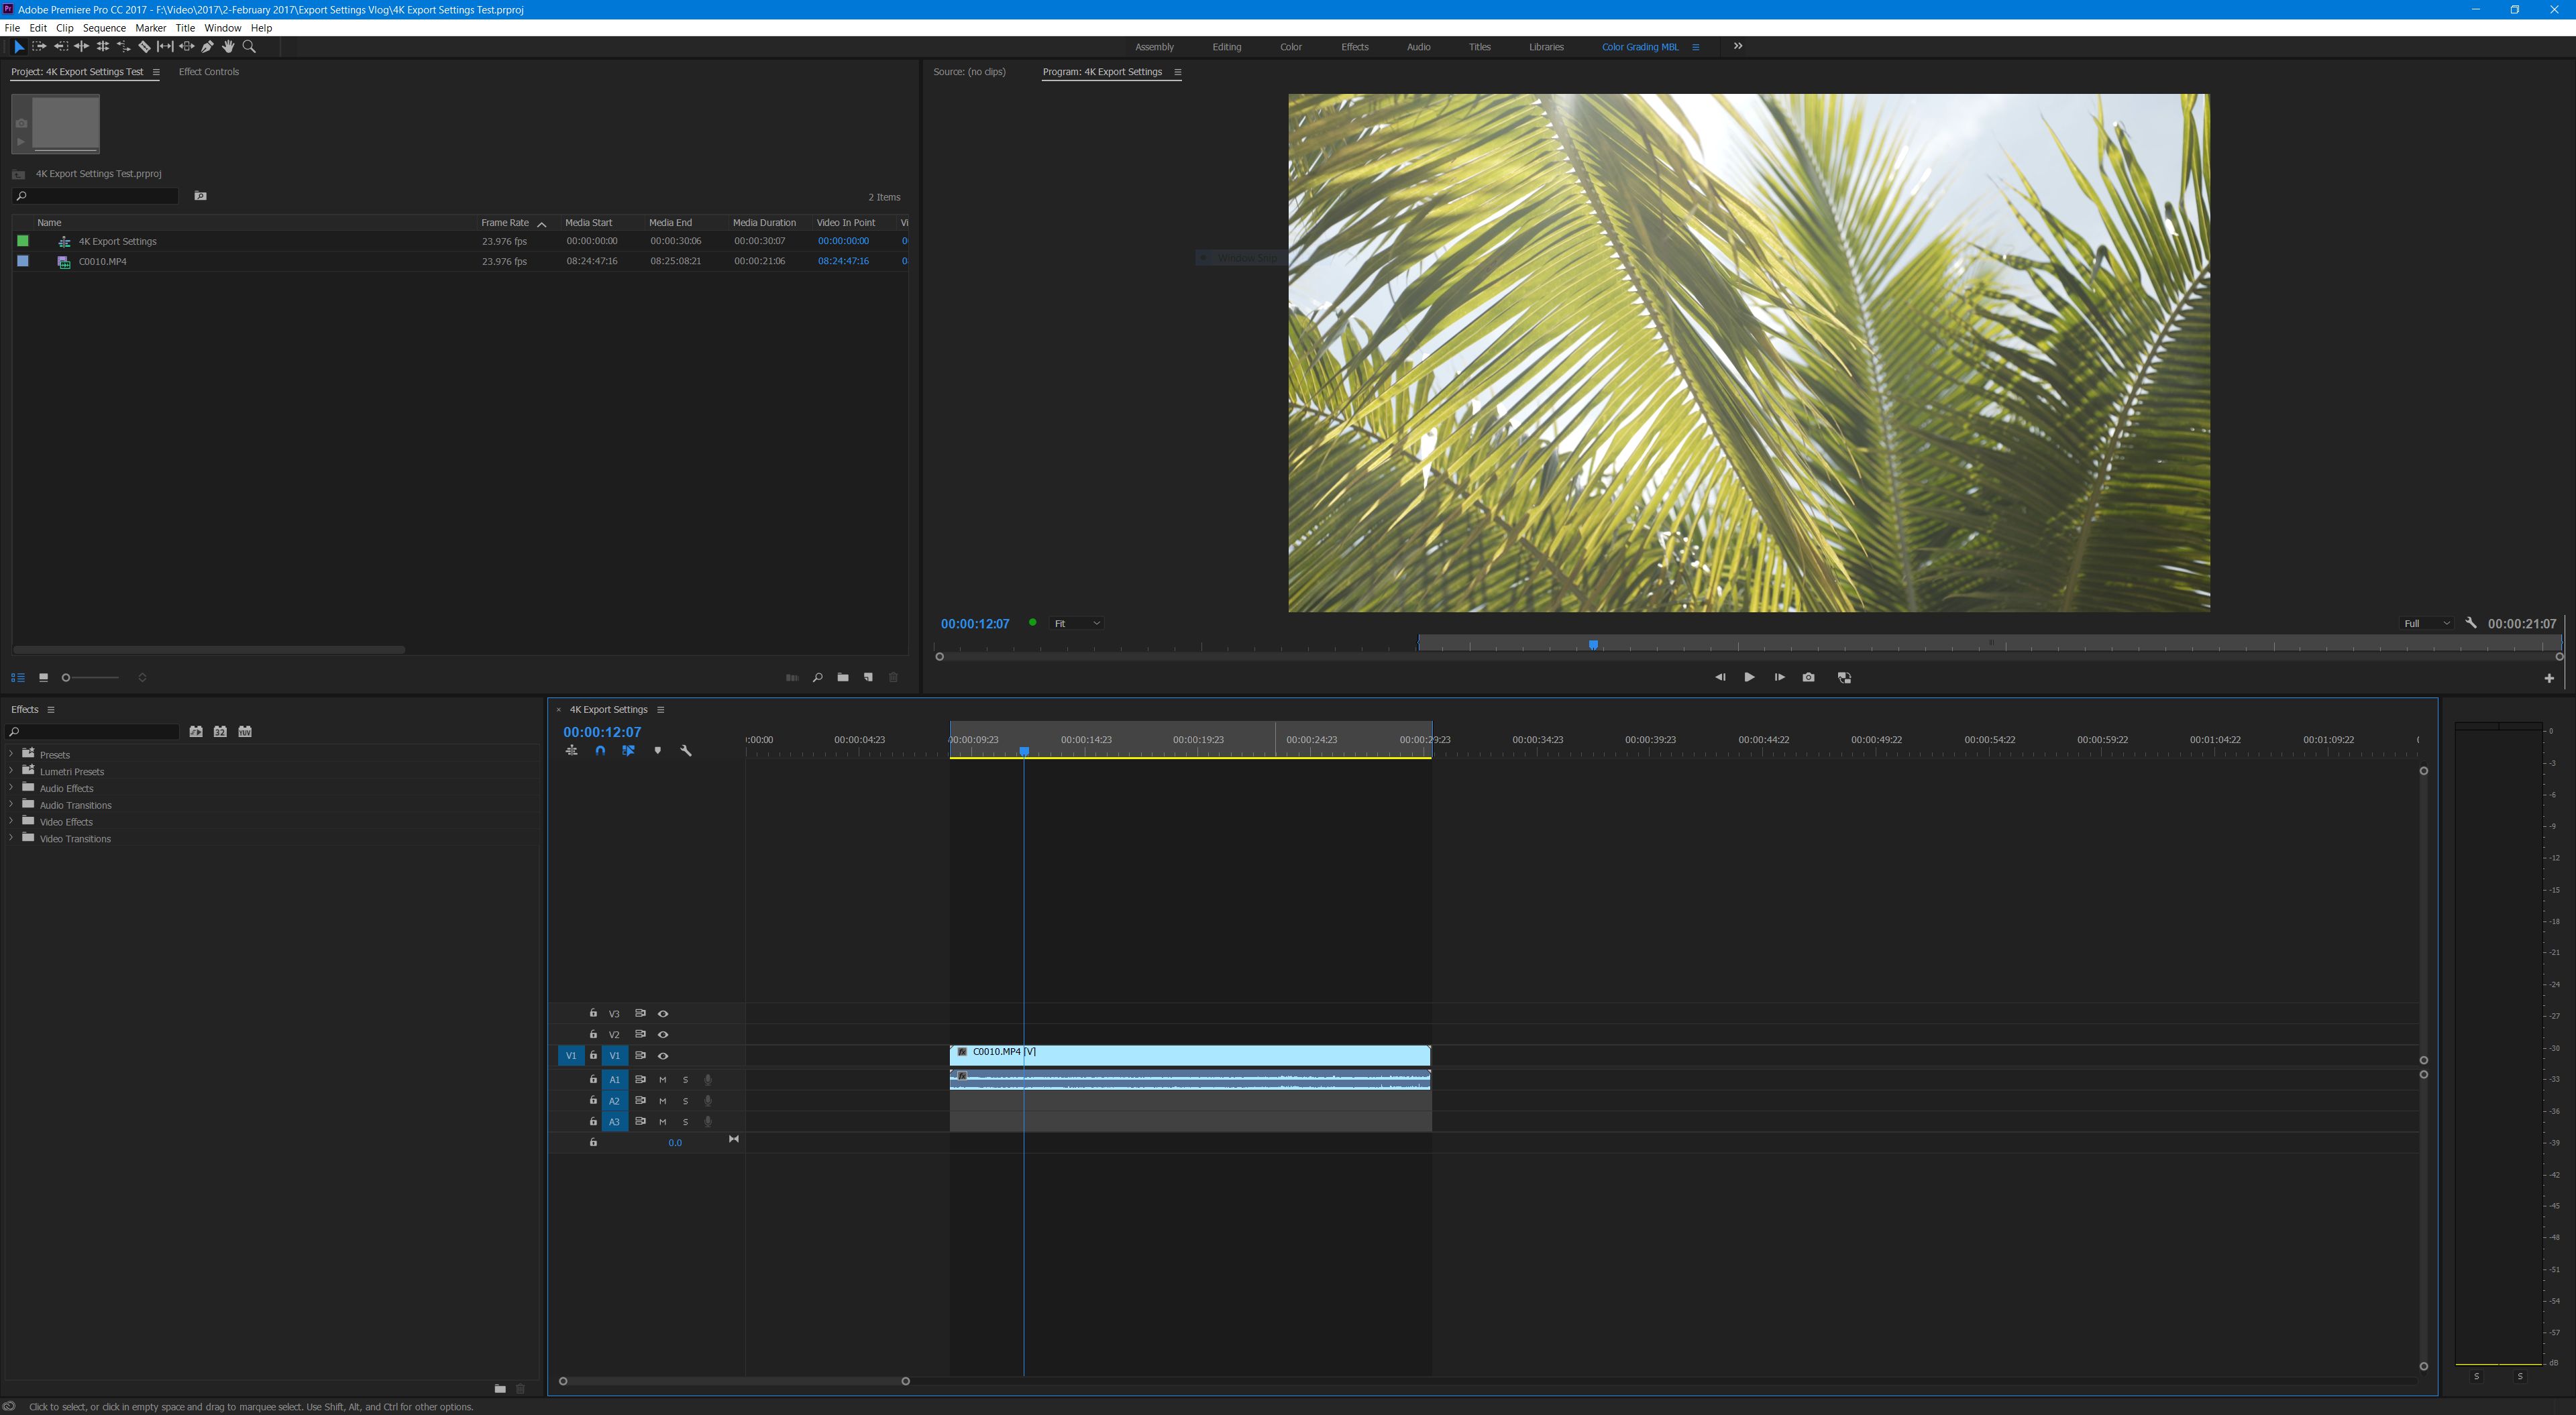
Before I get to my export settings, I need to discuss the sequence preset that I use. Premiere uses the term “sequence” to describe the timeline that you will use when editing your video. It is important to select a sequence preset that is the same as the video settings that you used when filming with your camera. You can use “Ctrl + N” or go to “File > New > Sequence” to open the new sequence dialog box. For the video clip I use in this project, I filmed in 3840×2160 resolution at 23.976 fps with the Sony A7Sii. I need to select a new sequence preset that is the same as these video settings.
The New Sequence Preset Window
SEQUENCE PRESET SETTINGS
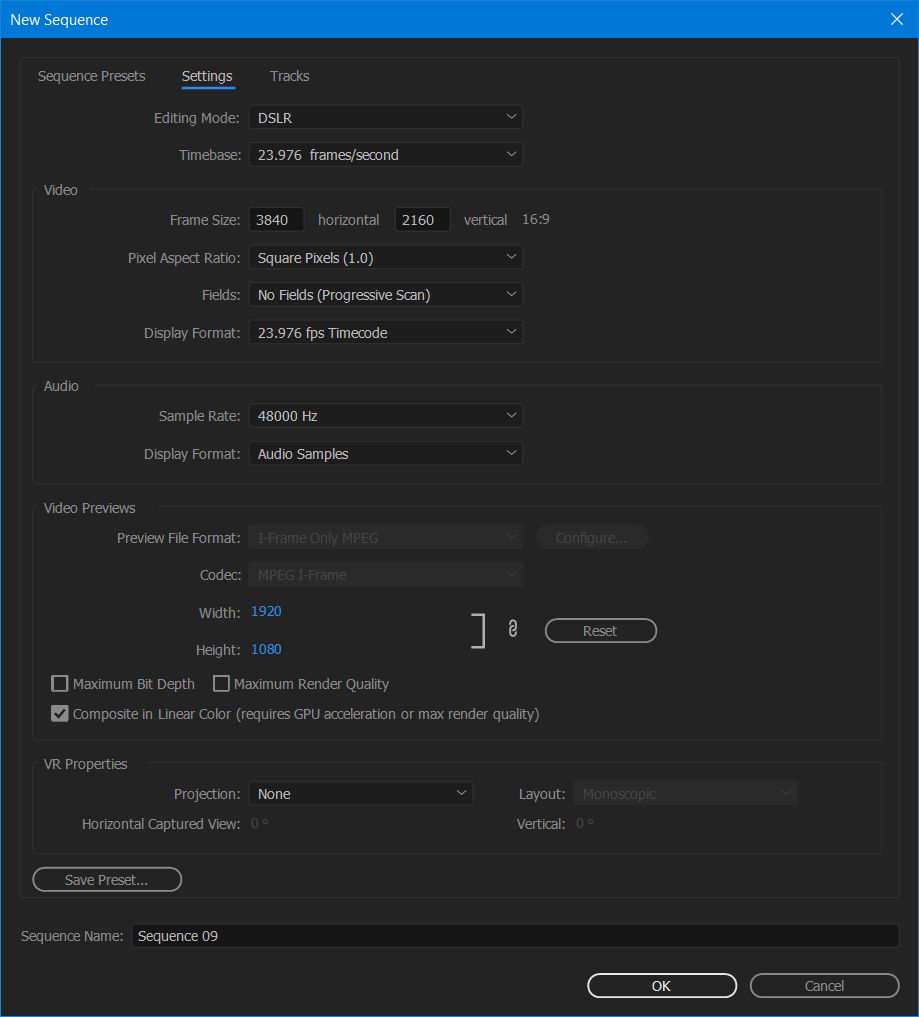
Once you have opened the New Sequence window, you have many presets to choose from. Because there aren’t any available for 3840×2160 footage, I would instead select “Digital SLR > 1080p > DSLR 1080p24” and then select the “Settings” tab at the top of the window. Under the “Video” heading, change the “Frame Size” to “3840 horizontal” and “2160 vertical”. Keep the rest of the settings the same as the preset.
New Sequence Settings
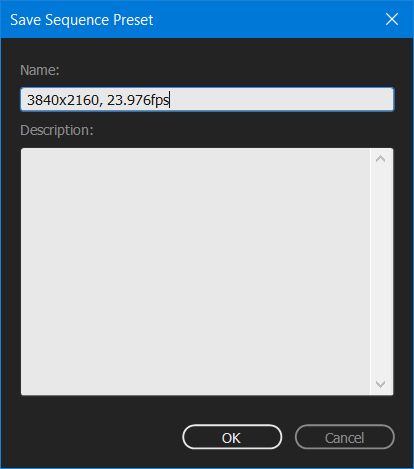
SAVE YOUR NEWLY CREATED PRESET
Click “Save Preset” at the bottom and save your settings as a new preset. I named mine “3840×2160 23.976fps” so I can easily remember it when editing future videos. Next select your newly made preset, and edit your video clips on the timeline you have created.
Save your sequence preset.
SET YOUR IN AND OUT POINTS
Once your video is edited and ready to render. You need to set your “In” and “Out” points. Do this by moving the video playhead to where you want the opening frame of your rendered video to begin and press the “I” key on your keyboard. Then move the playhead to the end of your video and select the “O” key on your keyboard. The timeline will turn a darker color where your in and out points are selected. It is now time to export your video! With the timeline selected you can either press “Ctrl + M” on the keyboard, or navigate to “File > Export > Media” in the menu.
Set your “In” and “Out” points.
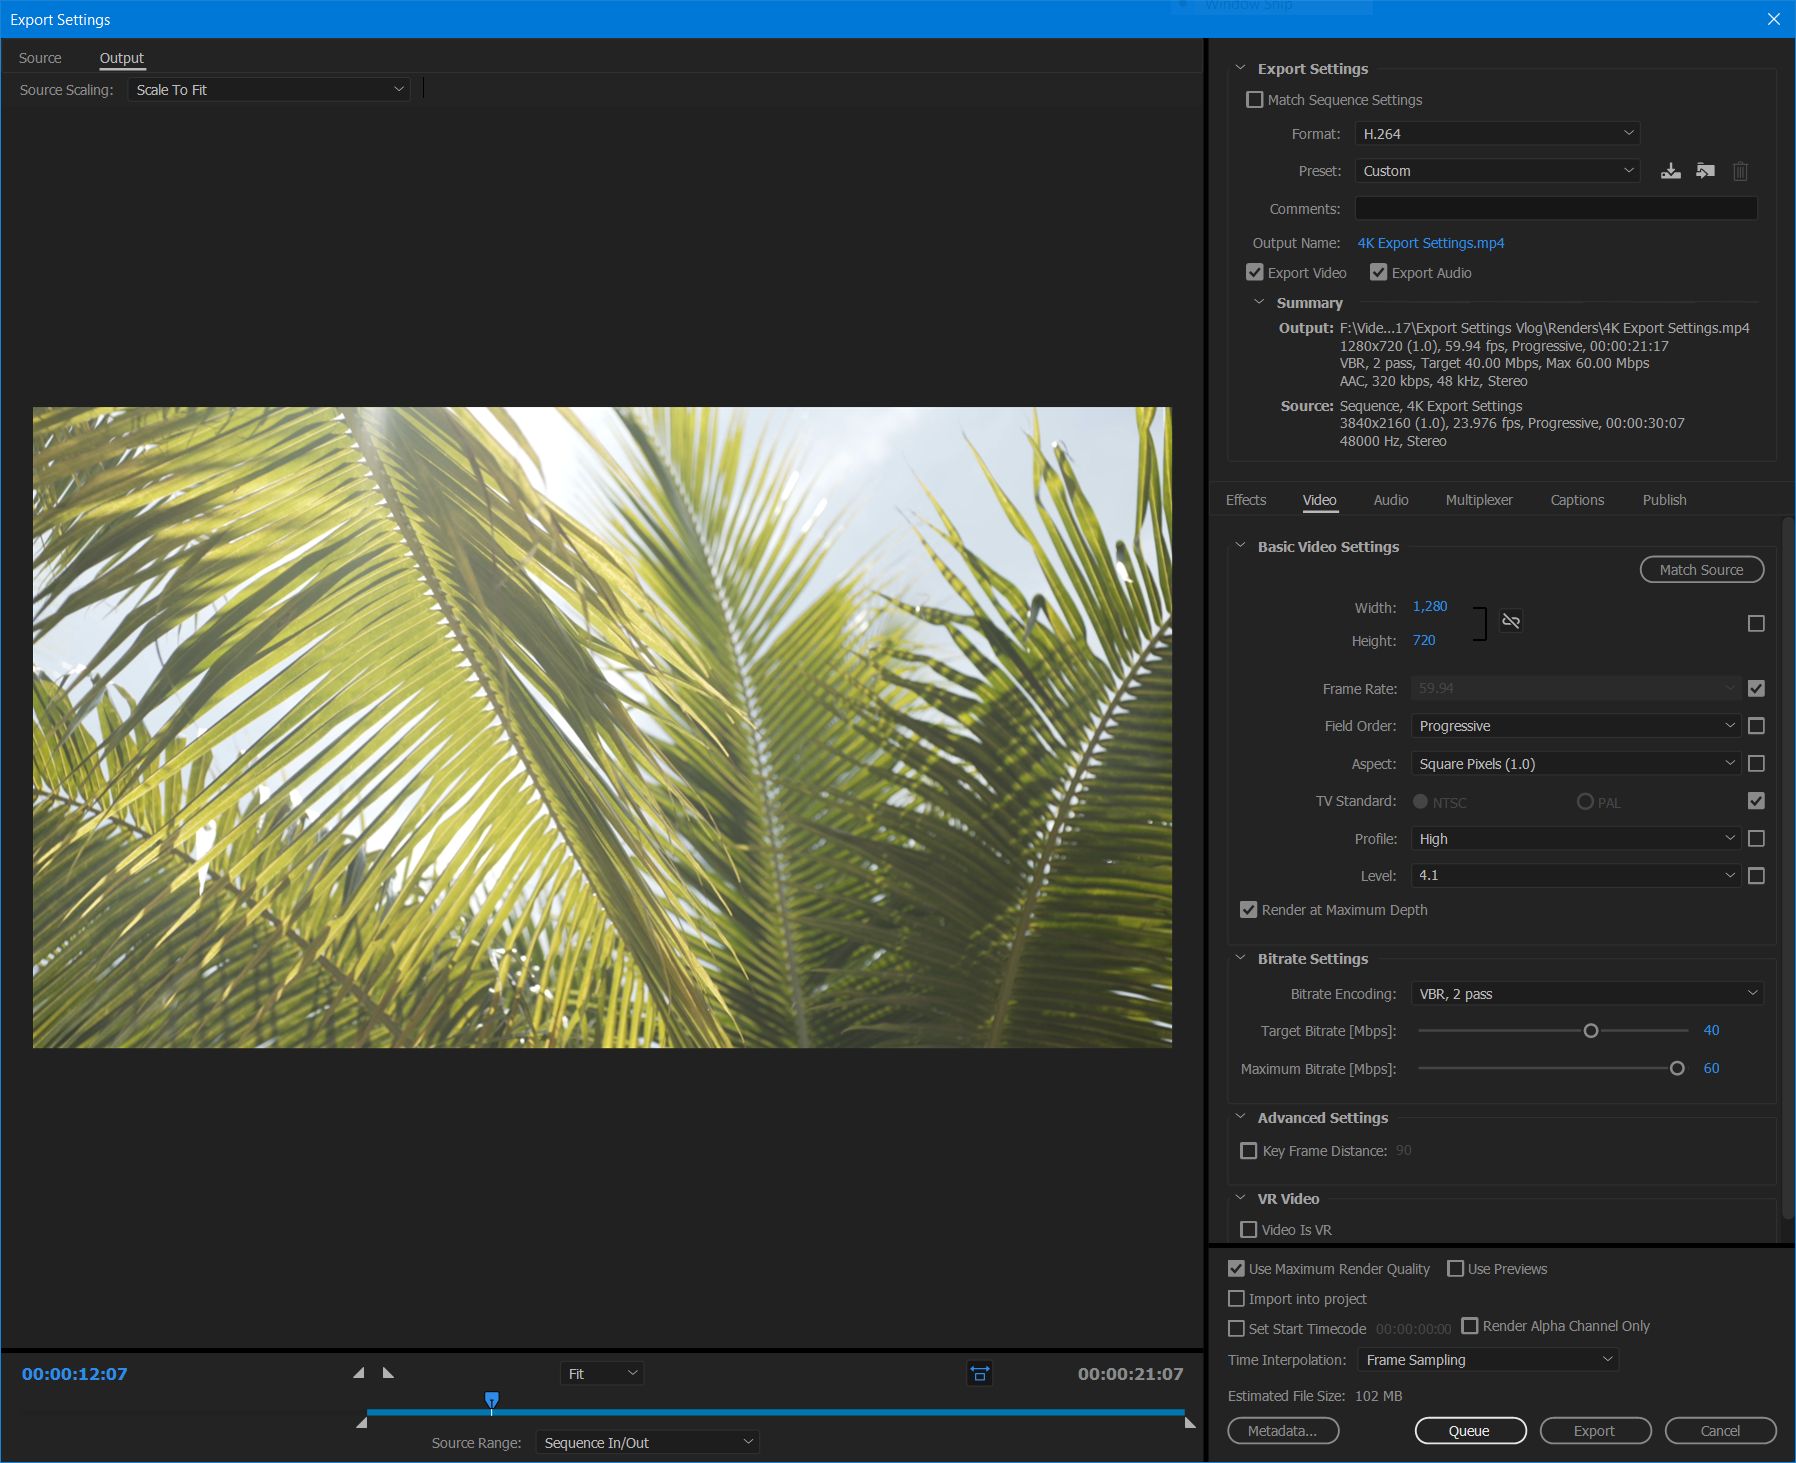
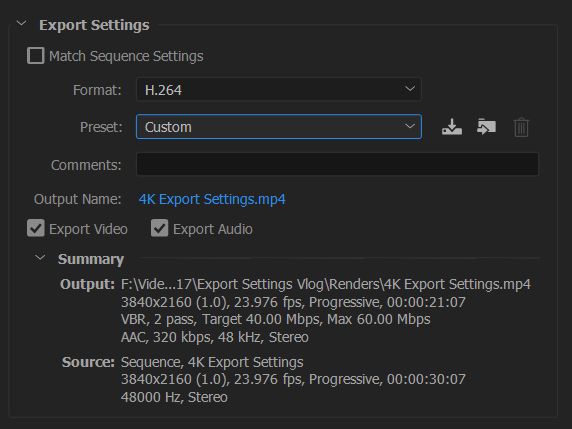
BEGIN CHANGING YOUR EXPORT SETTINGS
You’ve now opened the “Export Settings” dialog box and there’s approximately 3,000 settings you could change. Don’t freak out though, we’re going to tackle this one section at a time. First, under the “Export Settings” heading on the left, next to “Format” select “H.264” from the drop down menu. For Preset select, “Custom.” Click the blue text next to “Output Name” and select a name and location to save your video file. Make sure both the “Export Video” and “Export Audio” boxes are checked.
How the export settings dialogue box looks upon opening it for the first time.
The export settings heading of the dialog box.
BASIC VIDEO SETTINGS AND BITRATE SETTINGS FOR YOUTUBE, VIMEO, FACEBOOK, AND OTHER VIDEO SITES
If you are uploading your video to YouTube, Vimeo, Facebook, or any other video site that supports 4K, I recommend using the below settings. The file sizes will be quite large, but this will ensure that your video retains its quality when you upload it to these sites and they convert it into different formats and resolutions. Also, if you want to know my reasoning for choosing these settings, please watch the tutorial video.
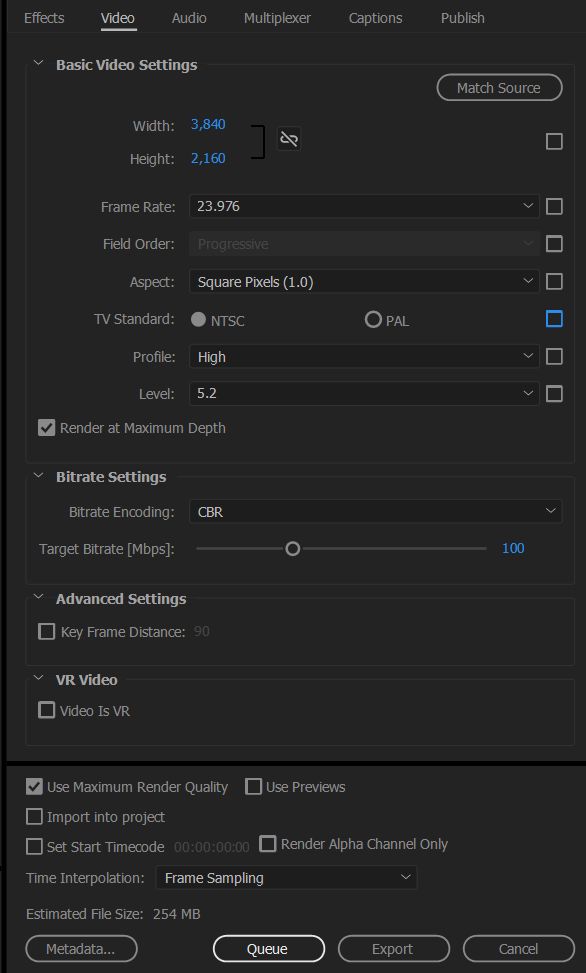
Select the “Video Tab” in the middle of the export settings dialog box and set “Profile” to “High” and “Level” to “5.2”. Then make sure your “Width” is set to “3,840” and your “Height” is set to “2,160”. Set your frame rate to “23.976”, and check the “Render at Maximum Depth.”
Under “Bitrate Settings” set “Bitrate Encoding” to “CBR” and your “Target Bitrate [Mbps] to “100.” Lastly, check “Use Maximum Render Quality” at the bottom.
Basic video settings and Bitrate settings.
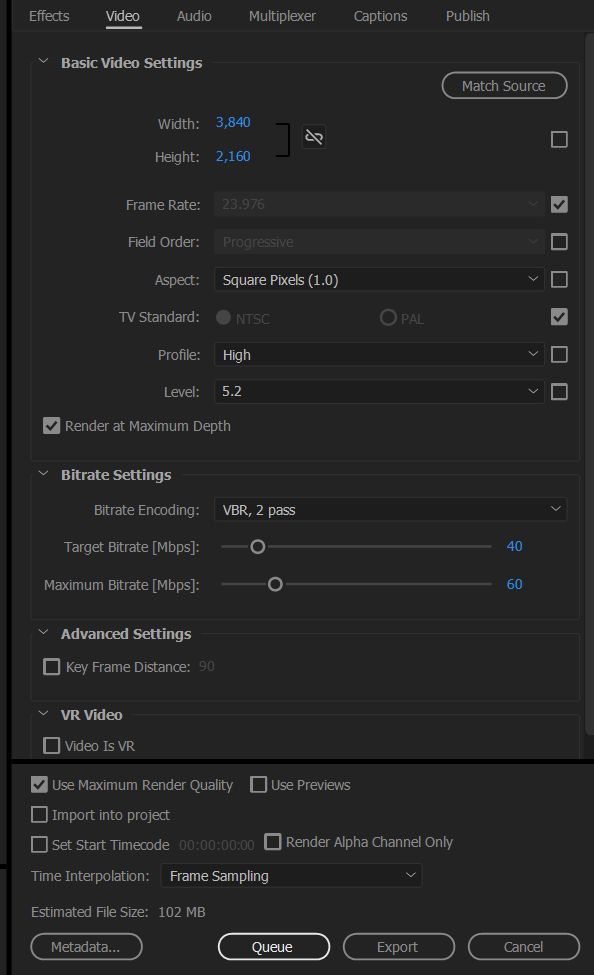
BITRATE SETTINGS FOR GIVING YOUR 4K VIDEO TO CLIENTS
If you are not planning on uploading your video to an online video site, and instead are giving it to a client, I would recommend using these bitrate settings because the file size won’t be nearly as large.
For “Basic Video Settings” use the same settings as you would if you were uploading to an online video site. For “Bitrate Settings,” change “Bitrate Encoding” to “VBR, 2 Pass.” Set “Target Bitrate [Mbps]” to “40” and Maximum Bitrate [Mbps] to “60”. Lastly, check “Use Maximum Render Quality” at the bottom.
Basic Video Settings and Bitrate Settings for clients.
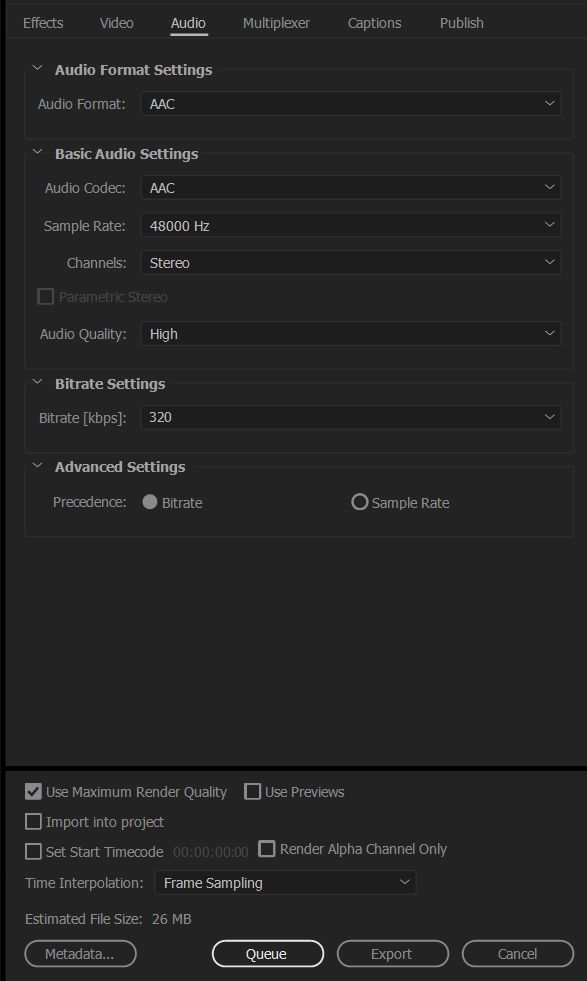
CHANGE YOUR AUDIO EXPORT SETTINGS
Click the “Audio” tab in the middle of the Export Settings window and for “Audio Format” select “AAC”. Under Basic Audio Settings, set the “Audio Codec” to “AAC”, Sample Rate to “48000 Hz”, “Channels” to “Stereo”, and “Audio Quality” to “High”. Lastly, for “Bitrate Settings” set “Bitrate [kbps]” to “320” and under Advanced Settings set “Precedence” to “Bitrate”.
Audio export settings.
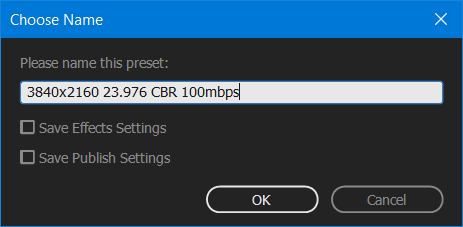
SAVE YOUR VIDEO PRESET
Now that you have created your video settings, click the down arrow icon to the right of your “Preset” at the top, and name your new Export Preset either “3840×2160 23.976 100mbps cbr” or “3840×2160 23.976 40,60 vbr” depending on whether you are saving the 100mbps CBR preset or the 40,60 VBR preset.
Video Export Preset
EXPORT YOUR VIDEO
You are ready to click “Queue” or “Export” at the bottom of the dialog box and render your video!
I hope this video and tutorial has been helpful to you. As always, if you have any questions or comments, please feel free to leave one below or get in touch.
Before I get to the main blog post I have a big announcement to make: I am now offering personal one-on-one hourly filmmaker consulting! Want me to critique your latest wedding film? Need recommendations about cameras, lenses, or lighting? Wanna chat about beard maintenance for an hour? I would love to talk with you, so please get in touch and schedule a consult today.
The first 5 people that signup for consulting can use the coupon code “take100” to get $100 off your first hour of consulting. 🙂
And now, on to your regularly scheduled blog post!
This is a big one. I’m giving all my audio secrets away! For over a year, the most requested topic for me to talk about is audio. Everyone apparently wants to know how I approach recording audio for a wedding film, the exact gear that I use to record the wedding notes, ceremony, and toasts, and how I make everything sound great. Well today is the day that I reveal it all! Strap in for almost thirty minutes of me covering all facets of recording audio for wedding films.
In this video I will cover:
Why audio is such a big deal for you and your audience.
The exact recorders, microphones, cables, batteries, and accessories that I use throughout the entire wedding day.
Who and what I record during the wedding ceremony.
All the ways to plug into a sound board.
How to handle DJs that won’t let you plug into their sound board.
A foolproof backup that Guarantees(!) that you will record high quality toasts audio.
Below is a full list of the Audio Equipment that I use. You can see this entire list with images and links my Kit page.
As always, if you have any questions or comments, please feel free to leave on below or get in touch.
About 9 years ago, before I was even considering pursuing a career in making videos, I entered a video contest put on by Texas A&M University called “Why I’m an Aggie.” My entry featured students speaking about why they chose Texas A&M and what they enjoyed about the university. Throughout the video, I featured pretty shots of campus that I shot with my trusty Sony HDR-UX1 (recording to mini-DVDs, SD cards weren’t fast or large enough yet).
The shot that set my contest entry apart from the others though, was an aerial video of campus that I filmed from a plane. Yes, I actually rode in a plane over campus to get a shot for my video! This blew away the judges considering that aerial video was still relatively rare (unless you happened to have a pilot father – thanks dad).
Nine years later, aerial video is now mainstream. People are buying Millennium Falcon camera drones, stuffing their dead cats and turning them into quadcopters, and anyone with a cell phone can purchase a flying camera for as little as $20. My aerial video in 2008 that took so much effort and timing, could now be accomplished by any kid with a drone Christmas present. It would probably look smoother and be better colored too.
In August of 2016, the Federal Aviation Administration passed their official rules for commercial drone usage in the United States. Up until this point, if you wanted to make money flying your drone you had to apply for a Section 333 waiver and actually possess a pilot’s license to fly a drone.
You can eat your drone, but I wouldn’t recommend it.
This all changed with the FAA’s Part 107 ruling, which made getting a license to fly your drone for commercial purposes as easy as taking a knowledge test, no pilot’s license required.
Now when I say easy, I mean easier than getting an actual pilot’s license, not that the test itself is easy. Which brings us to this video that I created today, which is all about why you should take the knowledge test, and how to study for and pass it.
In the video, I detail the exact resources that I used to pass the Part 107 knowledge test. These resources are now listed below in order that I speak about them in the video. If you study these materials, you shouldn’t need to spend any extra money on any courses or classes for the test.
But, if you find that you benefit more from a classroom setting, I would recommend checking out Drone Pilot Ground School and Remote Pilot 101.
Here are the study resources that I listed in the video, in order:
OTHER RESOURCES NOT MENTIONED IN THE VIDEO
– SkyVector
– AIRNAV
That’s it! Read and study these articles, listen to the podcast, take the practice test, and when you’re ready, go and take the real thing. If you take your time and prepare, you’ll pass like I did.
As always, if you have any questions or comments, feel free to leave one below or get in touch.