The a7S II mode dial stores six full camera presets, so you can jump between 4K 24, 1080p 60 and 120fps in about two seconds without touching a menu.
Continue reading
The a7S II mode dial stores six full camera presets, so you can jump between 4K 24, 1080p 60 and 120fps in about two seconds without touching a menu.
Continue reading
Ever since I made my first video reviewing the Sony a7S II, people have been asking me what camera settings I use. I’ve shown you my picture profile, and I talked about lenses a little bit in my review of the a7S II, but I’ve never made a video that goes all the way through my settings, and I have definitely never talked about my run and gun settings. So that changes here.
By run and gun I mean I need to get to the settings on this camera as fast as humanly possible, change them, and then have the camera get out of my way so I can tell the best story I can on a wedding day. And this may be an understatement, but Sony is not known for having the most intuitive menus. So the more settings I can push out onto buttons and dials and toggles and switches, the faster I can shoot.
Imagine being on a shoot and never having to open the menu for anything except formatting a card. Sounds pretty good, right? That’s where this series ends up, and it takes four parts to get there:
Why four videos instead of one quick five minute one? Because it isn’t enough to just tell you what settings I use. I want to tell you why I use them, so you aren’t out filming with them because Matt said they were good settings, but because you tried them and you know they work for your workflow and your shooting style.
Before we touch anything, hit the menu button, go to the toolbox at the far right, over to subheading six, down to Setting Reset, and reset the camera settings. Now the camera is basically how it comes out of the box and we’re both looking at the same thing.
Then check the mode dial on top and make sure it’s on the film strip. Not M, not S, not A, not P, and heavens no, not Auto. Never Auto. We’re changing video settings, so it goes on the film strip.
One thing that will save you a lot of scrolling: a big chunk of this menu is photo only. Image size, aspect ratio, quality, panorama, drive mode, bracketing, flash, red eye, soft skin, auto object framing, scene selection, silent shooting, AF microadjust, all of it is for stills. Whenever you see a little photo icon next to a setting, you can move right past it.
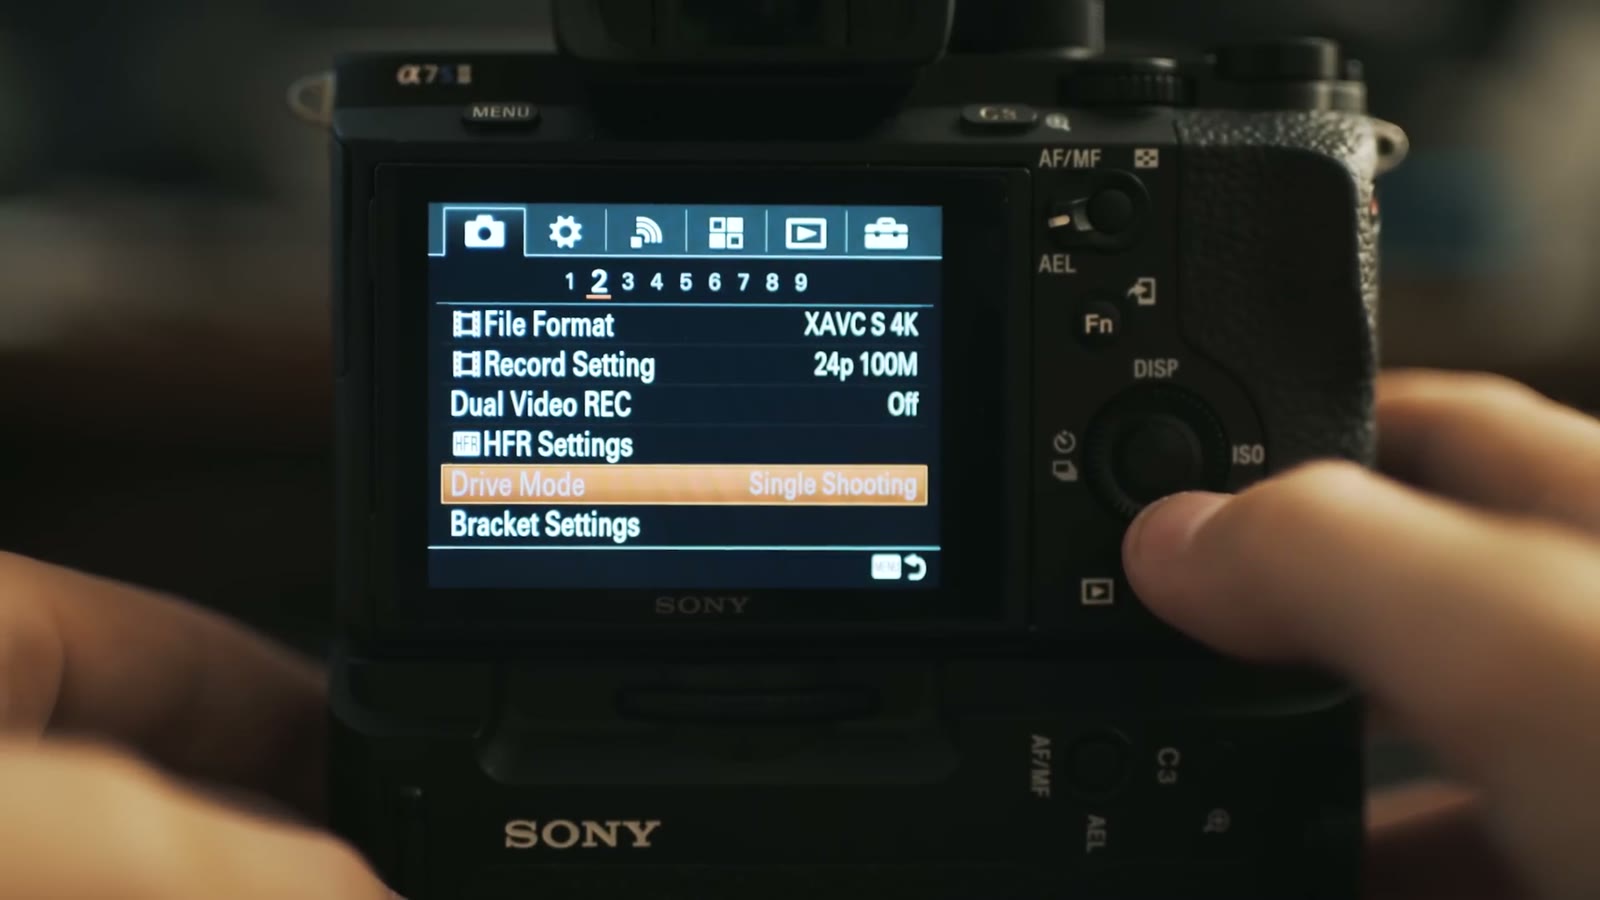
This one is huge. Set File Format to XAVC S 4K or XAVC S HD depending on what you’re shooting. Do not shoot AVCHD or MP4, they are not Sony’s latest codec and they will not look as good. If you want the best color grading depth and the best looking image, it’s one of the two XAVC S options, and lately I’ve been shooting XAVC S 4K because I want that quality.
Then Record Setting goes to 24p 100M. You’ll also see 30p 100M and 30p 60M in there. Always pick one of the 100M options, because the 60M ones are just lower video quality, and that goes double in 4K where you want every bit of data you can get.
Dual Video REC is really cool and underused. This camera can record a 720p proxy alongside your main file, so if your computer chokes on 4K you can edit the 720p files and relink them to the 4K at the end of the edit. 4K plus 720p, 1080p plus 720p, whatever you want. It saves you and your computer a lot of stress.
HFR settings look like they’d matter here and they really don’t for what we’re doing, so leave them alone.
If you’re on a native Sony E mount lens, Focus Mode lights up and gives you two options: AF-C, which is continuous autofocus, and MF, which is not what you’re thinking, you sicko, it’s manual focus. I use continuous AF a lot, especially whenever I’m flying the glidecam.
Focus Area gives you wide, zone, center, flexible spot, expand flexible spot, and lock on AF. Ninety percent of the time mine is on wide, because the camera picks something in most of the frame and I’m usually shooting pretty wide anyway so I want everything sharp. If you’re doing a slider move and you want the cake in focus and nothing else, that’s what zone or flexible spot are for. There’s a much faster way to get at this, and it’s in the function menu video.
While you’re in here, turn AF Illuminator off. It’s a photo thing that flashes a little light at people and it’s weird.
Open ISO and everything looks grayed out, which panics people. Scroll down a little and the options appear, starting at 50. Set it to something like 100 so you’re off Auto ISO, because Auto ISO is gross and you do not want the camera making that decision during a ceremony.
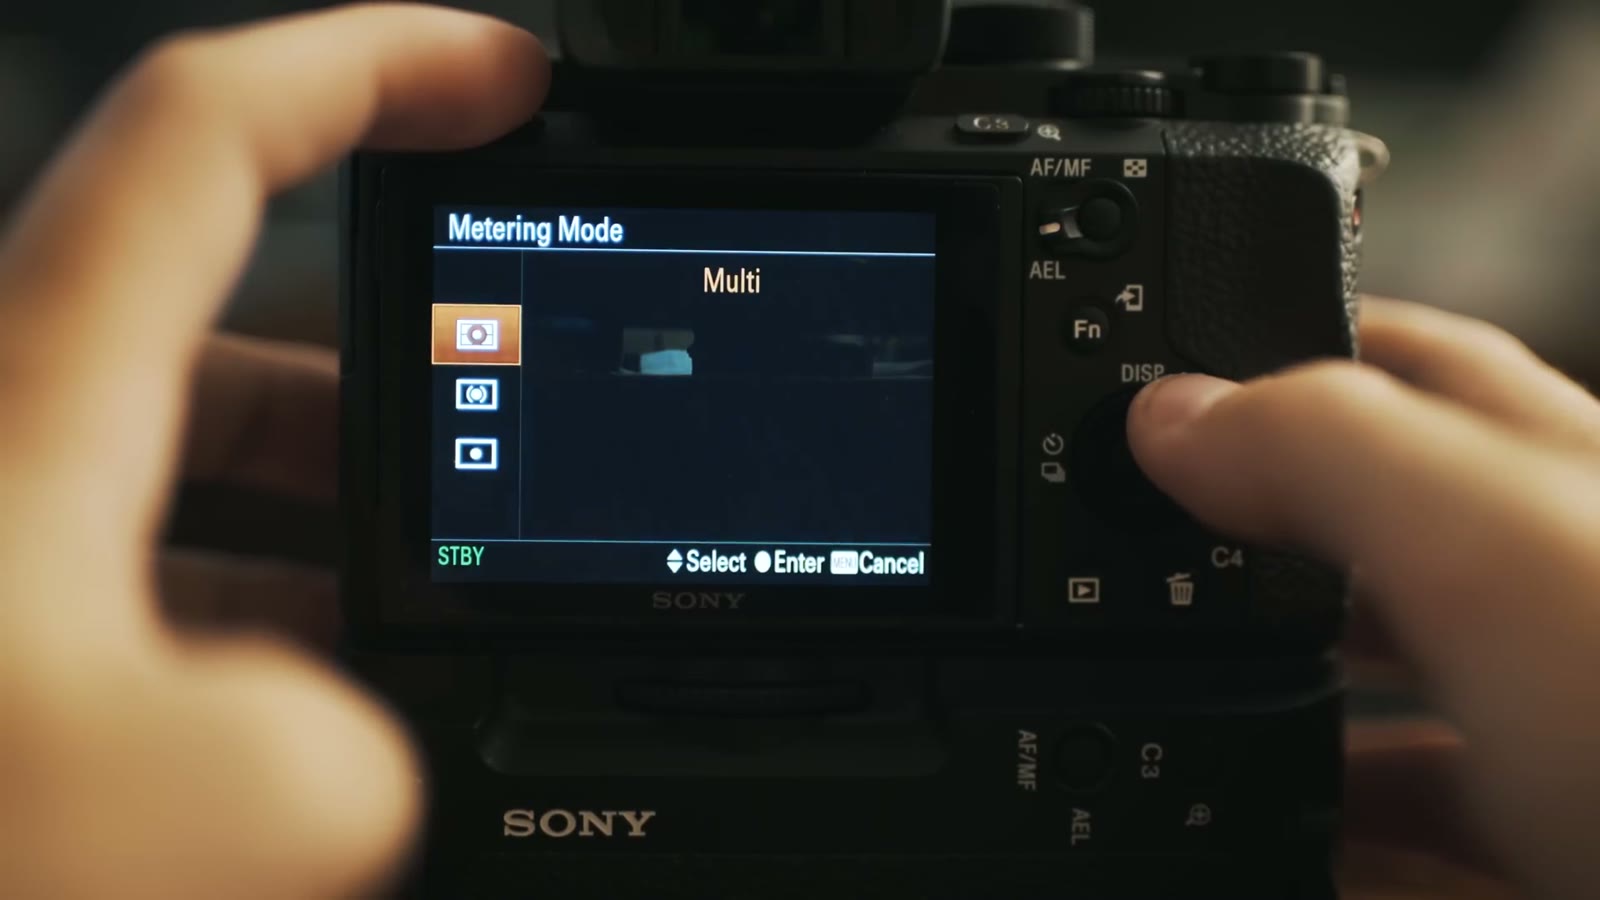
Metering Mode I leave on Multi. Multi means the camera analyzes all the light in the frame, so whenever you’ve got a blown out window shining in it knows the image is hot. Spot and center only meter the middle, and since we’re shooting video and not composing everything dead center, Multi is the one.
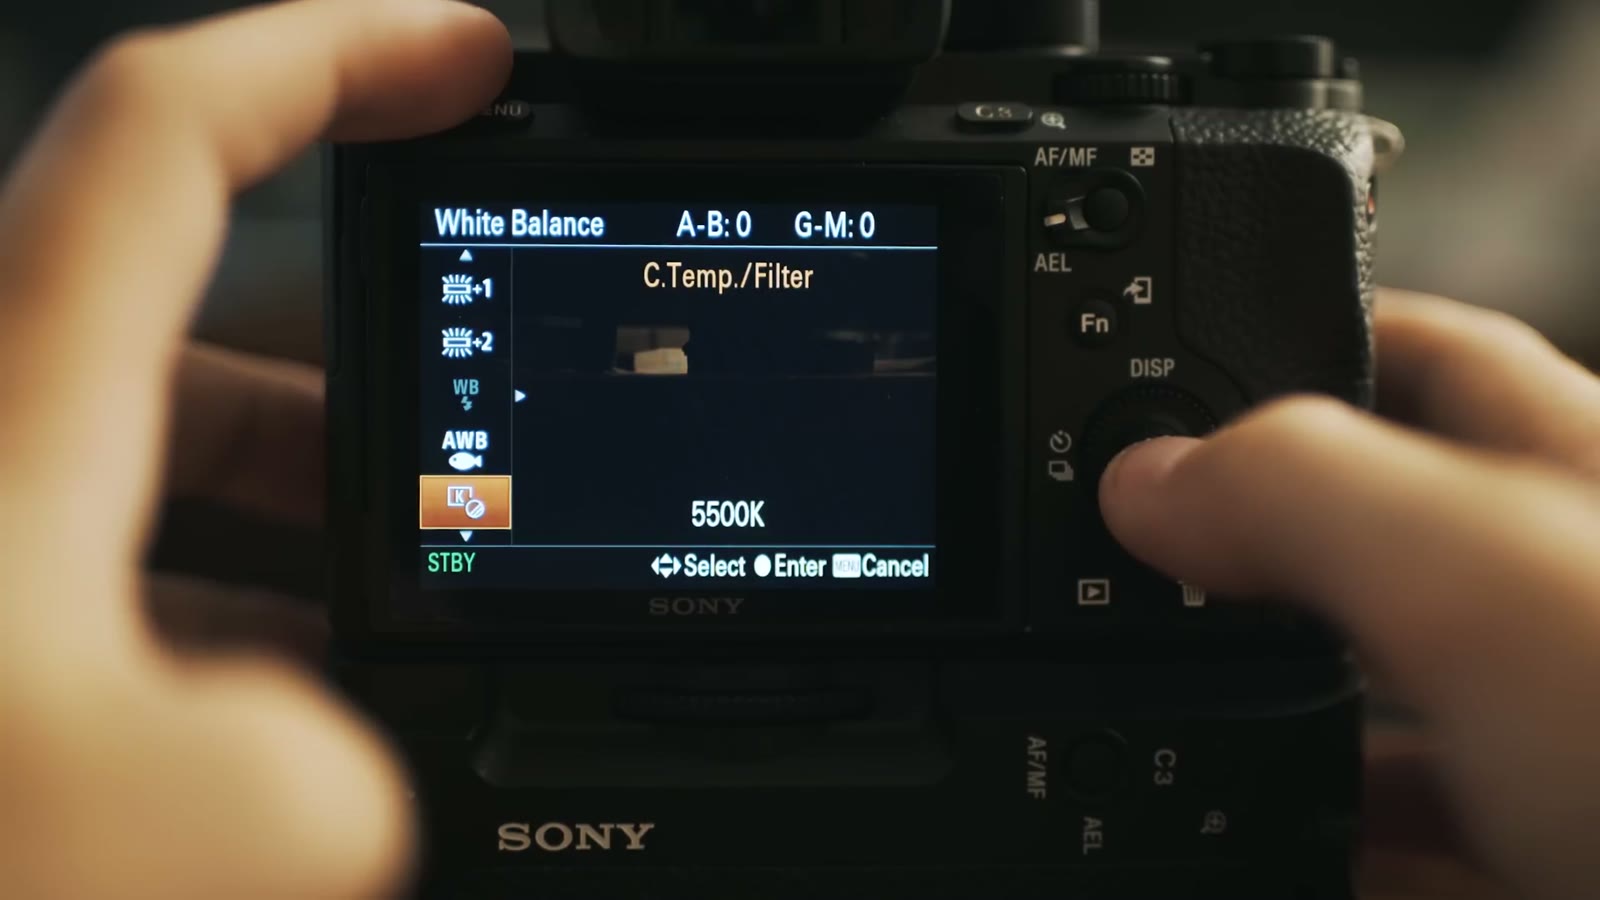
Auto white balance is a horrible idea, so scroll down to C.Temp./Filter, the one with the little K icon. Press right and you can spin the control wheel up and down to dial in your color temperature by hand.
And yes, digging into the menu every time you walk into a different room is miserable, which is exactly why the custom buttons video exists.
Turn DRO/Auto HDR off, leave Creative Style on standard and don’t touch it with a ten foot pole, and never, ever go near Picture Effect. Toy camera, pop color, posterization, retro. These are disgusting. Don’t do it to yourself.
Picture Profile is the one that actually matters, and mine is set to PP8. Rather than repeat myself here, go watch my favorite picture profile video, which explains all my settings and why they’re set that way, and then watch my color grading video so you’re not sitting there going “Matt, this looks washed out and gross, why would I use this.” Between those two you’re covered.
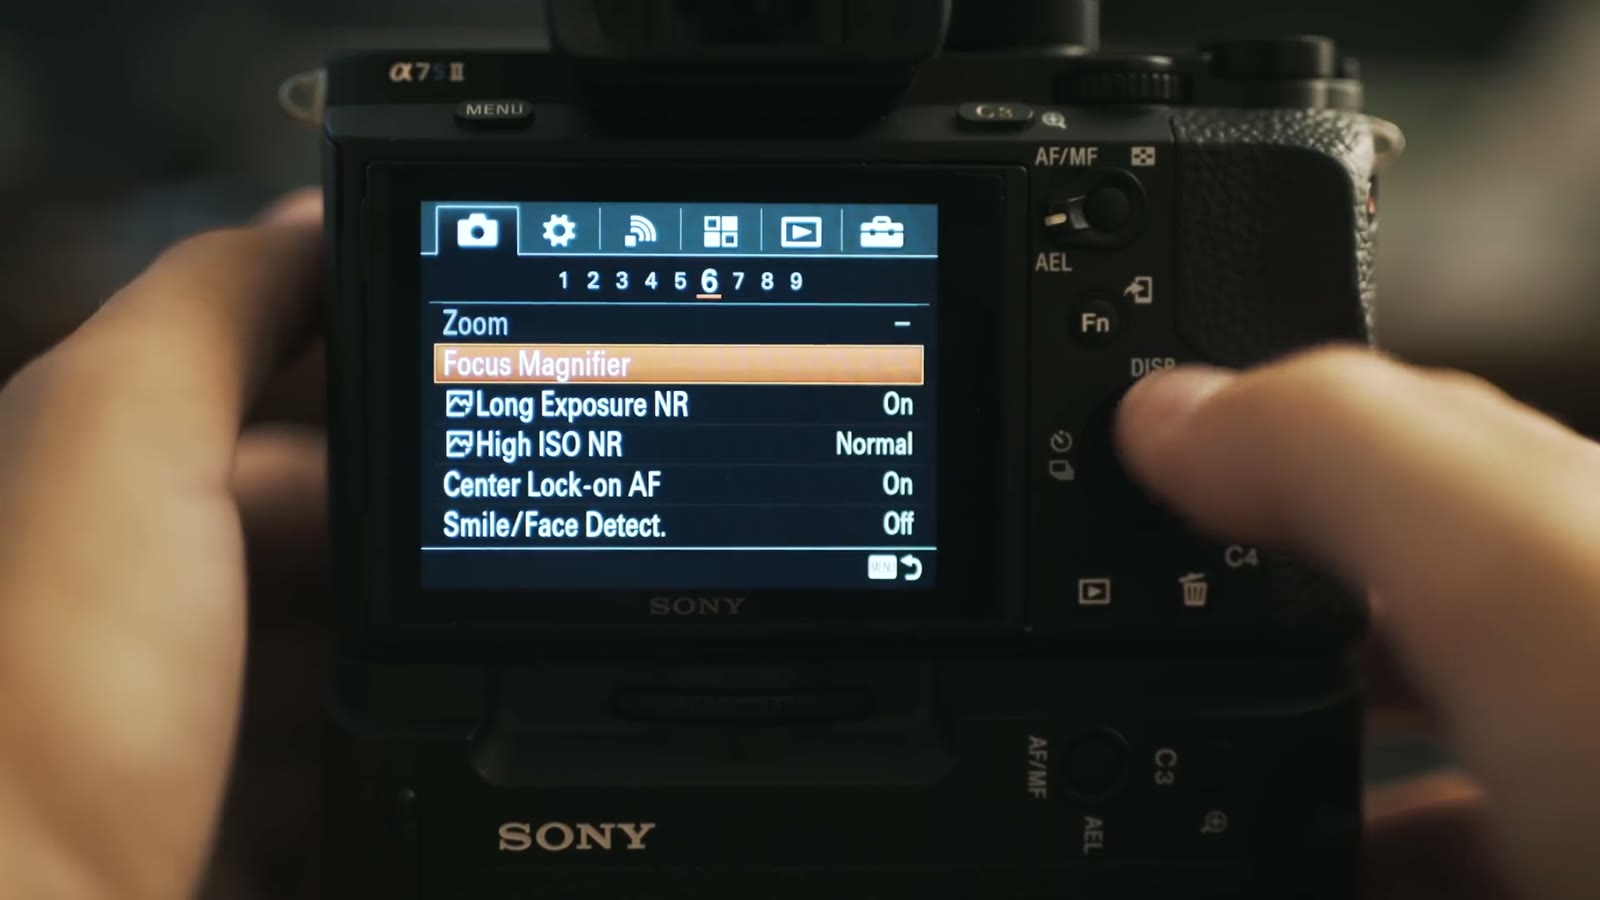
Focus Magnifier punches in so you can check focus, which is great, except getting to it through the menu is a pain. That gets a button in part three.
Turn Long Exposure NR and High ISO NR both off. I’m fairly sure they only apply to photos, but I turn them off anyway because I don’t want the camera deciding to smear my footage on my behalf.
Smile/Face Detect is the fun one. Set it to On, skip Register Faces for now, and leave it there. It works with continuous autofocus, so whenever I’m filming a bride getting ready and I’m on AF, the camera knows to grab the face instead of the flowers. It works for video and I like it a lot.
This is the one I get emails about. Look at the top left of your screen and if the film strip has a P next to it, your shutter speed and aperture are blinking because the camera is in program mode and it’s making your creative decisions for you.
Fix it in Movie under camera subheading 7. It shows you a bunch of weird little icons with cats and ladybugs and fountains and fireworks. You want the fireworks, because fireworks are awesome, and because that is Manual Exposure. Select it, hit enter, and now aperture and shutter speed are yours.
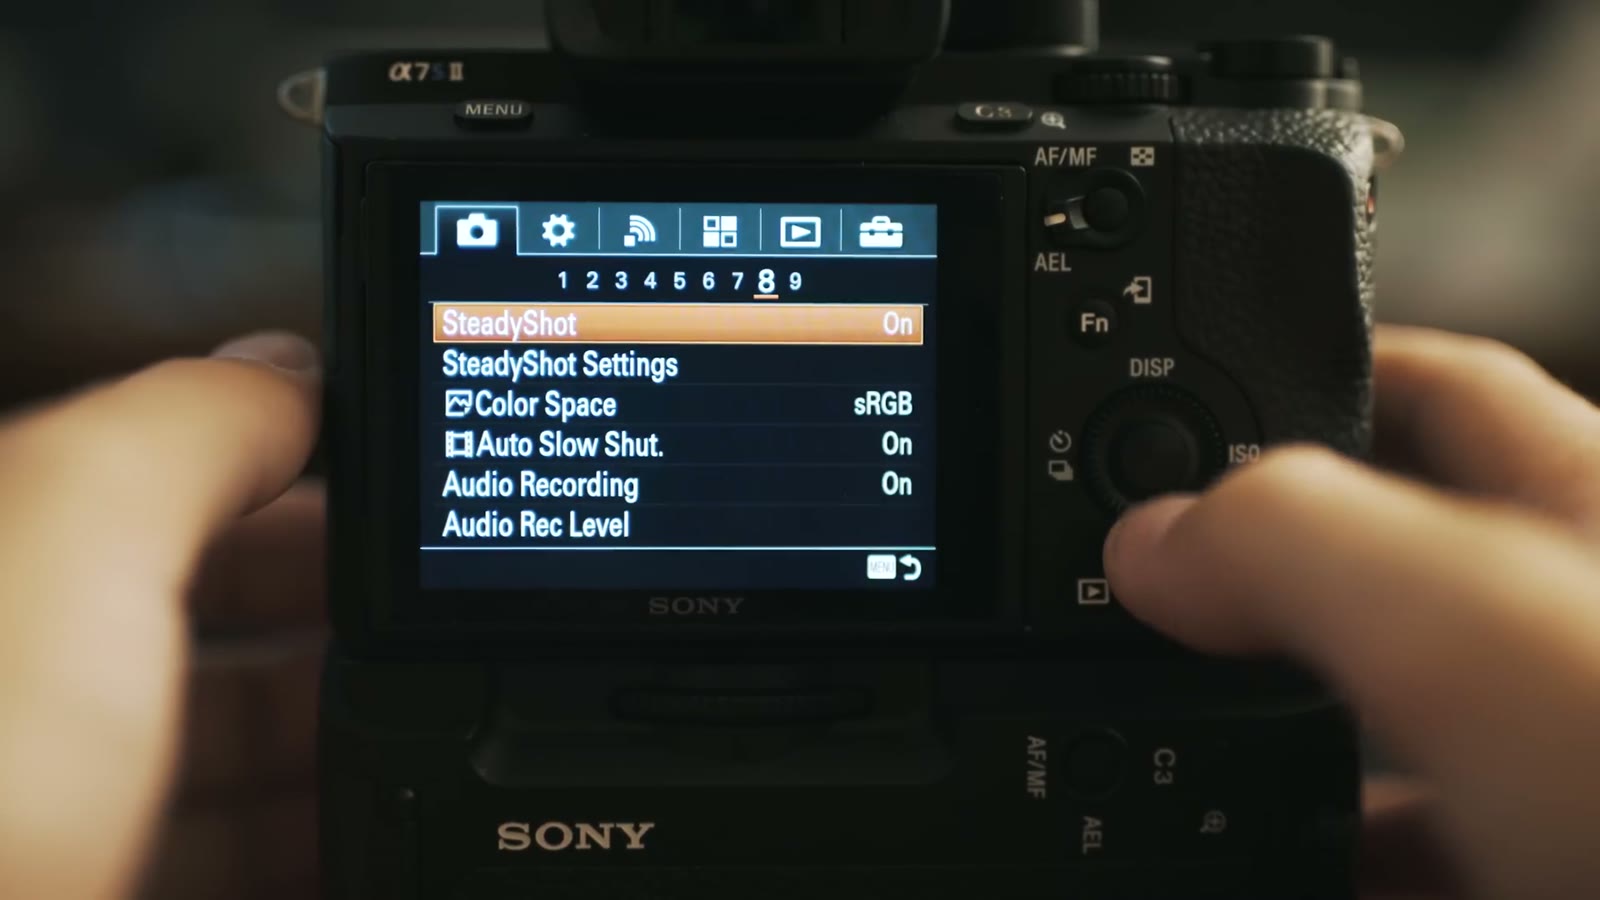
SteadyShot is the in body stabilization and you definitely want it on. If you go into SteadyShot Settings and Adjust is on Auto with focal length grayed out, that means your lens is talking to the camera electronically and you don’t have to do anything.
But if you’re like me and half your glass is a Sigma Art lens in Nikon mount on a Fotodiox adapter, that’s a dead lens with no electronic connection, and you have to set SteadyShot Adjust to Manual and then type in the focal length yourself so the sensor knows how to stabilize. In this case, 24mm.
And if you’re thinking that sounds like a lot of menu digging every time you swap a lens, you’re right, and I don’t do it that way. That’s the function menu video again.
While you’re on this page: leave Color Space on sRGB so your colors work across the widest variety of monitors, turn Auto Slow Shutter off because we don’t want to auto anything, and leave Audio Recording on. I keep the audio level at the default. It’s only ever scratch audio, because anything I actually need, a bride reading a letter, the ceremony, the vows, is going into a separate recorder.
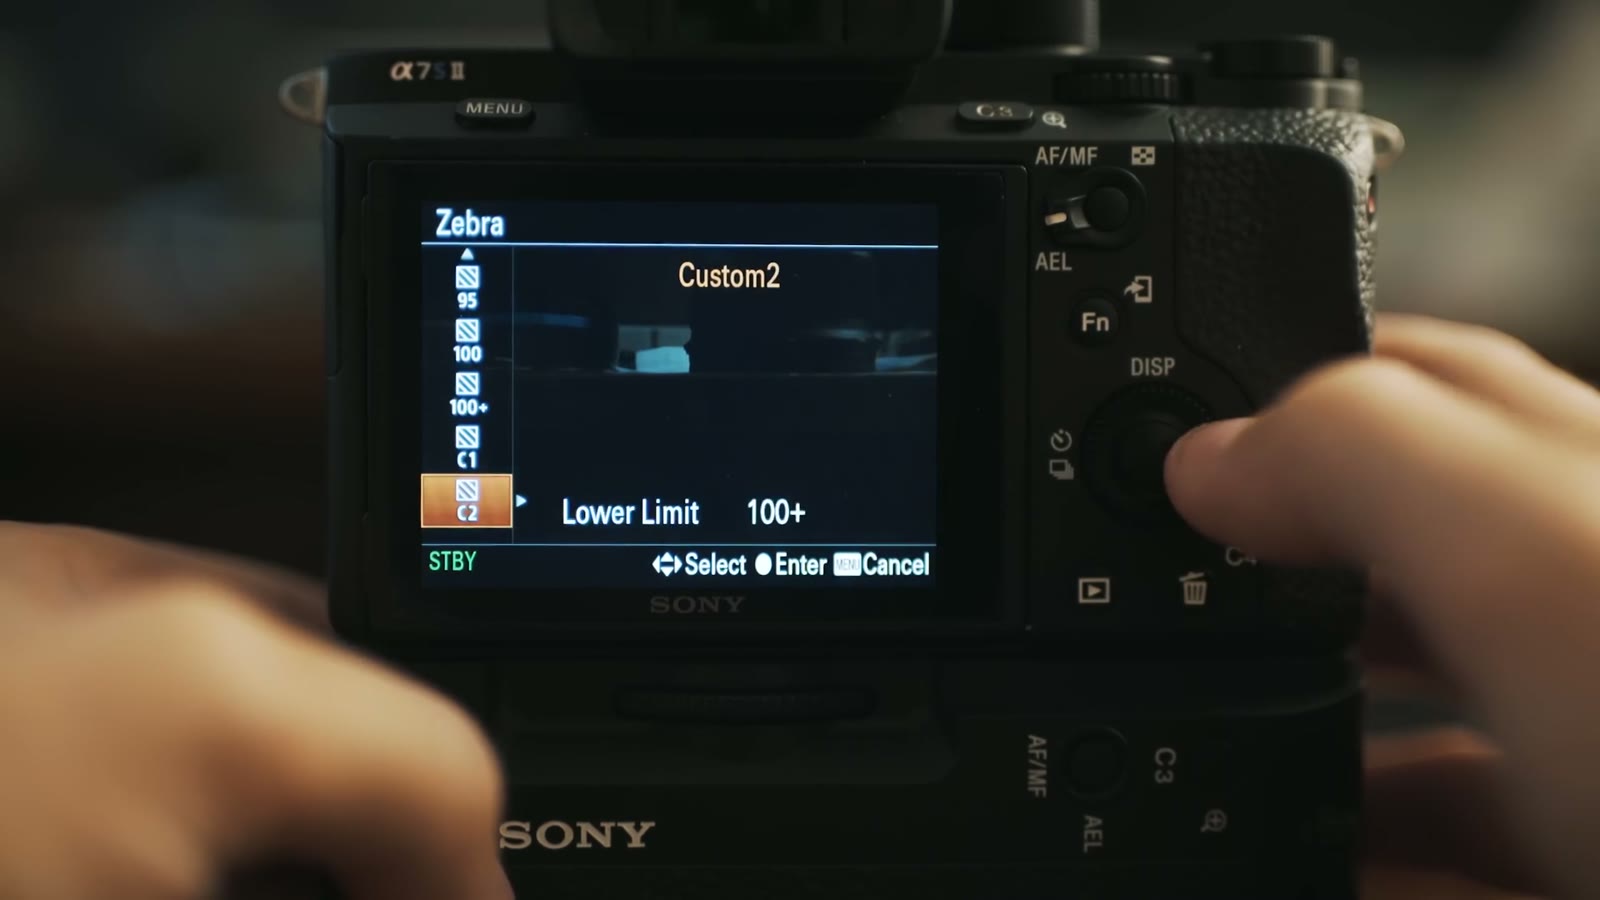
Zebra is very important, especially if you’re shooting my flat picture profile. Set it to 100+. Some of the lower zebra settings clip out and stop showing you the stripes past a point, and I want to know about everything that’s overexposed, all of it. That way I can look at a shot and go, okay, that window is blown out and that’s fine, but oh no, her skin is blown out and I need to fix that right now.
Turn MF Assist off, and set Focus Magnification Time to No Limit, since I’d rather click a button again to turn it off than have it time out on me mid shot.
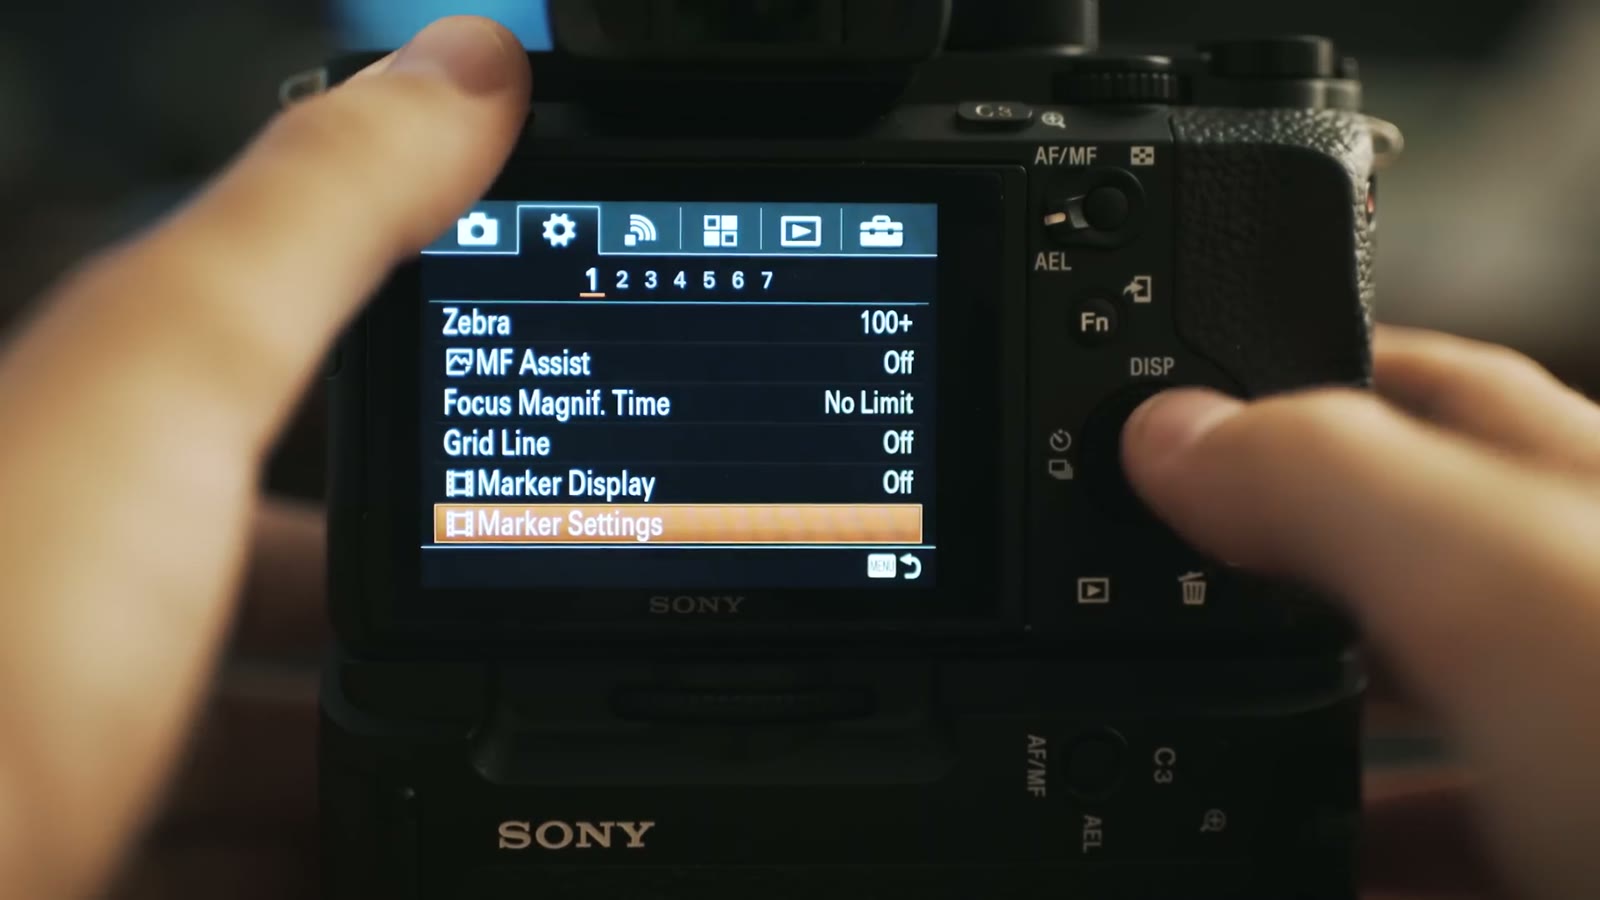
Grid Line, Marker Display, and Marker Settings all work together and really should have been grouped as one thing. Grid Line gives you rule of thirds, square, and diagonal plus square, which is handy for keeping a horizon straight or making sure a bride’s head isn’t tilted during the ceremony. I leave mine off and have a fast way to bring it up whenever I need it.
Markers are the cool part. Whenever you want to shoot for 2.35:1, go into Marker Settings, into Aspect, and pick 2.35:1. Then nothing happens and you think it’s broken. Go back and turn Marker Display on, and now you have two white lines showing you exactly where your crop is going to land. There’s also a safety zone at 80 or 90 percent if you’re delivering for broadcast.
Audio Level Display on, so you can see meters and know audio is actually recording.
DISP Button lets you choose what the display button cycles through on the monitor and the finder separately. I never check the graphic display box on either one, because there’s already plenty of information on the back of the screen.
Peaking I usually leave off, because I can punch in to check focus instead, unless I’m flying the glidecam and don’t want to be touching the camera. Peaking color is red, white, or yellow, which means Sony is clearly not patriotic, because it should obviously be red, white, and blue.
Exposure Set Guide is the most annoying thing on the planet and you should turn it off immediately. Whenever you change your shutter speed it throws a giant number up over your image telling you what you just set, as if you couldn’t read the tiny numbers you were already looking at. Off. I have another filmmaker to thank for pointing that one out to me.
Under gear subheading 3, Zoom Setting is probably on Optical Zoom Only. Change it to Clear Image Zoom. This is the setting that unlocks the trick in my video about getting Super 35mm mode while shooting 4K on the a7S II, and once it’s on, that Zoom option that was grayed out earlier in the menu isn’t grayed out anymore, no matter which lens you’re on.
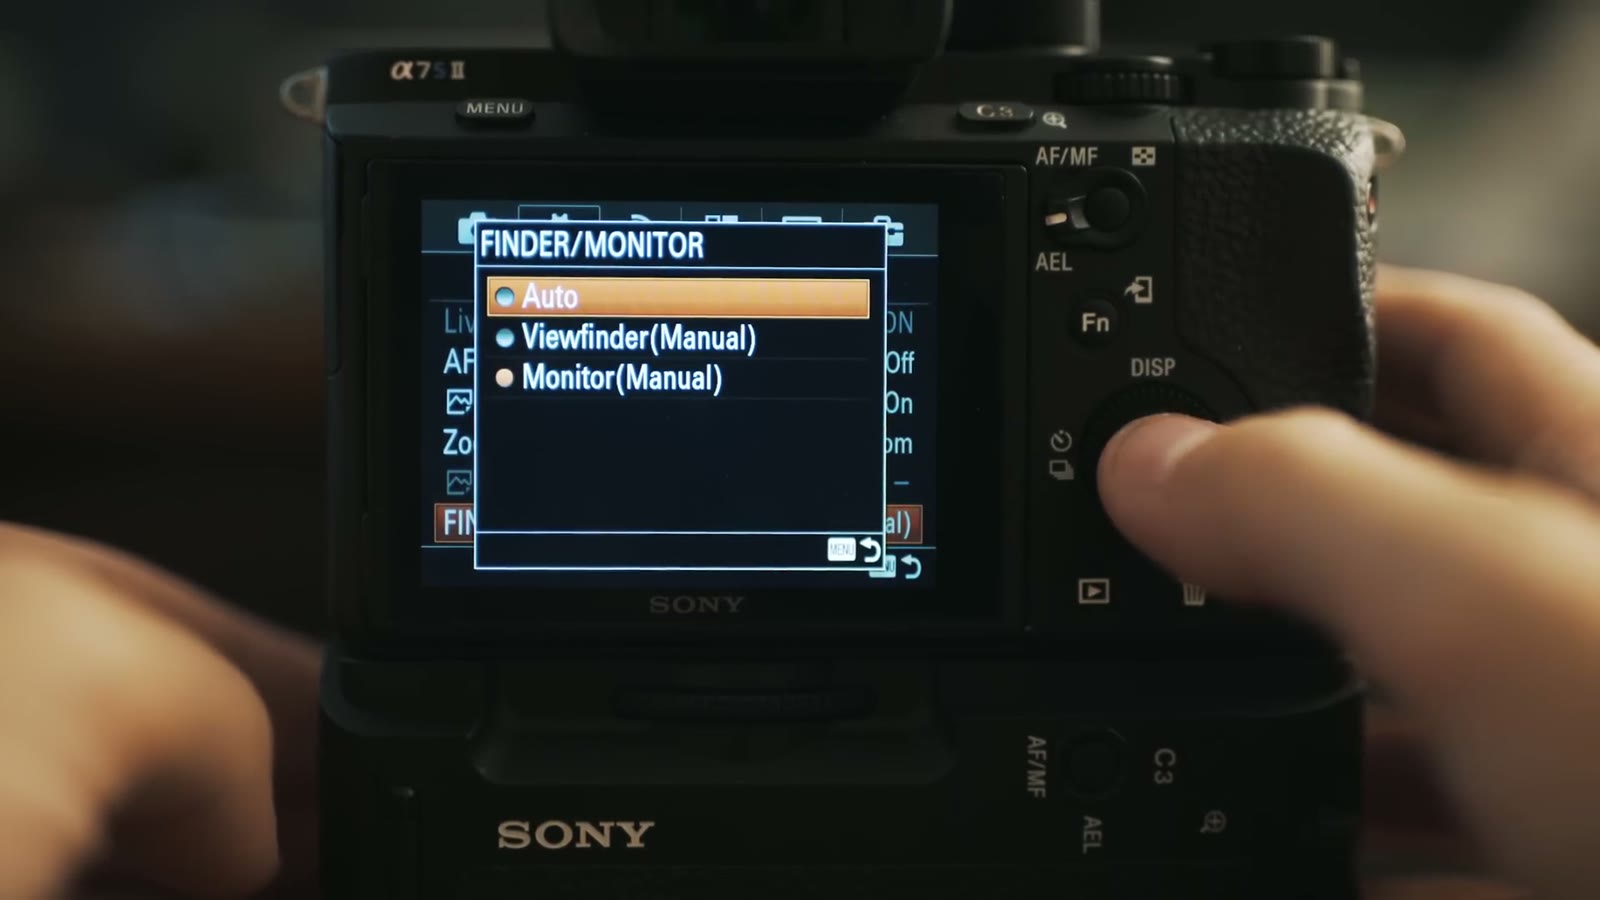
FINDER/MONITOR is probably on Auto, which sounds great until you’re leaning in close to change a setting and the camera decides you want the viewfinder and blanks the screen on you. It happens constantly. I set mine to Monitor (Manual) so the back screen stays on and the viewfinder stays out of it.
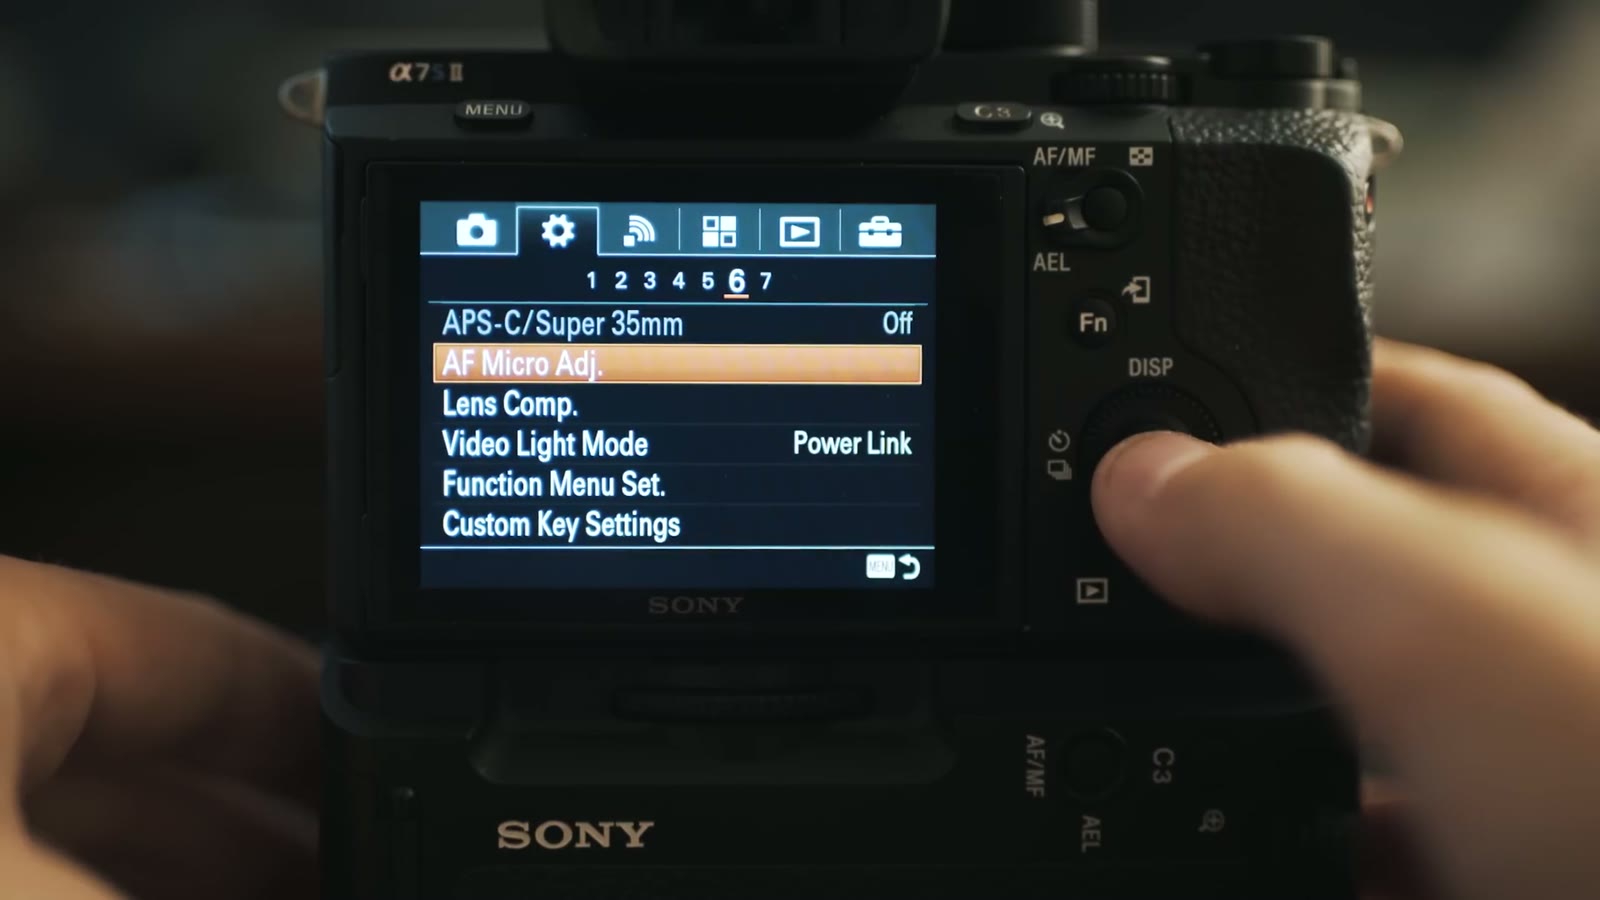
Gear subheading 6. If you’re in 4K this is unavailable, but if you’re shooting 1080p and you want the crop, this is where it lives. Remember the gear icon and remember submenu 6, because there is no way to put this on a quick toggle button. Going full frame to APS-C is one of the very few things you will always have to open the menu for.
Also on this page: leave all three Lens Compensation options off, and please, whatever you do, don’t use Video Light Mode. Don’t put a big LED on top of your camera. Light things off camera.
Gear subheading 7. Dial Setup is just asking whether you want the front dial to be aperture and the back dial to be shutter speed, or the other way around. Either is fine. I’ve left mine on the default, front for aperture, back for shutter, because that’s what I remember under pressure.
MOVIE Button has a choice of Always or Movie Mode Only. Mine is on Always, so that on the off chance I’m sitting in manual mode and something important starts happening, I can just hit record instead of fumbling the mode dial.
Go to the Wi-Fi menu and turn Airplane Mode on. It grays out all the wireless stuff, which you don’t need unless you’re using it at that exact moment, and from everything I’ve read, having those radios off keeps the camera cooler and gets you more battery life. On this little camera you need all the battery life you can get.
I set Monitor Brightness to Manual and mostly leave it at zero, bumping it to +2 in bright sun and down to -1 or -2 at night so the screen isn’t blinding me. And before anyone asks how I judge exposure with the brightness moving around: I don’t use the screen brightness to judge exposure, I use the in camera metering and the zebras. That’s the whole point of setting the zebras properly.
Gamma Display Assist is wonderful. It applies a LUT to your screen only, not to the recorded file, which saturates the image back up so you can actually see what you’ve got. I’ll be recording in my flat profile in some room, wondering whether I’m at 3200K or 3800K or somewhere in between, and I’ll flip Gamma Display Assist to S-Log3 just long enough to check my white balance, then turn it back off.
Volume at zero, because nobody needs the dinky speaker announcing itself. Tile Menu off, for the love of everything, it’s the grossest thing ever and it just dumps you back into the same menu anyway. Delete Confirm on Cancel first, so an accidental button press doesn’t cost you a clip. Display Quality on standard. Power Save Start Time at 5 minutes. Display Rotation on Manual, so the camera doesn’t get creative about orientation. NTSC/PAL depending on which side of the ocean you’re on. USB Connection on Mass Storage, USB LUN Setting on Multi, and turn USB Power Supply on so you can run the camera off an external battery.
Timecode settings all live under their own two headings if you use timecode. I don’t, so I don’t touch them. HDMI settings are all there too if you’re feeding an external recorder, which I’m not.
This last one is worth remembering because it will save you from a very bad afternoon. The a7S II uses an image database to keep track of your clips, the metadata, and how the audio syncs up. Whenever a memory card fails or a battery dies mid write, that database can get corrupted, and the camera will act like your footage is gone.
It isn’t gone. Do not panic. I’ve had this happen and I’ve had friends absolutely convinced they’d lost a wedding. Go to Recover Image Database, run it, and the camera rebuilds its file structure and your video files come back safe and sound. Try not to cry.
That’s every video related setting in the Sony a7S II menu. Not exactly the most intuitive system in the world, but we got through it, and good job for sticking with me, because the whole point of doing this once is that you never have to do it again.
The next three parts are where the speed actually comes from: the mode dial, custom buttons, and the function menu. Once those are set up you can change everything you need with one or two button presses and stay out of the menus entirely.
The rest of my a7S II writing is here too: my review of the camera, my favorite picture profile, how to color grade that profile, and how to get Super 35mm mode in 4K.
Want more help than a video can give? Download my free quick tips guide to booking more wedding film clients, take a look at my wedding film editing course, or come join the Learn Wedding Filmmaking Facebook group. Here’s all my favorite filmmaking gear, and everything I shoot gets graded with my LUTs.
The music licensing sites I recommend are Soundstripe (use the code WHOISMATT for 10% off a yearly or monthly subscription), Artlist (two extra months free), and Musicbed.
This was filmed in September 2016 against the firmware and menu layout of the day. Sony has shuffled a few things since, so a setting may sit a subheading over from where I say it does, and the newer bodies reorganized the menu entirely. The reasoning behind each choice has held up better than the menu positions have.
I’m required to state that I’m part of affiliate programs for Amazon, B&H, Soundstripe, Artlist, Musicbed, and Adobe, and that some of the links above are affiliate links.

How I setup the couple for filming, my philosophy for why I pose them certain ways, and some practical ideas for how you can create genuine laughter, smiles, and joy in your wedding film.
Continue reading

Since last November, I’ve been filming weddings exclusively with the Sony A7Sii in 4K. Due to the large file sizes this produces, I often end up with hundreds of gigabytes of footage from a single wedding. As I edit these weddings, I’ve realized that I will soon need to either buy a new computer to help handle the high-resolution footage, or implement a proxy based workflow where I edit lower quality video clips, then re-link the high-quality clips for final rendering.
That is why I was incredibly excited to see that the 2015.3 update of Premiere Pro added a built-in proxy workflow. Instead of having to watch as my computer bogs down from playing back the native 4K files of the A7Sii, or having to implement a round-trip through Da Vinci Resolve to create proxies, Premiere now lets me create them in Adobe Media Encoder and automatically links them to my existing footage. Once linked, it is a simple button press to switch between the native file and the proxy.
As I was working through implementing the update, I realized that it was a little TOO good. Due to the high quality proxies I was generating in Premiere Pro, it was impossible to at-a-glance tell whether I was working with the native file or the proxy file. I needed an immediate way to tell, and after a bit of research, I hit upon this a solution.

By adding a PNG file I created to the proxy export settings in Adobe Media Encoder, all my proxy files now include a transparent “Adobe Proxy” logo on the final rendered video. This makes telling the difference between native and proxy incredibly fast and easy.
To save you the work of creating your own transparent PNG logo, I’ve included a download link below. Simply download this file and follow the steps below to incorporate it into your Adobe Premiere Pro CC proxy workflow.

Follow these steps to add the adobe PNG logo to your Adobe Premiere Pro proxy workflow.
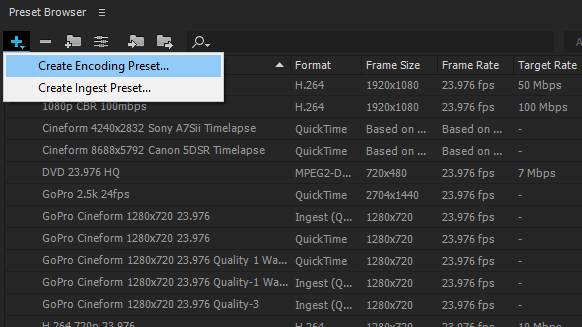
1. Open Adobe Media Encoder and in the “Preset Browser”, select the “Plus” sign and select “Create Encoding Preset.”
2. Create your proxy preset. In my case, I use GoPro Cineform at 720p.
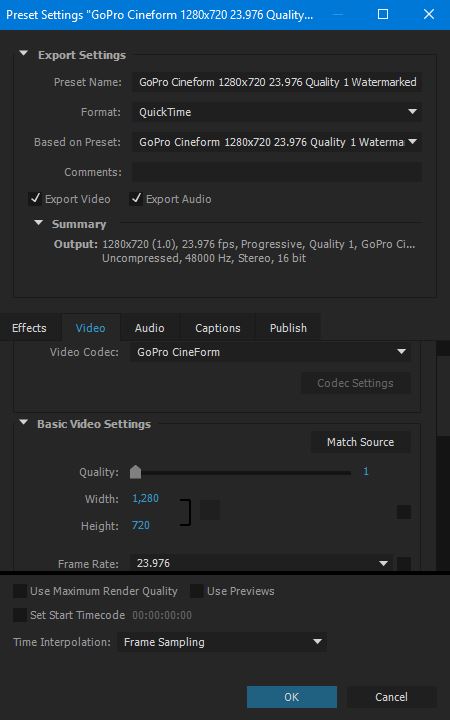
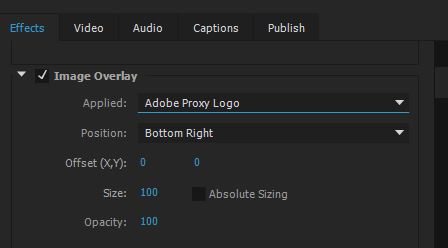
3. Open the “Effects” tab, and check the “Image Overlay” box. Click the drop down menu next to “Applied” and browse to the Watermark PNG file. Make sure you put the PNG file in a place where it will be consistent between video projects. For “Position” select “Bottom Right” or wherever you would like it to appear over your proxy video. Select “OK” and your Encoding Preset will be saved.
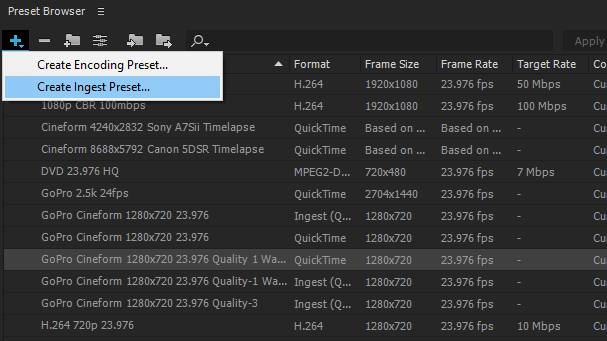
4. Select the “Plus” sign again in the “Preset Browser”, and this time select “Create Ingest Preset.”
5. Name your Preset. I named mine the same as my Encoding Preset but added the word “Ingest” at the end. Check the “Transcode files to Destination” box.
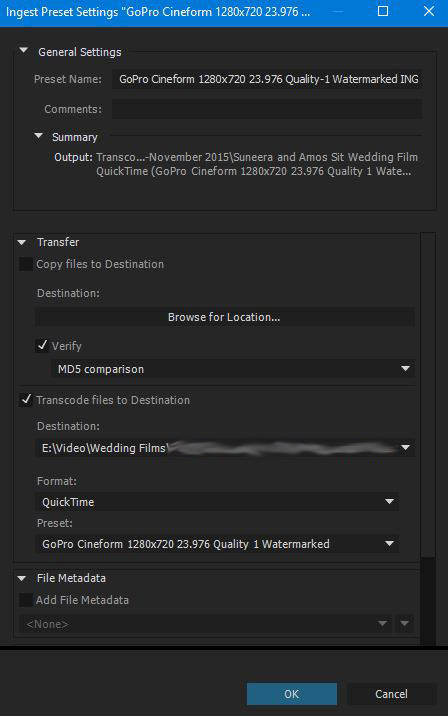
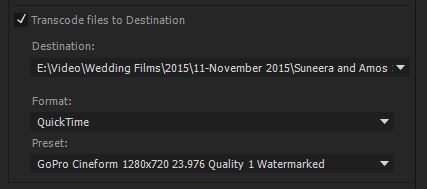
6. For “Destination” navigate to your current video project. Note: It really doesn’t matter where you tell it to navigate to, because when generating Proxies, Premiere will ignore this location and by default put the proxy files generated in the same folder as the native files. For “Format” and “Preset” select the Format and Preset you created as your encoding preset. In my case, it was “Quicktime” and “GoPro Cineform.” Click “Ok” and your Ingest Preset will be saved.
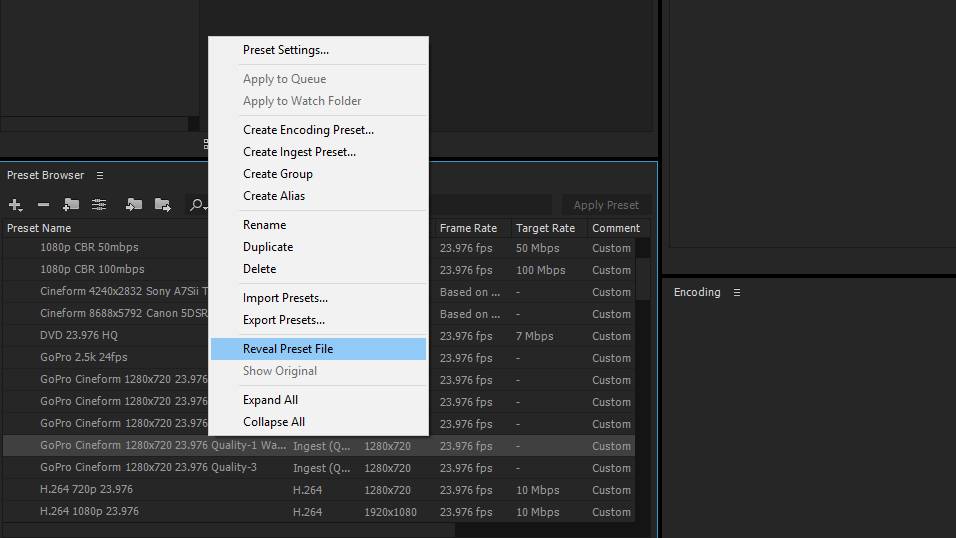
9. Right click on your Ingest Preset in the “Preset Browser” box and select “Reveal Preset File.” Make a note of where the file is in your computer’s file system.
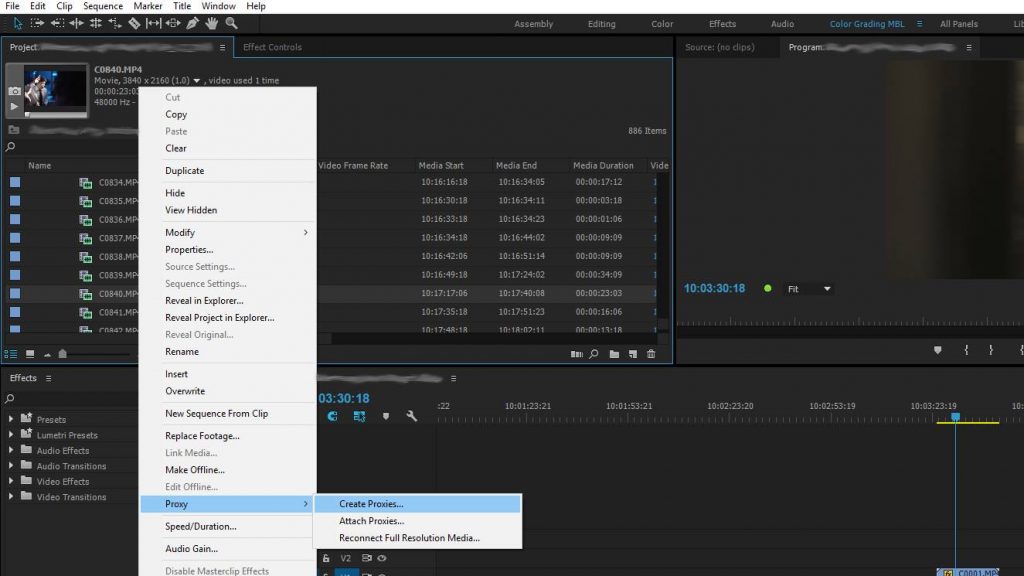
10. Open Premiere CC 2015.3, import your native video files, and in the “Project” window, select your video clips, right-click, and select “Proxy > Create Proxies…”
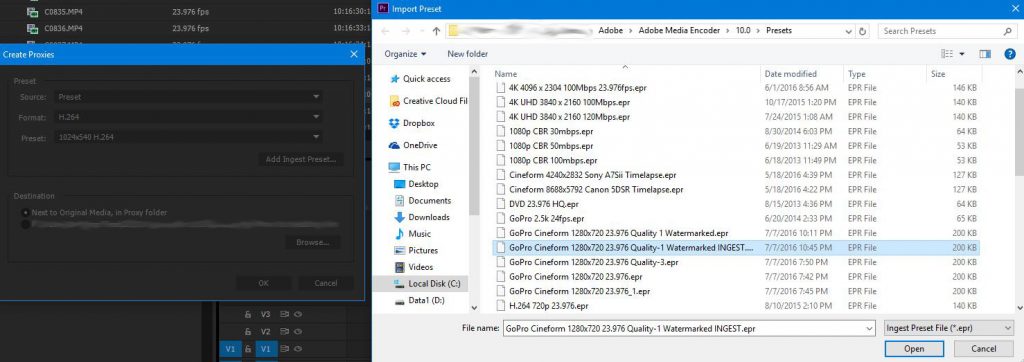
11. In the “Create Proxies” window, select “Add Ingest Preset” and browse through your file system to the Ingest Preset that you created. Select it and click “Open.”
12. The “Format” and “Preset” should now match your ingest preset you created in Adobe Media Encoder. Under “Destination,” select “Next to original media, in Proxy” folder, which will cause Premiere to ignore the destination you set in step 10.
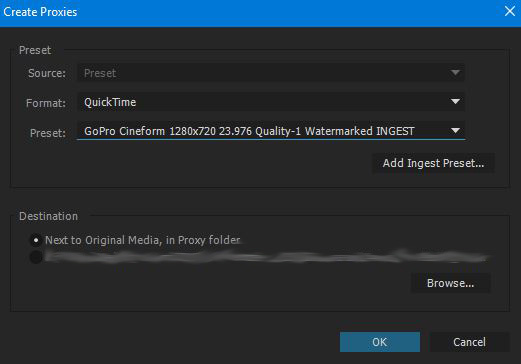
13. Click OK and sit back as Adobe Media Encoder opens up and renders all your proxy clips with the settings AND watermark that you added.
That’s it! Now all it takes is a quick glance to see if you are editing the native video files, or their proxies.
If this video has been helpful to you, you may also enjoy my wedding filmmaking training videos and tutorials. If you have any questions or comments, please do not hesitate to leave one below, or get in touch.

To help the story be told as clearly as possible, I try to film establishing shots of all the locations on a wedding day.
Continue reading
In the simplest terms, a LUT is a preset file that contains color, contrast, brightness, and saturation information in the .cube format. LUTs are used for a lot of reasons, including simulating film stock looks, emulating camera colors, or even color calibration. Today I’ll be showing you how to use them.
Continue reading