How to EASILY film in Sony’s S-Cinetone Picture Profile

Updated 12-31-25

Color Presets For S-Cinetone

Today I want to share with you how to quickly and easily film with the S-Cinetone picture profile in your Sony camera! So if you have been looking for a picture profile that looks really good straight out of camera with minimal need to color correct and color grade, this video is for you!

And to help save you time and bring out the best possible colors with your camera, I’ve actually created a set of video presets called whoismatt luts, that work great with S-Cinetone and really help give your footage a unique look.

CAN YOUR CAMERA USE S-CINETONE?!

Getting started now, the first thing you need to figure out is if your camera can even use the S-Cinetone picture profile. This is a relatively new profile and is only available on the Sony FX9, FX6, A1, FX3, and a7S III at the time of making this video. 

If you aren’t sure, just open up your camera’s picture profile menu and scroll down to PP11. If you see PP11, congratulations, you have S Cinetone! If you don’t see PP11 though, either your camera doesn’t support it, or if you are on the a7S III, you will need to download a firmware update for your camera to add S-Cinetone. You can download this firmware update from Sony’s firmware update website.

Now grab your Sony camera and navigate to the picture profile menu. The first thing you should do is make sure your camera is set to PP11 and that both the gamma and color modes say S-Cinetone. If they don’t say that, scroll down to the bottom where it says reset and reset PP11 to its default settings.

EXPOSING S-CINETONE

Moving on, let’s talk exposure! If you’ve watched my SLOG3 easy filmmaking settings video, or if you’ve shot in log picture profiles with other cameras you’re probably used to overexposing your footage so you can then bring the exposure levels down in post when editing so your footage isn’t noisy. 

Well S-Cinetone is different so you’re going to need to relearn things! You do not need to overexpose your footage, and you don’t need to underexpose it either. With this picture profile, what you see is what you get, so it is in your best interest to make sure your exposure level is right in the middle, not too bright and not too dark, just right. It’s like Goldilocks with the bears and the porridge but it’s light and color and thankfully no bear attacks. 

Anyways, going back to your camera now, looking at the bottom of the screen you’re going to see your shutter speed, lens aperture, and the letters MM and a number anywhere from -2.0 to +2.0. This MM stands for multi-metering, and it tells you how bright the image is that your camera is recording.

If your camera doesn’t say MM, open the menu and go to exposure/color, metering, and set your metering mode to multi. Then, you can go back out and see this number which in my case says 0.0, which means that this image that it is recording isn’t over or under exposed. If your camera says -1.0 (minus one point oh) it means that it is 1 stop underexposed. If it reads +1.0 (plus one point oh) that means it is 1 stop overexposed. 

For S-Cinetone, you want this number to read ideally 0.0 because that is ideal for the profile. If it says -0.3 (negative zero point 3) or +0.3 (plus zero point 3) that is probably okay, but 0.0 is the sweet spot that will keep things from getting too dark or bright in your shot. 

That said though, I don’t want you to just trust this metering number and forget to look at the image on your camera screen! Remember, S-Cinetone is a what you see is what you get picture profile, meaning that the image you see on the back of the camera is very close to what you will see on your computer when you copy it. 

So if you are looking at your meters and they say 0.0, but the person you are filming looks really dark, they are going to look dark in the footage you are recording. That 0.0 may be because the camera is seeing a bright background behind the person and it is saying the background is properly exposed but the person is not. Ideally you want your subject to be 0.0 on the metering, so that means that you may need to brighten the image up until it looks good to you on the back of the screen.

I do want you to be aware though that this can cause some parts of your footage to be overexposed though. You may have to blow out some highlights to make your subject in the footage look bright enough. This is unfortunate but the price you will pay to use S-Cinetone and have the footage look good straight out of camera.

Now if you don’t want your footage to look overexposed, an alternative option would be to shoot in Slog3, as that picture profile has much higher dynamic range than S-Cinetone and you will not need to worry about your footage being overexposed.

ZEBRAS ARE YOUR FRIEND

Back to S-Cinetone now, if you want to take the guesswork out of whether it is overexposing or not, you really need to use Zebras. And not the animal either, this isn’t a goldilocks metaphor agaom, we’re talking about your camera’s zebras settings, which will put black and white lines on your screen that show you what is overexposed.

Go into your camera’s menu, go to Exposure/Color, Zebra Display, and for Zebra Level you’re going to want to select 100+. Next make sure Zebra Display in the menu is turned on, and as you start to bring up the exposure of your camera, either by changing your aperture or ISO, you are going to notice zebra lines appearing on the overexposed parts of your footage. 

Because you set your zebra level to 100+, that number is the maximum brightness the S-Cinetone footage can handle before it clips the highlights and cannot recover them. So as you are filming with your camera, I would first look at your metering and make sure it is at approximately 0.0, and then I would look for any zebras to appear on the back of the camera. If they show up, then I would consider what you are filming. 

If you’re filming a person standing in front of the sunset, and you have the super bright sun and clouds behind them, you will definitely see some zebras in the background and that is okay. But, if you are seeing zebras on the persons’ face or skin, that means that your footage is definitely too bright and your exposure needs to be darker. 

I would highly recommend filming some test shots with people lit by different light sources. As you gain experience with watching your metering and zebras you should get a good idea of how the camera is exposing and what looks good. 

DUAL GAIN ISO LEVELS FOR S-CINETONE

Alright, you’ve got your metering setup, and your zebras, the last thing we need to talk about is ISO. If you turn your ISO up, your footage gets brighter. If you turn it down, it gets darker. And as a bonus, unlike SLOG3 which I really never recommend filming at anything lower than 640 ISO, with S Cinetone, you can go all the way down to ISO 100, which is great if you are filming on a bright day.

Now if you’ve watched my SLOG3 settings video or my a7siii review, or basically any other video about proper exposure with the a7siii, FX3, or FX6, you will know that these 3 cameras share basically the same sensor, and it is known as a dual native ISO sensor. 

This means that there are 2 ISOs where the camera will look its best and give you the absolute maximum dynamic range that it is capable of. This dual native ISO will change depending on the picture profile and the camera you are filming with, but in the case of S Cinetone on the a7sIII and FX3, they are ISO 100 and ISO 2000. Alternatively, if you are filming with a Sony FX6 in S Cinetone, these ISOs where the camera looks its best will be ISO 320 and ISO 5000.

As I said, these camera’s sensors are similar, but testing from the very knowledgeable Alister Chapman over at XDCAM-USER has shown that they are slightly different, which is why the ISOS vary between them.

So to wrap up the talk about ISOs, I would keep your camera to ISO 100 or 2000 if you want it to look its absolute best, but honestly, in my testing, because the sensor Sony is using in these 3 cameras is so dang good in lowlight, I haven’t been able to really see a difference between ISO 100 and ISO 1600, and 1600 should arguably look worse because its right be low ISO 2000 where the dual gain sensor kicks in and gets cleaner. 

So in short, S-Cinetone is a what you see is what you get picture profile and that carries over to the ISO settings as well. I wouldn’t worry about the dual gain sensor with this picture profile, and instead I would focus on how good the image looks on the back of the camera. 

And that is how to easily film with S Cinetone picture profile on your Sony camera! If you have a new a7siii, FX3, or A1 and you want to know what settings are best for it, I would recommend watching my menu and custom buttons setup videos that will walk you through all the best settings to use. And if you are using the a7siii specifically, you can download my setup preset file which will give you all of my settings instantly. I will like to that preset file and my setup videos below.

I will also link down below to my color presets which work very well with S-Cinetone! Don’t get me wrong, S cinetone looks great straight out of camera, but these will make it look even better. 

How to Record 4K 120FPS in XAVC S-I on the Sony a7S III

If you are trying to record in 4K at 120FPS in XAVC S-I on the Sony a7S III and cannot figure out how to access this frame rate, here’s how to do it in 4 easy steps.

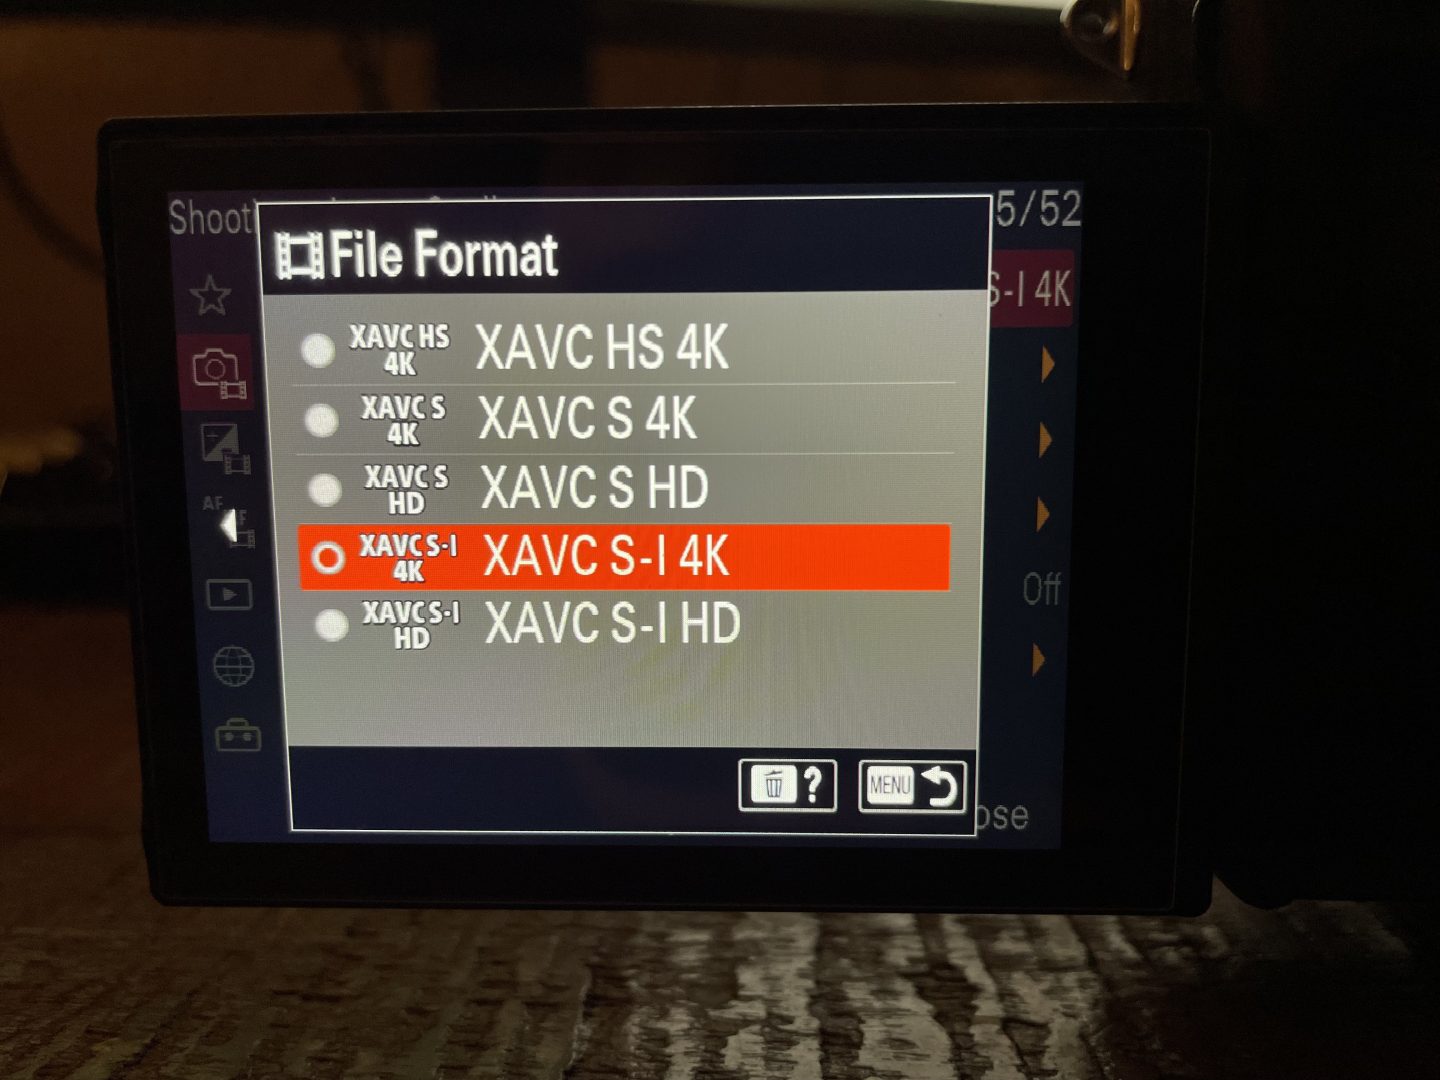
Open your a7S III's menu and for file format, select XAVC S-I
  1. Open your a7S III’s menu and for file format, select XAVC S-I
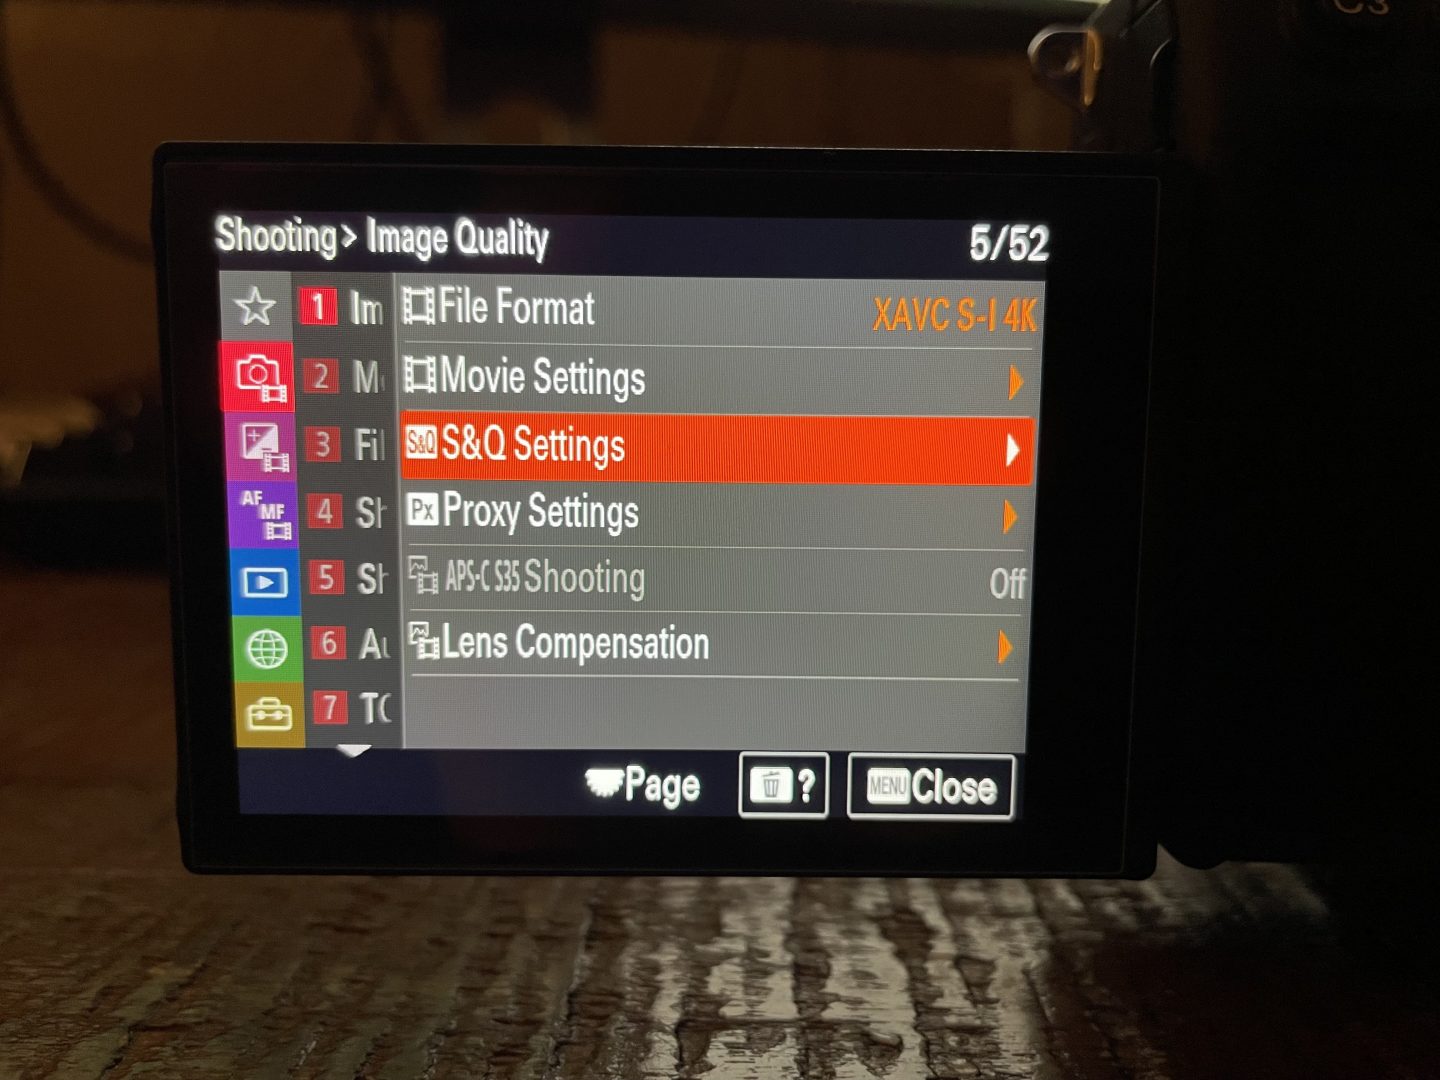
Navigate to the S&Q Settings Menu

2. Navigate to the S&Q Settings Menu

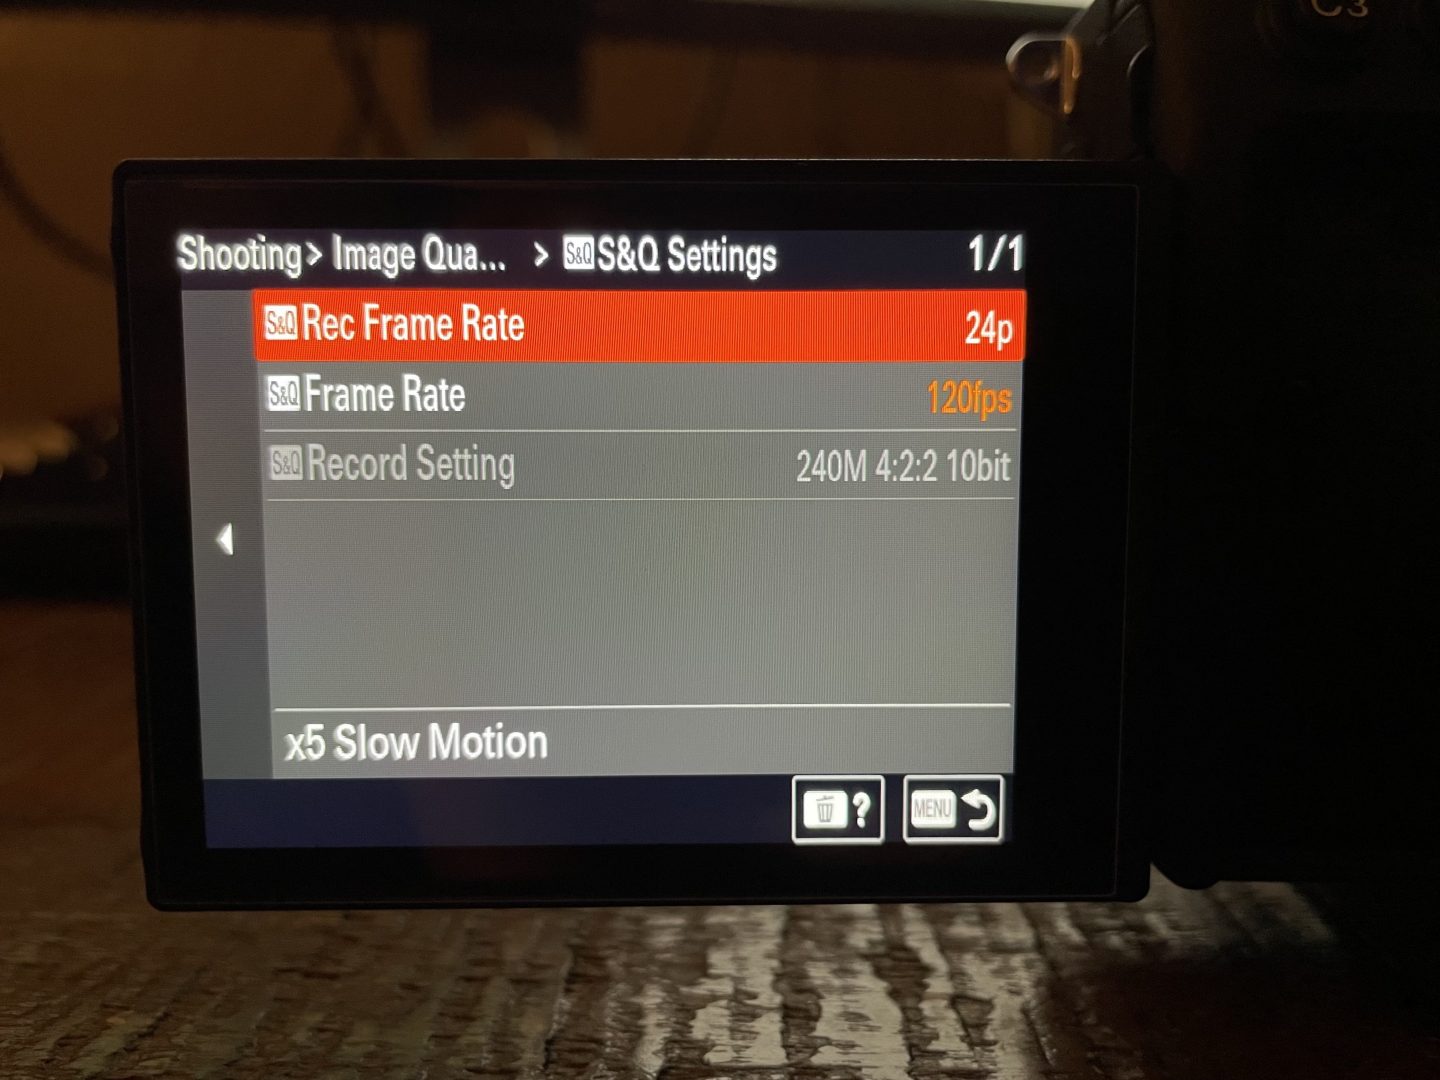
Set your S&Q Frame Rate to 120fps. For your S&Q Record Frame Rate, you can select the final frame rate you want your video to be in. I usually use 24p.

3. Set your S&Q Frame Rate to 120fps. For your S&Q Record Frame Rate, you can select the final frame rate you want your video to be in. I usually use 24p.

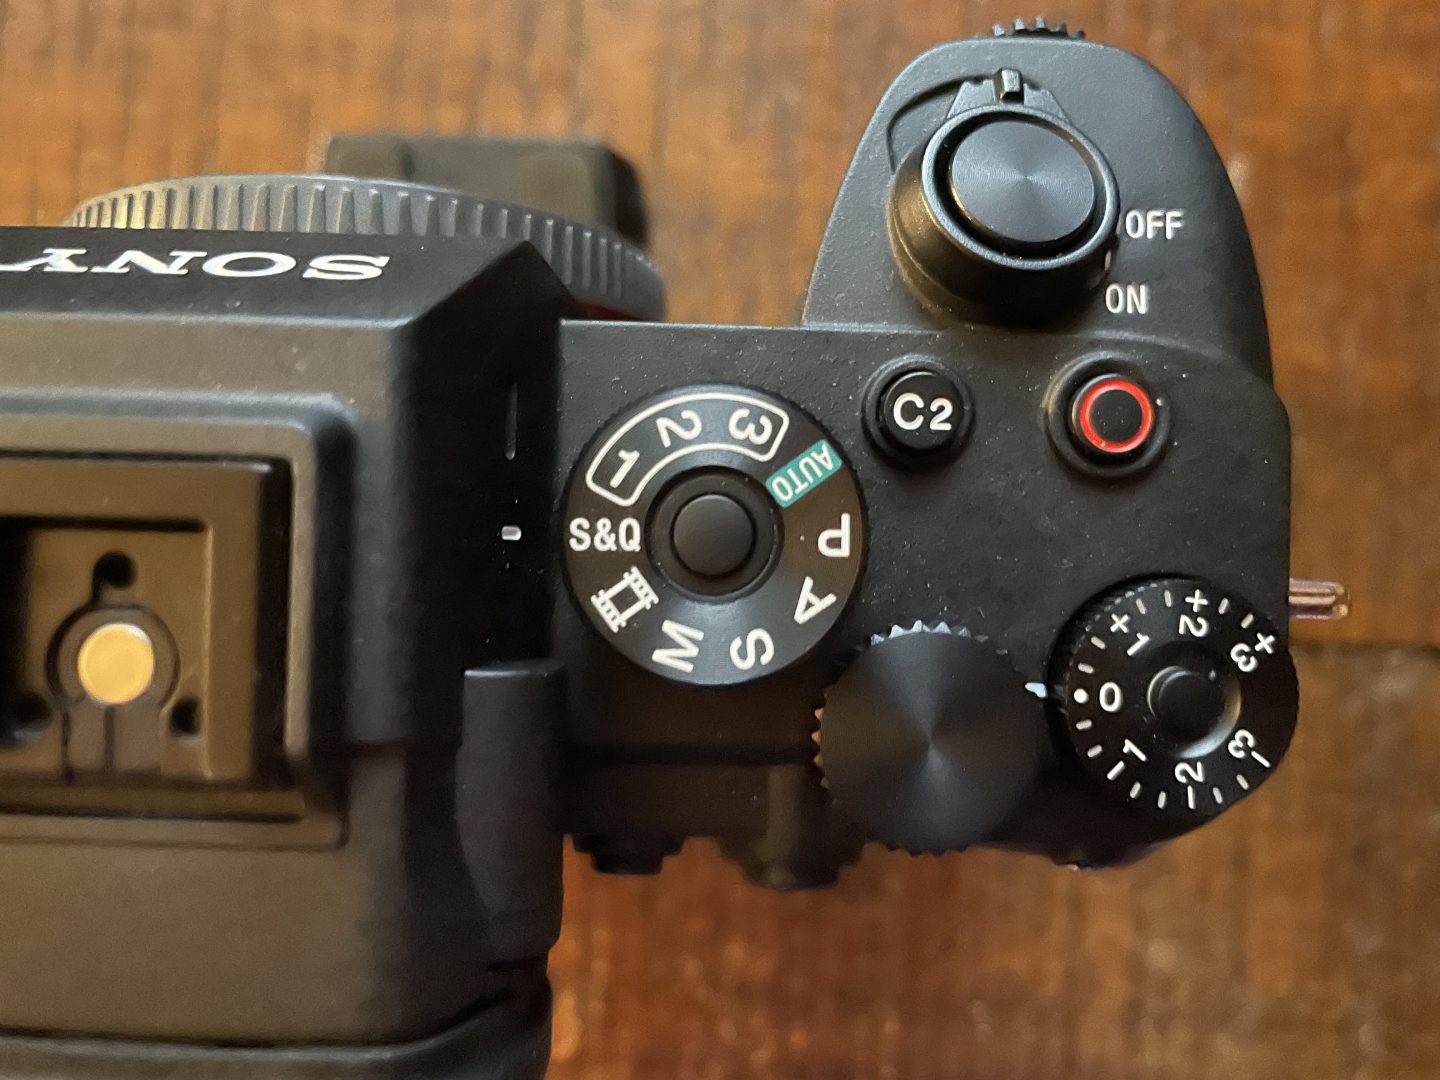
Set the mode dial at the top of your camera to S&Q and begin recording. Anything you film will now be in 4K at 120fps in XAVC S-I!

4. Set the mode dial at the top of your camera to S&Q and begin recording. Anything you film will now be in 4K at 120fps in XAVC S-I!

That’s it!

Due to the large amount of data recording in XAVC S-I in 4K generates, you have to use the camera’s S&Q mode to access 4K at 120FPS in XAVC S-I. Please be aware that recording in S&Q mode will disable audio recording, and automatically make the footage slow motion in-camera.

If you still need to record audio with your a7S III while recording in 4K at 120FPS, I recommend avoiding using XAVC S-I and instead using XAVC S or XAVC HS.

TROUBLESHOOTING

If you receive the error, “Cannot record in this recording setting. Either switch to a memory card higher than CFexpress VPG200, or change the S&Q Record Setting,” this means your memory card is not fast enough to record in XAVS S-I at 4K 120fps.

To fix this issue, you will need to use a CFexpress Type A memory card with your camera. For more information about memory cards for the a7S III, check out my a7S III Memory Cards Guide!

Has this been helpful? Send me a message using the contact form if you have any other questions!

Warp Stabilizer EXPLAINED – Fix Shaky Video in Premiere Pro

😍 Signup for Artgrid (Extra 2 Months FREE!): https://whoismatt.com/artgrid
👍 Download my FREE Warp Stabilizer Presets: https://whoismatt.com/warpstabilizerpresets/

Fix your shaky videos in Premiere Pro without jello or wobble using Warp Stabilizer! This video covers the best warp stabilizer settings to get you smooth and stable footage.

How To EASILY Color Grade Sony a7S III LOG Footage Without LUTs in Premiere Pro 2021

SLOG3 comes out of the camera flat, washed out, and gray, and the first time you drop it on a timeline it is genuinely discouraging. So here is how I take it from that to contrasty and saturated and actually good looking, in Premiere Pro, using no LUTs at all.

One thing before we start. If you didn’t film it right in the first place, grading it is going to be much, much harder, so if you haven’t already, go watch how to easily film in SLOG3 first. Everything below assumes your exposure was in the right place on the day.

What Color Grading Actually Is

At its heart, color grading is shifting and modifying the colors in a film to create a certain mood. And mood is the whole point, because the colors you choose genuinely change the emotional response somebody has watching it. Speaking very generally: darker and bluer reads sadder and more tragic, warmer with more saturation reads happier and more energetic.

That’s the tip of the iceberg and your options are basically unlimited, so what you’re going for is up to you and the film you’re making. But you should decide, on purpose, before you start dragging things around.

Find Your Hero Shot

Step one is picking a hero shot. This is the one clip you grade first and properly, and then you use it as the baseline for everything else in the film, which is what makes this fast instead of miserable.

You want your hero shot to have good variety in both color and exposure. The one I picked has the sun coming in on one side, real shadows down at the bottom, and, most importantly, skin in it.

That sounds weird written down. What I mean is that if there are people in your video, your hero shot needs to include them, so you can see what’s happening to their skin tones as you work. Otherwise you’ll grade a beautiful landscape and then discover your couple has gone blue like Smurfs, or green like the Hulk.

And yes, those are donkeys in my hero shot. They’re called beer burros, the couple had them brought along for the photo shoot, and they’ve got little baskets to carry beer in. They’re pretty awesome.

The Lumetri Color Panel

Switch to the Color workspace and the Lumetri Color panel shows up on the right. If yours doesn’t look like mine, go to Window, then Workspaces, then Reset to Saved Layout, and it’ll come back.

You’ll see Basic Correction, Creative, Curves, Color Wheels & Match, HSL Secondary, and Vignette. That’s a lot, and it looks overwhelming, but here’s the good news: we’re only going to use three of them. Basic Correction, Curves, and Color Wheels. That’s it.

And here’s the counterintuitive part. Do not start in Basic Correction. It’s the first tab, it has the exposure and contrast sliders you’d expect to reach for, and on SLOG3 it just doesn’t work. Push the exposure, nope. Brighter, darker, highlights up, shadows down, blacks down. It never looks good. Double click those sliders to reset them and leave that tab alone until much later.

Curves Are Your Friend

If you take one thing away from this whole thing, make it curves.

In the Curves tab you get RGB Curves with a white dot and a red, green, and blue dot. The colored ones let you change contrast for those individual channels, but we want all of them, so keep white selected. Under it is a diagonal line, and that line is your image: bottom left is your shadows, the middle is your mid-tones, the top is your highlights.

Click in the middle to add a point and drag it up, and the image gets brighter. Click down in the shadows and drag down, and the shadows get darker while the mid-tones stay up. Then add a point in the highlights and lift it, watch the sky start to blow out, and back it off until you can still see detail in the clouds.

Toggle the effect off and on in Effect Controls and you’ll see you’ve already fixed most of the contrast, with three clicks, before touching a single color.

Lumetri Scopes, Or How To Stop Guessing

So how do you know whenever your contrast is right? Do you just eyeball it and hope? No. You can be scientific about this, and it takes about ten seconds to learn.

Open Lumetri Scopes at the top left. The one you care about is the waveform. Down the left side you have numbers from 0 to 100, where 0 is the absolute darkest black you can get and 100 is where things start to clip and blow out.

Turn your curves off and watch what happens: the whole waveform squishes into the middle of the range. That squish is SLOG3. Turn the curves back on and it spreads out to fill the scope, which is the entire job in one picture.

Now drag your shadow point down and watch the left side of the waveform crush toward zero. Go too far and you’re throwing away real information, the image starts to look videoy, and the poor beer burro goes completely black. Push the highlights up and you’ll see them approach 100 and clip. So instead of hoping, you look at the scope and it tells you.

Color Wheels

Contrast is handled, but everything still looks blue and washed out. Close Curves, open Color Wheels & Match, and you get three wheels: shadows, mid-tones, highlights. Which should sound familiar, because that’s exactly what the curve was divided into. It’s all connected.

Drag the mid-tone puck around and you’ll see how fast this gets away from you. Toward green and everybody’s the Hulk. Toward purple and the whole frame goes purple. The key word for this entire tab is subtlety. Double click to reset and then move it a genuinely small amount.

For this shot I went slightly warm on the mid-tones because there’s sun coming in and I want that warmth, then took the highlights toward gold, because it was sunset and that’s what sunset actually looks like. This is where you decide what you’re making. Darker and moodier, or brighter and happier? It’s a wedding film and I want this couple looking vibrant, so I’m going bright, warm, and saturated.

Now Go Back To Basic Correction

Remember Basic Correction, the tab that was useless twenty minutes ago? Now it’s great. At the end of the process, whenever the heavy lifting is done, those sliders are perfect for small tweaks that make the image pop.

Nudge the temperature a smidge warmer. Then go to saturation, because SLOG3 is desaturated by nature and you’re going to need it. I find 120 usually looks right. You can go higher, and you can absolutely go too far, and there’s a point where it stops looking like film and starts looking like a phone filter. Subtle changes. You’ll get there.

Applying The Hero Shot To Everything Else

This is where all that work pays off. Select the hero clip, go to Effect Controls, click Lumetri Color, and hit Ctrl+C, or Cmd+C on a Mac. Then select your next clip and paste.

On my second clip, the groom getting dressed, the paste made him extremely orange. Don’t panic, that’s normal, and it’s still a huge step in the right direction because the contrast came along with it.

Pull the scopes up and you’ll see this shot is sitting way too deep in the shadows, mostly because of his dark jacket, so lift the shadow point until the blacks stop crushing and you keep the roll-off on the jacket. That’s the other great thing about SLOG3, by the way: as long as you filmed it right, you can push and pull it a long way before it falls apart.

Fixing Green Skin

The real problem with this shot is that he’s standing next to a window with green grass outside, so the sun is bouncing green off the lawn and straight onto his face.

Reset the temperature and the warm wheel settings you copied from the sunset shot, because they don’t belong here. Then take the mid-tones, which control most of his skin, warmer and slightly toward magenta, and watch his skin get a healthier red tone. Go too far and the wall behind him turns purple, so back it off.

The whole thing is a balance between complementary colors, and once it clicks you’ll use it constantly. Too green, go red. Too red, go green. Too blue, go orange. That’s it, that’s the trick.

I’ll also say I’m not a big fan of messing with the shadow wheel unless I need to, because shifting shadow color goes weird faster than anything else in this panel. Here I took the shadows just barely into blue, to put a little coolness back in his jacket and offset the warmth, and that’s as far as I’d push it.

The Dark Reception Shot

Third clip is dancing at the reception, and it’s much darker than either of the others, which is where people usually give up.

Here’s the life hack. If pasting your hero shot onto a clip doesn’t work, don’t force it. Paste from whichever clip you’ve already graded that’s closest to it instead. I deleted the hero grade off this one and pasted the groom’s grade in, which was much nearer the mark, and then made small adjustments from there.

Cool the temperature down, back off the magenta in the wheels until the dress reads white again, then push the shadows a little darker. I genuinely don’t care whether the band in the background is visible. I want the focus on the couple, and dropping the background is how you get it.

The Short Version

  • Grade one hero shot properly, with skin in it, then copy it to everything else.
  • Skip Basic Correction at the start. Come back to it at the end.
  • Curves for contrast. Three points: shadows, mid-tones, highlights.
  • Watch the waveform instead of guessing.
  • Color Wheels for mood, in very small movements.
  • Saturation around 120, because SLOG3 starts flat.
  • Whenever a paste doesn’t fit, paste from the nearest graded clip instead.

Curves are your friend. Color wheels are your friend. Subtlety is the whole game.

If you want to skip most of this, I built a set of color presets for SLOG3 that get you a long way in one click and that you can then tweak using everything above. And if you don’t have Premiere yet, there’s a free trial.

The gear I shoot all of this on is at my a7S III wedding kit, my free guide to booking more wedding clients is here whenever you want it, and there are a few thousand of us in the Learn Wedding Filmmaking Facebook group.