
I’m gonna show you how to export 4K videos out of Premiere Pro in very high quality, whether that video is headed to YouTube, Facebook, Vimeo, or straight to a paying client. These are the exact settings I use on everything I export, and by the end of this you’re going to have them all dialed in and saved as a preset so that you never have to think about any of it ever again.
Here’s the short version if you just want the numbers and you’re in a hurry:
- Format: H.264
- Preset: High Quality 2160p 4K
- Frame Size: UHD 3840 x 2160
- Frame Rate: match your footage (23.976 in my case)
- Field Order: Progressive | Aspect: Square Pixels (1.0)
- Render at Maximum Depth and Use Maximum Render Quality: both checked
- Performance: Hardware Encoding
- Profile: High | Level: 5.2
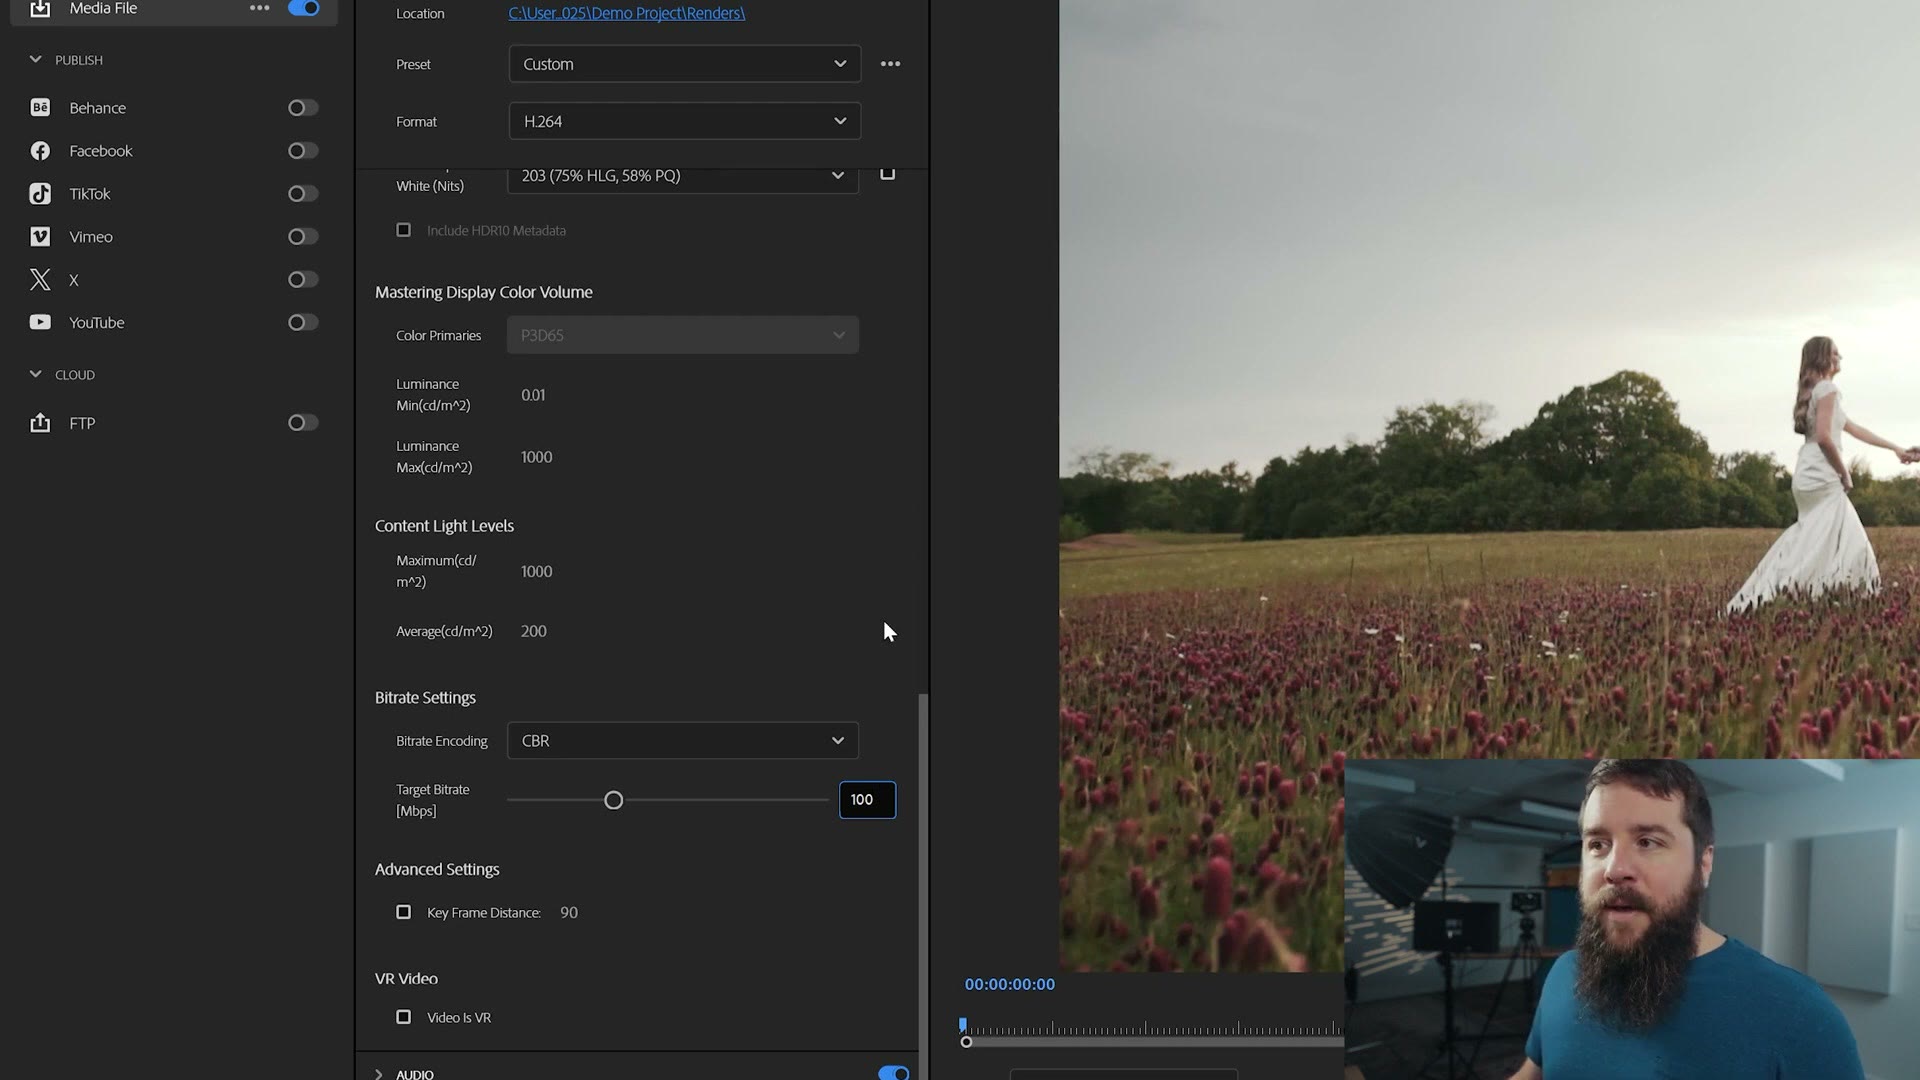
- Bitrate Encoding: CBR | Target Bitrate: 100 Mbps
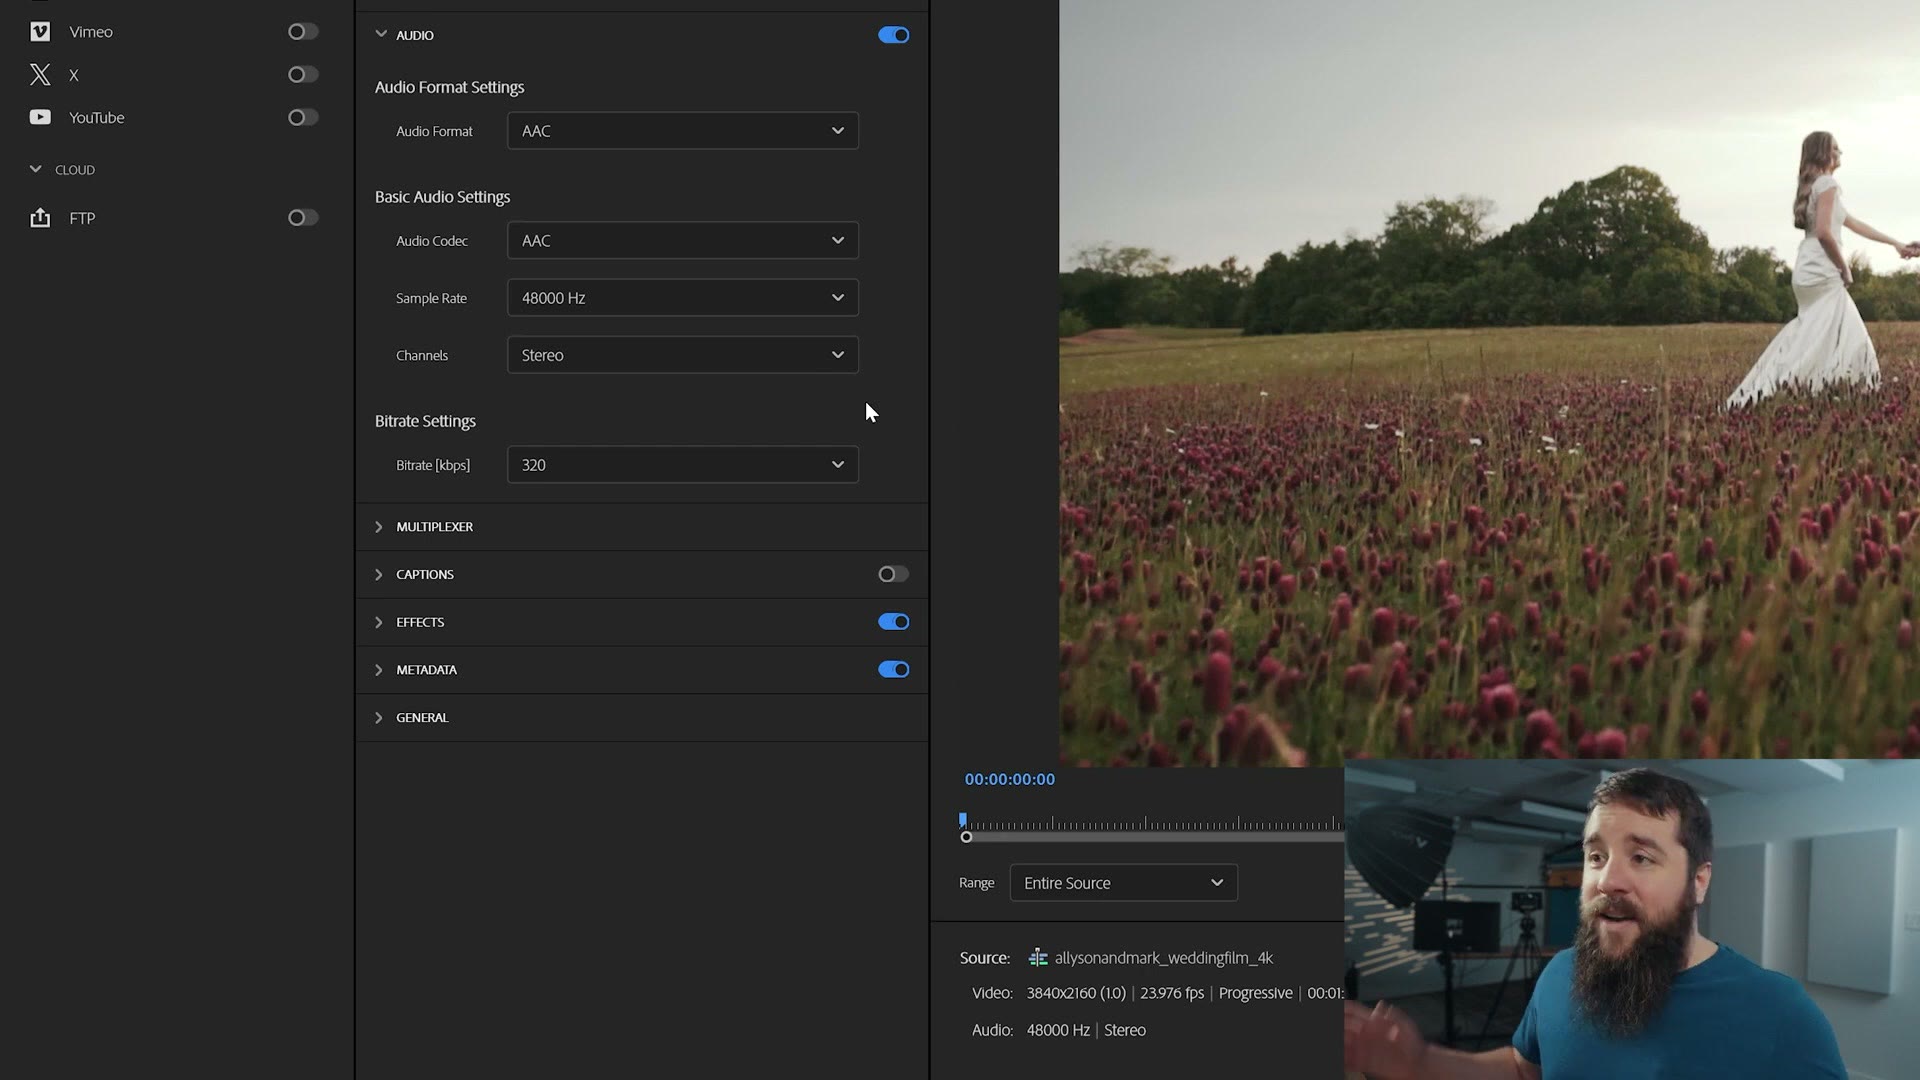
- Audio: AAC, 48000 Hz, Stereo, 320 kbps
Download My Free 4K Export Preset
Before we get into any of this, I put together a set of free export presets that will give you all of these high quality 4K settings immediately, without you needing to dial in a single one of them manually. They even come with instructions showing you how to import them into Premiere Pro, so go download them for free right here. That’s genuinely the fastest way to do this. But if you want to actually understand what each of these settings is doing, or you’d rather build the preset yourself, keep reading, because I’m going to walk you through all of it.
Open Up The Export Window
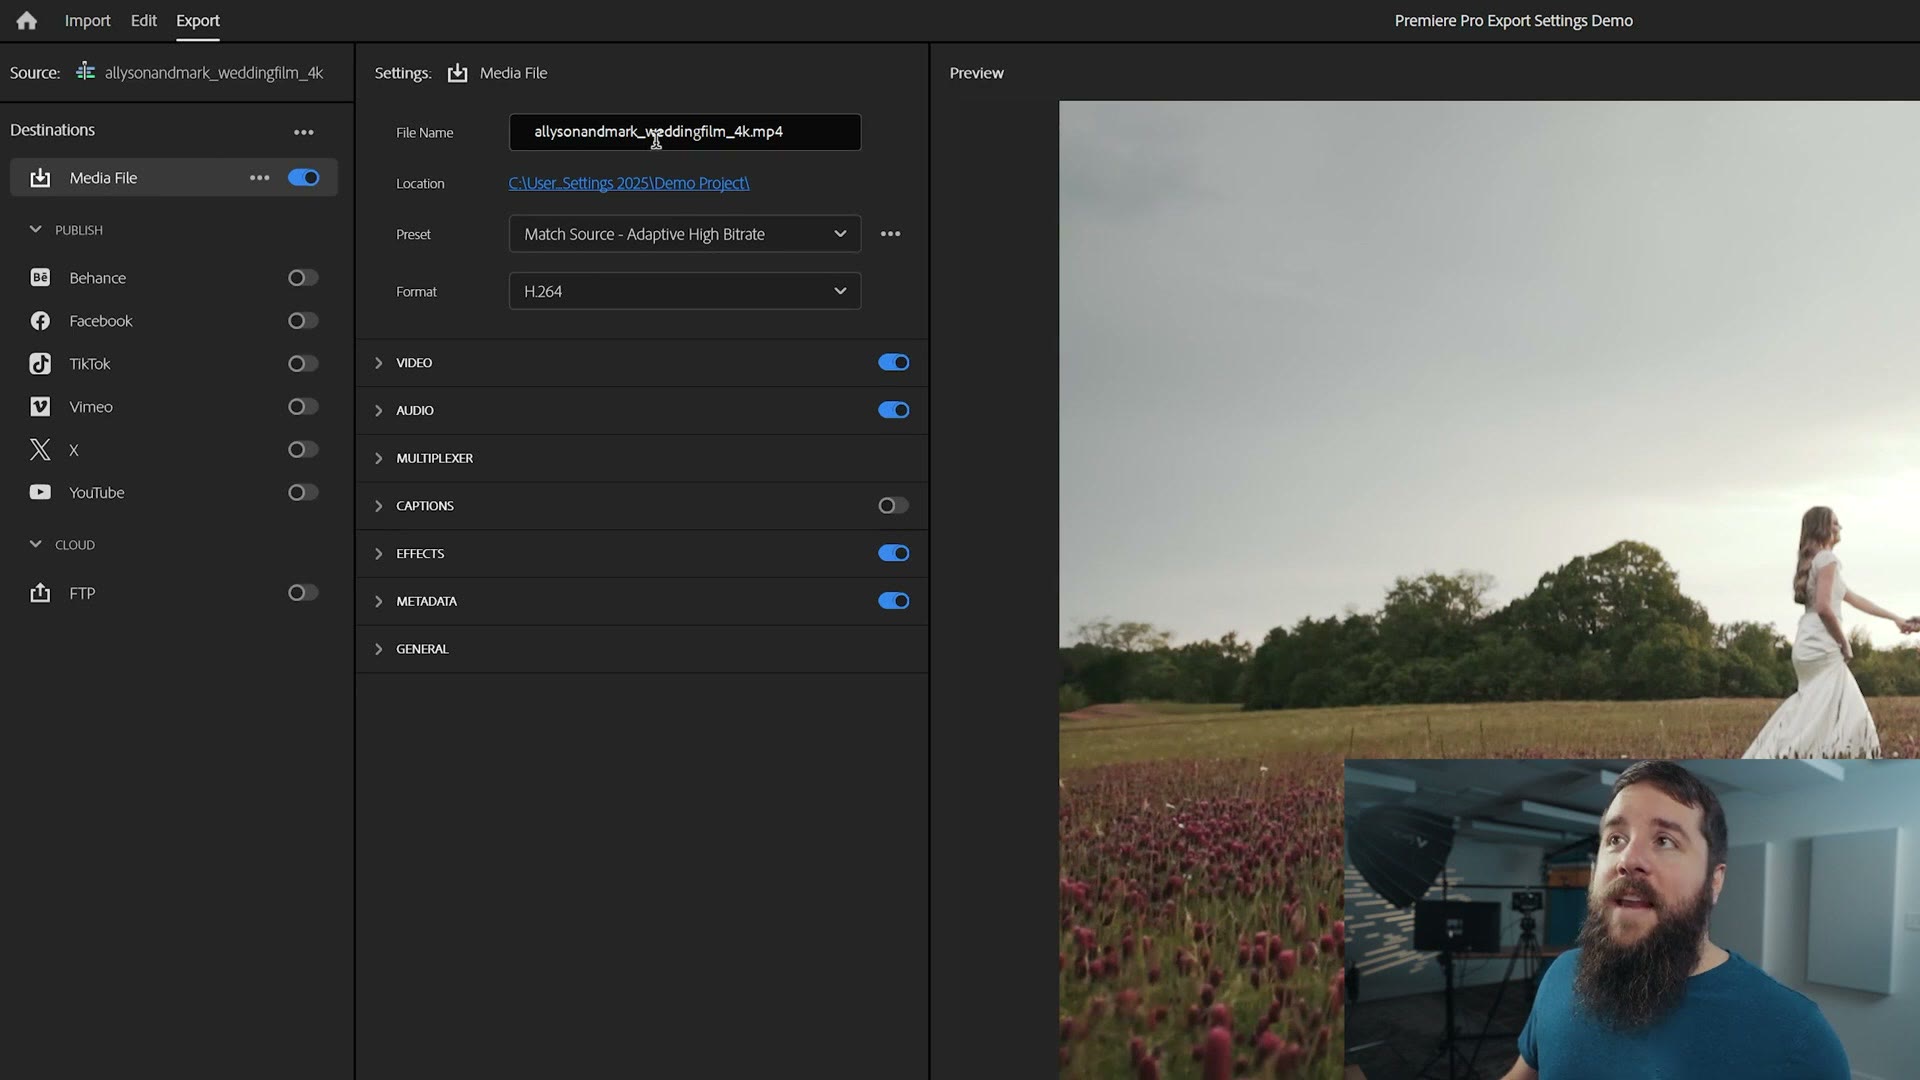
Let’s pretend your video is fully done and it’s ready to go. Once you reach that point you can either press Ctrl M on PC or Command M on Mac, or you can go up to the Export tab at the top and click on that. Either way, it’s going to open up the export window. Make sure Media File over on the left is selected, and then give your video a name. In this case I’m calling it Allyson and Mark Wedding Film. You can title your video whatever you want, just leave that .mp4 on the end.
Then click on Location, because this is where your video file is actually going to be saved. I like to make a folder called Renders inside the project folder and drop the exported video in there. And if you remember one thing from this whole post, please remember where you saved your video file. Otherwise you’re going to be very confused, going “where’s my video?” It is where you saved it. In that folder.
Choose The 4K Preset
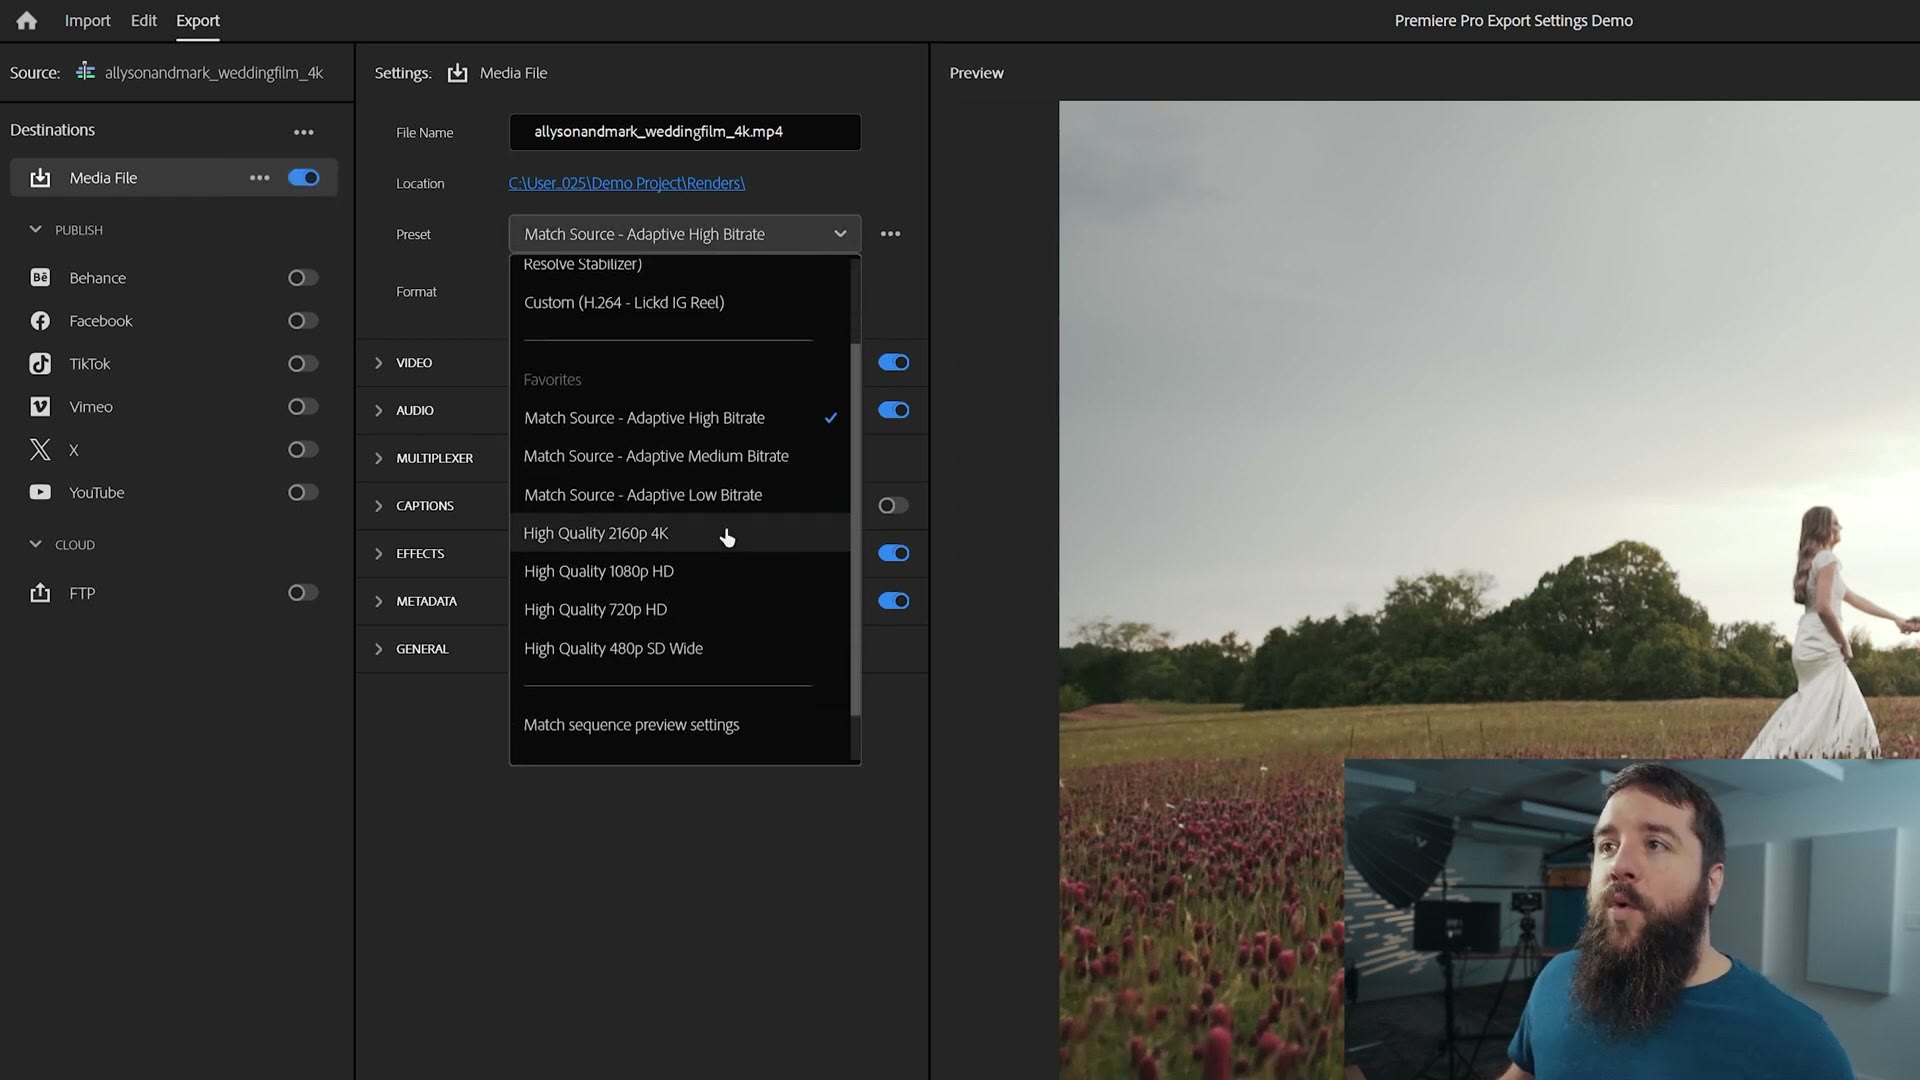
Click the Preset dropdown and go down to High Quality 2160p 4K. And at this point you’re probably thinking, this is great Matt, do I just go down there and hit Export and I’m good to go? Right? No. Because I told you at the start that I want to give you the best possible export settings, and by default Adobe is not quite going to give you the best.
So that means we need to dig into the Video tab, and there are a handful of settings sitting there, and then you click More and, spoiler, there are a lot more settings. But do not worry. Hold on to your beard, things are gonna get a little complicated, but I’m going to walk you through all of it and make it easy.
Basic Video Settings
Set Frame Size to UHD 3840 x 2160. Frame Rate should match your footage, which for me is 23.976, and if that field is greyed out you can click the little checkbox over to the right of it to unlock it and change it. Field Order stays Progressive, and Aspect stays Square Pixels 1.0.
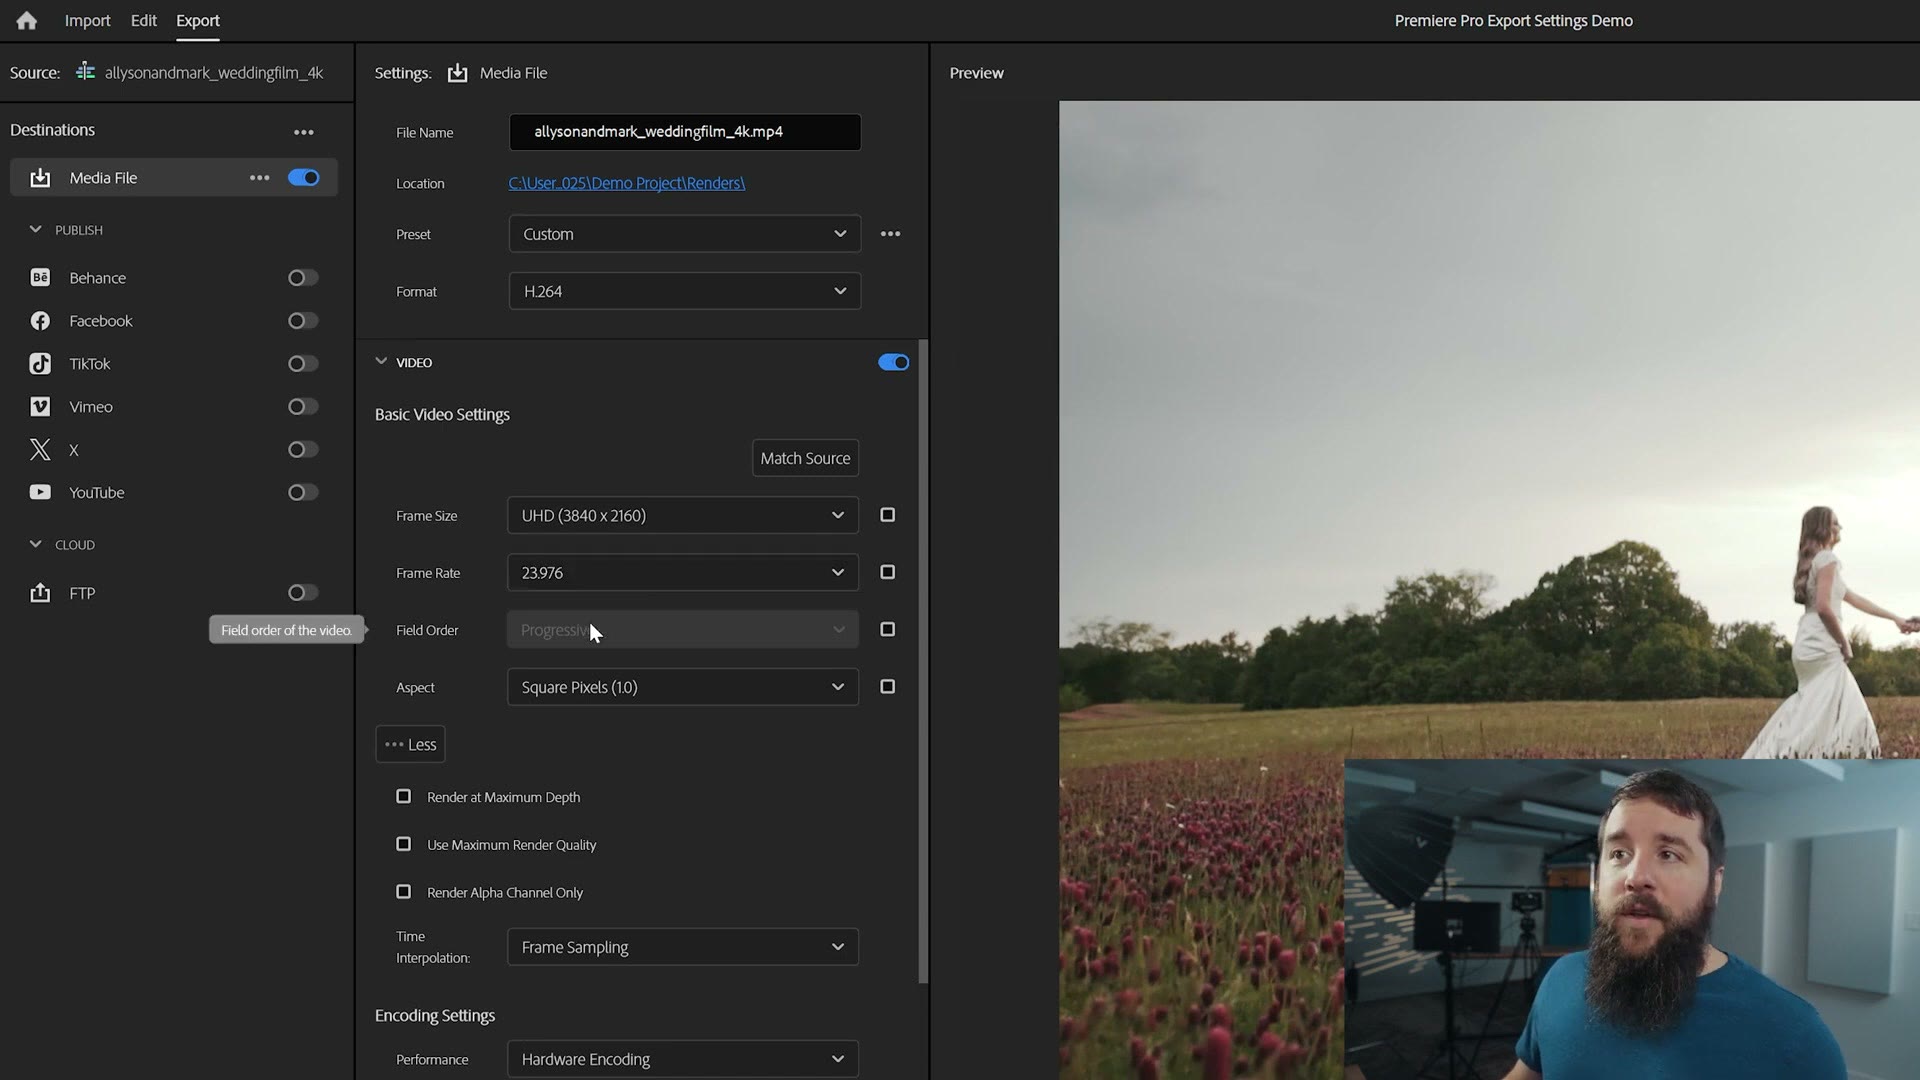
Underneath that, make sure Render at Maximum Depth and Use Maximum Render Quality are both checked, because yeah, we want the highest quality video, right? Yeah. You definitely want that. So leave those checked.
Encoding Settings
Scroll down to Encoding Settings and set Performance to Hardware Encoding if it’s available to you. If it isn’t and all you see is Software, that’s okay, it’ll still work. But hardware encoding lets your computer render your videos dramatically faster because Premiere is going to lean on your graphics card to do the work, so I highly recommend it whenever you have the option.
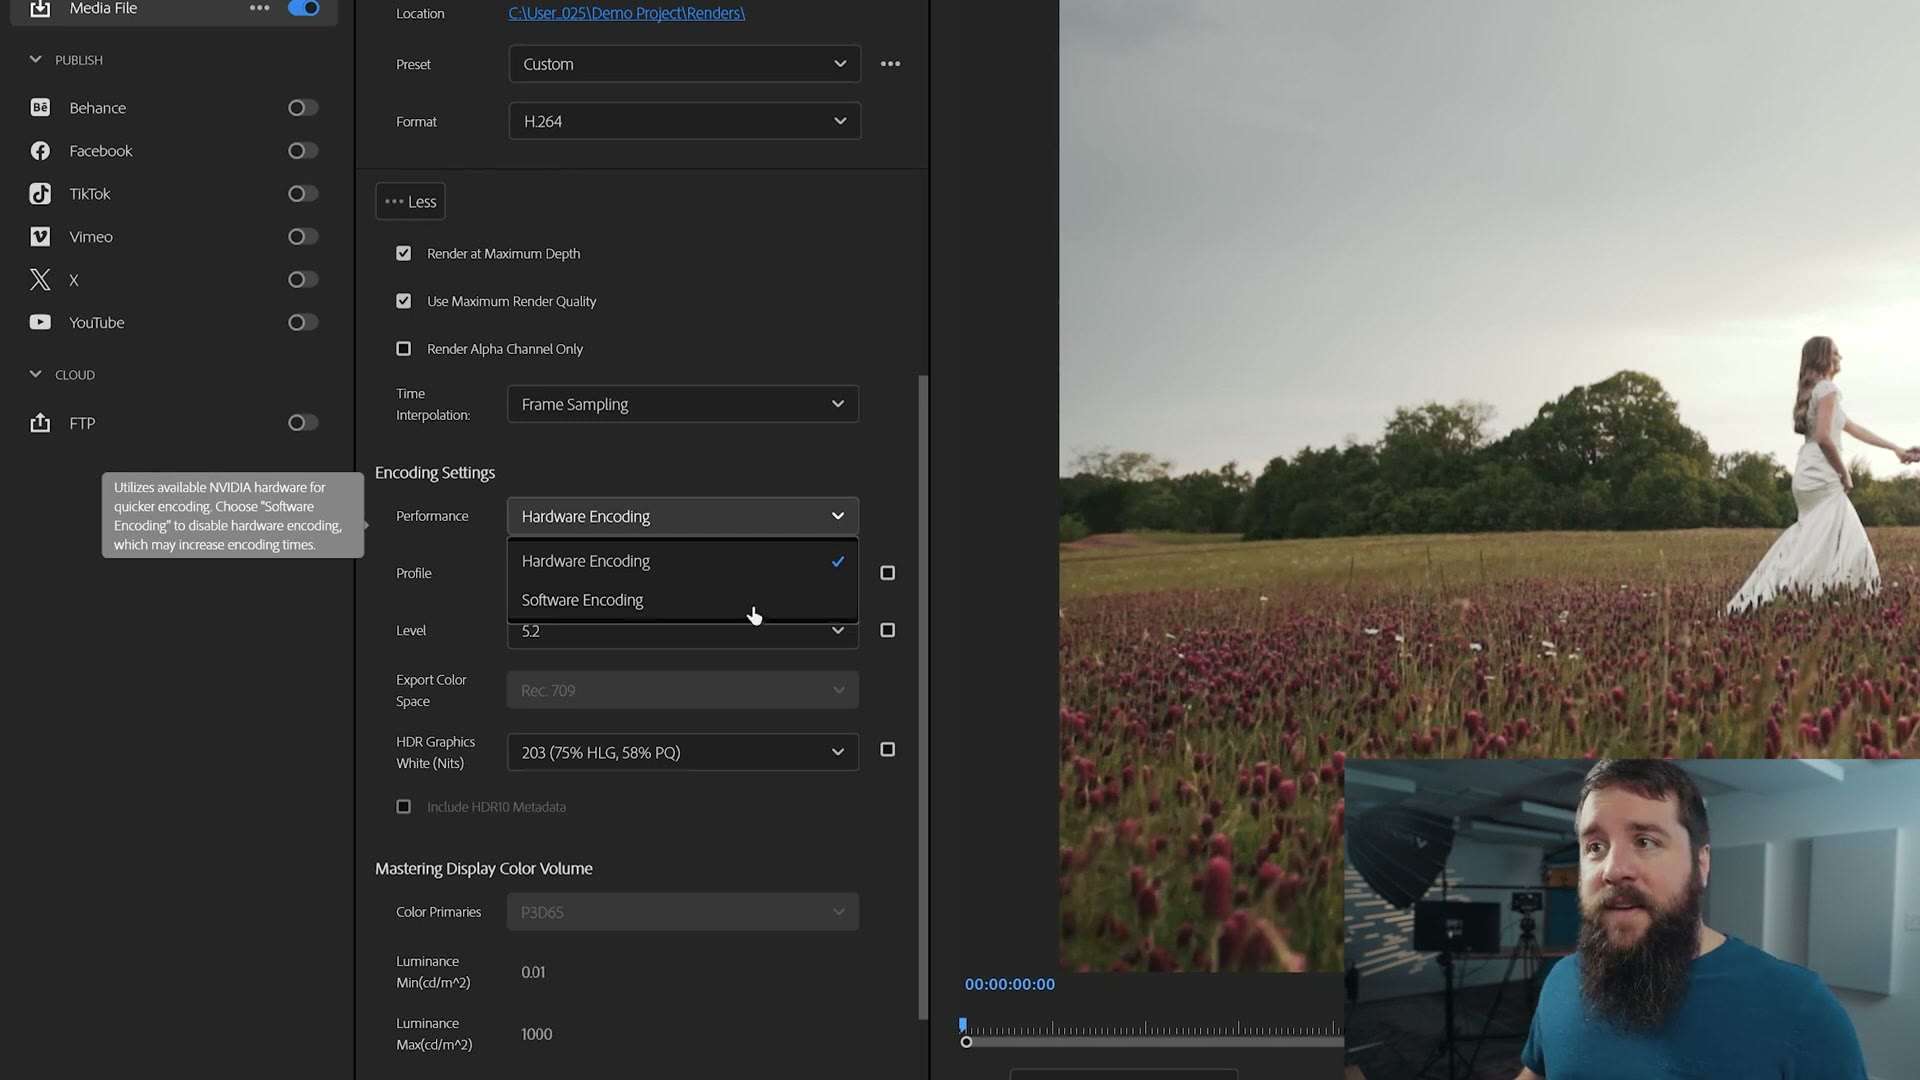
Leave Profile set to High and set Level to 5.2. And by the way, I want you to notice that there is also a High 10 setting sitting right there, and you may be thinking, well, if we’re already on High, why don’t we go to High 10? Go really fancy. Do not do that. You only want High 10 if you are exporting an HDR video using an entire HDR editing workflow, which is way outside the scope of this. I’ve had people tell me “oh, I chose High 10 and my video looks weird.” Yeah! Because you don’t want to do that. Leave it on High. For HDR Graphics White (Nits), leave that set to 203, which should already be the default.
Bitrate Settings
This is where things get super important, because bitrate is the single biggest setting affecting the quality of the video you’re exporting. For Bitrate Encoding you want CBR, which stands for constant bitrate, and which basically means Premiere is always going to be pushing your video to be as high quality as it possibly can. Then for Target Bitrate, crank it up to 100 Mbps.
If you’re not using this one, I went through Best Export Settings For DaVinci Resolve For YouTube (with FREE Export Presets) as well.
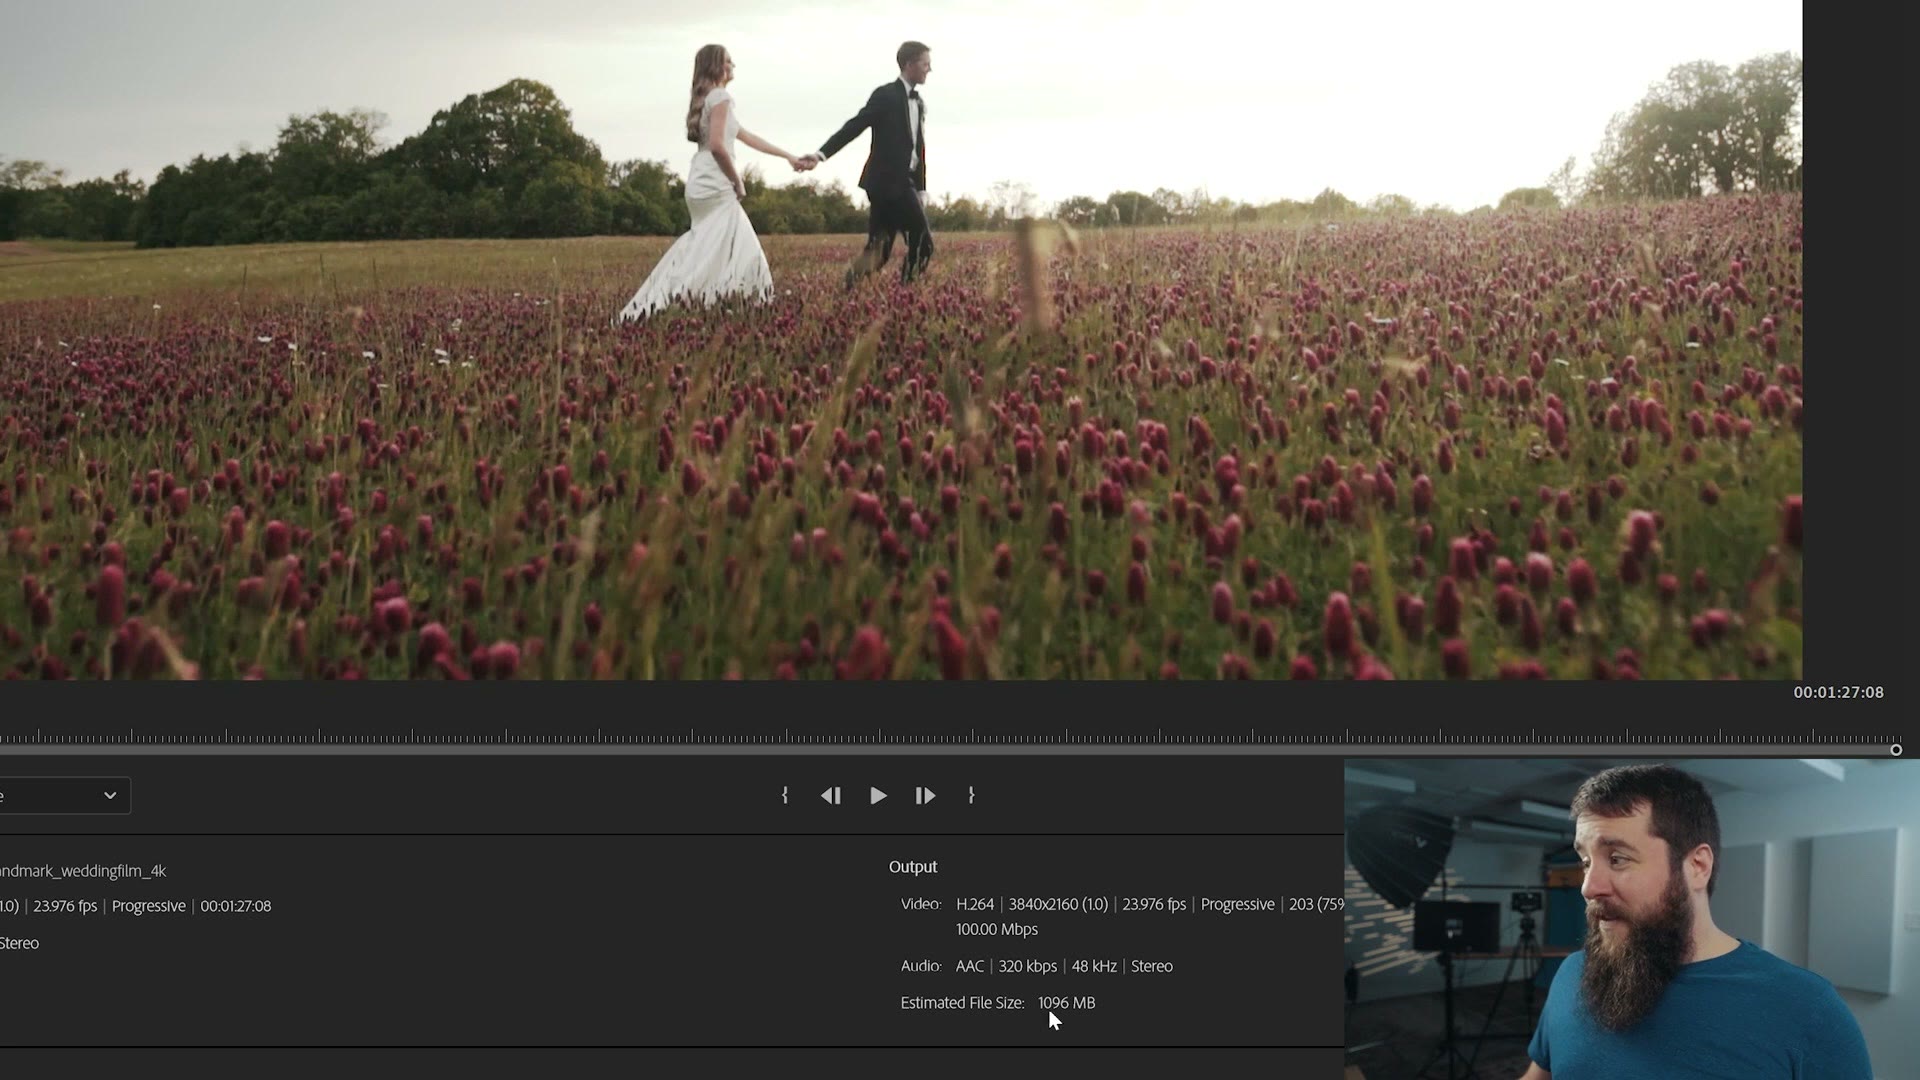
This is going to result in a very big file. Look down at the Estimated File Size in the bottom right and you’ll see that this video, which is a minute and 27 seconds long, is already 1096 MB. So it’s a beefy file. But that large file size is completely worth it if you want the highest quality 4K video going up to YouTube.
Always Upload To YouTube In 4K
Speaking of the highest quality videos on YouTube, even if you did not film your video in 4K, and you shot it in 1080p for example, I would still recommend using these 4K export settings for basically everything you export whenever the destination is YouTube. Because if you upscale your lower resolution files to 4K and export and upload them that way, YouTube is going to use a significantly higher bitrate whenever it plays your video back, and the quality is going to be dramatically better than if you had uploaded it in HD. It’s sort of a hack. So in short, always upload to YouTube in 4K, and honestly you can do the same on Facebook or Vimeo or wherever else, it’ll pretty much always help you.
Audio Settings
Go down to the Audio tab and all of these should be good by default: Audio Format AAC, 48000 Hz, Stereo, and a 320 kbps bitrate. Like I said, these should already be set up correctly, but it doesn’t hurt to check.
Save Your Export Settings
Congratulations, your settings are all done. But if you want to save yourself from going back and dialing in every one of these things again on every single video you ever export, you now have two options. First, you can download my free presets, which give you everything we just covered in one click. Or you can save what you just built as a preset of your own.
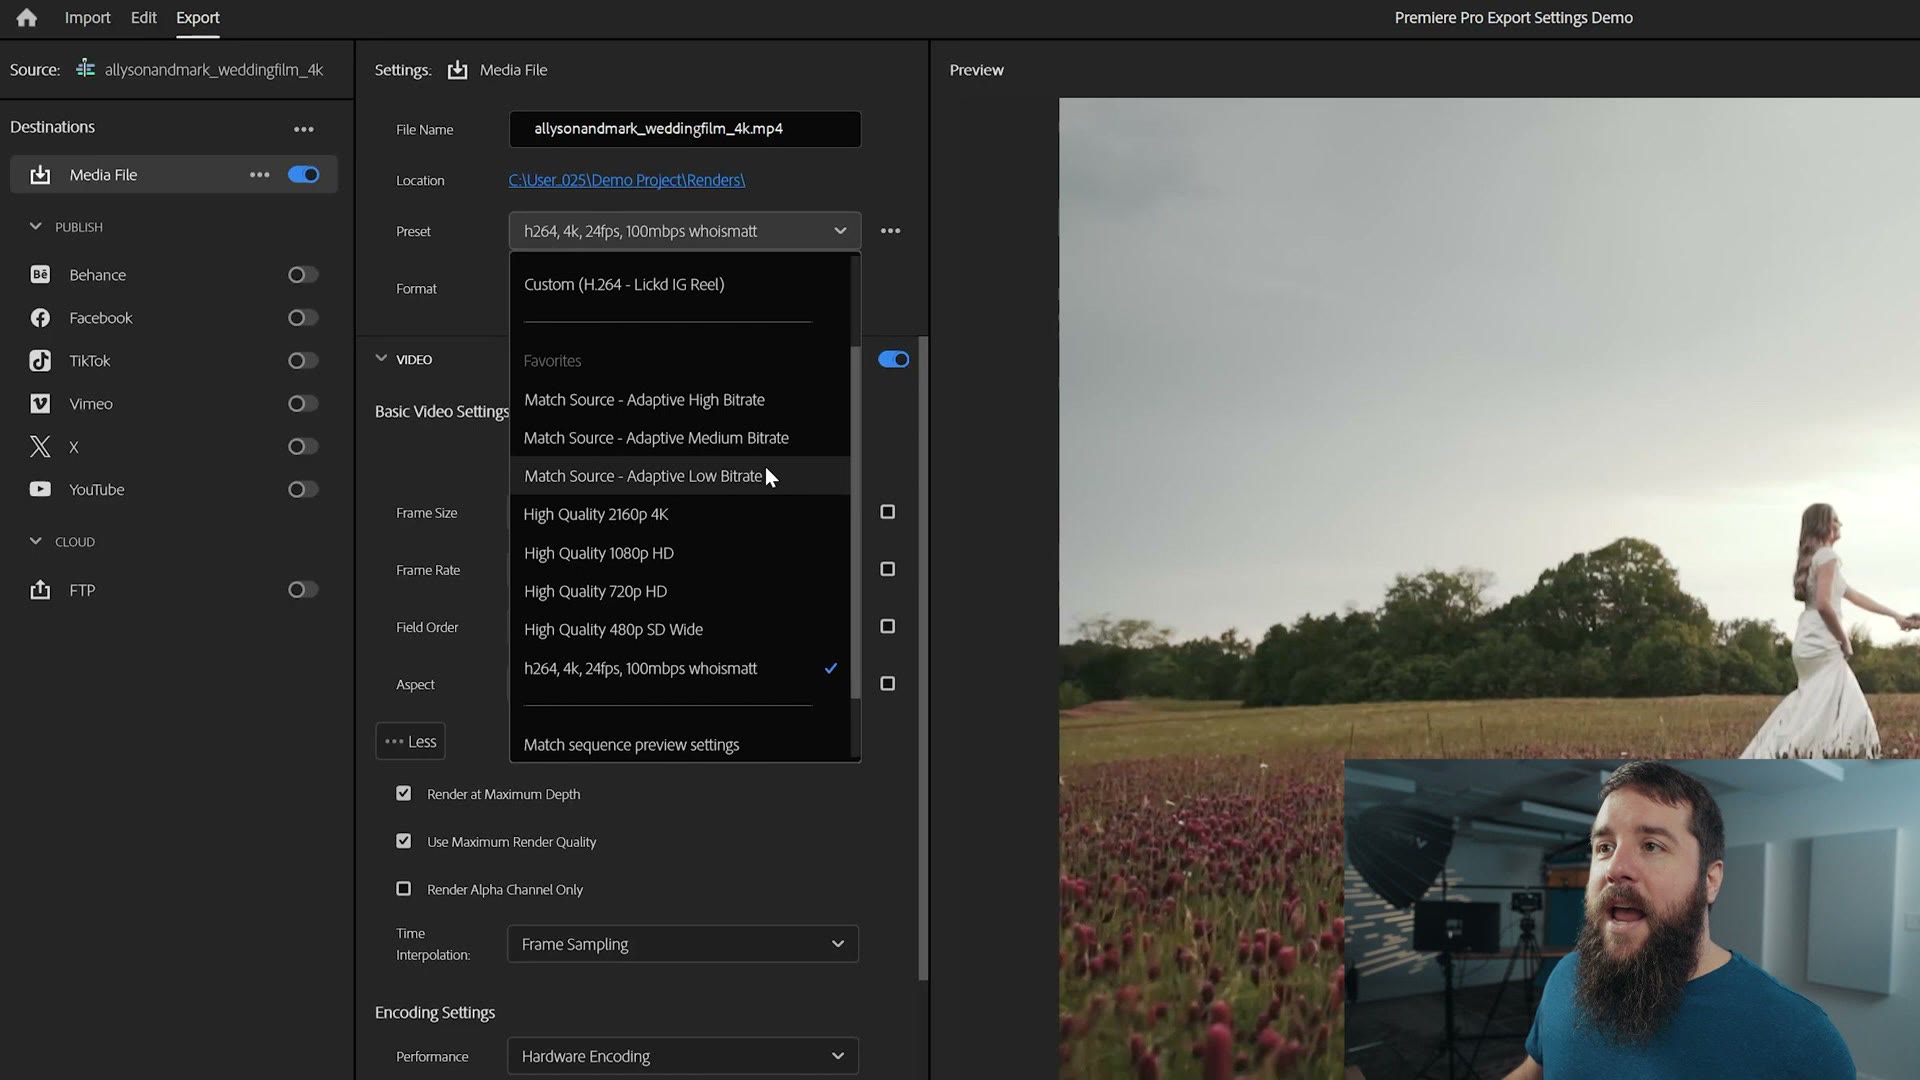
To do that, go up to the Preset section, click the three dots to the right of it, click Save Preset, and give it a name. I called mine “h264, 4k, 24fps, 100mbps whoismatt” because those are all the critical settings, and we’ll throw in the whoismatt at the end. See? Remember who helped you make it. Press OK, and from then on any time you want to export using these settings, you click the Preset dropdown and your preset is sitting right there. One click and you’ve got all of it instantly.
After that, all you have to do is click Send to Media Encoder to export using Adobe Media Encoder, or just hit Export, and your video is done. If Premiere ever tells you Media Encoder is not installed when you do that, here is the 30 second fix.
Download My Free Edit Videos Like A Pro Guide
Because I would love to help you out even more, I’ve also put together a free guide called Edit Videos Like A Pro. It walks you through some of the biggest tips I have for you as a video editor, and these are things that took me years to learn, so you can use this guide to take a huge shortcut. Download it completely free right here. Thanks so much for reading and have a great day!