
I would like to share with you a cool workaround I discovered that enables you to shoot with your camera in APS-C/Super35mm crop sensor mode, WHILE shooting in 4K.
Continue reading
I would like to share with you a cool workaround I discovered that enables you to shoot with your camera in APS-C/Super35mm crop sensor mode, WHILE shooting in 4K.
Continue reading
If you’ve watched my previous two wedding cinematography vlogs, you’re probably aware that they’re on the technical side. I’ve covered bit rates, color depth, picture profiles, and battery life for both the Sony A7Sii and the FS5. Both are amazing cameras that I was more than happy to review and share with other wedding cinematographers, and if you’re looking to switch or upgrade, I’d highly recommend watching both of those.
But I’ve got to take a step back from technical reviews like that, mostly because I cannot afford to buy any more cameras at this point.
So instead I want to talk about something that, in my opinion, has a far greater effect on how you create great wedding films than any camera does. Wedding days at their core are about relationships. The bride and groom’s relationship. The parents and their relationship with their children. The minister’s relationship with the couple. And a whole lot more as these two families come together on the wedding day.
Let’s talk about one more relationship, one that will affect you more than any of the others on the wedding day. Your relationship with the photographer. Or, if you’re the photographer reading this, your relationship with the videographer, because this works exactly the same in both directions.
Have you ever had a wedding where everything just clicks? You meet the photographer, you start getting along, you realize you have the same interests, and suddenly you go from who is this random person to hey, there’s a cool shot over here, you should check this out. And you’re both like, that’s awesome. And by the end of the night you’re swapping information, saying we should hang out sometime, oh you’re in town too, this is great, oh you’re two hours away, I’ll drive to see you, this is awesome. Because meeting other creative people like that can be such a cool experience.
What if I told you every single wedding could be like that? Maybe not to the point where you’re making weekend plans at the end of every one, but where you leave saying that was a positive experience, I liked working with that person, I would do that again. That’s my whole goal with this video.
One huge thing to consider is that a wedding is not a normal job. And I know, dumb Matt, of course it isn’t. But think about what that actually means. You are not in a cubicle from nine to five, Monday through Friday. If you work in a cubicle, of course you know the same people, because you see them every day. With a wedding, you are working with a different coworker every single week. One week it’s one photographer, the next week it’s a completely different one.
Some of those people are great. They’re entrepreneurial, they should not be in a cubicle, they should be doing their own thing and running their own business and being happy and successful. On the flip side, you also get people who are way too crazy to work in a cubicle, who are a little bit insane, who would genuinely not get along well with others, and their solution was I’m going to start my own business so I don’t have to work with those people. Except now you have to work with them, because you’re both shooting the same wedding. And if you’re one of those people, I’m sorry, I’m sure you’re a very nice person, but you’re a little weird. Okay. Just saying.
Regardless of who you’re working with, remember that the bride and groom chose them. It’s not up to your opinion. You don’t get to show up and decide this person is insane and I don’t want to work with them. It is your job to get along with them for the day. So if you can hold onto one thing, hold onto this: the bride chose them, she wants to be happy, let’s keep her happy, let’s get along. That goes a long, long way. It’s not about you. It’s about the bride and groom.
This is my first massive tip for you, and it blew my mind whenever I experienced it. I want to give a huge thanks to Alex Maldonado at Alex M Photography for doing it to me first, so that I could experience it and then share it with you.
Here it is, step by step.
Fast forward to the wedding. You’ve reached out, you’ve sent the email, you’ve gotten a nice reply back. Whenever you meet the photographer for the first time in person, reiterate everything you said in that email.
First, tell them you want to get along. I realize that sounds basic, essentially I want to be your friend, but it really is helpful to say it out loud. Second, tell them you want to share ideas. So if you see a cool shot, tell them. Hey, this is a cool angle, come over here and check this out. And suddenly you’ve got creative information flowing back and forth, instead of this is my shot, my perfect precious shot, and you don’t get it. You end up with a genuine collaboration where both of your work improves because of it.
If you put all of this into practice, you’ll show up on the wedding day looking like you already know the photographer. I have literally had brides and grooms walk up and ask how many weddings have you two shot together, and I say, one, yours, we met ten minutes ago. And they say, but you get along. And you go, is that weird? Okay. But that’s what happens when you hit it off with each other.
I’ve had photographers absolutely floored just because I emailed them. Within five minutes of shooting they’re saying I want you to shoot every wedding with me, and I’m getting referrals from them now, because they enjoyed working with me. All because I took two minutes out of my day to send an email that said hi, I like your work, looking forward to this weekend.
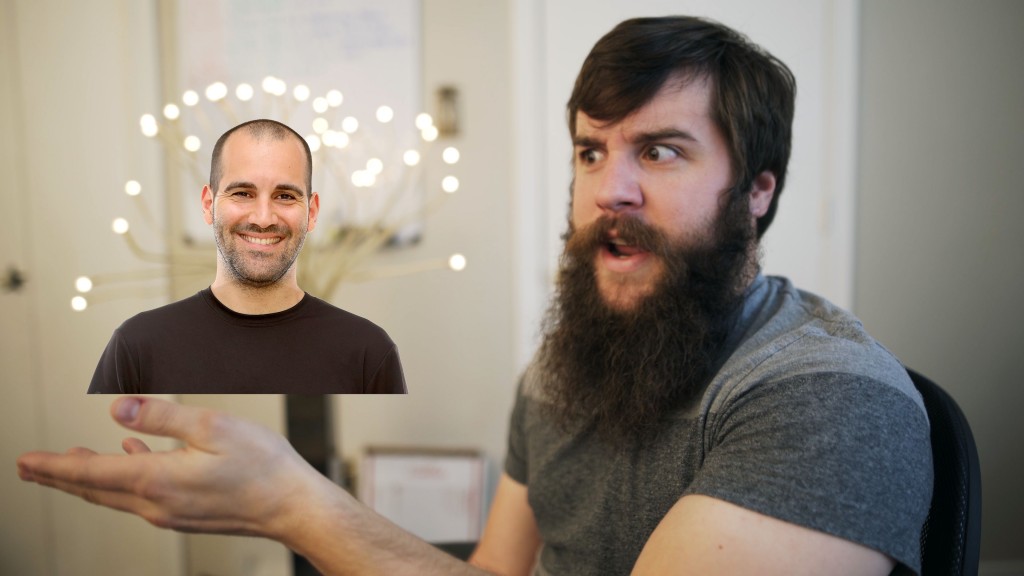
Above all, keep in mind that everybody wins whenever the photographer and the cinematographer get along. You’re less stressed. The bride is less stressed. There’s a free flow of creative ideas, both of your portfolios get visuals that look better, and the couple gets a better film and better photos. Everything benefits when the two of you are friendly with each other. It’s a win all around.
I really hope this helps you out, whether you’re a wedding cinematographer or a photographer, and that you can use it to improve your next wedding day.
If you have any questions or comments, please feel free to get in touch. You can also watch my wedding films at Filmstrong Productions, and follow along on Instagram.
A note on timing: this was filmed in January 2016, about six years into shooting weddings. The advice hasn’t aged a day, but the cameras in the first paragraph certainly have.

For the past two weeks, I have been testing Konova’s new motorized system for use with their sliders. I have made a setup video and review of the new MS Series Motorized System.
Continue reading
Ever sinc e Instagram unveiled video uploading last month, I have been desperate to upload videos that I have previously recorded on my iphone, as well as videos from other cameras and ones that I have edited. With this easy to follow text tutorial, you will be able to upload any video you want to Instagram, even ones that are much higher quality than those you can record with an iPhone camera, such as DSLR videos, or RAW Timelapse clips. The only drawback is that you cannot use a still frame from the video that you are uploading, and your custom video cannot exceed the 15 second length.
You can view an example of a custom uploaded video on my Instagram Page.
WHAT YOU WILL NEED
That’s it! Once you get everything setup, it only takes around 5 minutes to edit your custom video and render it.
The original idea for this project came from a Google Search I did yesterday and a post on TechEnvy which used Quicktime Pro. The difference between this tutorial and that one is that Adobe Premiere is used which offers much more freedom, customization, and quality when it comes to editing your video.
Step One
Download and install iFunBox and Adobe Premiere Pro.
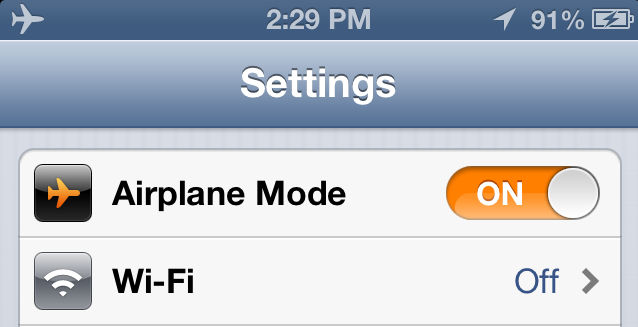
Set your iPhone to “Airplane Mode” so that it is no longer connected to the Internet.
Step Two
Open Instagram and record a video that is approximately as long as the custom video that you want to upload. Make sure you get the video length as close as possible; your custom video will have to match the length you record exactly so it doesn’t go to black at the end. Remember, you can’t have a video longer than 15 seconds.
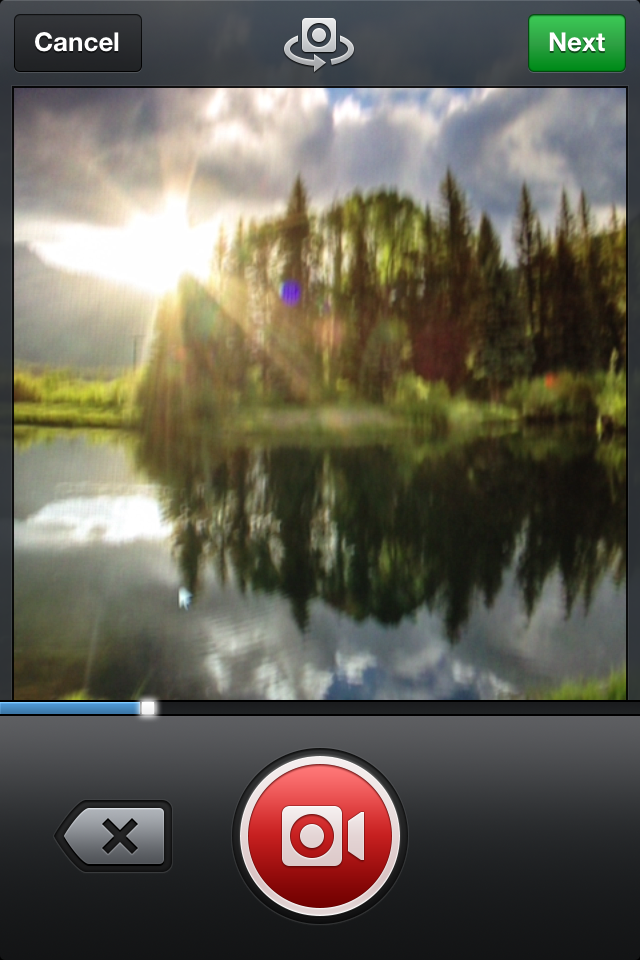
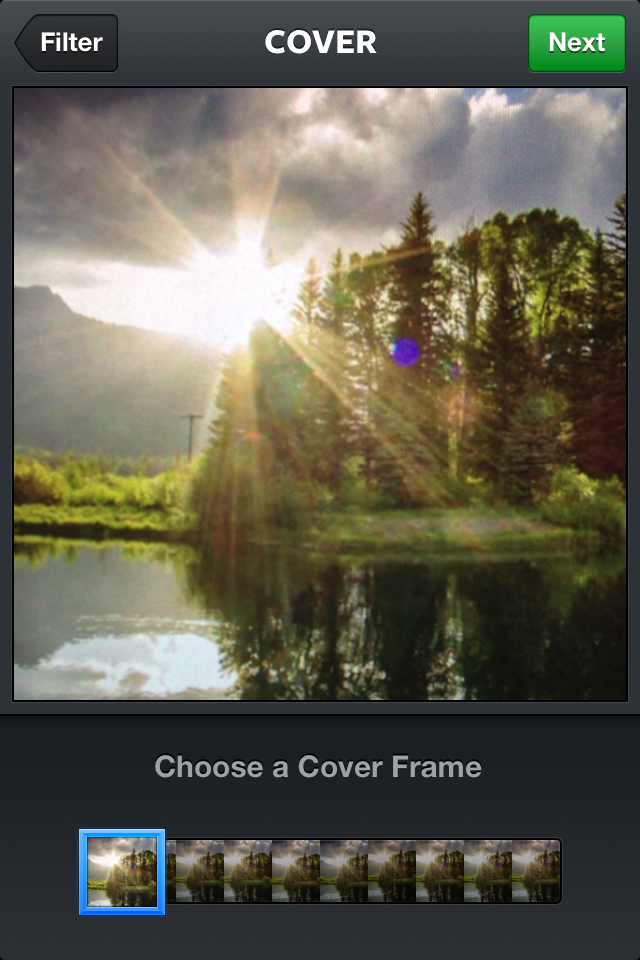
Also, you cannot choose a still frame from your custom video, meaning that you must choose a still frame from the video you record in Instagram. I find that it is easiest to record the computer screen of the video that I want to custom upload, and select a still frame from that recording. That way, the video matches the still frame.
Step Three
Type in the description for the video and select the services you want to upload it to as well (Facebook, Twitter, FourSquare, etc). Then click “Share”.

Instagram will immediately say “Failed” due to you not having an Internet connection.

Step Four
Connect your iOS device to your computer and open iFunBox. The App will recognize that your iPhone is connected.
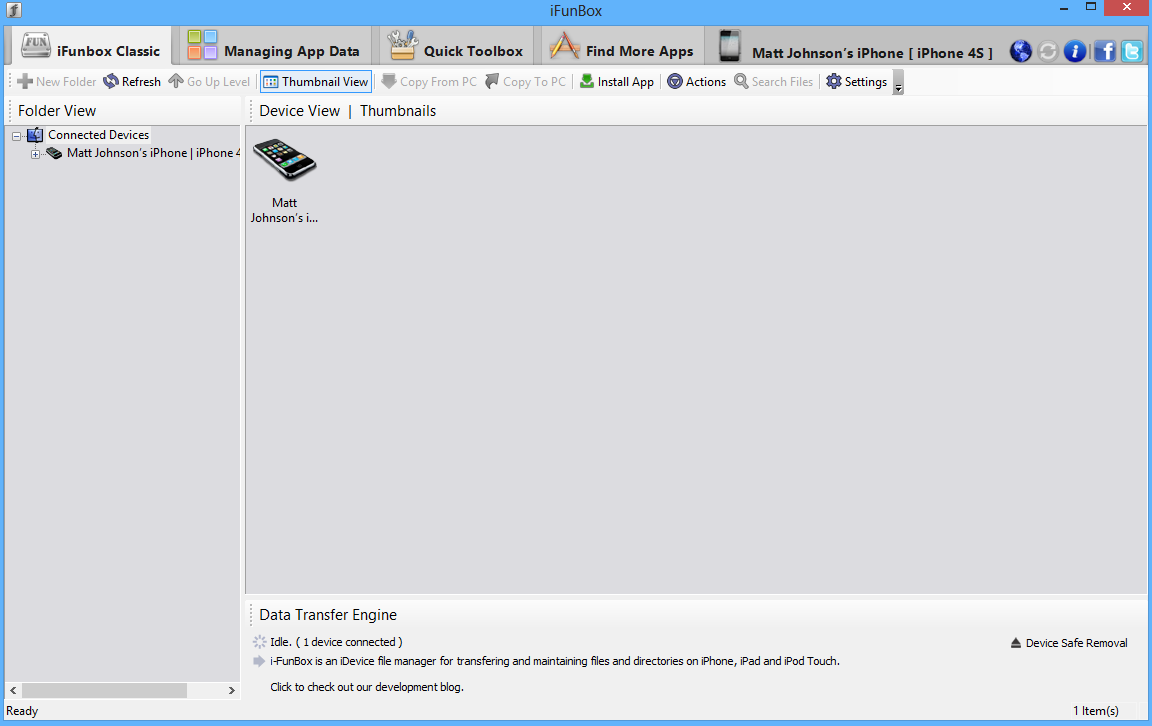
Double Click on your iPhone and you will have options such as User Applications, App File Sharing, General Storage etc.
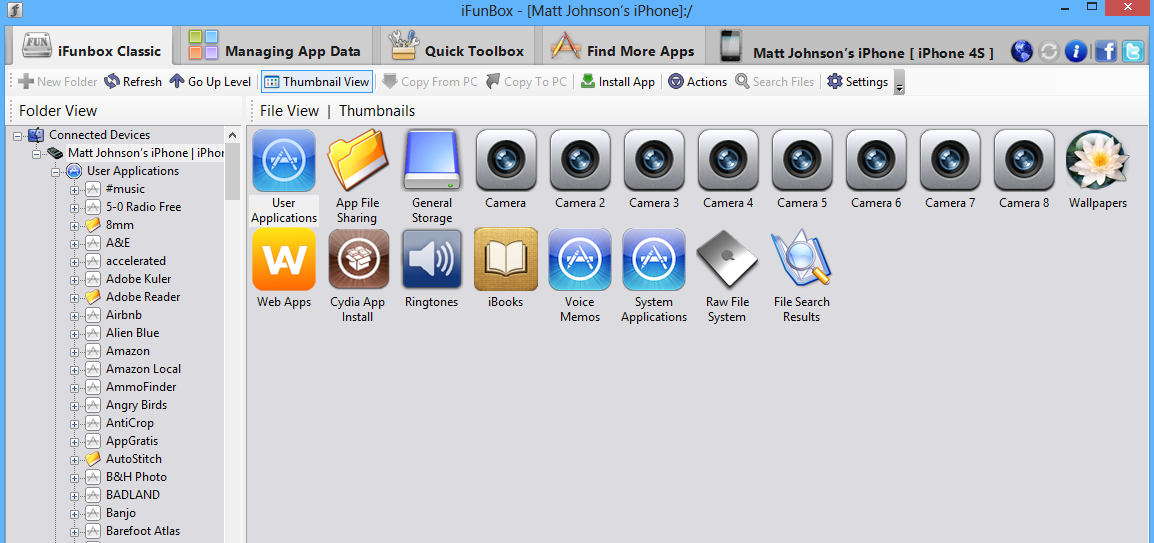
In the “iFunbox Classic” tab, DOUBLE CLICK: User Applications > Instagram > Library > Application Support > Instagram > Videos.
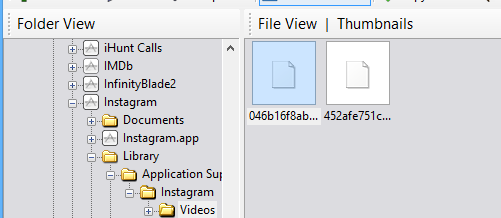
Step Five
There should be two files that are both just a long sequence of numbers and letters. One of the files will end with the extension “.mov.locked”, that is the one you want. Click and drag it to your desktop. You can then minimize iFunbox.

Step Six
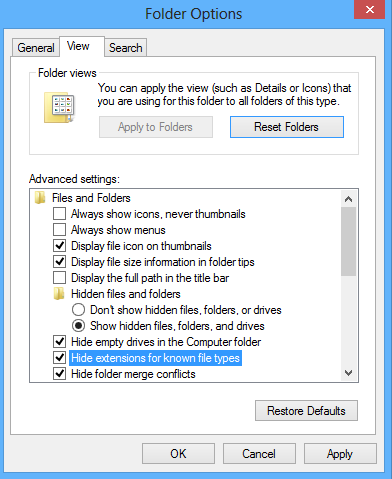
By default, Windows will not let you see the file extensions for files that it recognizes. This is to prevent users from changing them and being unable to open their files. You will need to re-enable this feature to change the file extension. Go to Start > Control Panel > Search: Show File Extensions

Click “Show or Hide File Extensions.” In the window that opens, UNCHECK the “Hide Extensions For Known File Types” box and hit Apply, then OK.
Step Seven
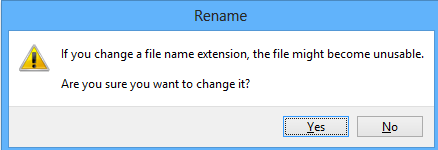
Select the file you copied to the desktop and remove the “.locked” extension from the end of it. A dialogue box should appear asking if you are sure you want to change the file extension.
Step Eight
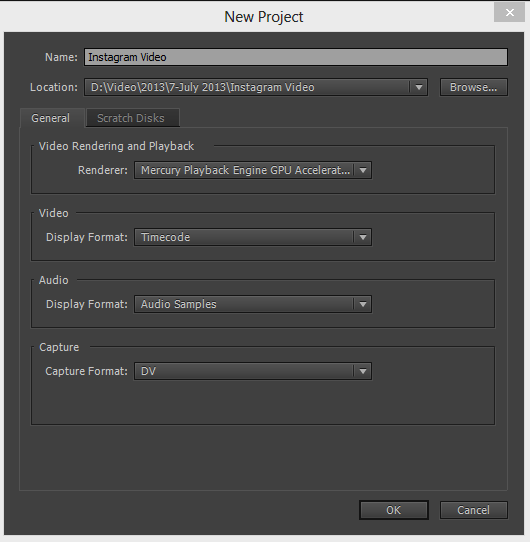
Open Adobe Premiere Pro and choose to create a New Video Project. I find it best to create a folder to keep all the project files inside. Then select “OK”.
Step Nine
If you are using CS6, a “New Sequence” Dialogue box should appear. If you are using Premiere CC, then you will need to select File > New > Sequence.
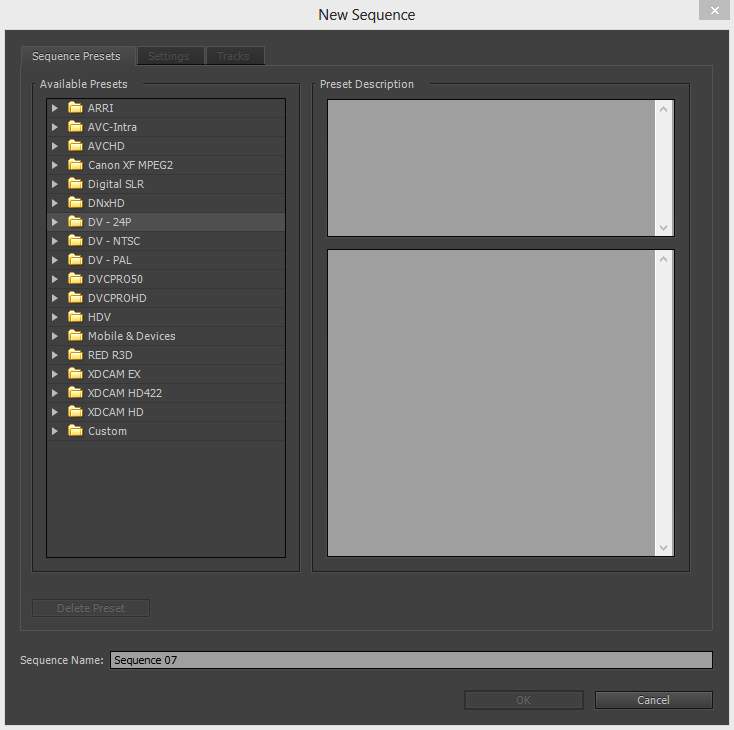
From the Twirly arrow drop down menu, select Digital SLR > 1080P > DSLR 1080p 30.
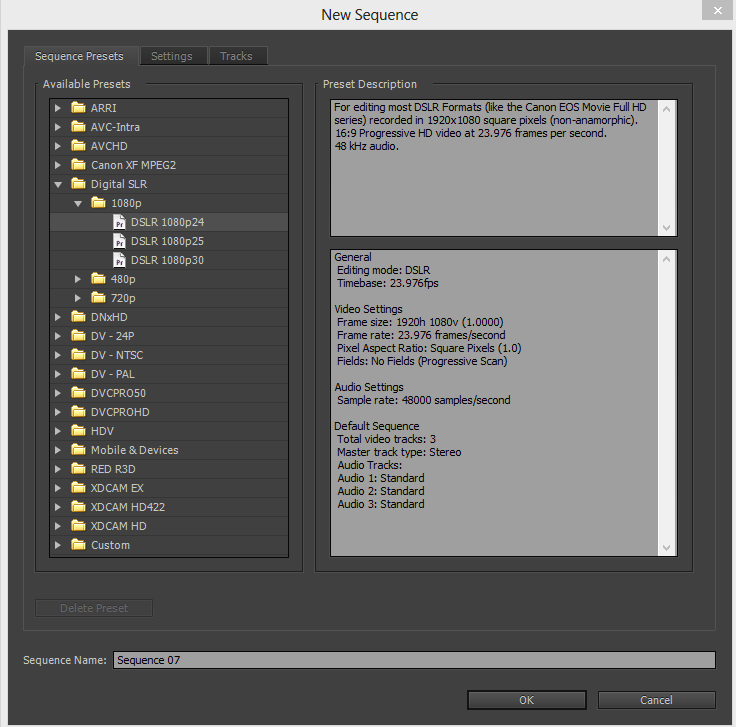
Now select the “Settings” tab at the top, and choose the following options.
Then choose to save the preset so you can use it again later.
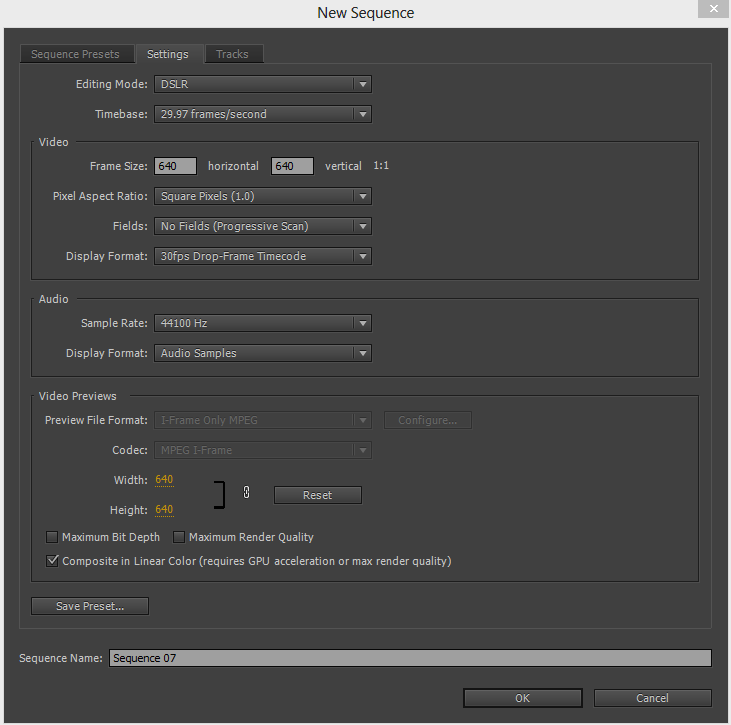
Step Ten
Import the video that you copied from your iPhone to your desktop into Premiere Pro. Also import the custom video you want to use in its place.
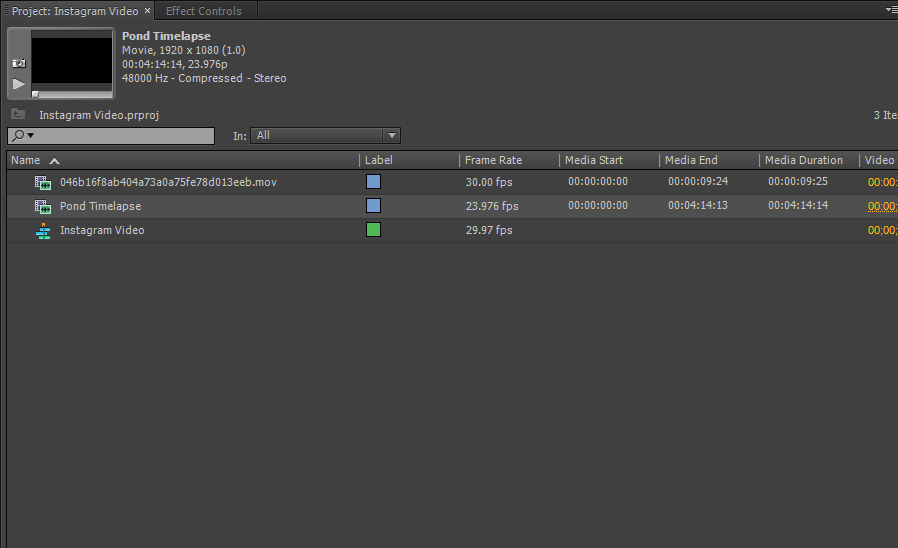
Step Eleven
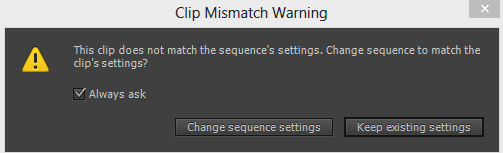
Drag your originally shot Instagram video to the timeline. A “Clip Mismatch” warning might come up but you can ignore it and tell it to “Keep Existing Settings.”
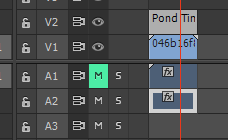
Make sure you MUTE the audio for the Instagram clip, otherwise you will have whatever audio you shot with your iPhone interfering with your custom video audio. Once you have muted the audio, drag the custom clip that you want to use onto the timeline so it sandwiches the original iPhone clip in the middle.
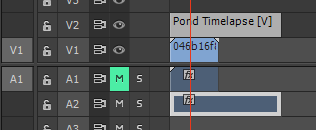
Step Twelve
If you are using a 1080p video file, you will notice that it is far bigger than the 640 x 640 clip size that Instagram allows. Select your custom video clip in the timeline and choose “Effect Controls”. So you can adjust the Position and Scale of your custom clip.
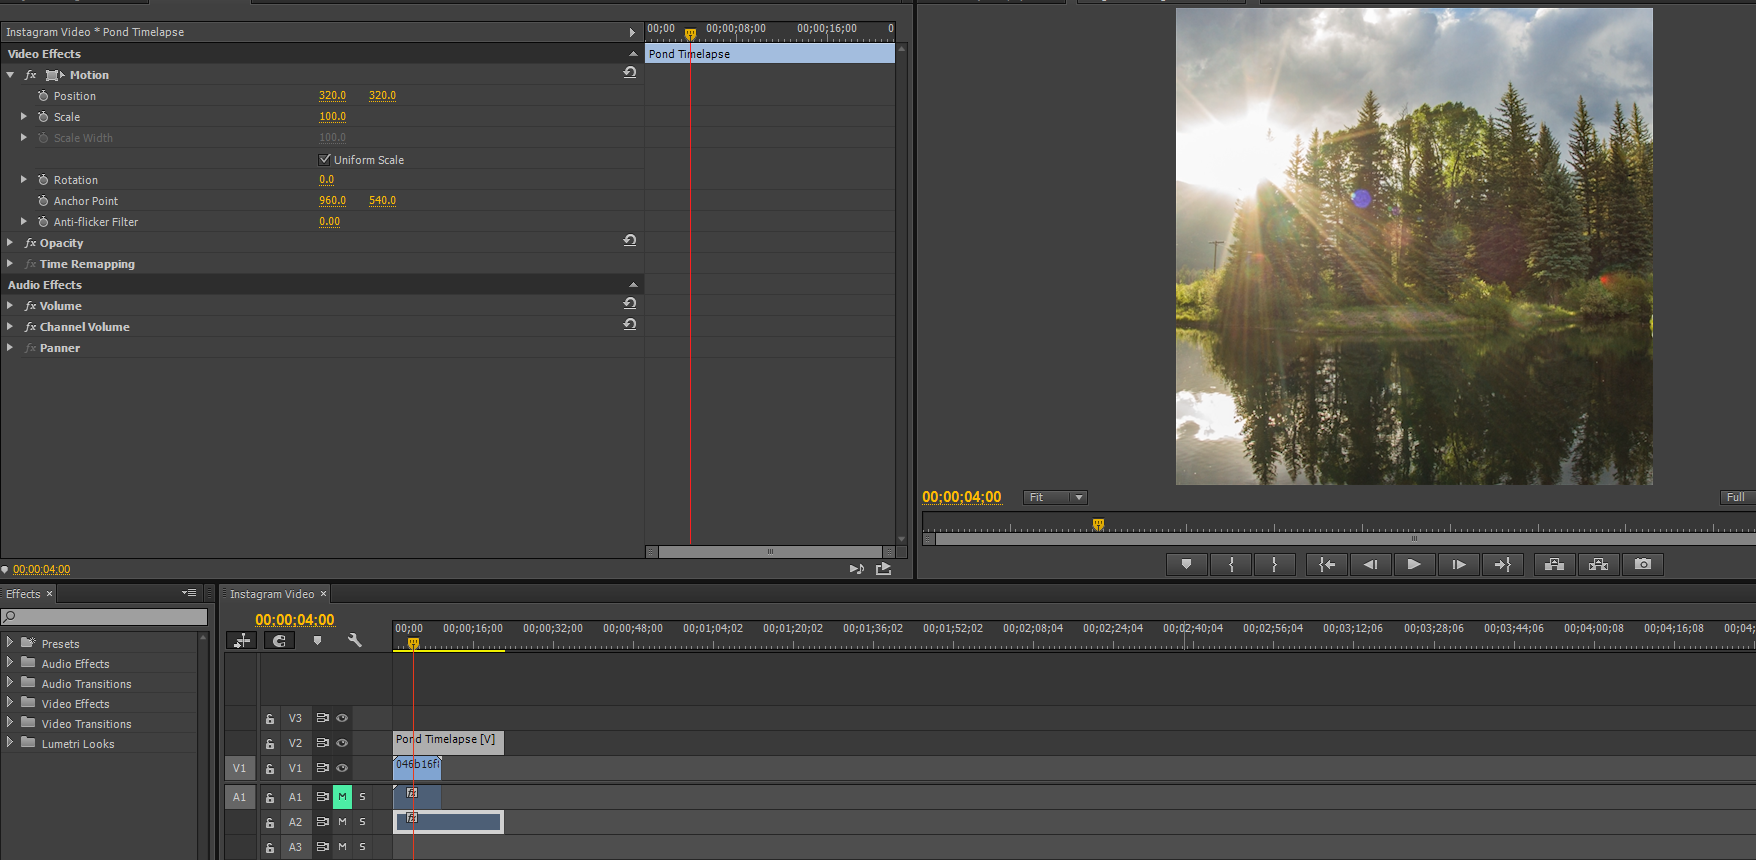
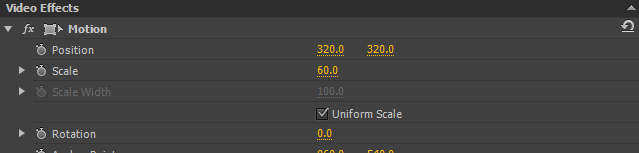
Adjust the Scale and Position of your clip so it fits nicely into the 640 x 640 window. If you are using footage that is 16:9, the sides will be cropped off. For a 1080p video clip, the Scale can be set to 60 to make the clip fit vertically in the frame.
If you want to set the scale lower you can, but be prepared for black bars at the top and bottom of the clip. You could remove the bars by placing a white color matte below the clip.
Step Thirteen
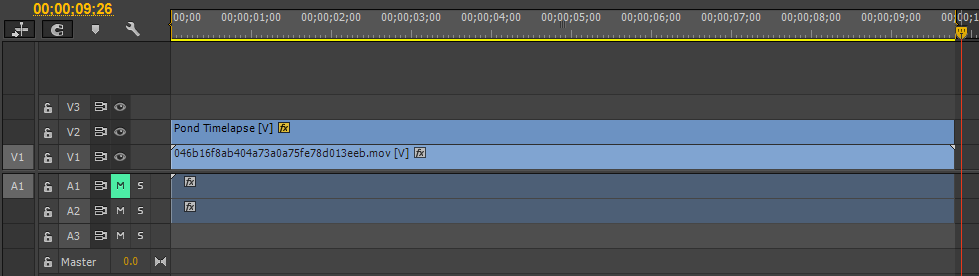
Now adjust the length of your clip so it matches the length of the clip you shot with your iPhone.
Step Fourteen
It’s time to render your clip! Set your in and out points on the clip so it knows where to render. You do this by moving the playback head to the beginning of your clip and hitting “I” and then the end of you clip and hitting “O”.
Step Fifteen
Select File > Export >Media, or select your timeline and hit CTRL + M. This will bring up the export dialogue box.
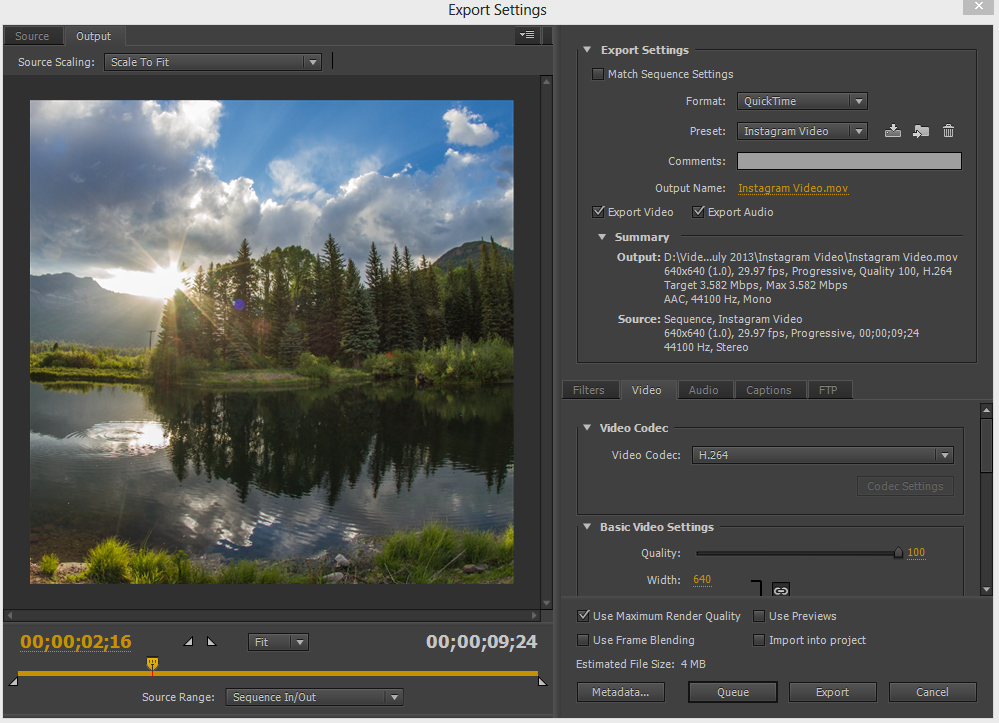
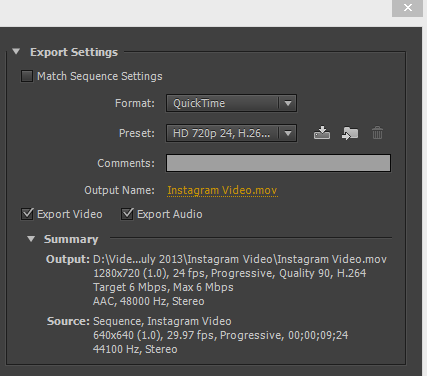
Choose the video format “Quicktime” and choose any preset from the preset dropdown menu (we are going to customize one). Make sure “Export Video” and “Export Audio” are checked, and select the file name and choose where you want the file to be saved to.
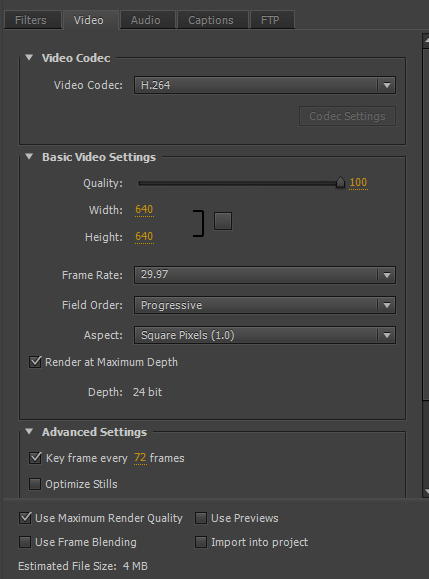
Select the “Video” tab below. Choose the following settings:
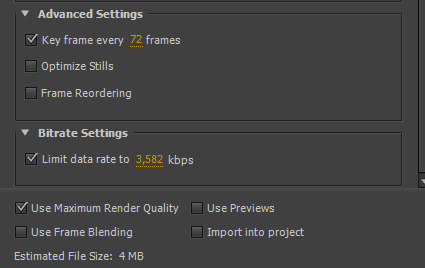
Under “Bitrate Settings” check the box and choose the limit the data rate to “3,582 kbps” and check the “Use Maximum Render Quality” box.
Click the “Audio” tab and choose:
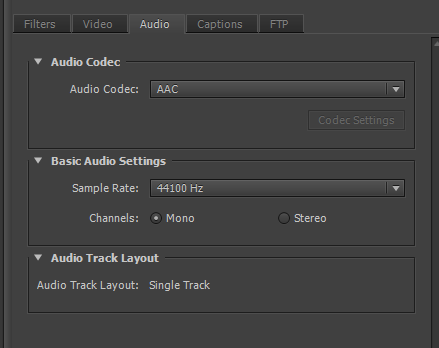
That’s it! Now save these render settings as a preset and click Export.
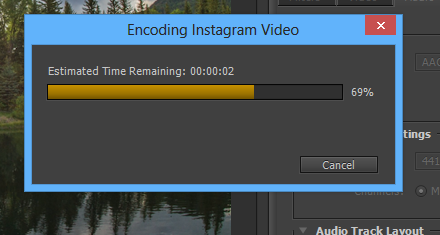
Step Sixteen
Once it is finished rendering, navigate to your rendered file. Rename the rendered file to the sequence of numbers and letters that the Instagram video you shot was named (copy and paste helps). Then add “.locked” to the end of the file so it looks something like A293FJEOF.mov.locked”.
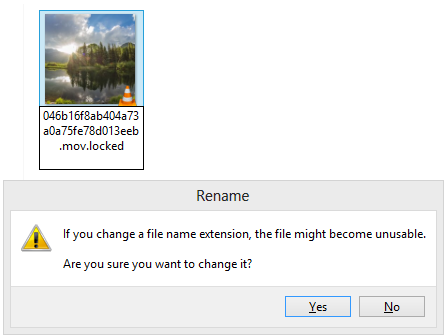
Step Seventeen
Maximize iFunbox and drag your new video file into the Video folder so it replaces the original video file. iFunbox won’t give you any warnings about copying over the files, so make sure you copy it.
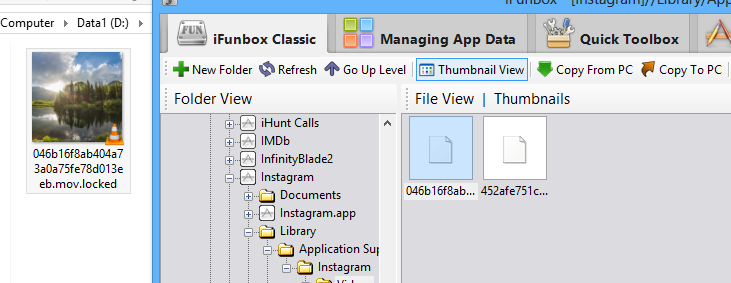
Step Eighteen
Disable Airplane Mode on your iPhone and hit the swirly button on Instagram. Your custom video should begin uploading. Here is my custom uploaded Instagram video. You can also watch it on my Instagram page.

Tutorial on cropping your videos to the 2:35:1 Cinemascope and Anamorphic viewing ratio using Adobe Premiere Pro CS5. Includes a free PSD file with crop lines.
Continue reading
Turn 60p to 24p in After Effects…
Continue reading