
Building a vertical sequence in Premiere Pro, scaling a horizontal clip to fill it, and the export settings that keep a Short looking sharp after YouTube compresses it.
Continue reading
Building a vertical sequence in Premiere Pro, scaling a horizontal clip to fill it, and the export settings that keep a Short looking sharp after YouTube compresses it.
Continue reading
Two export recipes for DaVinci Resolve: H.265 at double your frame rate for uploading, and H.264 at a much higher bitrate for client delivery, so nobody gets a file their computer cannot play.
Continue reading
Every setting for exporting the best looking 1080p HD file out of Premiere Pro 2022, step by step, plus a free preset that does all of it for you.
Continue reading
Every setting for exporting the best looking 4K file out of Premiere Pro 2022, step by step, plus the reason you should export in 4K even when you filmed in HD.
Continue reading
Save time and download my free 1080p Export Preset for Premiere Pro!
This is the second video in my tutorial series all about the video settings that I use when rendering my videos in Adobe Premiere Pro CC. While first video and text tutorial was all about my 4K export settings, this one tackles my 1080p export settings. If you are using Adobe Premiere Pro CS6, CS 5.5, or CS5, I have an earlier blog post I wrote back in 2012 detailing my 1080p export settings for those programs.
This tutorial is significantly shorter than my 4K export settings tutorial due to me not going nearly as in-depth about my reasoning for choosing the settings that I use. So if you are watching this video or reading the text tutorial below and are confused about why I am using a certain setting, I would highly recommend watching the 4K export settings video, as many of the settings that I go over are similar and include explanations.
Want to export even faster? Instead of creating your own export preset, just download and use mine!
Lastly, if you would rather read how to export your videos in 1080p instead of watch, I have included a text tutorial with screenshots below, detailing my exact export settings.
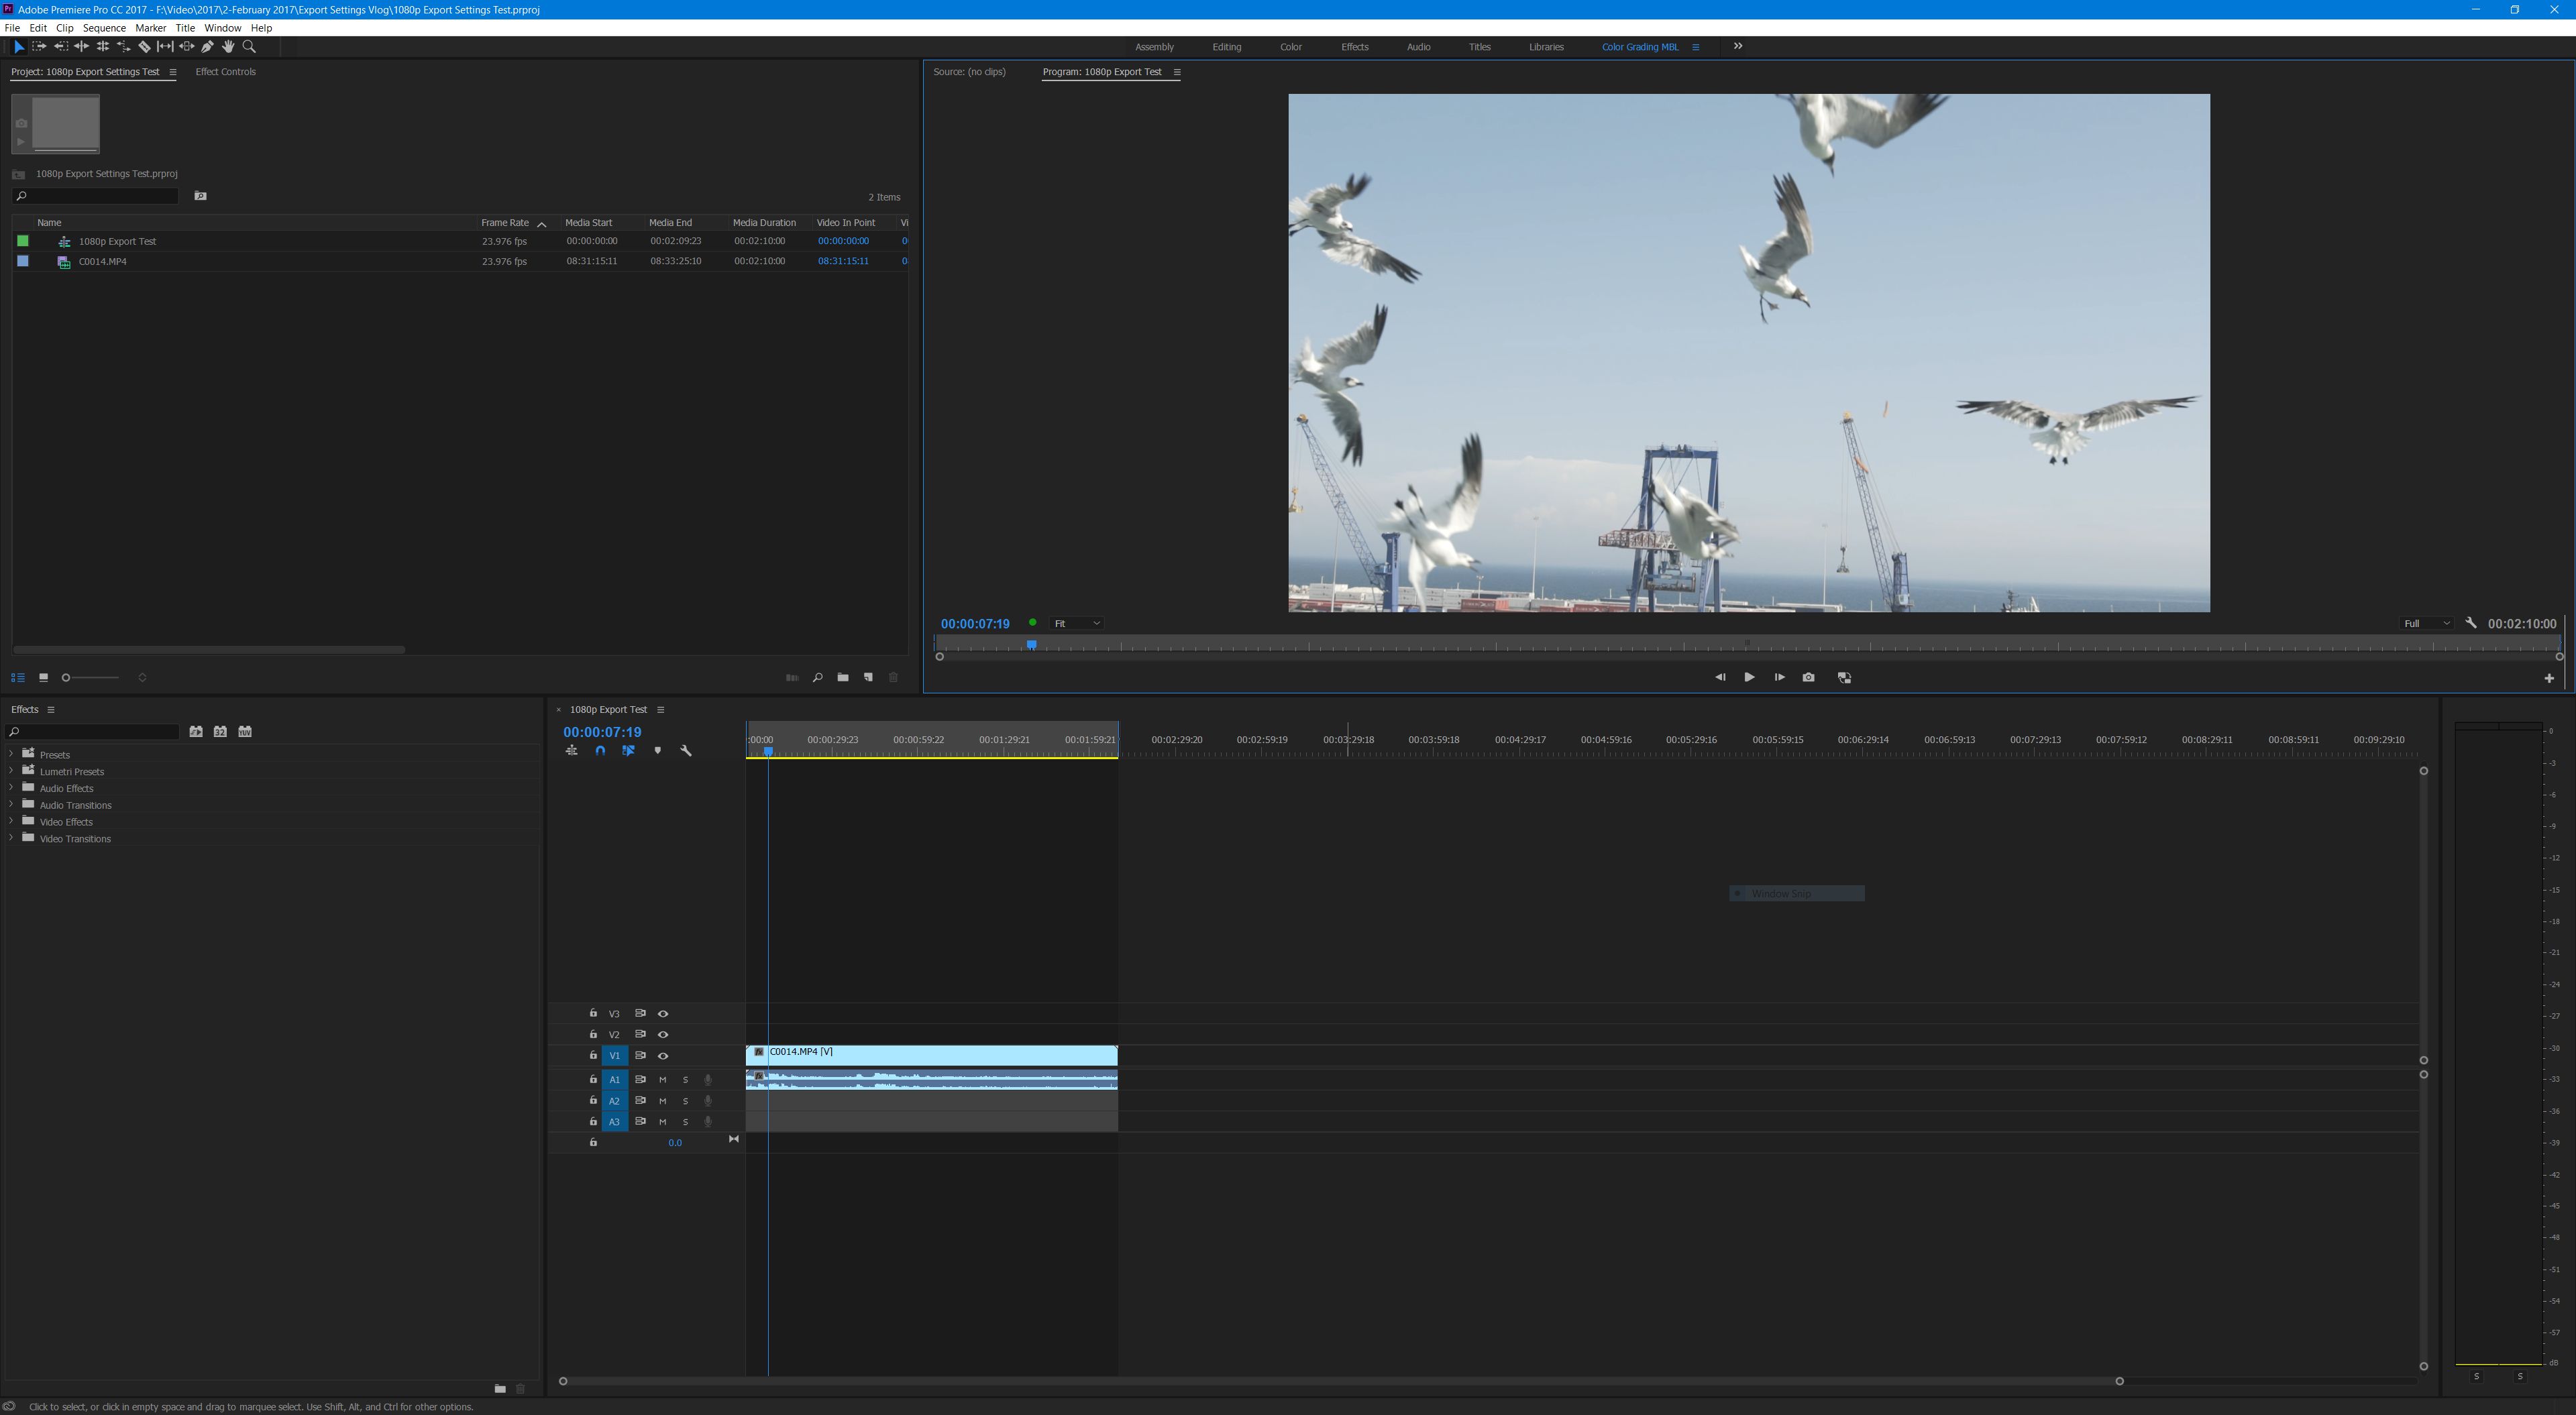
First, make sure you have Adobe Premiere Pro installed. Don’t have a copy of Premiere?! Download a free 7-day trial from adobe here.
SEQUENCE PRESET SETUP
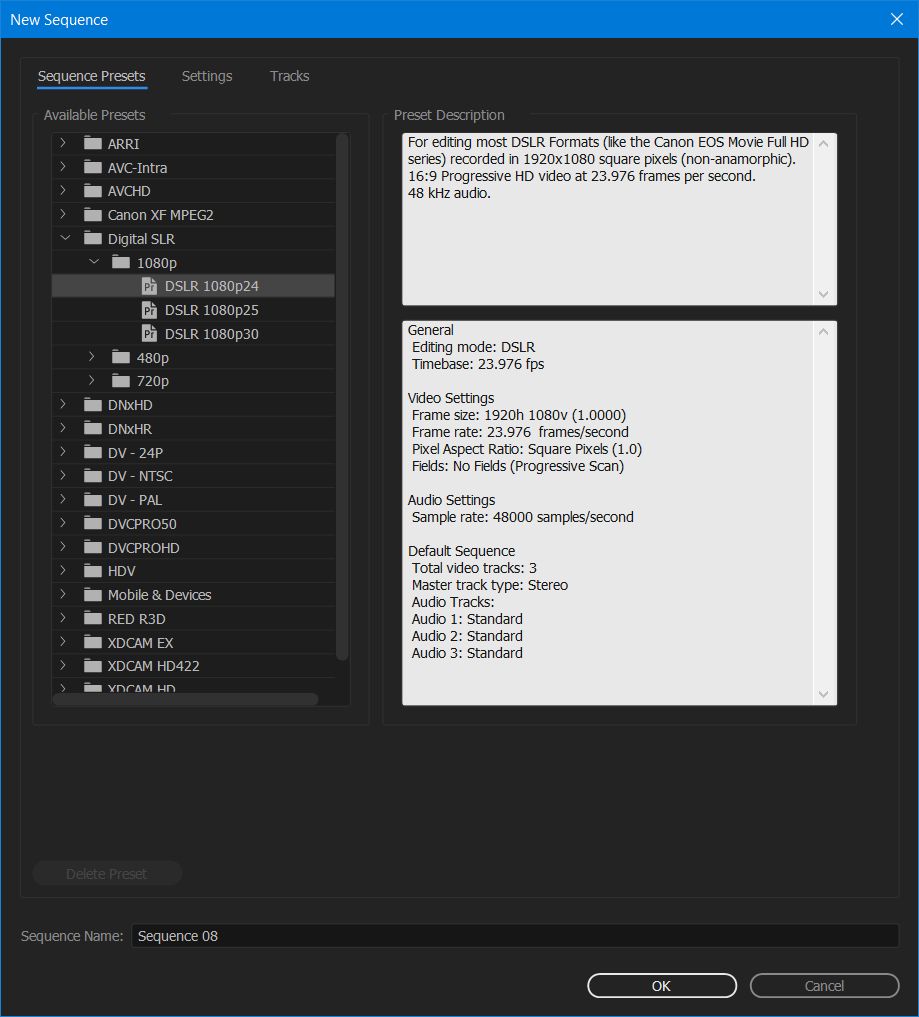
Before I get to my export settings, I need to discuss the sequence preset that I use. Premiere uses the term “sequence” to describe the timeline that you will use when editing your video. It is important to select a sequence preset that is the same as the video settings that you used when filming with your camera. You can use “Ctrl + N” or go to “File > New > Sequence” to open the new sequence dialog box. For the video clip I use in this project, I filmed in 1920×1080 resolution at 120fps with the Sony A7Sii. I then used Premiere to interpret the footage to 23.976 fps and that is what we will be exporting today. I need to select a new sequence preset that is the same as these video settings. Select Digital SLR > 1080p > DSLR 1080p24. Name your sequence in the dialogue box below, and click “OK.”
EDIT YOUR VIDEO
Your video is now ready to be edited as you would normally on the timeline. Once you have finished editing and are ready to export your video, go to the next step.
SET YOUR IN AND OUT POINTS
Once your video is edited and ready to render. You need to set your “In” and “Out” points. Do this by moving the video playhead to where you want the opening frame of your rendered video to begin and press the “I” key on your keyboard. Then move the playhead to the end of your video and select the “O” key on your keyboard. The timeline will turn a darker color where your in and out points are selected. It is now time to export your video! With the timeline selected you can either press “Ctrl + M” on the keyboard, or navigate to “File > Export > Media” in the menu.
BEGIN CHANGING YOUR EXPORT SETTINGS
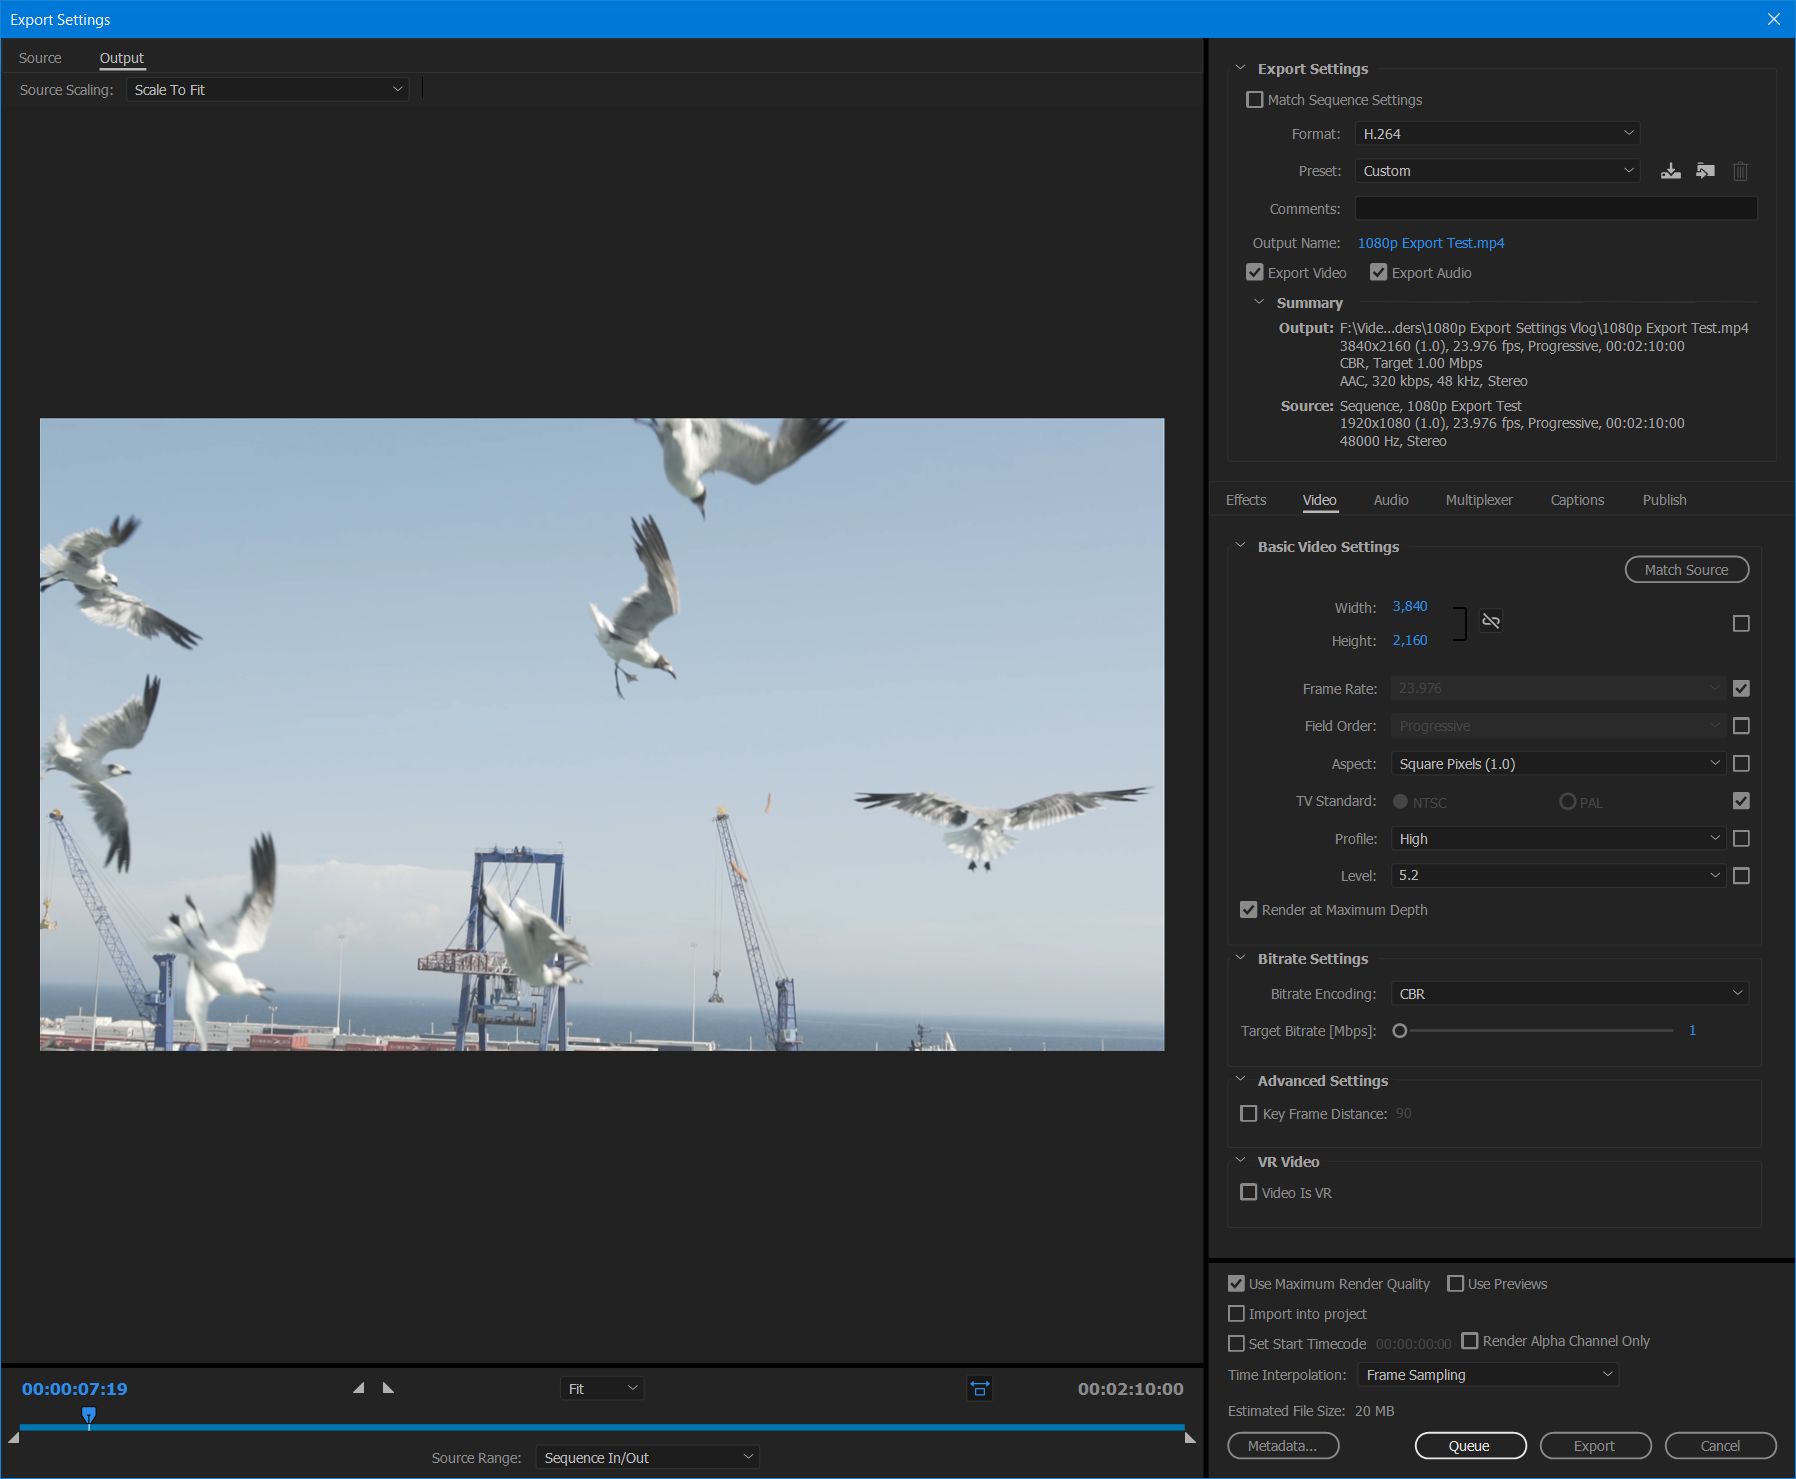
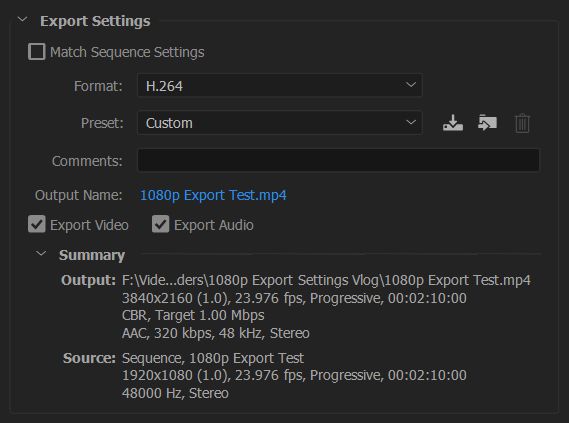
You’ve now opened the “Export Settings” dialog box and there’s approximately 3,000 settings you could change. Don’t freak out though, we’re going to tackle this one section at a time. First, under the “Export Settings” heading on the left, next to “Format” select “H.264” from the drop down menu. For Preset select, “Custom.” Click the blue text next to “Output Name” and select a name and location to save your video file. Make sure both the “Export Video” and “Export Audio” boxes are checked.
BASIC VIDEO SETTINGS AND BITRATE SETTINGS FOR YOUTUBE, VIMEO, FACEBOOK, AND OTHER VIDEO SITES
If you are uploading your video to YouTube, Vimeo, Facebook, or any other video site, I recommend using the below settings. The file sizes will be quite large, but this will ensure that your video retains its quality when you upload it to these sites and they convert it into different formats and resolutions. Also, if you want to know my reasoning for choosing these settings, please watch my 4K export settings video.
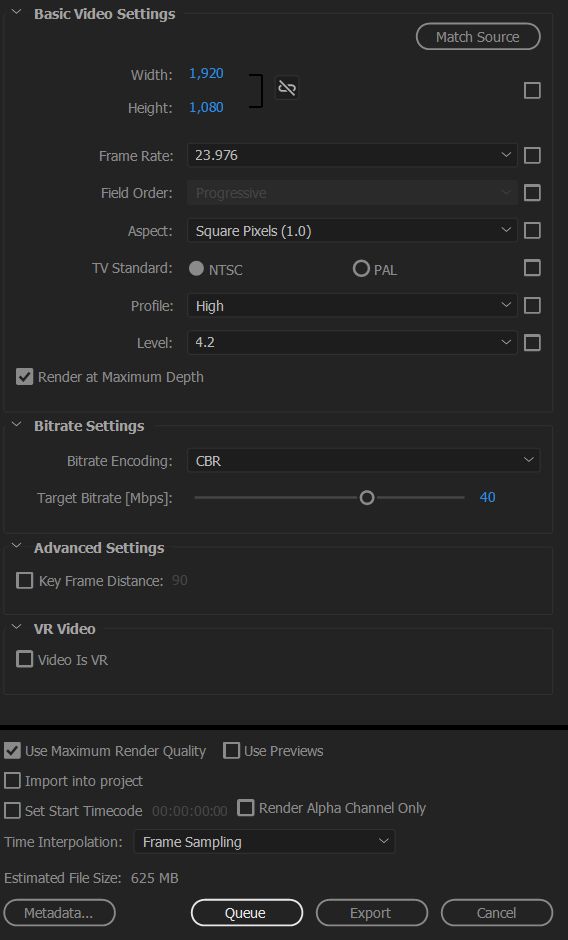
Select the “Video Tab” in the middle of the export settings dialog box and set “Profile” to “High” and “Level” to “4.2”. Then make sure your “Width” is set to “1,920” and your “Height” is set to “1,080”. Set your frame rate to “23.976”, and check the “Render at Maximum Depth.”
I put together How To Export 4K Video In Premiere Pro CC 2022 For YouTube, Facebook, & Vimeo, How To Export High Quality HD Video In Premiere Pro CC 2022 For YouTube, Facebook, & Vimeo, and Best Export Settings For Premiere Pro For YouTube as well, which cover the part I skipped over here.
Under “Bitrate Settings” set “Bitrate Encoding” to “CBR” and your “Target Bitrate [Mbps] to “40.” Lastly, check “Use Maximum Render Quality” at the bottom.
BITRATE SETTINGS FOR GIVING YOUR 1080p VIDEO TO CLIENTS
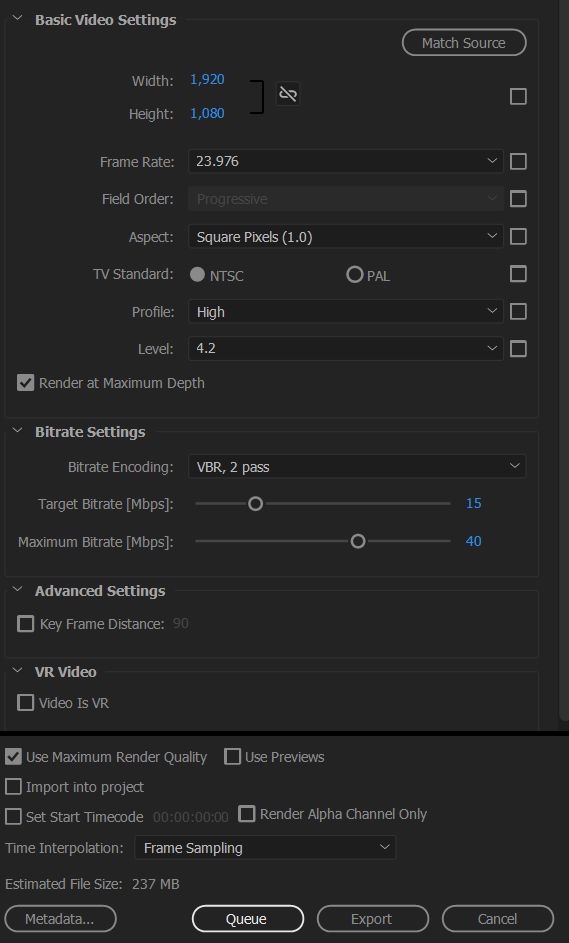
If you are not planning on uploading your video to an online video site, and instead are giving it to a client, I would recommend using these bitrate settings because the file size won’t be nearly as large.
For “Basic Video Settings” use the same settings as you would if you were uploading to an online video site. For “Bitrate Settings,” change “Bitrate Encoding” to “VBR, 2 Pass.” Set “Target Bitrate [Mbps]” to “15” and Maximum Bitrate [Mbps] to “40”. Lastly, check “Use Maximum Render Quality” at the bottom.
CHANGE YOUR AUDIO EXPORT SETTINGS
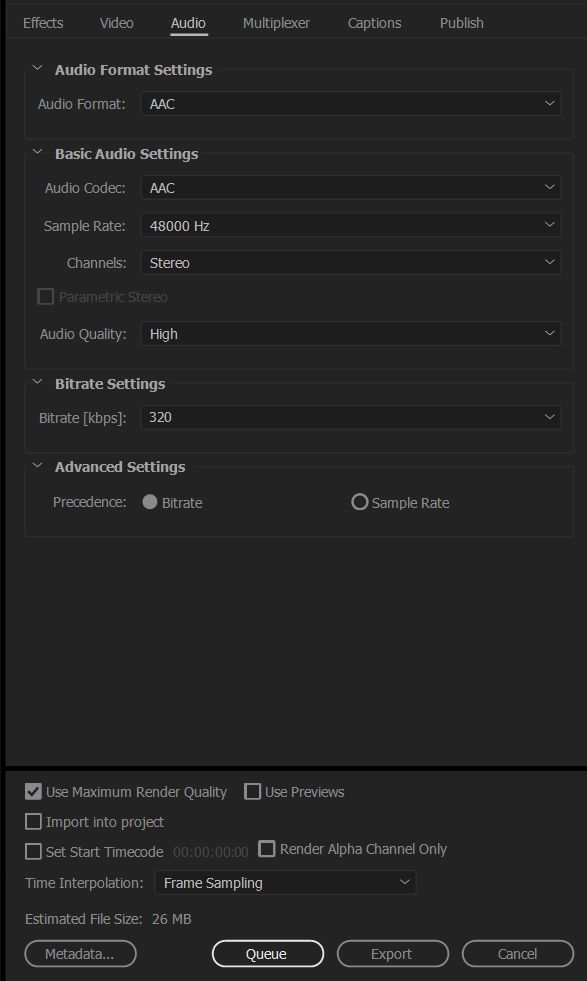
Click the “Audio” tab in the middle of the Export Settings window and for “Audio Format” select “AAC”. Under Basic Audio Settings, set the “Audio Codec” to “AAC”, Sample Rate to “48000 Hz”, “Channels” to “Stereo”, and “Audio Quality” to “High”. Lastly, for “Bitrate Settings” set “Bitrate [kbps]” to “320” and under Advanced Settings set “Precedence” to “Bitrate”.
SAVE YOUR VIDEO PRESET
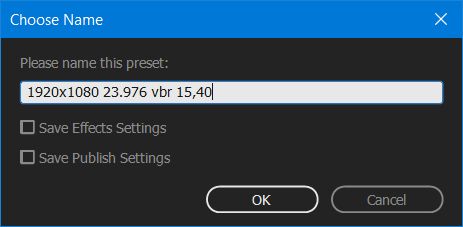
Now that you have created your video settings, click the down arrow icon to the right of your “Preset” at the top, and name your new Export Preset either “1920×1080 23.976 cbr 40” or “1920×1080 23.976 vbr 15,40” depending on whether you are saving the 40mbps CBR preset or the 15,40 VBR preset.
EXPORT YOUR VIDEO
You are ready to click “Queue” or “Export” at the bottom of the dialog box and render your video!
I hope this video and tutorial has been helpful to you. As always, if you have any questions or comments, please feel free to leave one below or get in touch.

Save time and download my free 4K Export Preset for Premiere Pro!
Way back in 2012 I wrote a blog post about my export settings for high definition videos in Premiere Pro. That post went on to become one of the most popular posts on my site. Wanna know what the second most popular post was? My video export settings for Instagram videos in Premiere Pro.
There’s a trend here, and I realized that with the advent of 4K video, I had the opportunity to create a new text and video tutorial about the settings that I use when shooting with my Sony A7Sii. As I prepared to create this tutorial, I decided that this would be the perfect time to revisit those posts about my high definition and Instagram export settings, and create videos for them as well.
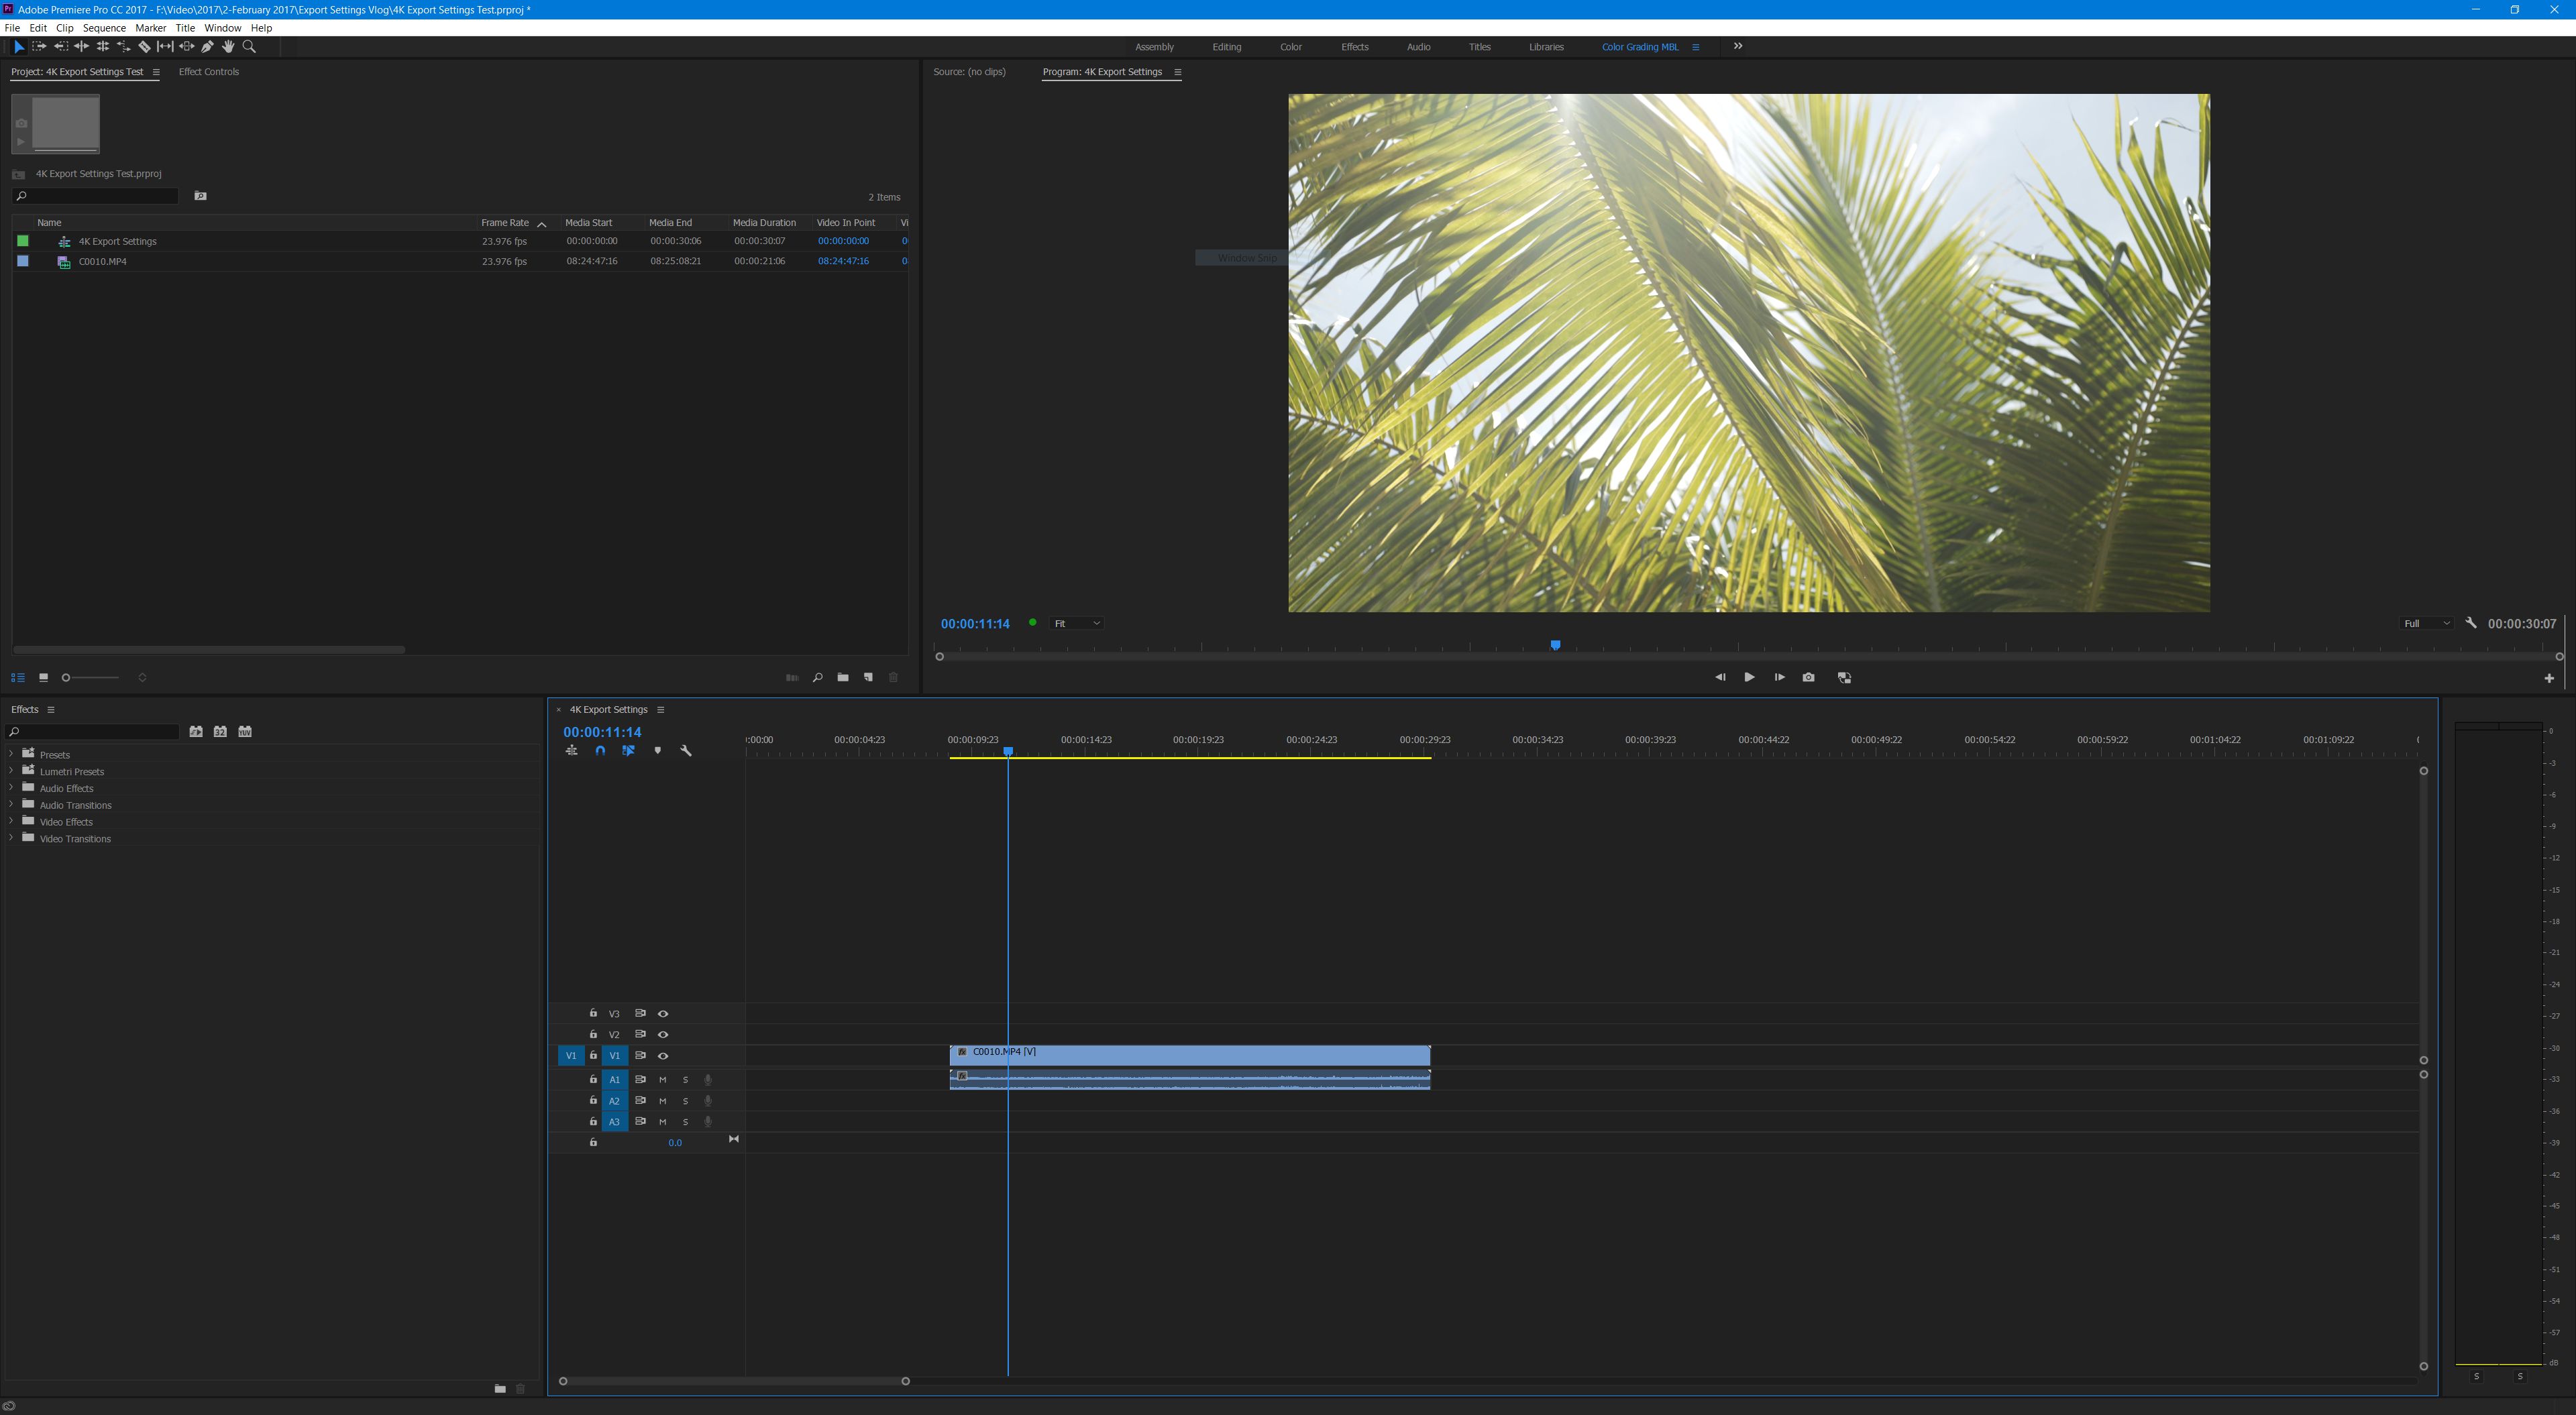
First, make sure you have Adobe Premiere Pro. Don’t have Premiere Pro?! You can download a 7-day free trial here.
Wanna save time? Download my 4K export preset for Premiere Pro!
SEQUENCE PRESET SETUP
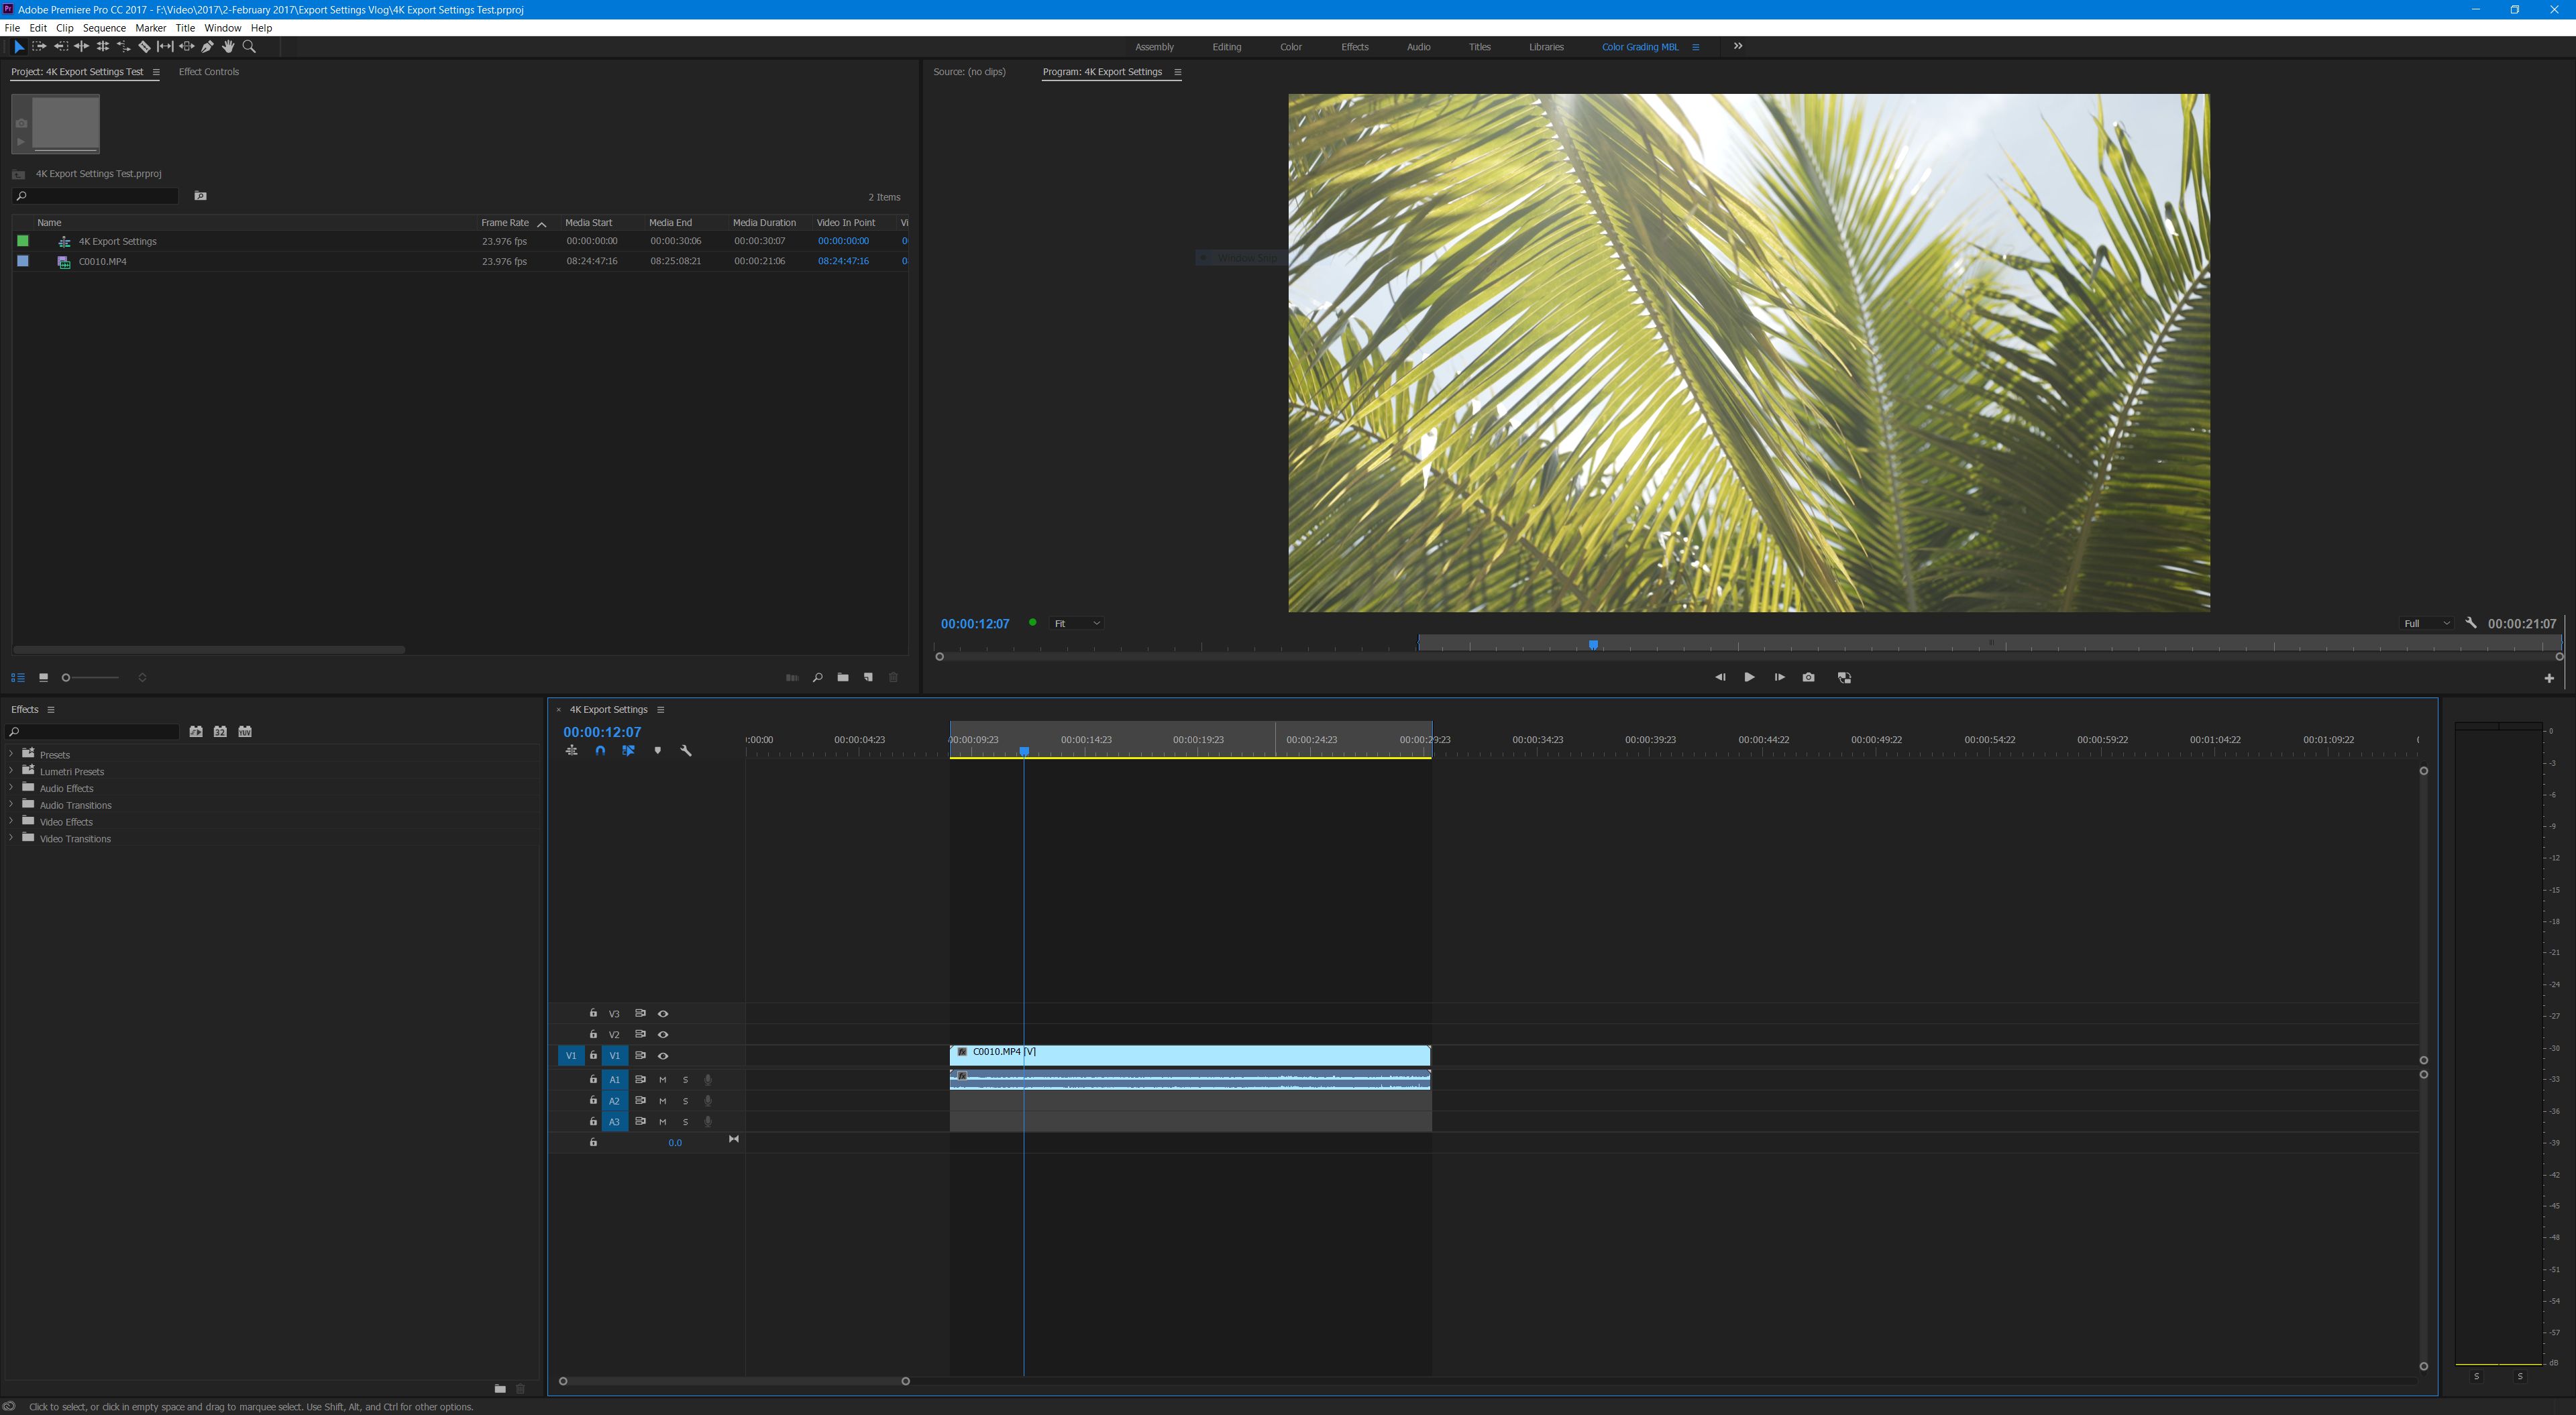
Before I get to my export settings, I need to discuss the sequence preset that I use. Premiere uses the term “sequence” to describe the timeline that you will use when editing your video. It is important to select a sequence preset that is the same as the video settings that you used when filming with your camera. You can use “Ctrl + N” or go to “File > New > Sequence” to open the new sequence dialog box. For the video clip I use in this project, I filmed in 3840×2160 resolution at 23.976 fps with the Sony A7Sii. I need to select a new sequence preset that is the same as these video settings.
SEQUENCE PRESET SETTINGS
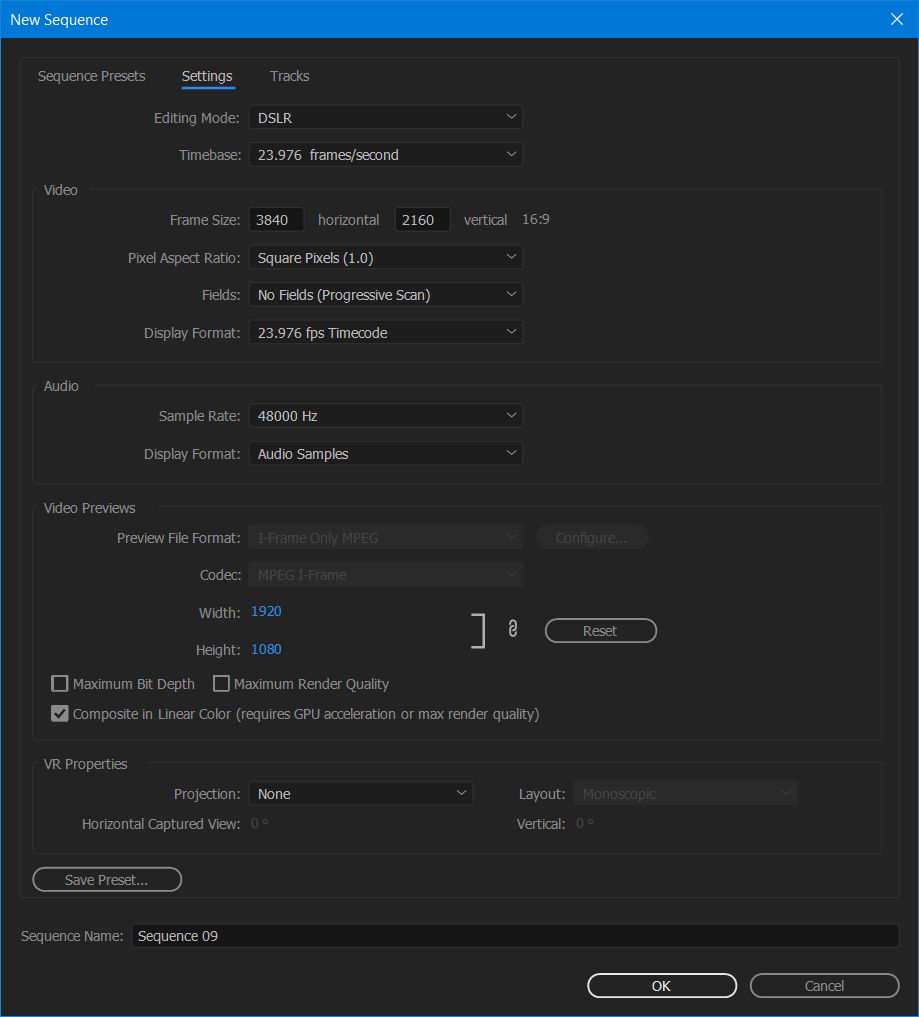
Once you have opened the New Sequence window, you have many presets to choose from. Because there aren’t any available for 3840×2160 footage, I would instead select “Digital SLR > 1080p > DSLR 1080p24” and then select the “Settings” tab at the top of the window. Under the “Video” heading, change the “Frame Size” to “3840 horizontal” and “2160 vertical”. Keep the rest of the settings the same as the preset.
SAVE YOUR NEWLY CREATED PRESET
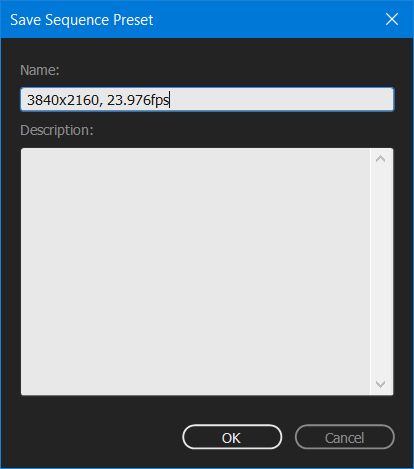
Click “Save Preset” at the bottom and save your settings as a new preset. I named mine “3840×2160 23.976fps” so I can easily remember it when editing future videos. Next select your newly made preset, and edit your video clips on the timeline you have created.
SET YOUR IN AND OUT POINTS
Once your video is edited and ready to render. You need to set your “In” and “Out” points. Do this by moving the video playhead to where you want the opening frame of your rendered video to begin and press the “I” key on your keyboard. Then move the playhead to the end of your video and select the “O” key on your keyboard. The timeline will turn a darker color where your in and out points are selected. It is now time to export your video! With the timeline selected you can either press “Ctrl + M” on the keyboard, or navigate to “File > Export > Media” in the menu.
BEGIN CHANGING YOUR EXPORT SETTINGS
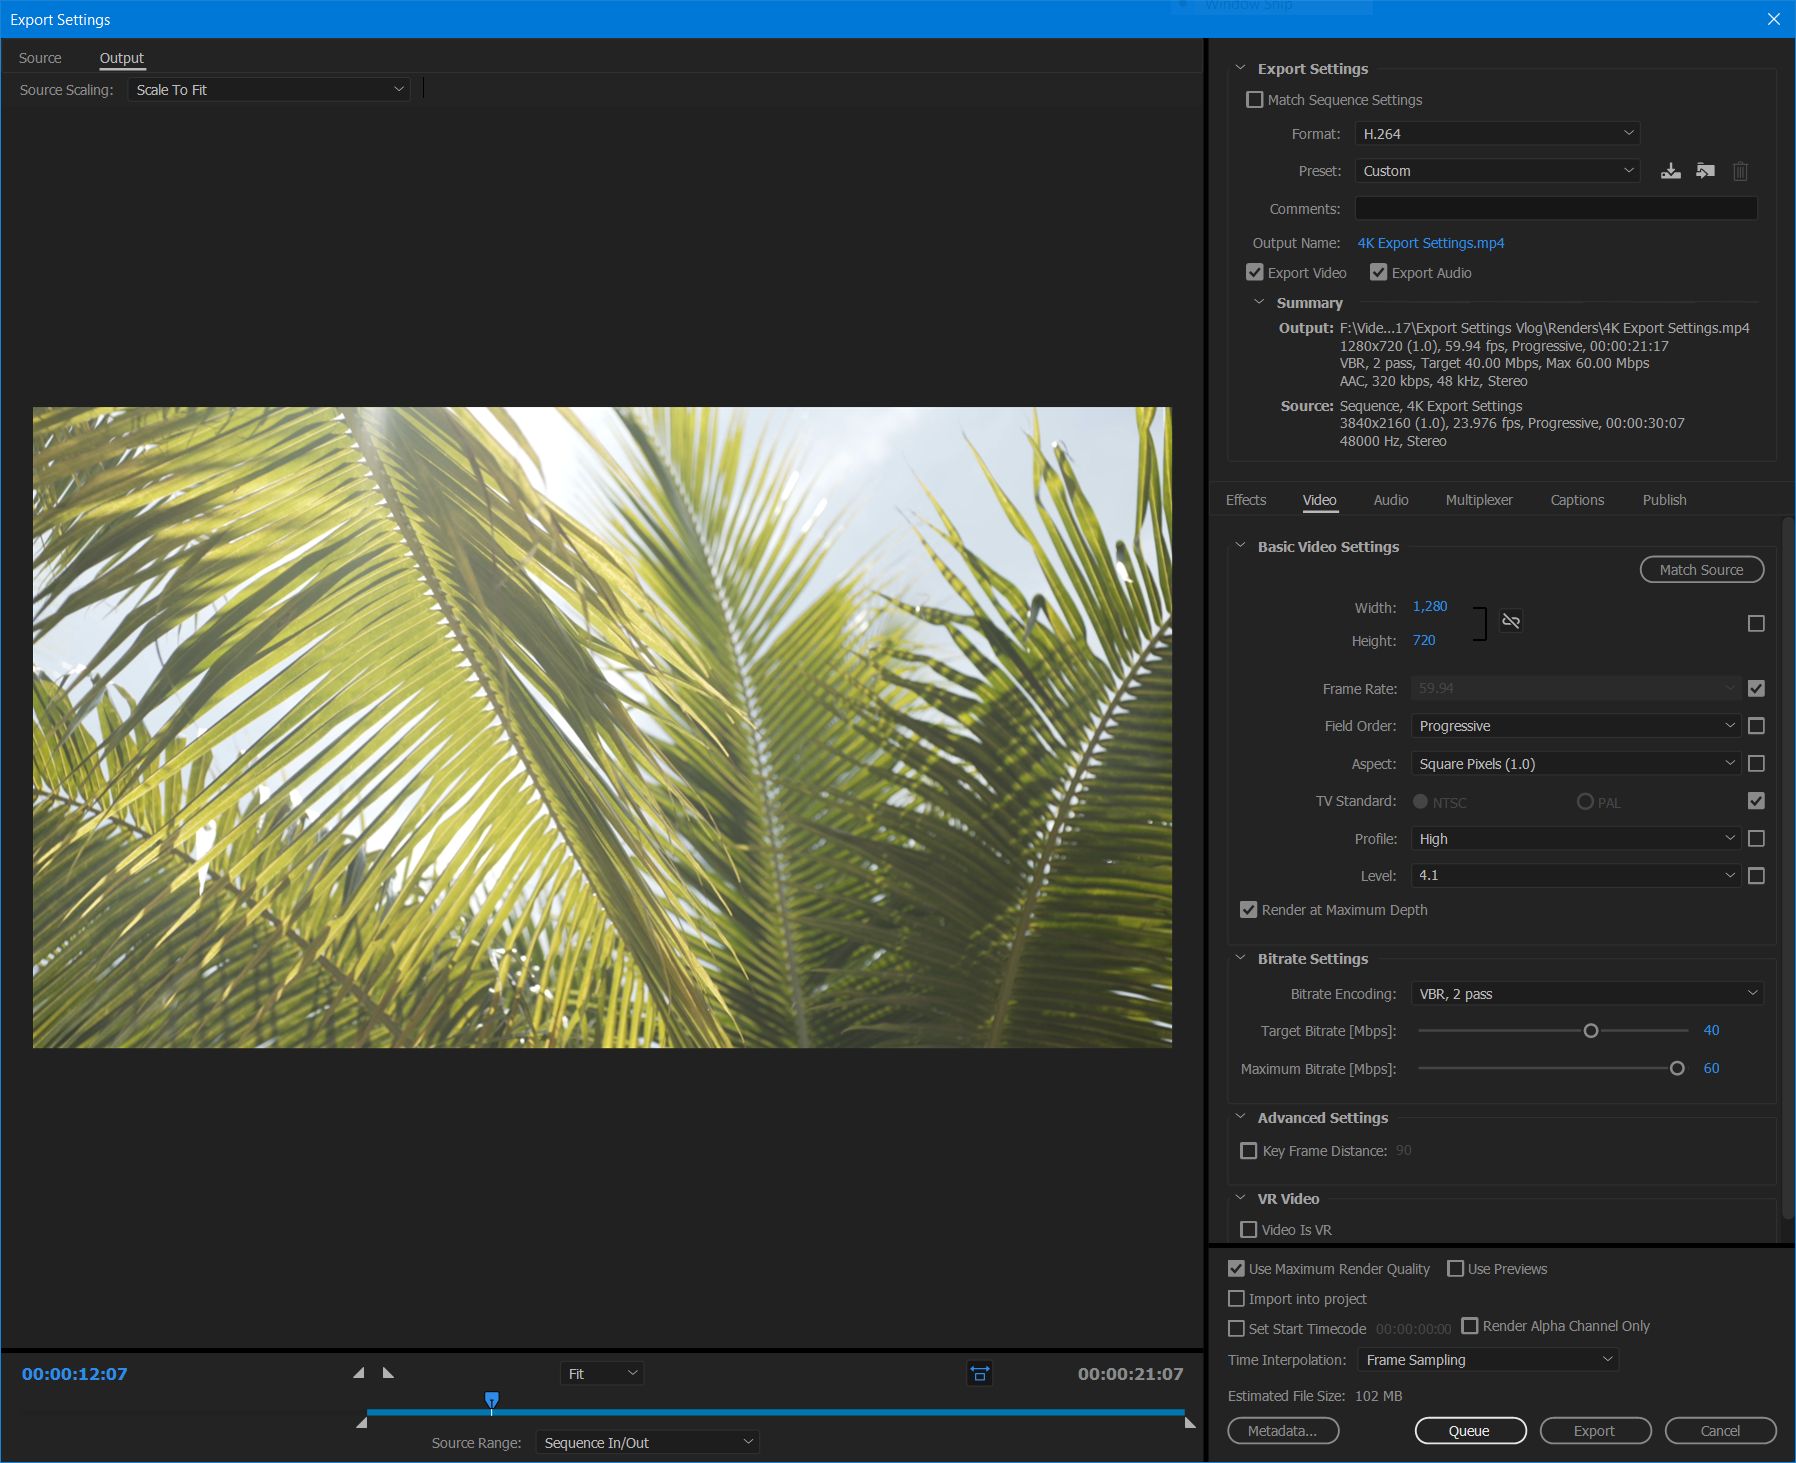
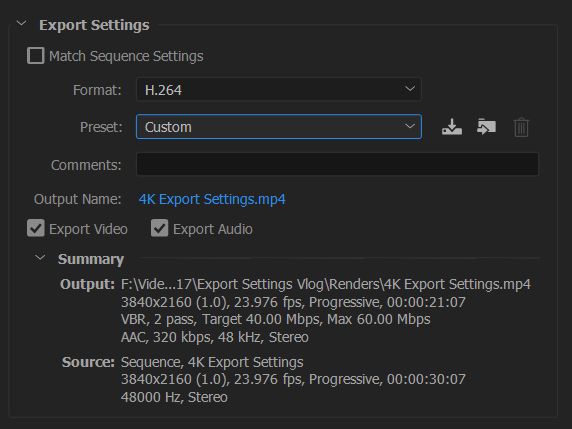
You’ve now opened the “Export Settings” dialog box and there’s approximately 3,000 settings you could change. Don’t freak out though, we’re going to tackle this one section at a time. First, under the “Export Settings” heading on the left, next to “Format” select “H.264” from the drop down menu. For Preset select, “Custom.” Click the blue text next to “Output Name” and select a name and location to save your video file. Make sure both the “Export Video” and “Export Audio” boxes are checked.
BASIC VIDEO SETTINGS AND BITRATE SETTINGS FOR YOUTUBE, VIMEO, FACEBOOK, AND OTHER VIDEO SITES
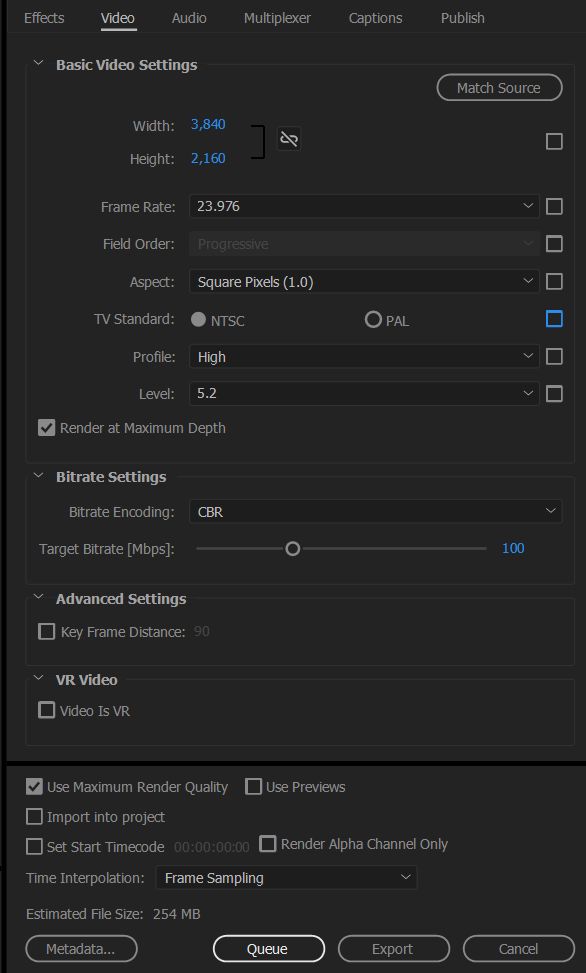
If you are uploading your video to YouTube, Vimeo, Facebook, or any other video site that supports 4K, I recommend using the below settings. The file sizes will be quite large, but this will ensure that your video retains its quality when you upload it to these sites and they convert it into different formats and resolutions. Also, if you want to know my reasoning for choosing these settings, please watch the tutorial video.
Select the “Video Tab” in the middle of the export settings dialog box and set “Profile” to “High” and “Level” to “5.2”. Then make sure your “Width” is set to “3,840” and your “Height” is set to “2,160”. Set your frame rate to “23.976”, and check the “Render at Maximum Depth.”
Under “Bitrate Settings” set “Bitrate Encoding” to “CBR” and your “Target Bitrate [Mbps] to “100.” Lastly, check “Use Maximum Render Quality” at the bottom.
BITRATE SETTINGS FOR GIVING YOUR 4K VIDEO TO CLIENTS
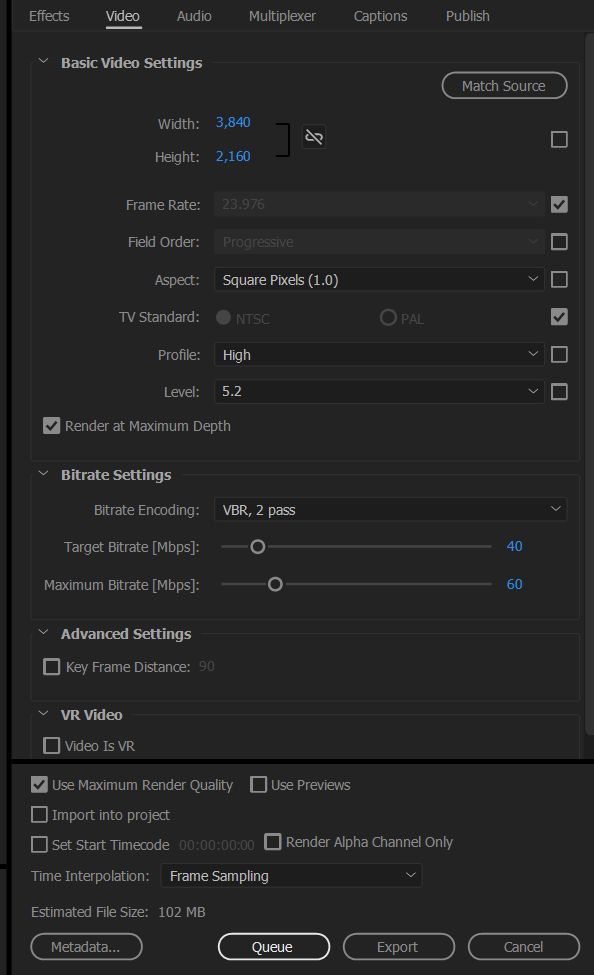
If you are not planning on uploading your video to an online video site, and instead are giving it to a client, I would recommend using these bitrate settings because the file size won’t be nearly as large.
For “Basic Video Settings” use the same settings as you would if you were uploading to an online video site. For “Bitrate Settings,” change “Bitrate Encoding” to “VBR, 2 Pass.” Set “Target Bitrate [Mbps]” to “40” and Maximum Bitrate [Mbps] to “60”. Lastly, check “Use Maximum Render Quality” at the bottom.
CHANGE YOUR AUDIO EXPORT SETTINGS
Click the “Audio” tab in the middle of the Export Settings window and for “Audio Format” select “AAC”. Under Basic Audio Settings, set the “Audio Codec” to “AAC”, Sample Rate to “48000 Hz”, “Channels” to “Stereo”, and “Audio Quality” to “High”. Lastly, for “Bitrate Settings” set “Bitrate [kbps]” to “320” and under Advanced Settings set “Precedence” to “Bitrate”.
SAVE YOUR VIDEO PRESET
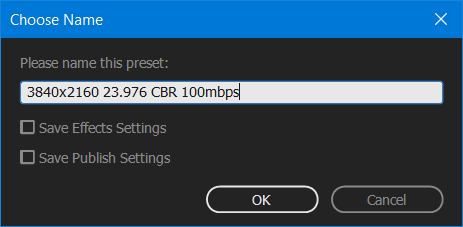
Now that you have created your video settings, click the down arrow icon to the right of your “Preset” at the top, and name your new Export Preset either “3840×2160 23.976 100mbps cbr” or “3840×2160 23.976 40,60 vbr” depending on whether you are saving the 100mbps CBR preset or the 40,60 VBR preset.
EXPORT YOUR VIDEO
You are ready to click “Queue” or “Export” at the bottom of the dialog box and render your video!
I hope this video and tutorial has been helpful to you. As always, if you have any questions or comments, please feel free to leave one below or get in touch.