It’s no secret that I love drones. Ever since I flew my friend Taylor’s Phantom 2 back in early 2014 (back when DJI had no app and video was recorded with a GoPro), I knew that I would be buying a lot of these flying cameras in the years to come.
What started with a Phantom 2 of my own, recently expanded to a Mavic Pro, and now a Phantom 4 Pro. My wife says I may have a problem. I say I may have a fleet. Can I call it a fleet? I like how that sounds: Matt’s fleet of drones.
With the advent of the FAA releasing their Part 107 certification for commercial drone pilots last year, there are thousands of new licensed drone pilots taking the knowledge test and wondering which drone they should invest in. There are also thousands of reviews of the new DJI Mavic Pro out there, but none of them have answered the two primary questions I feel that professional filmmakers are asking: Is the Mavic Pro good enough for commercial filmmaking? And: If I already own a drone such as a Phantom or Inspire, should I invest in a Mavic Pro as well?
I love this drone. 🙂
In this review video, I will answer those two questions! As well as tell you:
The very best places to buy your Mavic Pro! and how to avoid having to use DJI’s sketchy repair service.
How the Mavic drone being tiny is actually an incredibly useful feature for filmmakers.
If the image quality of the Mavic Pro is good enough for commercial use (spoiler: yes, it definitely is).
5 ways to maximize the image quality of the Mavic Pro!
Incidentally, I took the FAA’s Part 107 test, passed, and made a video about how I studied, so if you are considering taking the test as well, I hope my video helps you.
Here’s my gear list with all the places to buy the Mavic + Accessories.
I am also now offering one-on-one personal filmmaker consulting! Wanna talk about cameras, lighting, or booking clients? Let’s do it!
As always, if you have any questions or comments about this review, please feel free to leave one below, or get in touch.
There are some things that you can learn by reading books and manuals, but some only come through years of experience. In my wedding tutorial vlogs, I attempt to distill all my years of knowledge into easy to understand tips and tutorials to give you a “shortcut” so you can improve quicker. My goal with these tutorials is to not only tell you how I do something, but why I do it.
Today, in the same vein as those favorite tutorials I bring you a new one, all about how I film dancing at a wedding reception. In it, I cover four key tips that should help your improve your footage of people dancing during a wedding reception. The open dance floor doesn’t have to be boring or intimidating! It can be a lot of fun, I promise.
In this video I cover:
How to interact with the couple, wedding coordinator, and DJ when preparing to film the dancing at the reception.
A way to light the dance floor and make it look incredible even when there’s awful venue lighting.
My go-to technique to get more energetic dancing shots that show how much fun the wedding guests were having.
The exact way I shoot to make editing dancing footage super easy in post (it’s almost editing itself!)
If any of that interests you, I would highly recommend checking out the video.
As always, if you have any questions or comments, please feel free to leave one below or get in touch.
Get the lights, stands, and dimmer I talked about in the video on my Kit page.
This is the second video in my tutorial series all about the video settings that I use when rendering my videos in Adobe Premiere Pro CC. While first video and text tutorial was all about my 4K export settings, this one tackles my 1080p export settings. If you are using Adobe Premiere Pro CS6, CS 5.5, or CS5, I have an earlier blog post I wrote back in 2012 detailing my 1080p export settings for those programs.
This tutorial is significantly shorter than my 4K export settings tutorial due to me not going nearly as in-depth about my reasoning for choosing the settings that I use. So if you are watching this video or reading the text tutorial below and are confused about why I am using a certain setting, I would highly recommend watching the 4K export settings video, as many of the settings that I go over are similar and include explanations.
Lastly, if you would rather read how to export your videos in 1080p instead of watch, I have included a text tutorial with screenshots below, detailing my exact export settings.
Premiere Pro handles 1080p footage easily.
My text guide for how to export 1080p video in Premiere Pro CC for YouTube and Video
First, make sure you have Adobe Premiere Pro installed. Don’t have a copy of Premiere?! Download a free 7-day trial from adobe here.
SEQUENCE PRESET SETUP
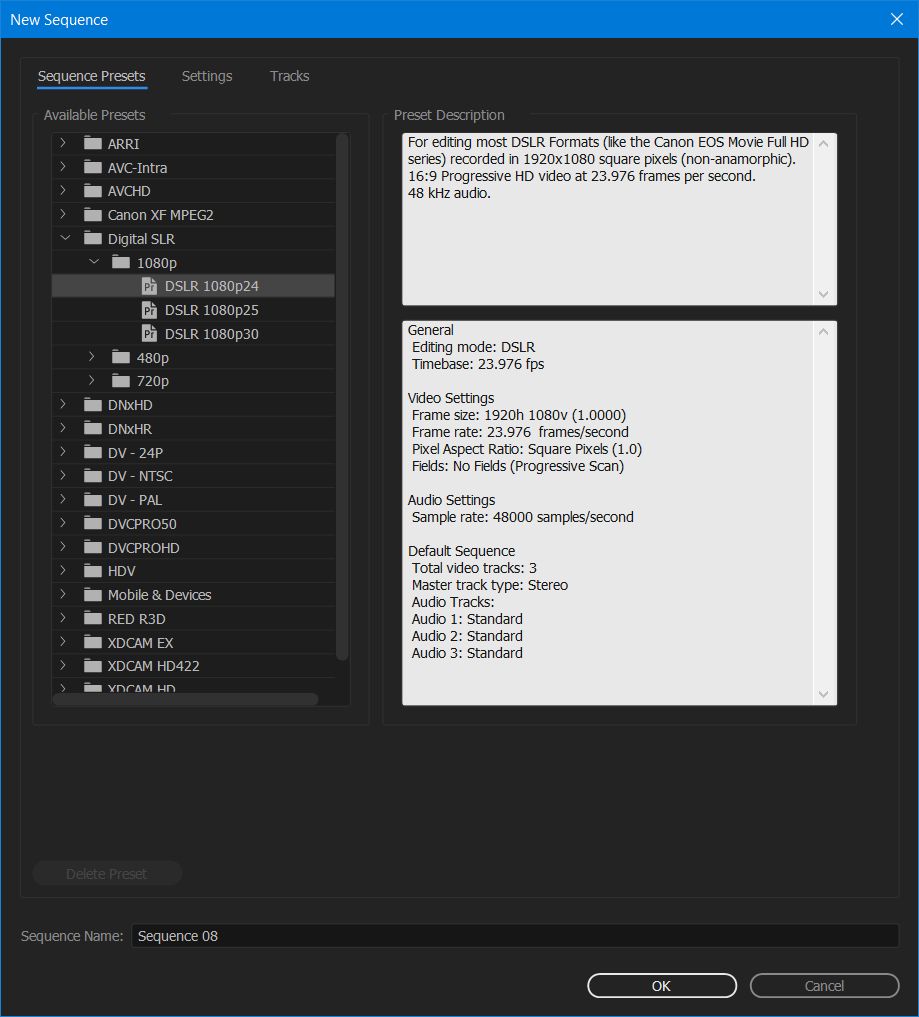
Before I get to my export settings, I need to discuss the sequence preset that I use. Premiere uses the term “sequence” to describe the timeline that you will use when editing your video. It is important to select a sequence preset that is the same as the video settings that you used when filming with your camera. You can use “Ctrl + N” or go to “File > New > Sequence” to open the new sequence dialog box. For the video clip I use in this project, I filmed in 1920×1080 resolution at 120fps with the Sony A7Sii. I then used Premiere to interpret the footage to 23.976 fps and that is what we will be exporting today. I need to select a new sequence preset that is the same as these video settings. Select Digital SLR > 1080p > DSLR 1080p24. Name your sequence in the dialogue box below, and click “OK.”
The New Sequence Preset Window
EDIT YOUR VIDEO
Your video is now ready to be edited as you would normally on the timeline. Once you have finished editing and are ready to export your video, go to the next step.
SET YOUR IN AND OUT POINTS
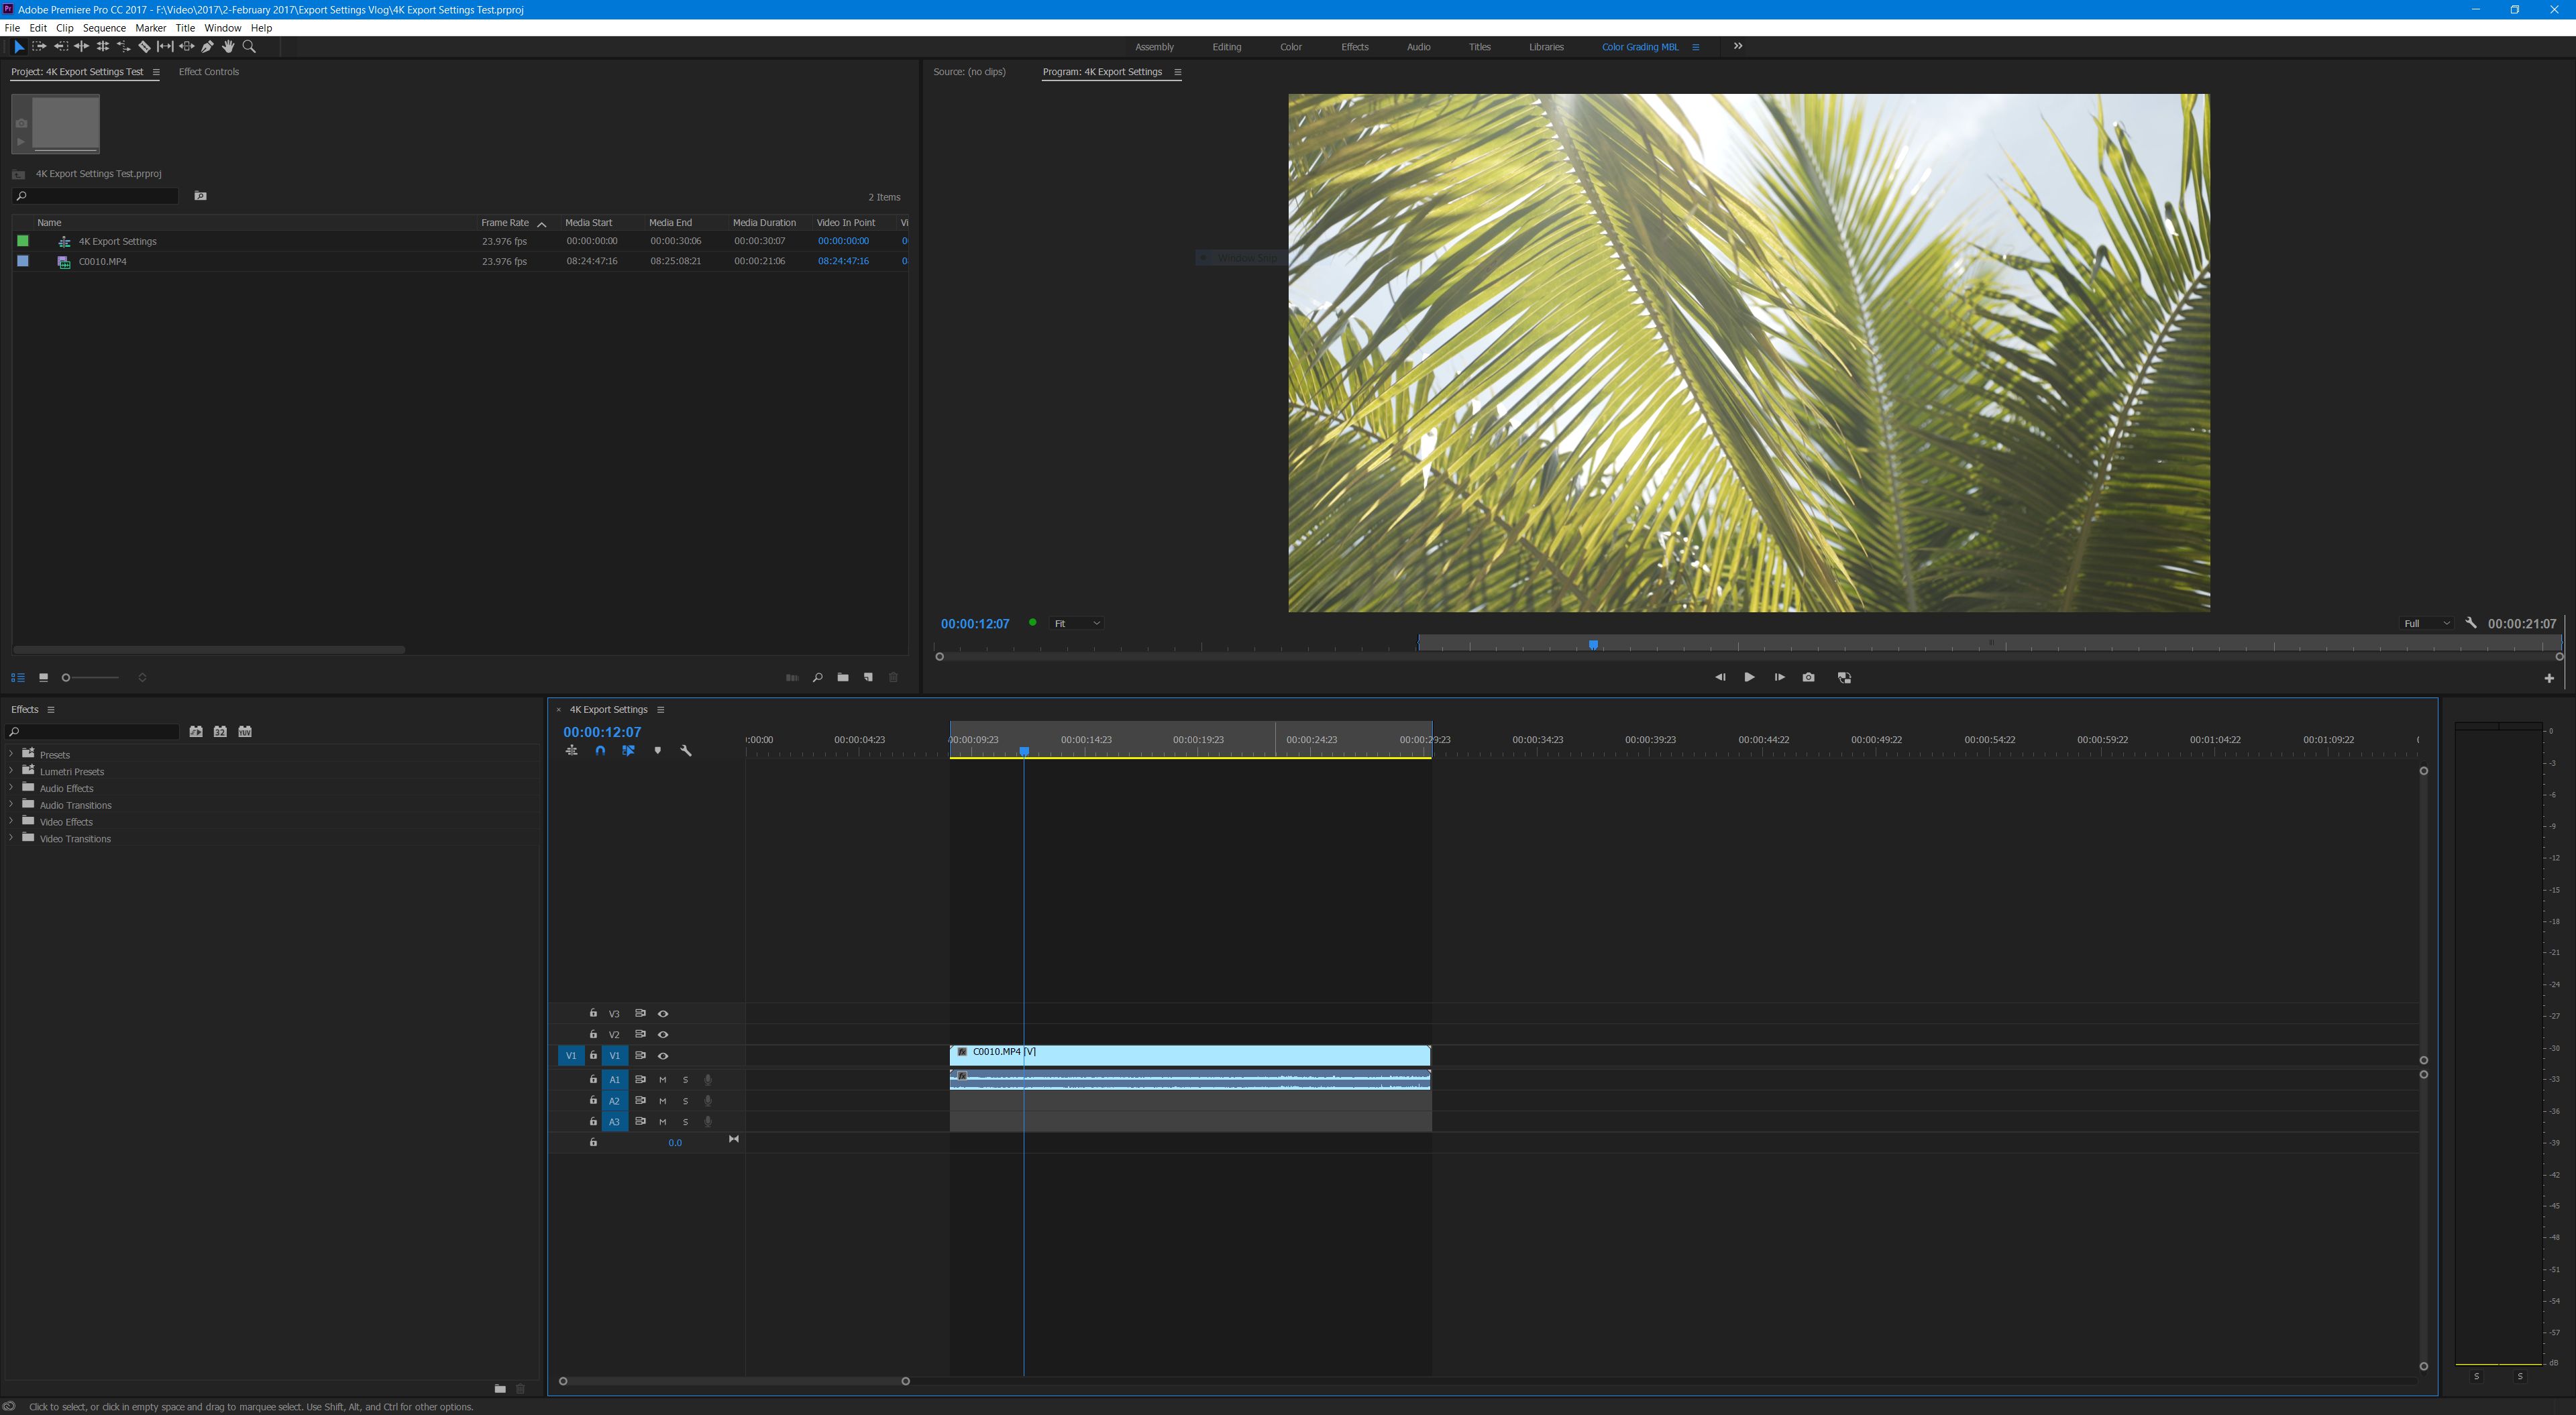
Once your video is edited and ready to render. You need to set your “In” and “Out” points. Do this by moving the video playhead to where you want the opening frame of your rendered video to begin and press the “I” key on your keyboard. Then move the playhead to the end of your video and select the “O” key on your keyboard. The timeline will turn a darker color where your in and out points are selected. It is now time to export your video! With the timeline selected you can either press “Ctrl + M” on the keyboard, or navigate to “File > Export > Media” in the menu.
Set your “In” and “Out” points.
BEGIN CHANGING YOUR EXPORT SETTINGS
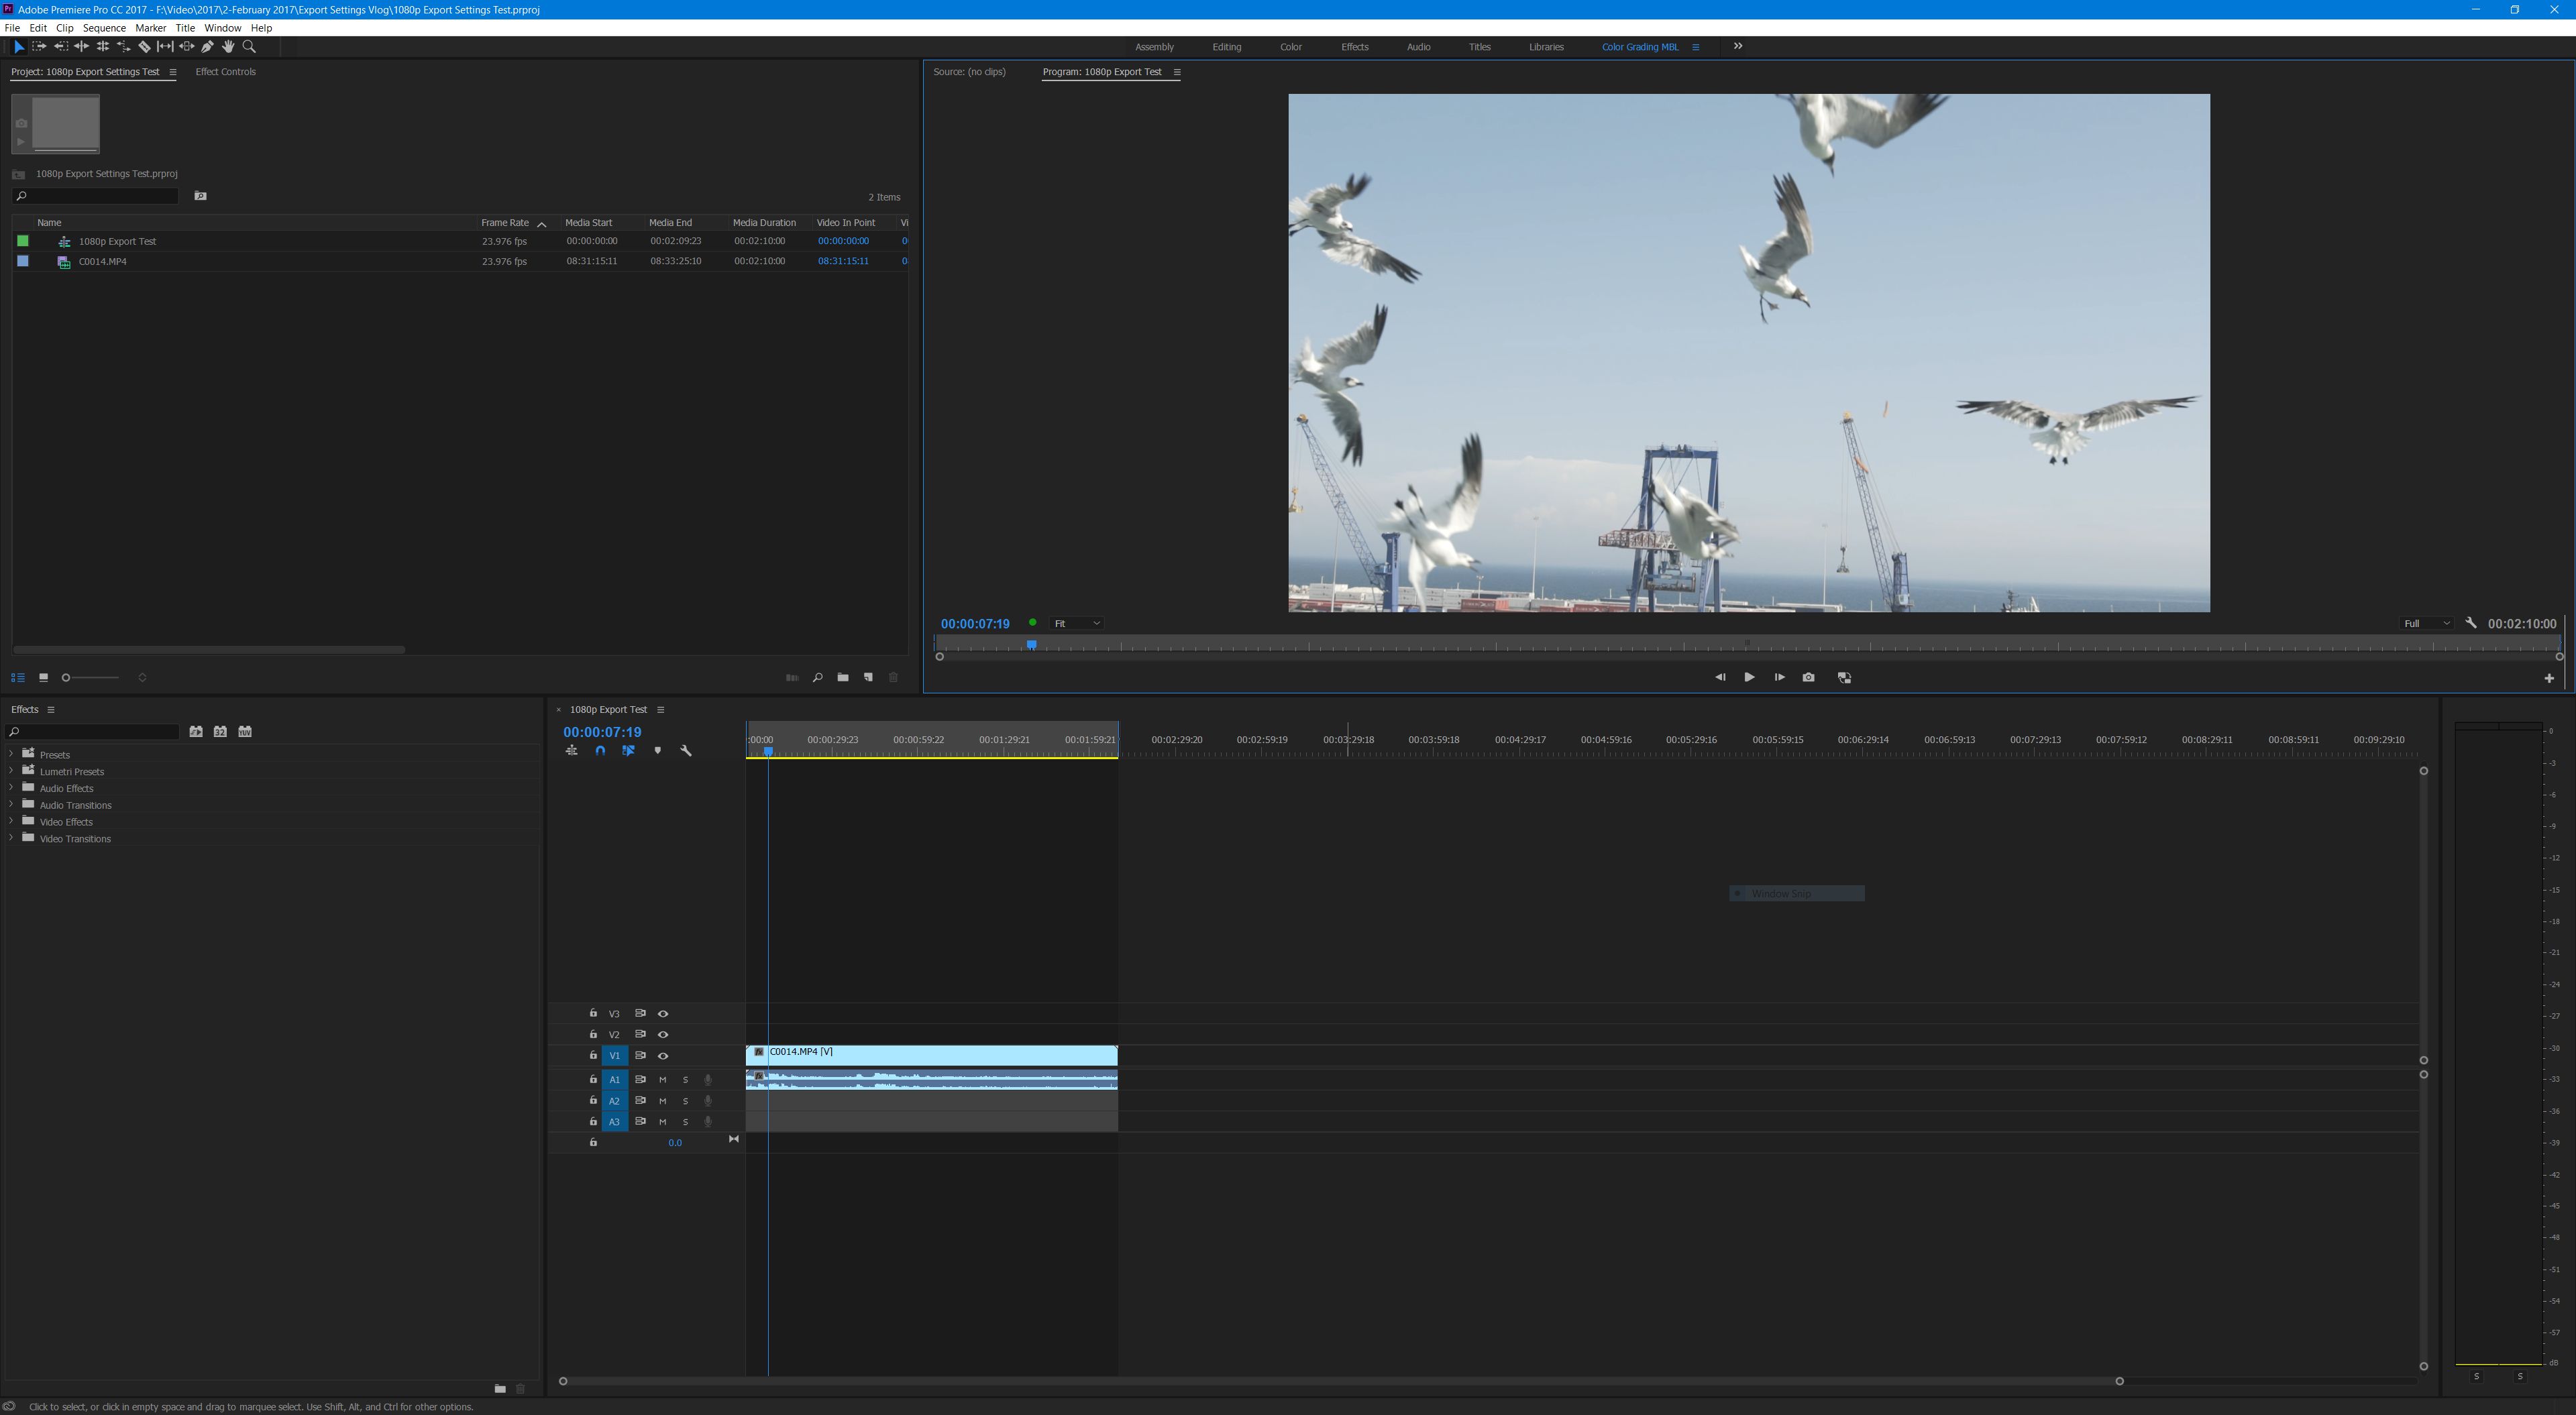
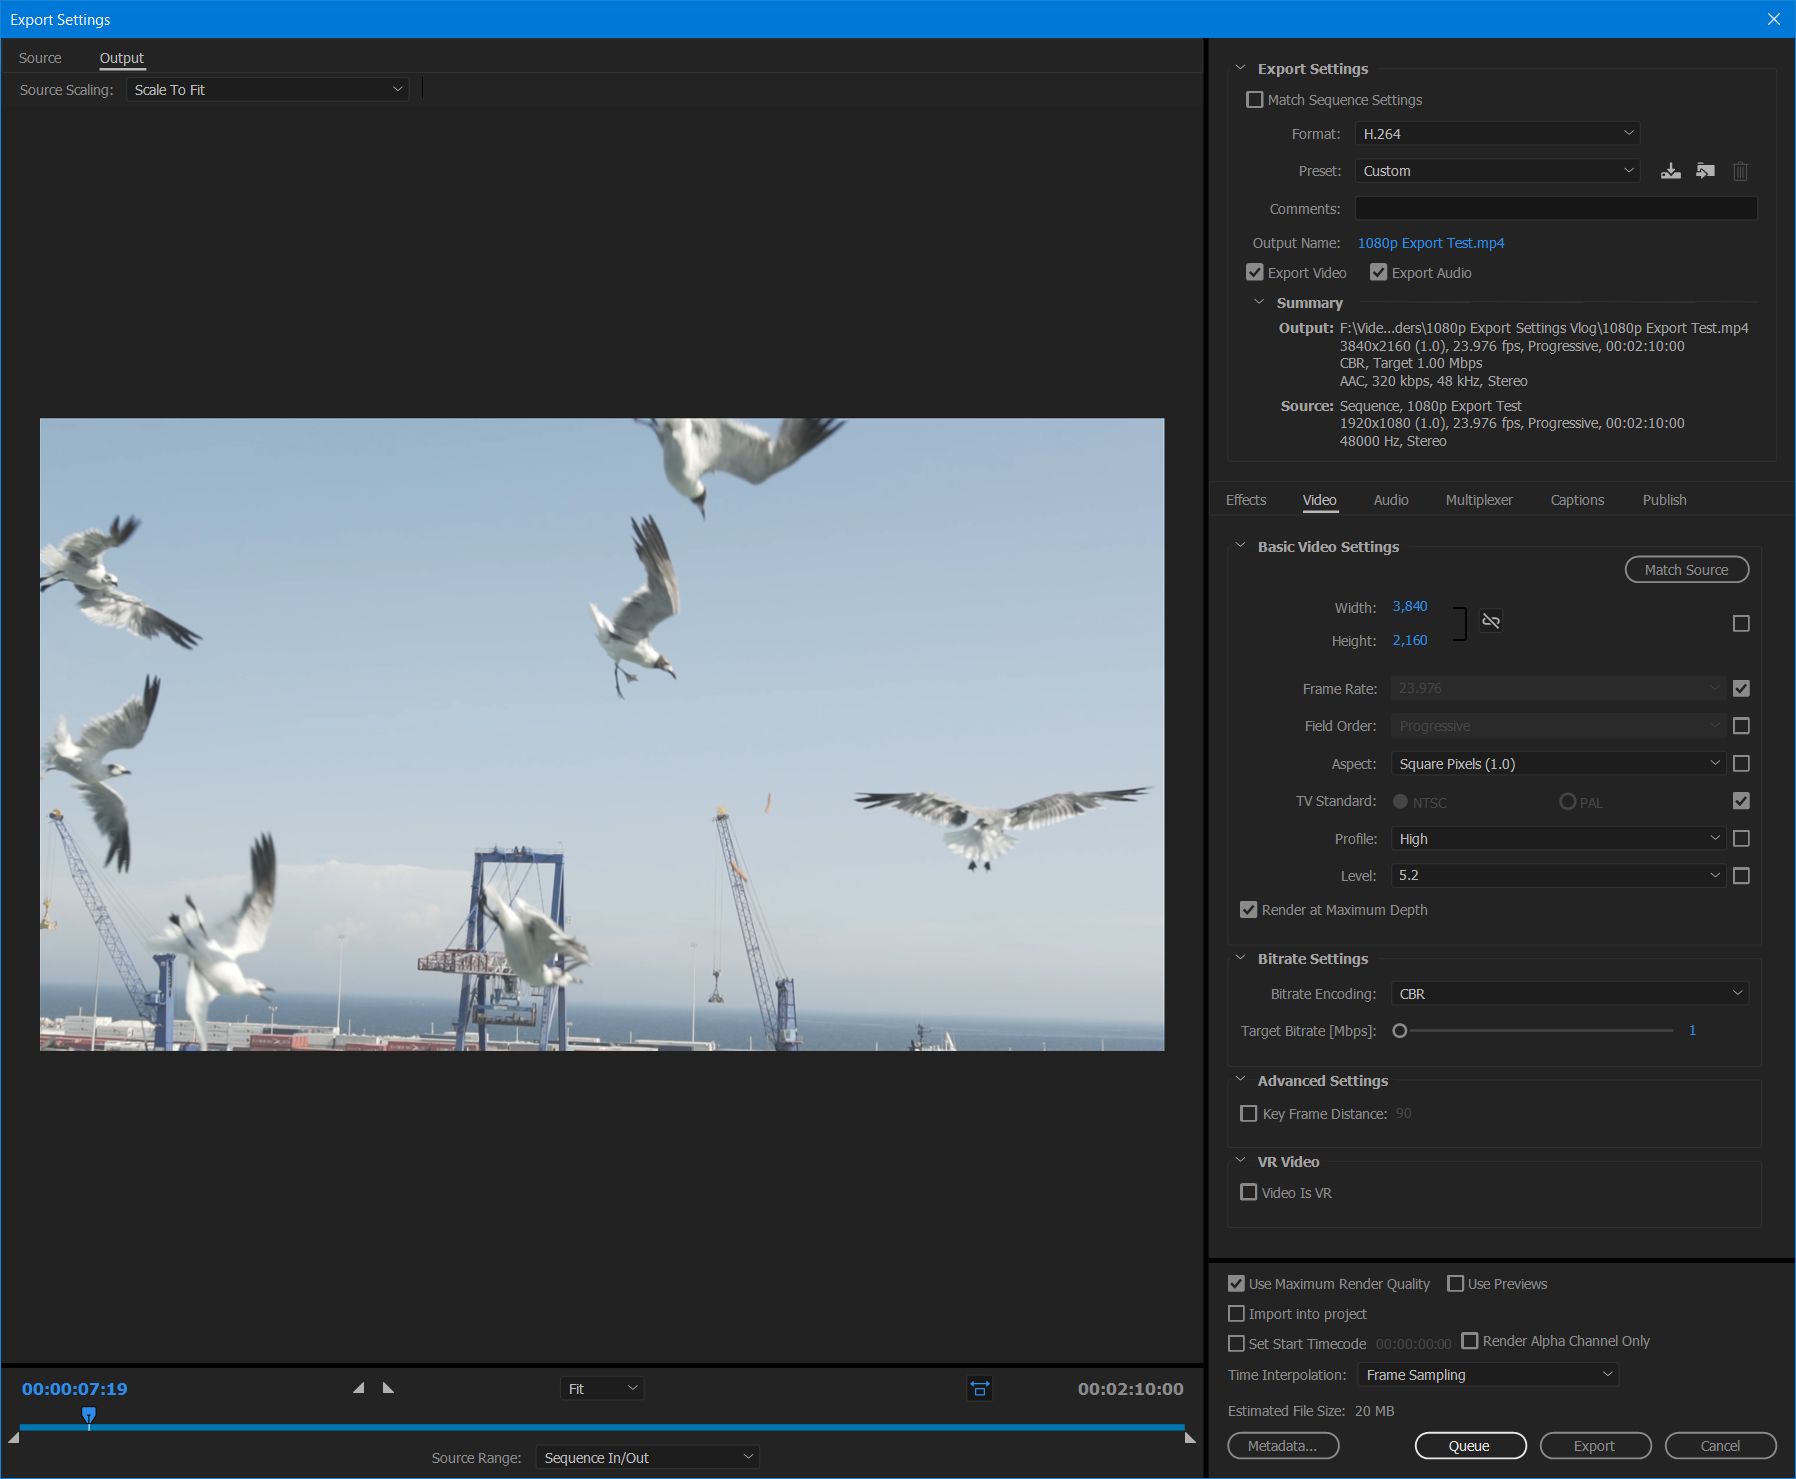
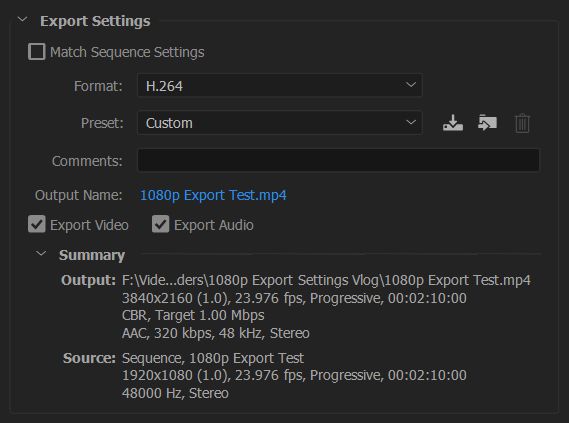
You’ve now opened the “Export Settings” dialog box and there’s approximately 3,000 settings you could change. Don’t freak out though, we’re going to tackle this one section at a time. First, under the “Export Settings” heading on the left, next to “Format” select “H.264” from the drop down menu. For Preset select, “Custom.” Click the blue text next to “Output Name” and select a name and location to save your video file. Make sure both the “Export Video” and “Export Audio” boxes are checked.
How the export settings dialogue box looks upon opening it for the first time.
The export settings heading of the dialog box.
BASIC VIDEO SETTINGS AND BITRATE SETTINGS FOR YOUTUBE, VIMEO, FACEBOOK, AND OTHER VIDEO SITES
If you are uploading your video to YouTube, Vimeo, Facebook, or any other video site, I recommend using the below settings. The file sizes will be quite large, but this will ensure that your video retains its quality when you upload it to these sites and they convert it into different formats and resolutions. Also, if you want to know my reasoning for choosing these settings, please watch my 4K export settings video.
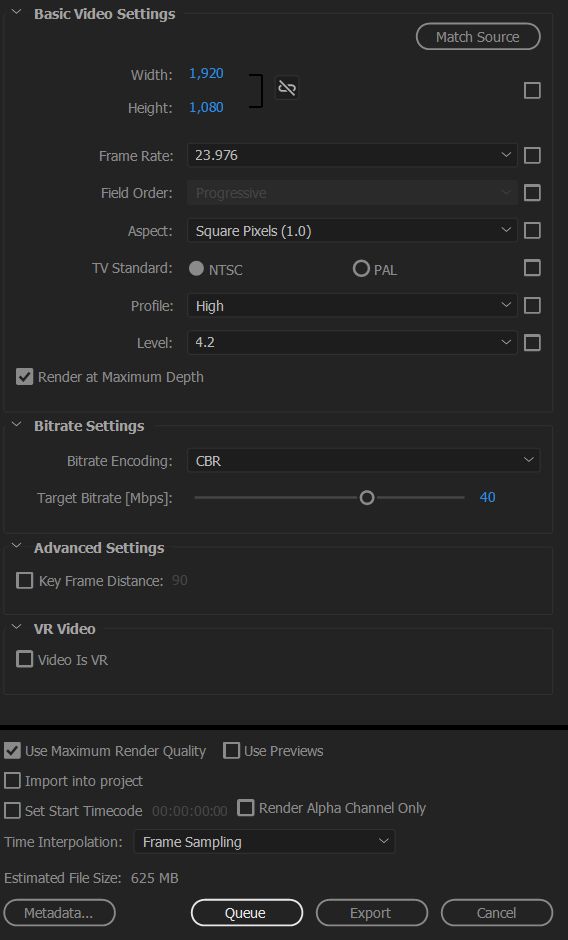
Select the “Video Tab” in the middle of the export settings dialog box and set “Profile” to “High” and “Level” to “4.2”. Then make sure your “Width” is set to “1,920” and your “Height” is set to “1,080”. Set your frame rate to “23.976”, and check the “Render at Maximum Depth.”
Under “Bitrate Settings” set “Bitrate Encoding” to “CBR” and your “Target Bitrate [Mbps] to “40.” Lastly, check “Use Maximum Render Quality” at the bottom.
HD Video export settings for YouTube, Vimeo, Facebook, etc.
BITRATE SETTINGS FOR GIVING YOUR 1080p VIDEO TO CLIENTS
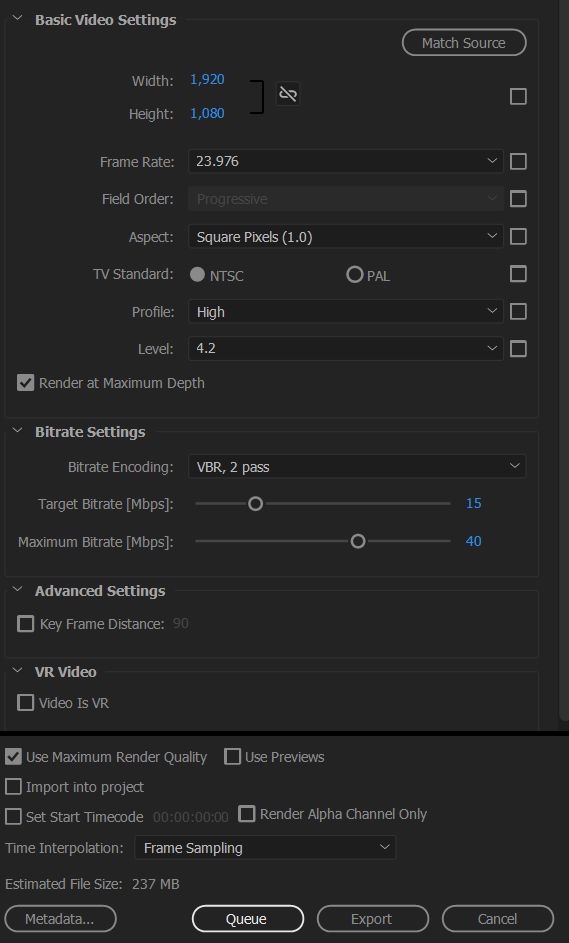
If you are not planning on uploading your video to an online video site, and instead are giving it to a client, I would recommend using these bitrate settings because the file size won’t be nearly as large.
For “Basic Video Settings” use the same settings as you would if you were uploading to an online video site. For “Bitrate Settings,” change “Bitrate Encoding” to “VBR, 2 Pass.” Set “Target Bitrate [Mbps]” to “15” and Maximum Bitrate [Mbps] to “40”. Lastly, check “Use Maximum Render Quality” at the bottom.
HD Export settings for rendering your videos for clients.
CHANGE YOUR AUDIO EXPORT SETTINGS
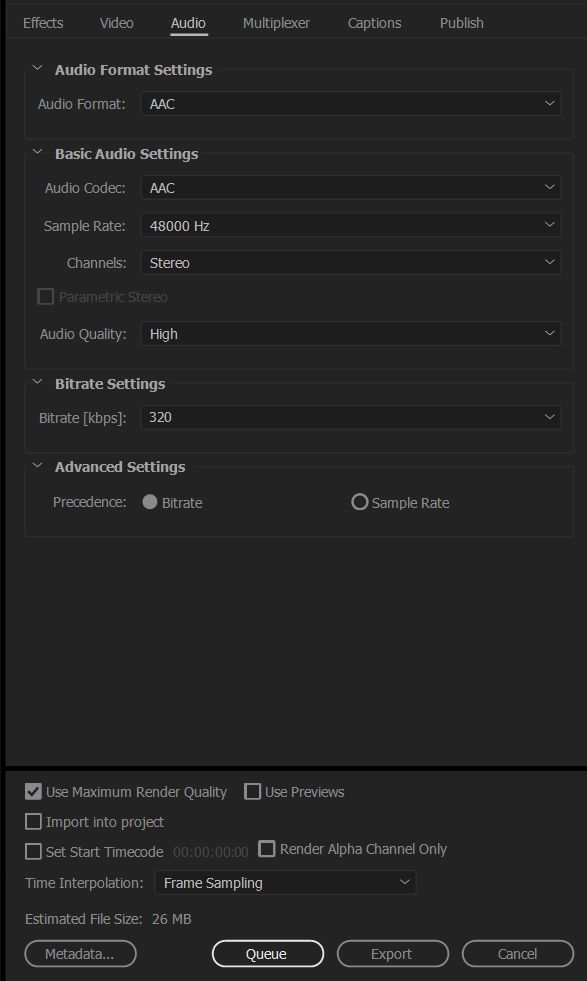
Click the “Audio” tab in the middle of the Export Settings window and for “Audio Format” select “AAC”. Under Basic Audio Settings, set the “Audio Codec” to “AAC”, Sample Rate to “48000 Hz”, “Channels” to “Stereo”, and “Audio Quality” to “High”. Lastly, for “Bitrate Settings” set “Bitrate [kbps]” to “320” and under Advanced Settings set “Precedence” to “Bitrate”.
Audio export settings.
SAVE YOUR VIDEO PRESET
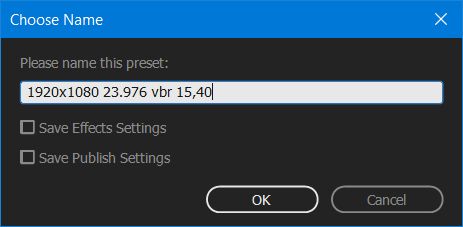
Now that you have created your video settings, click the down arrow icon to the right of your “Preset” at the top, and name your new Export Preset either “1920×1080 23.976 cbr 40” or “1920×1080 23.976 vbr 15,40” depending on whether you are saving the 40mbps CBR preset or the 15,40 VBR preset.
EXPORT YOUR VIDEO
You are ready to click “Queue” or “Export” at the bottom of the dialog box and render your video!
I hope this video and tutorial has been helpful to you. As always, if you have any questions or comments, please feel free to leave one below or get in touch.
Save time and download my free 4K Export Preset for Premiere Pro!
Way back in 2012 I wrote a blog post about my export settings for high definition videos in Premiere Pro. That post went on to become one of the most popular posts on my site. Wanna know what the second most popular post was? My video export settings for Instagram videos in Premiere Pro.
There’s a trend here, and I realized that with the advent of 4K video, I had the opportunity to create a new text and video tutorial about the settings that I use when shooting with my Sony A7Sii. As I prepared to create this tutorial, I decided that this would be the perfect time to revisit those posts about my high definition and Instagram export settings, and create videos for them as well.
Adobe Premiere Pro CC 2017 doesn’t look very different from CS5.
My text guide for how to export 4K video in Premiere Pro CC for YouTube and Video
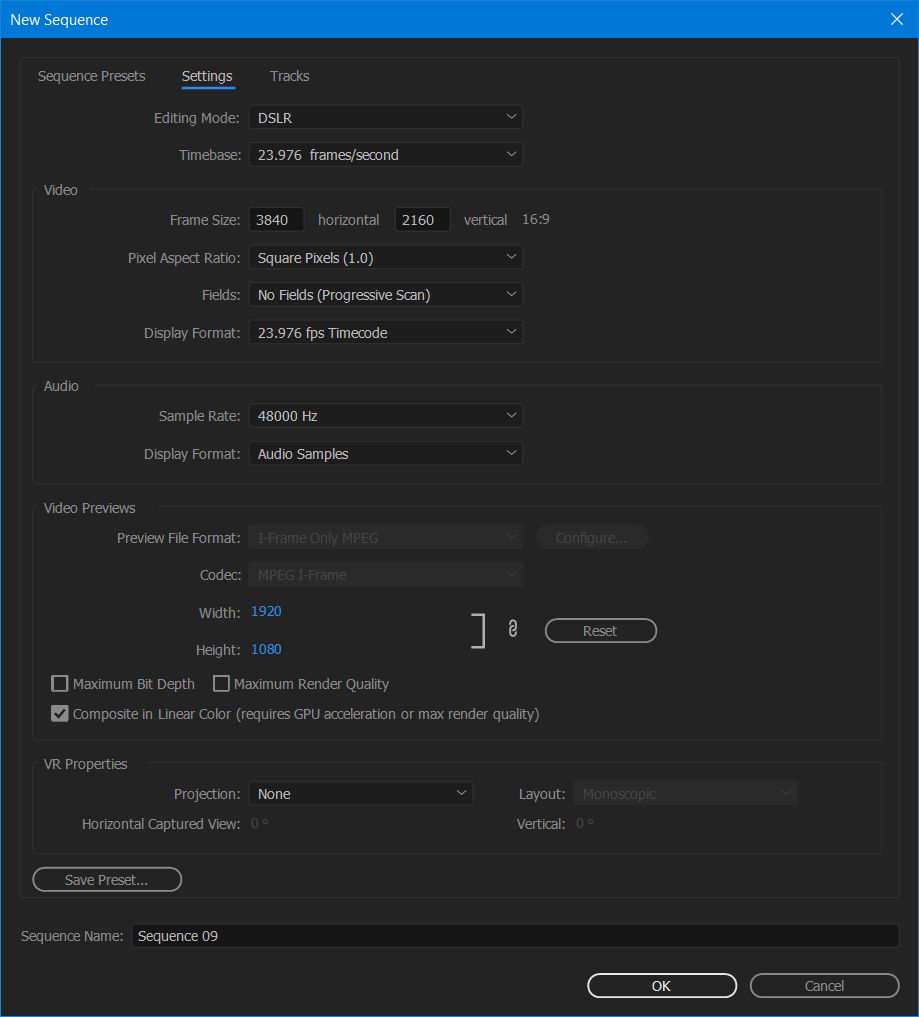
Before I get to my export settings, I need to discuss the sequence preset that I use. Premiere uses the term “sequence” to describe the timeline that you will use when editing your video. It is important to select a sequence preset that is the same as the video settings that you used when filming with your camera. You can use “Ctrl + N” or go to “File > New > Sequence” to open the new sequence dialog box. For the video clip I use in this project, I filmed in 3840×2160 resolution at 23.976 fps with the Sony A7Sii. I need to select a new sequence preset that is the same as these video settings.
The New Sequence Preset Window
SEQUENCE PRESET SETTINGS
Once you have opened the New Sequence window, you have many presets to choose from. Because there aren’t any available for 3840×2160 footage, I would instead select “Digital SLR > 1080p > DSLR 1080p24” and then select the “Settings” tab at the top of the window. Under the “Video” heading, change the “Frame Size” to “3840 horizontal” and “2160 vertical”. Keep the rest of the settings the same as the preset.
New Sequence Settings
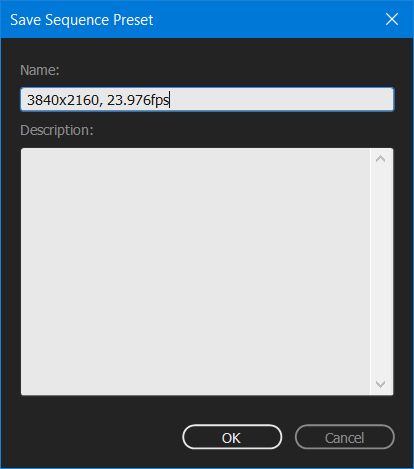
SAVE YOUR NEWLY CREATED PRESET
Click “Save Preset” at the bottom and save your settings as a new preset. I named mine “3840×2160 23.976fps” so I can easily remember it when editing future videos. Next select your newly made preset, and edit your video clips on the timeline you have created.
Save your sequence preset.
SET YOUR IN AND OUT POINTS
Once your video is edited and ready to render. You need to set your “In” and “Out” points. Do this by moving the video playhead to where you want the opening frame of your rendered video to begin and press the “I” key on your keyboard. Then move the playhead to the end of your video and select the “O” key on your keyboard. The timeline will turn a darker color where your in and out points are selected. It is now time to export your video! With the timeline selected you can either press “Ctrl + M” on the keyboard, or navigate to “File > Export > Media” in the menu.
Set your “In” and “Out” points.
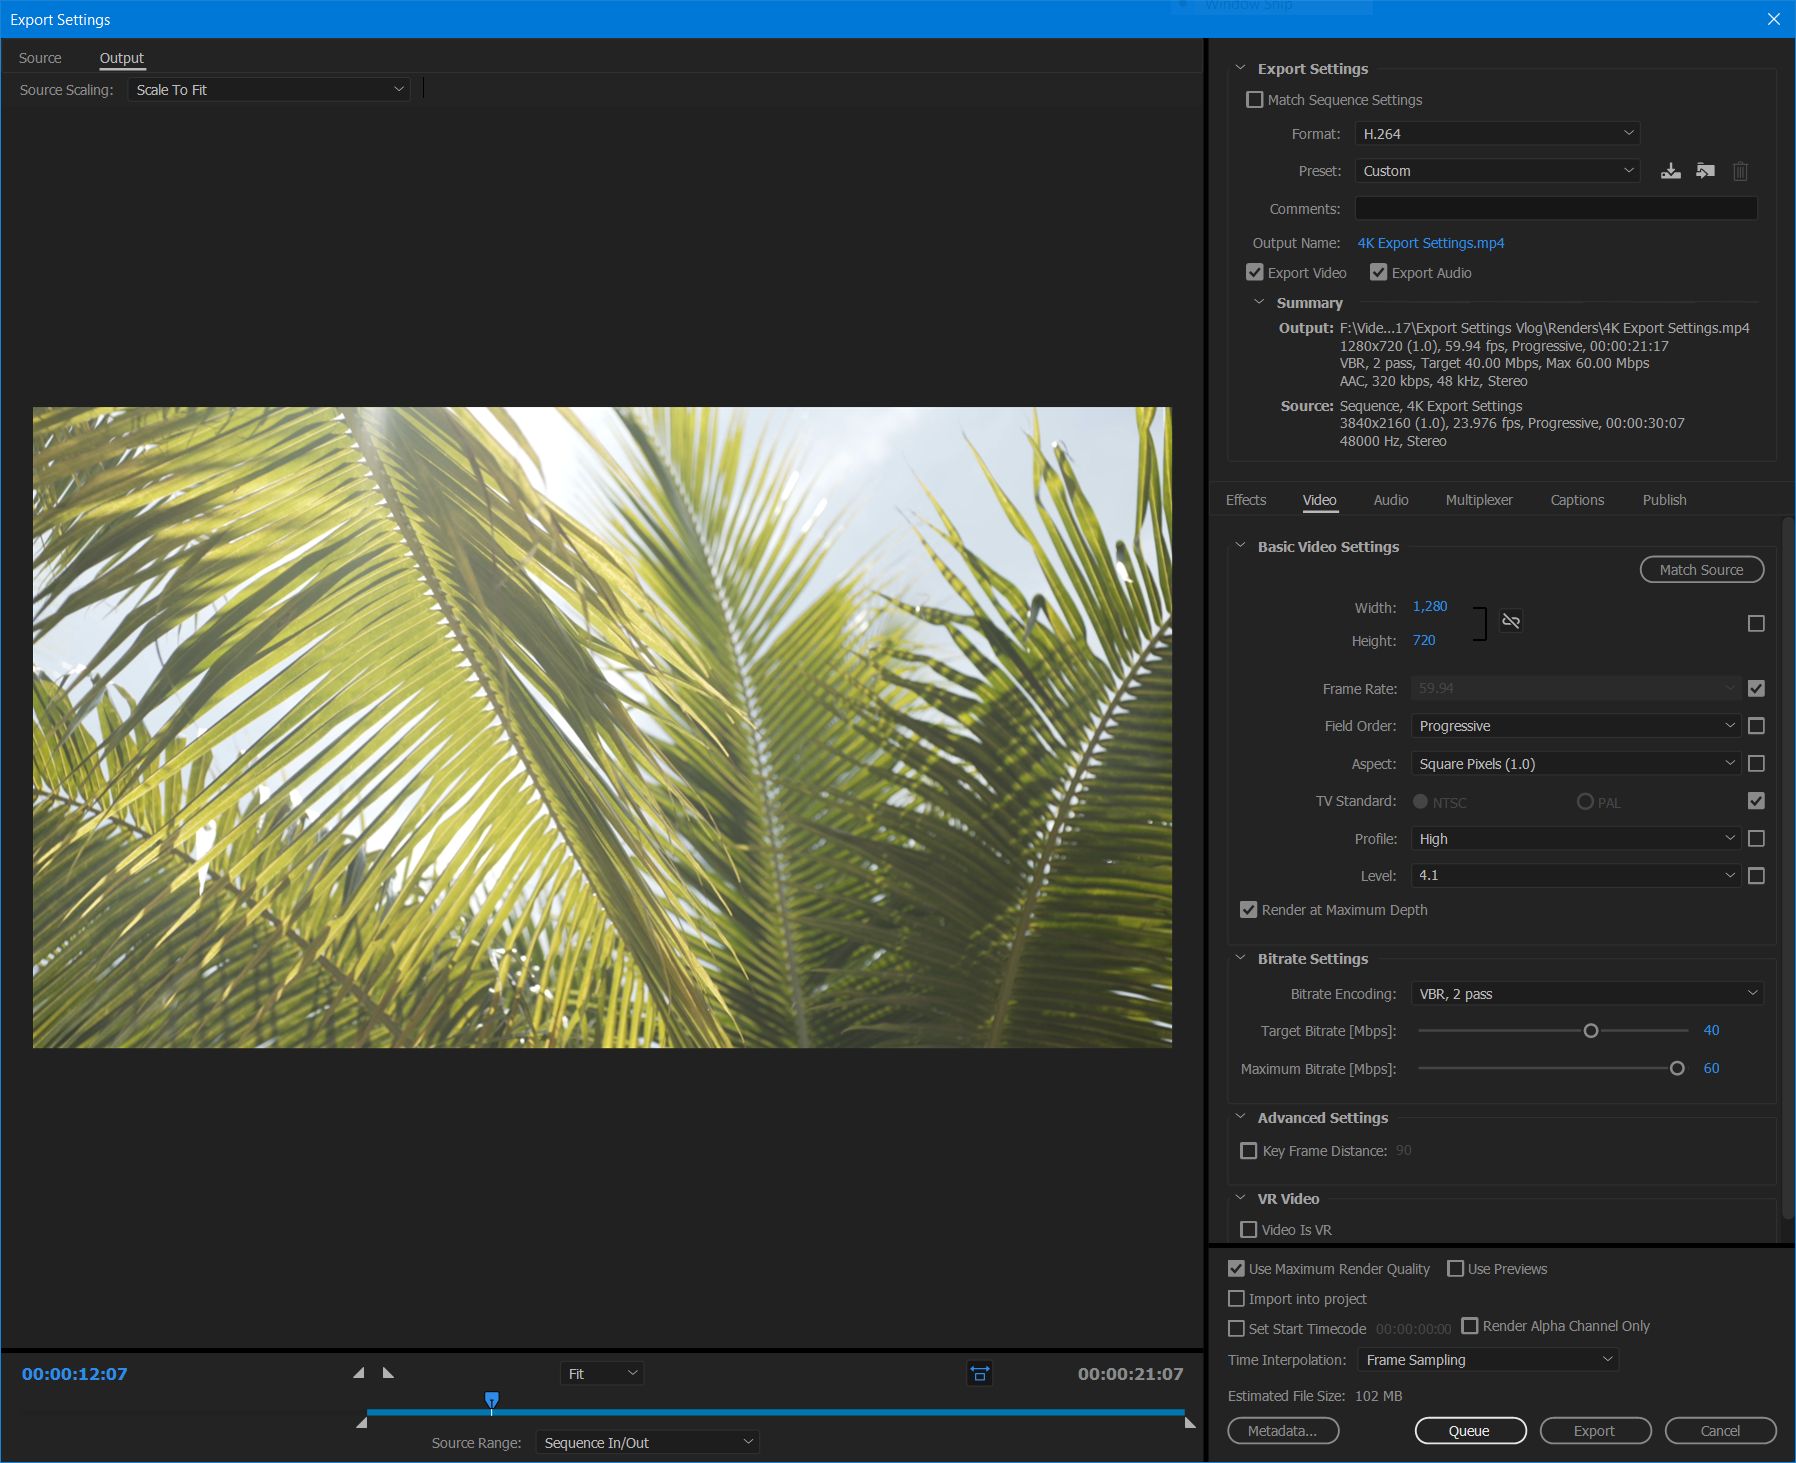
BEGIN CHANGING YOUR EXPORT SETTINGS
You’ve now opened the “Export Settings” dialog box and there’s approximately 3,000 settings you could change. Don’t freak out though, we’re going to tackle this one section at a time. First, under the “Export Settings” heading on the left, next to “Format” select “H.264” from the drop down menu. For Preset select, “Custom.” Click the blue text next to “Output Name” and select a name and location to save your video file. Make sure both the “Export Video” and “Export Audio” boxes are checked.
How the export settings dialogue box looks upon opening it for the first time.
The export settings heading of the dialog box.
BASIC VIDEO SETTINGS AND BITRATE SETTINGS FOR YOUTUBE, VIMEO, FACEBOOK, AND OTHER VIDEO SITES
If you are uploading your video to YouTube, Vimeo, Facebook, or any other video site that supports 4K, I recommend using the below settings. The file sizes will be quite large, but this will ensure that your video retains its quality when you upload it to these sites and they convert it into different formats and resolutions. Also, if you want to know my reasoning for choosing these settings, please watch the tutorial video.
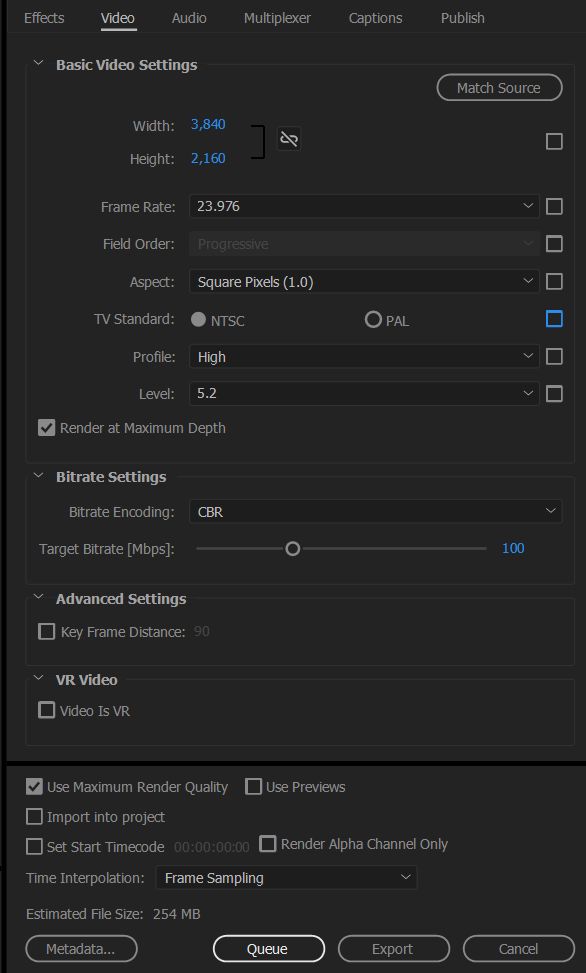
Select the “Video Tab” in the middle of the export settings dialog box and set “Profile” to “High” and “Level” to “5.2”. Then make sure your “Width” is set to “3,840” and your “Height” is set to “2,160”. Set your frame rate to “23.976”, and check the “Render at Maximum Depth.”
Under “Bitrate Settings” set “Bitrate Encoding” to “CBR” and your “Target Bitrate [Mbps] to “100.” Lastly, check “Use Maximum Render Quality” at the bottom.
Basic video settings and Bitrate settings.
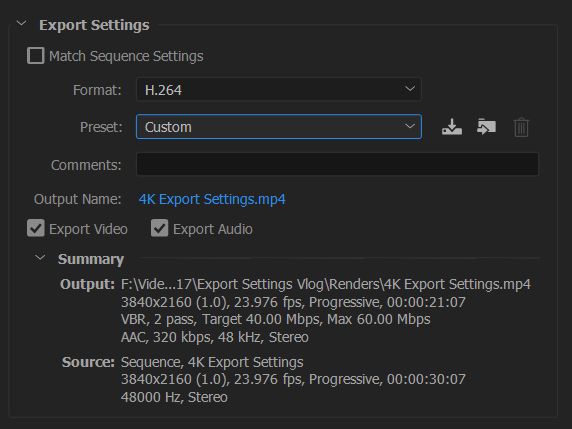
BITRATE SETTINGS FOR GIVING YOUR 4K VIDEO TO CLIENTS
If you are not planning on uploading your video to an online video site, and instead are giving it to a client, I would recommend using these bitrate settings because the file size won’t be nearly as large.
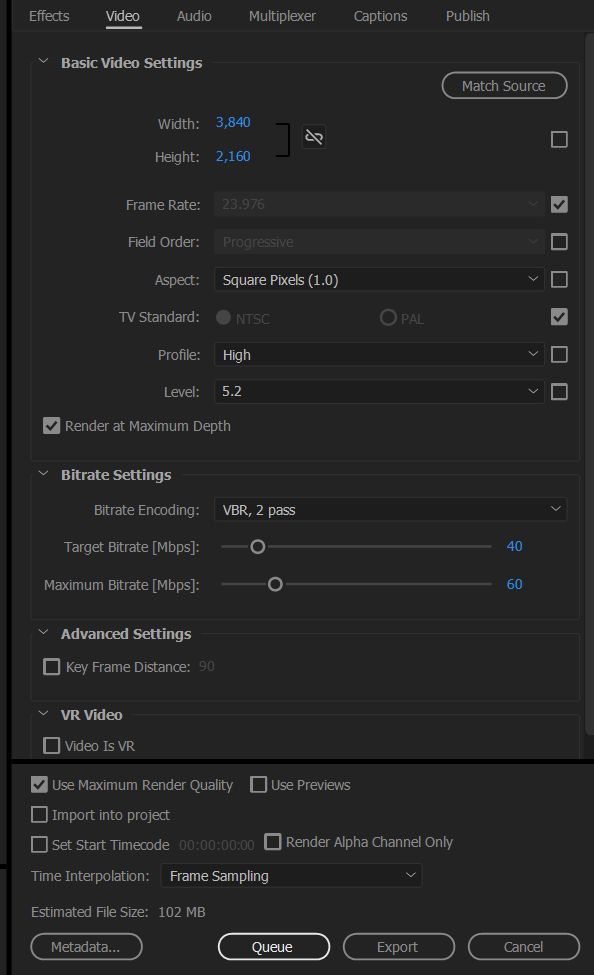
For “Basic Video Settings” use the same settings as you would if you were uploading to an online video site. For “Bitrate Settings,” change “Bitrate Encoding” to “VBR, 2 Pass.” Set “Target Bitrate [Mbps]” to “40” and Maximum Bitrate [Mbps] to “60”. Lastly, check “Use Maximum Render Quality” at the bottom.
Basic Video Settings and Bitrate Settings for clients.
CHANGE YOUR AUDIO EXPORT SETTINGS
Click the “Audio” tab in the middle of the Export Settings window and for “Audio Format” select “AAC”. Under Basic Audio Settings, set the “Audio Codec” to “AAC”, Sample Rate to “48000 Hz”, “Channels” to “Stereo”, and “Audio Quality” to “High”. Lastly, for “Bitrate Settings” set “Bitrate [kbps]” to “320” and under Advanced Settings set “Precedence” to “Bitrate”.
Audio export settings.
SAVE YOUR VIDEO PRESET
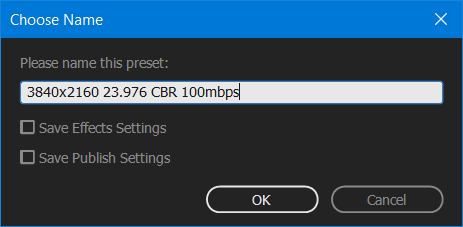
Now that you have created your video settings, click the down arrow icon to the right of your “Preset” at the top, and name your new Export Preset either “3840×2160 23.976 100mbps cbr” or “3840×2160 23.976 40,60 vbr” depending on whether you are saving the 100mbps CBR preset or the 40,60 VBR preset.
Video Export Preset
EXPORT YOUR VIDEO
You are ready to click “Queue” or “Export” at the bottom of the dialog box and render your video!
I hope this video and tutorial has been helpful to you. As always, if you have any questions or comments, please feel free to leave one below or get in touch.
Way back in December of 2015 when I posted my review of the Sony A7Sii (and subsequently started vlogging about reviews, gear, etc.), I mentioned that I had ordered a revolutionary new lens adapter: the Vizelex ND Throttle. Many of you began asking for a my thoughts on this adapter, and I promised in my replies that I would post one “soon.” Well, soon ended up being over one year later, but I’m pleased to announce that my video review of the Vizelex ND Throttle Lens Adapter is finally here!
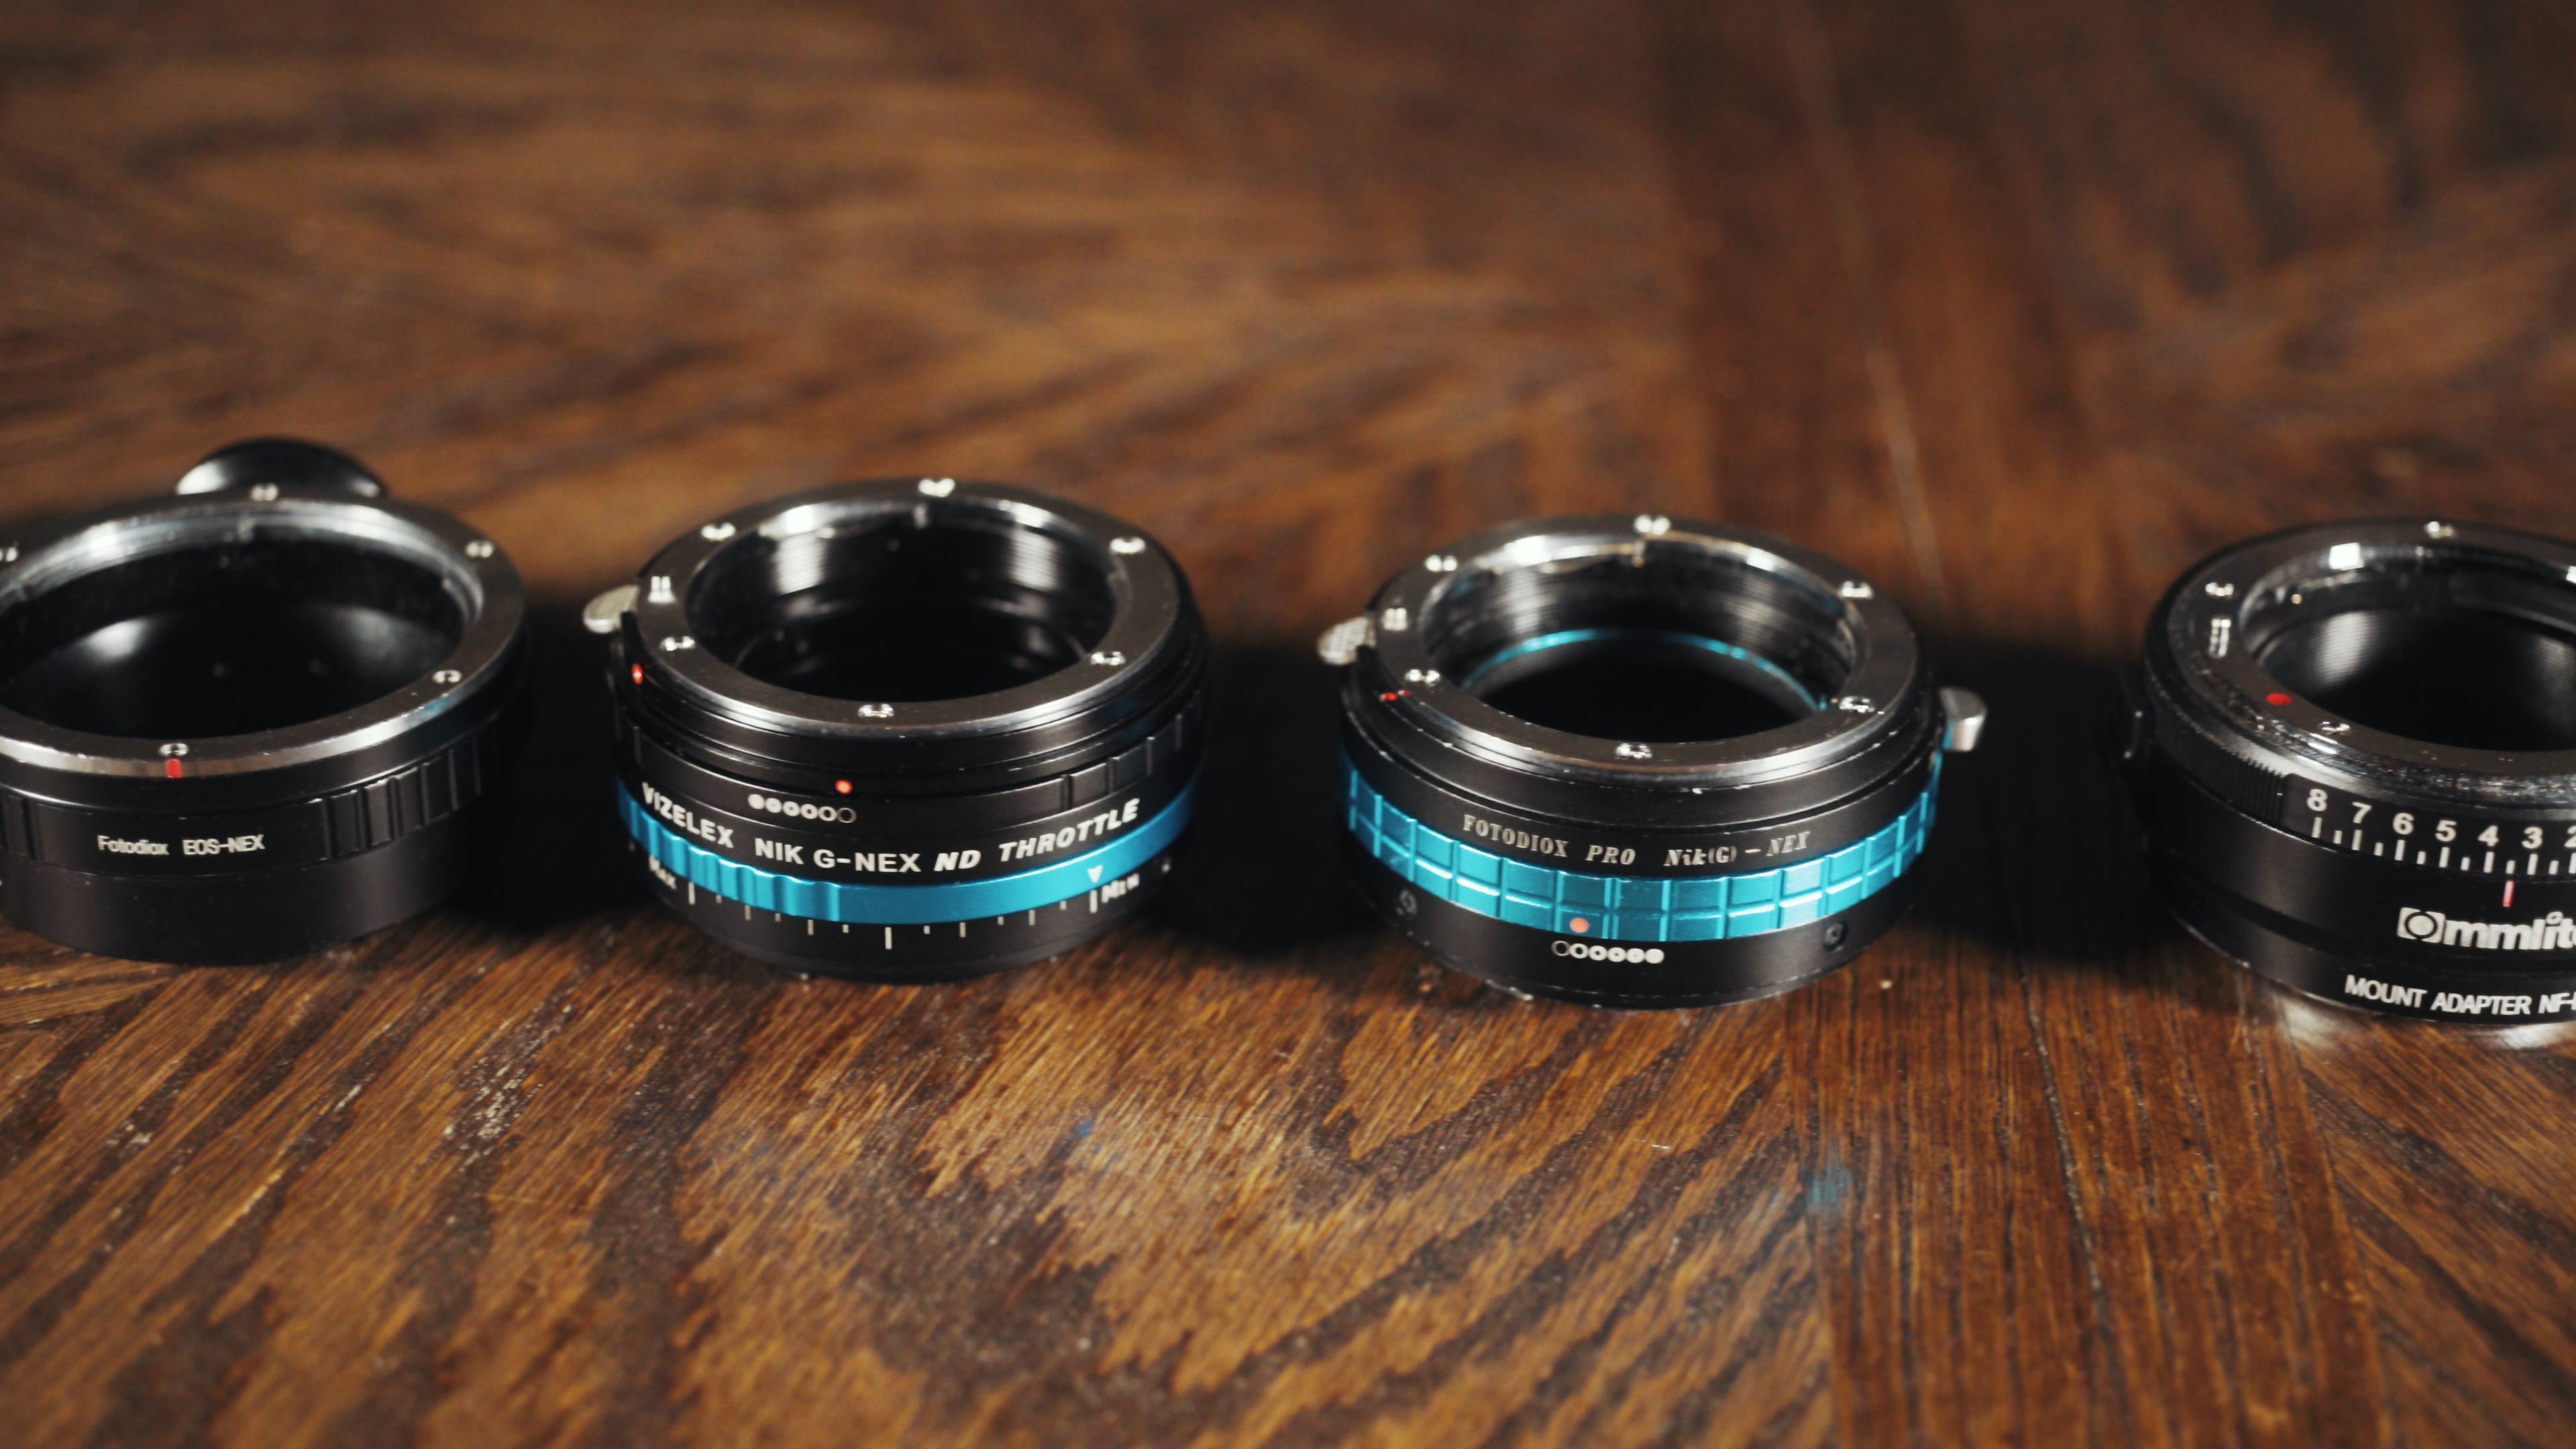
Over the past 9 years of creating videos, I have amassed quite a collection of lens adapters for my cameras. Since switching to Sony E-mount in 2012, this number has grown considerably. Because of the shallow flange distance of the Sony E-Mount camera system, it is incredibly exciting to see just how many lenses can be paired with my Sony camera bodies. Of my adapters, I have Nikon lenses to Canon cameras, Canon to Sony, Nikon to Sony, electronic adapters, manual adapters, Speed Boosters, and now: adapters with variable ND filters built right into the adapter itself. I love that we are continuously seeing the miniaturization of technology, and I hope to soon see even more nifty features crammed into lens adapters in the future.
SO MANY lens adapters…
In the video, I specifically review the Nikon lens to Sony E-Mount version of the ND Throttle, and give my thoughts on the construction, ND visual quality, color cast, sharpness, and vignetting. I also give all my reasons for why I prefer to use an ND filter when filming, as well as some recommendations for how to get the best performance from this adapter. I hope you enjoy me rambling for 20-ish minutes about the finer points of ND filtration. 🙂
Look how pretty it looks!
Note: Back in the Summer of 2016, Fotodiox released a Canon lens to E-Mount version of the adapter, but I haven’t had the chance to test it yet, so I have kept my review focused on the Nikon mount version. The build quality appears to be similar, so if you are considering purchasing one of the other lens mount adapter versions, this review should still be very helpful to you.
You can checkout the Vizelex ND Throttle Adapter at Amazon and B&H.
Ethics Statement: This is an entirely independent review. SKB did not pay me to create this video, I didn’t receive this case for free, or receive any other compensation. I’m a fan of this case and after six months of use I really wanted to make a review about it.
If you have any questions about the ND Throttle, or filmmaking questions in general, feel free to leave a comment below or get in touch. I’m now also offering one-on-one filmmaker consulting!
Before I get to the main blog post I have a big announcement to make: I am now offering personal one-on-one hourly filmmaker consulting! Want me to critique your latest wedding film? Need recommendations about cameras, lenses, or lighting? Wanna chat about beard maintenance for an hour? I would love to talk with you, so please get in touch and schedule a consult today.
The first 5 people that signup for consulting can use the coupon code “take100” to get $100 off your first hour of consulting. 🙂
And now, on to your regularly scheduled blog post!
This is a big one. I’m giving all my audio secrets away! For over a year, the most requested topic for me to talk about is audio. Everyone apparently wants to know how I approach recording audio for a wedding film, the exact gear that I use to record the wedding notes, ceremony, and toasts, and how I make everything sound great. Well today is the day that I reveal it all! Strap in for almost thirty minutes of me covering all facets of recording audio for wedding films.
In this video I will cover:
Why audio is such a big deal for you and your audience.
The exact recorders, microphones, cables, batteries, and accessories that I use throughout the entire wedding day.
Who and what I record during the wedding ceremony.
All the ways to plug into a sound board.
How to handle DJs that won’t let you plug into their sound board.
A foolproof backup that Guarantees(!) that you will record high quality toasts audio.
Below is a full list of the Audio Equipment that I use. You can see this entire list with images and links my Kit page.
As always, if you have any questions or comments, please feel free to leave on below or get in touch.