
My name is Matt Johnson, and this is the second video in my series about fast filmmaking settings for the Sony a7 IV. The first one was a deep dive into every menu in the camera. This one builds on it and shows you all my settings for the mode dial, the custom buttons, the function menu and the custom menus.
So if you film weddings, documentaries, or basically anything where you have to shoot fast, this is how you put the exact settings you need at your fingertips, so you can film quickly and never waste time trying to remember where something is buried.
Two things before we start.
First, if you have not watched my a7 IV menu settings video, I highly recommend going through that one first, because this one builds directly on it.
Second, and more importantly, if you want to save yourself the next twenty minutes entirely, you can download my a7 IV settings file and load it straight onto your camera. Every setting below, already done. No need to follow along and customize anything by hand. It is completely free. My gift to you.
Alright. Let’s get started.
Mode Dial Setup
The mode dial on top of the camera is going to let you switch between frame rates and resolutions very fast, and there are three presets on it to customize. Here is how I set all three.
Preset 1: 4K at 24 frames per second
Preset 1 is for anything you want at normal speed, meaning not slow motion. This is especially important for any clip where you need the audio, like a ceremony or toasts, because if you record people talking at a higher frame rate and then slow it down, their lips will not match their words. Having 24 frames per second sitting on preset 1 keeps that one dial click away.
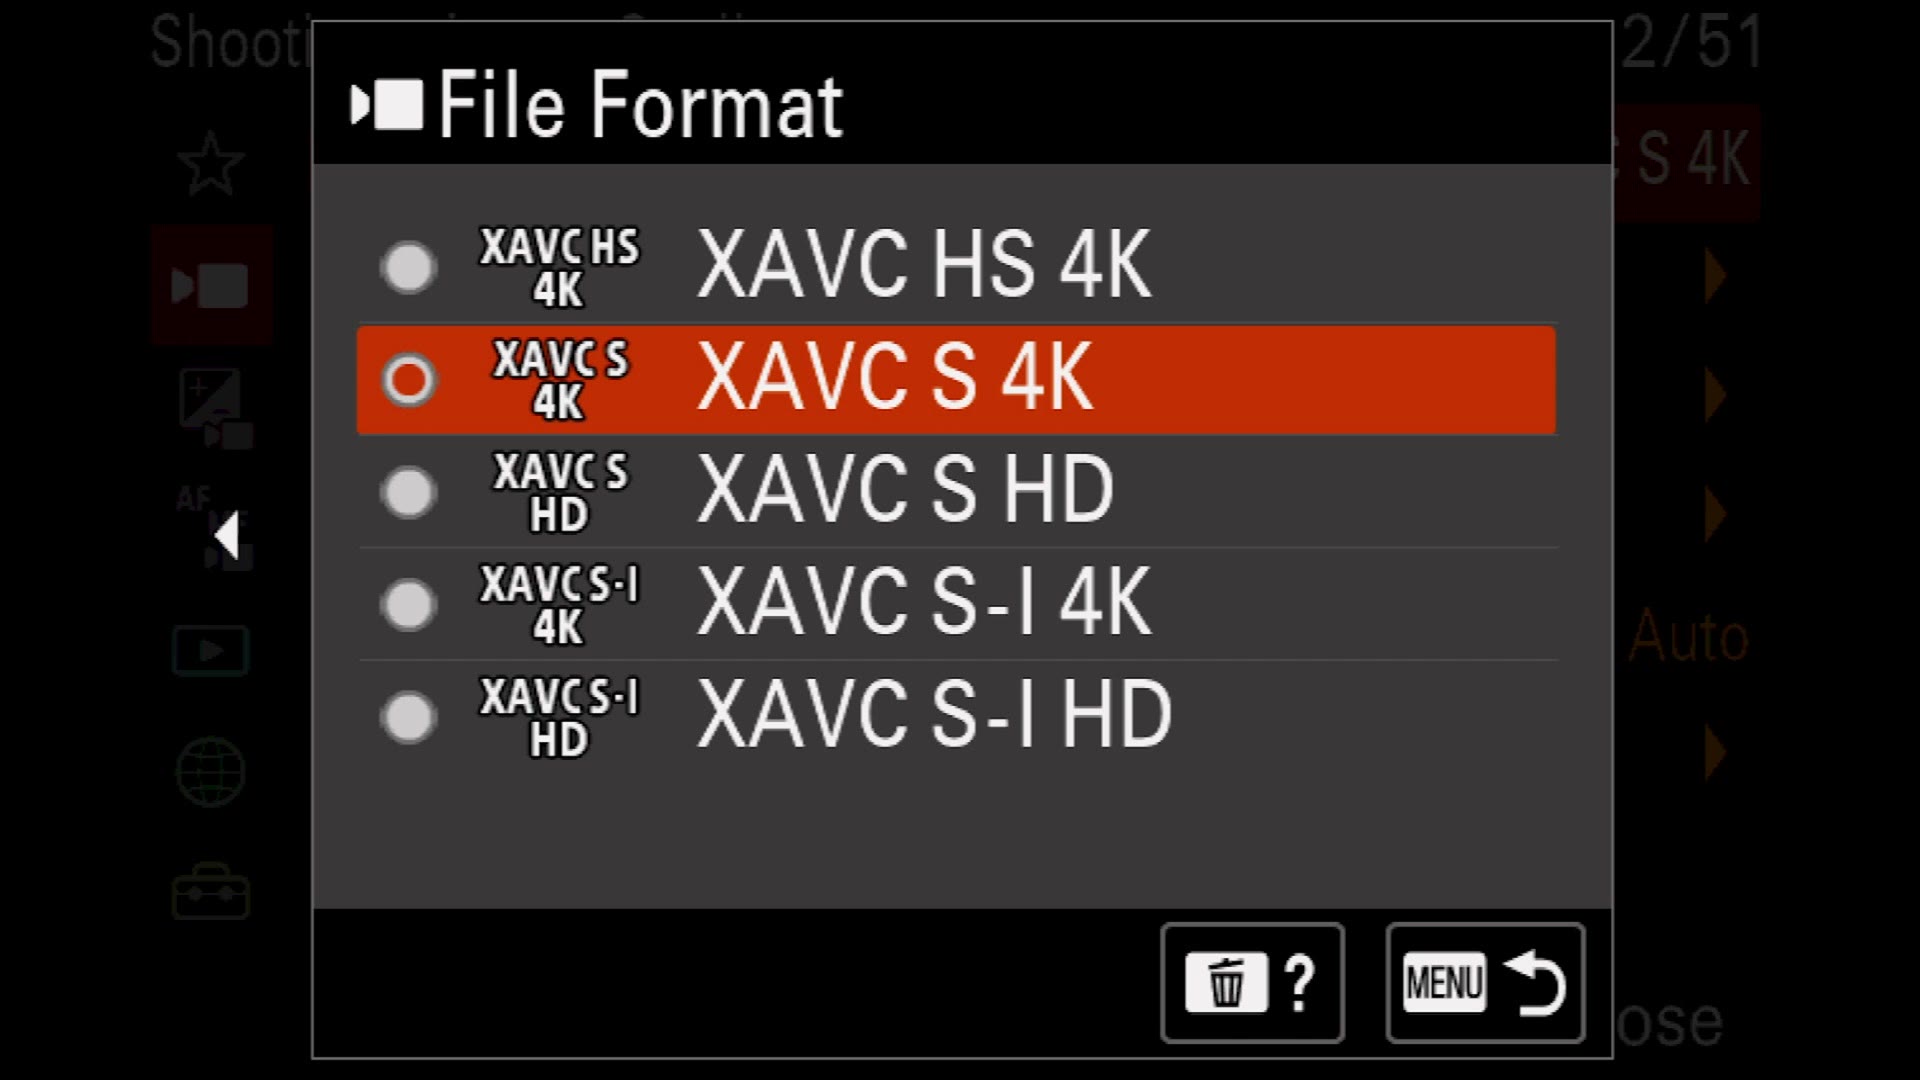
Go to Shooting, Image Quality, File Format, and make sure XAVC S 4K is selected.
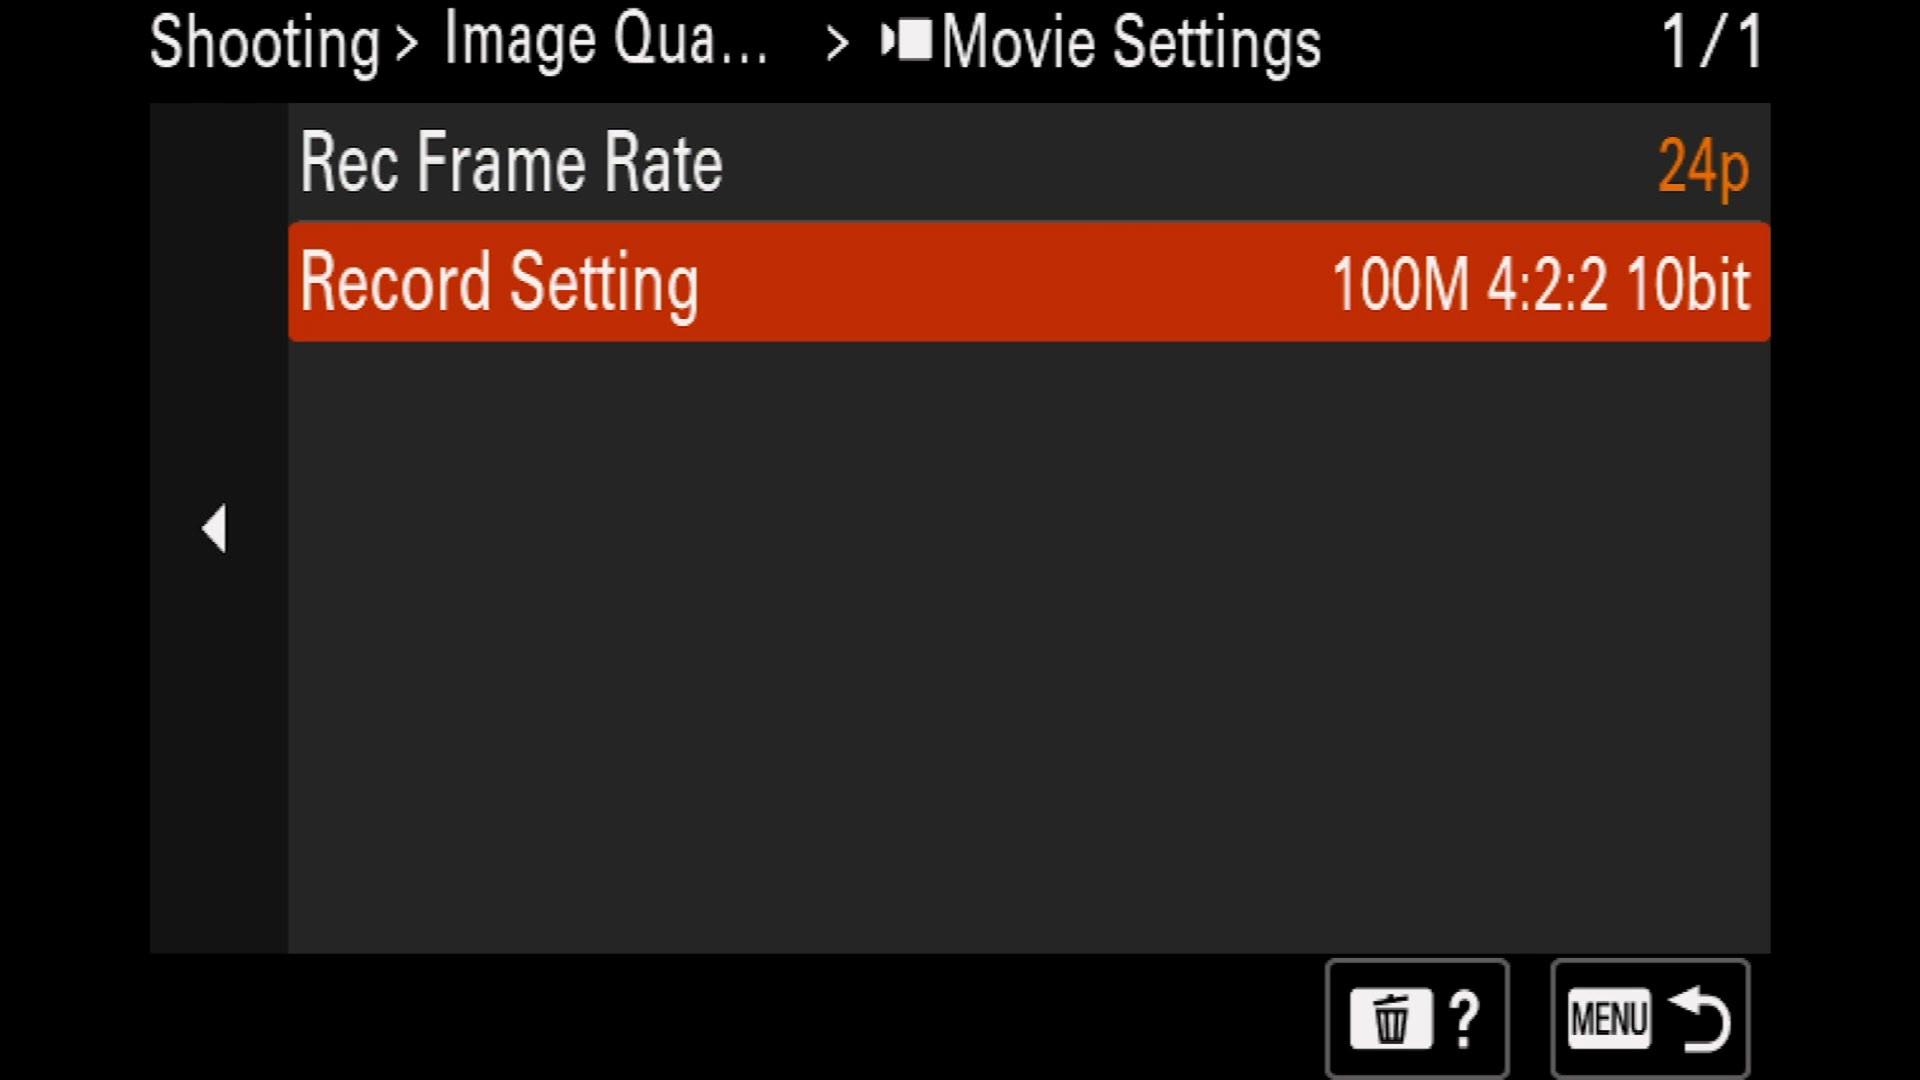
Then in Movie Settings, select 24p with the Record Setting at 100M 4:2:2 10bit.
Set your shutter speed to roughly double the frame rate, which is 1/50. Set your aperture wider, f/2.8 if your lens can do it. The lens I am using in the video only goes to f/4, so that is what you will see on screen, but the preset file I am giving you is set to f/2.8. For ISO, use the base ISO of S-Log3, which is 800.
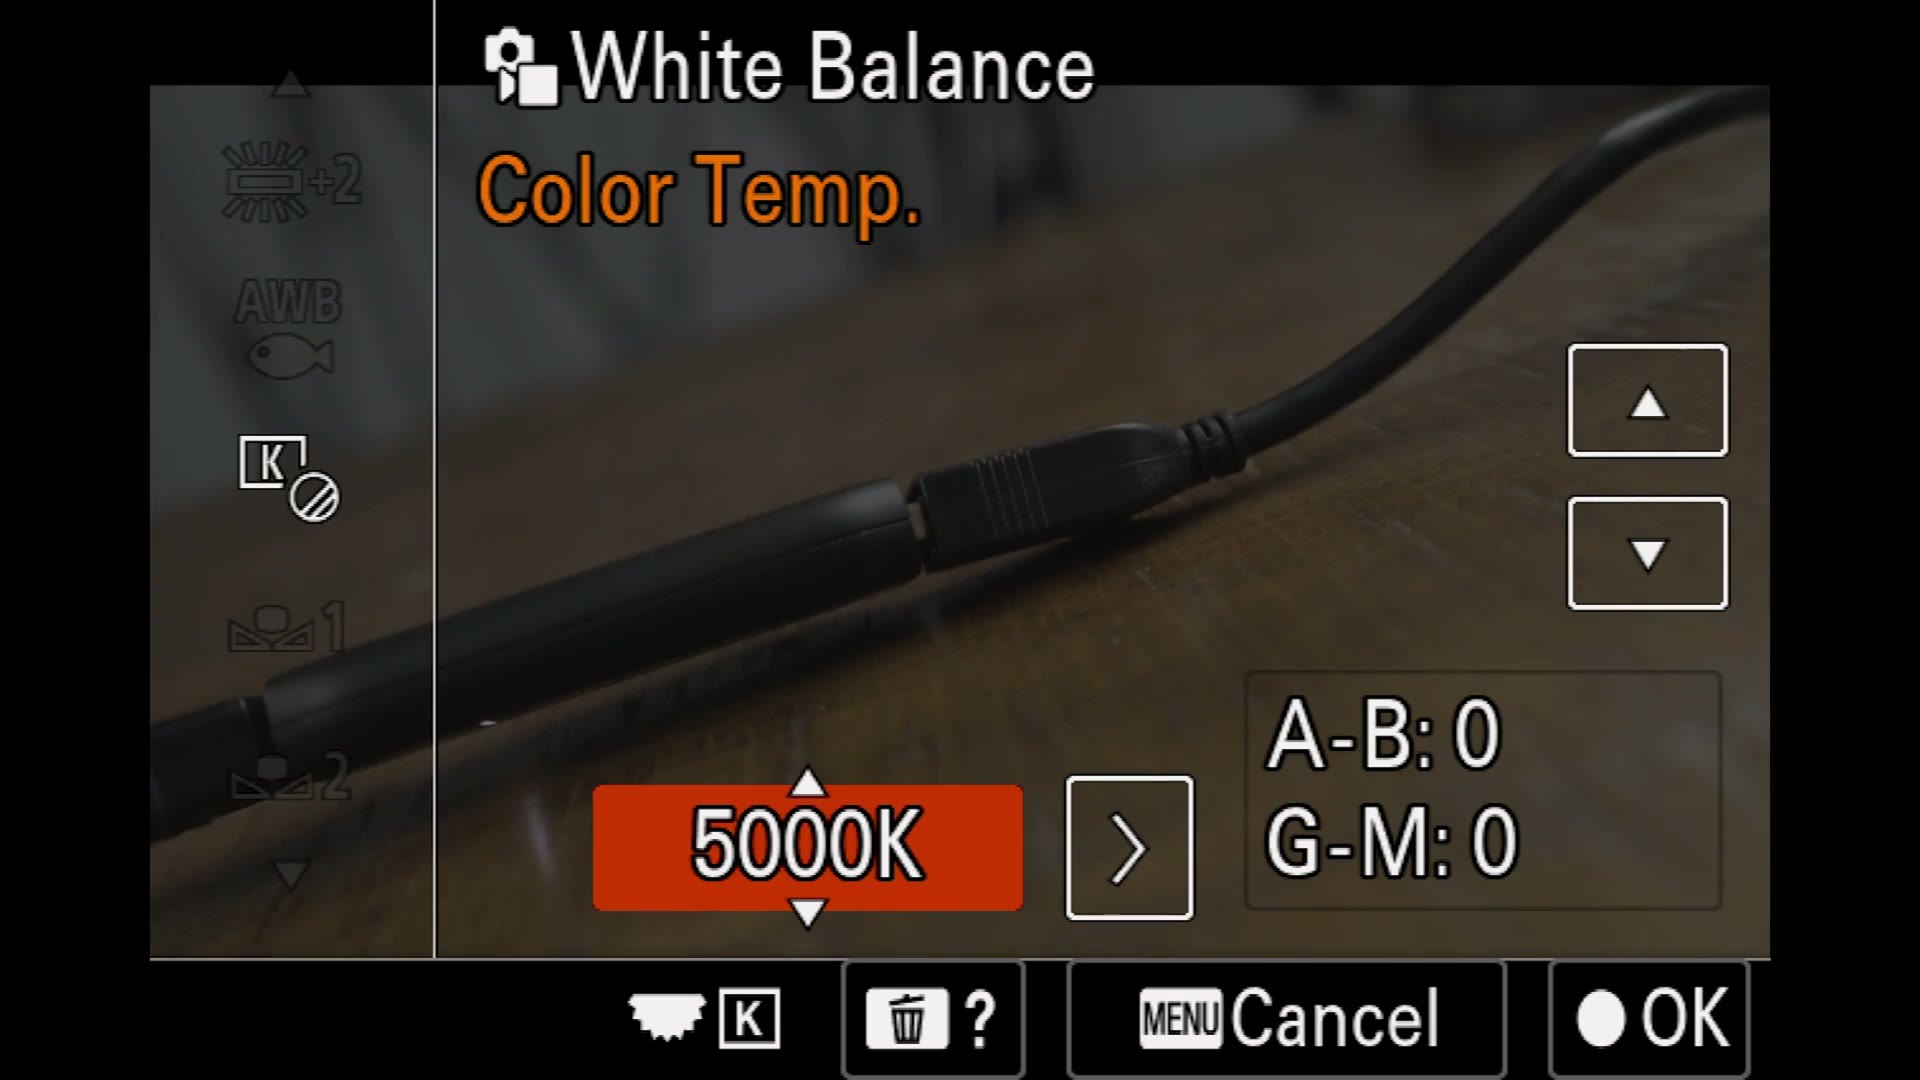
Then for white balance, which lives under the Exposure / Color menu, set it to 5000 Kelvin. 5000 is going to look great for anything outdoors or in daylight. You may need to tweak it indoors or under weird colored lighting, but it is a good place to live.
Finally, to save all of it, go to Shooting, Shooting Mode, Camera Set. Memory, and select preset 1.
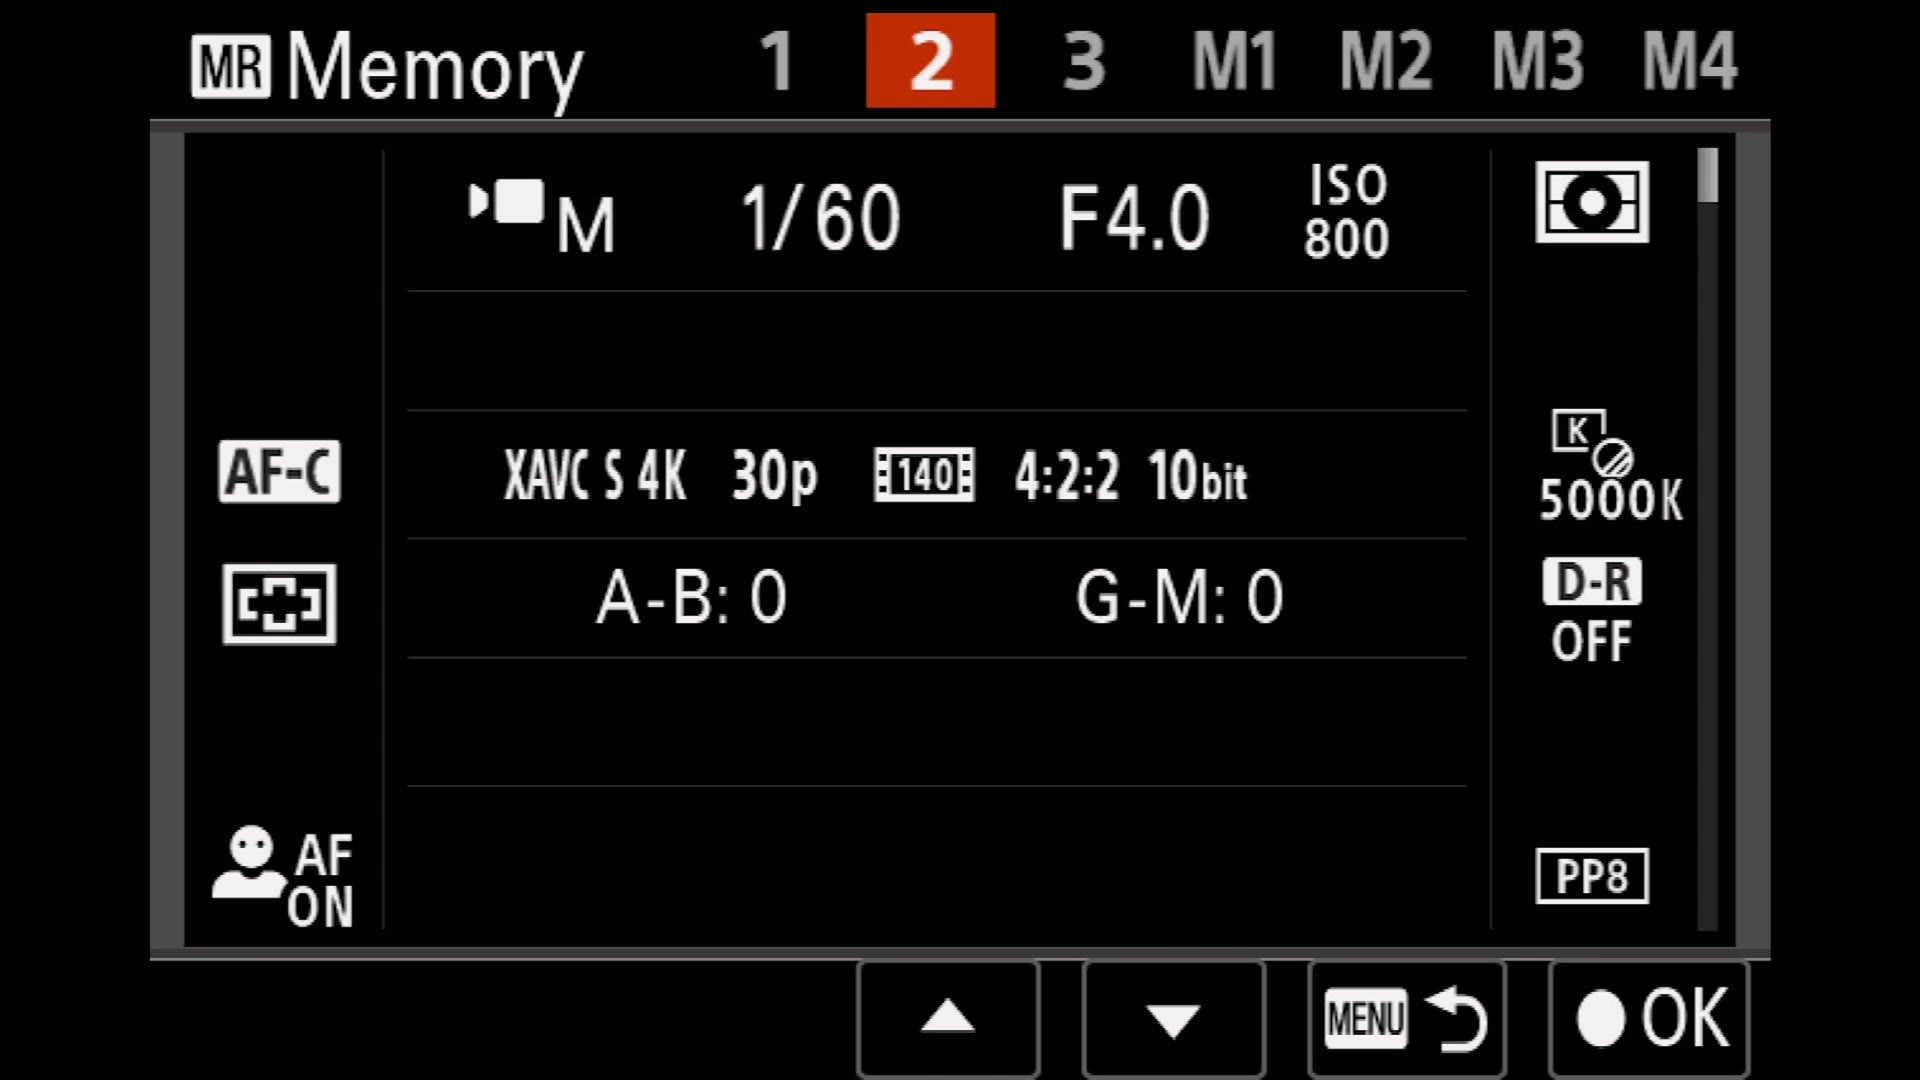
Now any time you want those settings, you flick the dial to 1 and you are in 24 frames per second with everything already dialed in.
Preset 2: 4K at 30 frames per second
Preset 2 is 4K at 30 frames per second, which is a little slower than 24 when you slow it down.
Quick note on why my ladder looks the way it does. On the a7S III I would set preset 2 to 60 frames per second and preset 3 to 120. But the a7 IV cannot do 120 frames per second at all, so on this camera the ladder is 24, 30, 60.
Leave File Format at XAVC S 4K, change the recording frame rate to 30p, and set Record Setting to 140M 4:2:2 10bit for the highest quality. Because this is 30 frames per second, change your shutter speed to 1/60. White balance, aperture and ISO are all already correct, so you can press menu, go back to Shooting Mode, Camera Set. Memory, and select preset 2.
Preset 3: 4K at 60 frames per second
This is the exciting one, because this is slow motion. Love it.
Keep File Format at XAVC S 4K, change Movie Settings to 60p, and set Record Setting to 200M 4:2:2 10bit. That gets you very high quality slow motion.
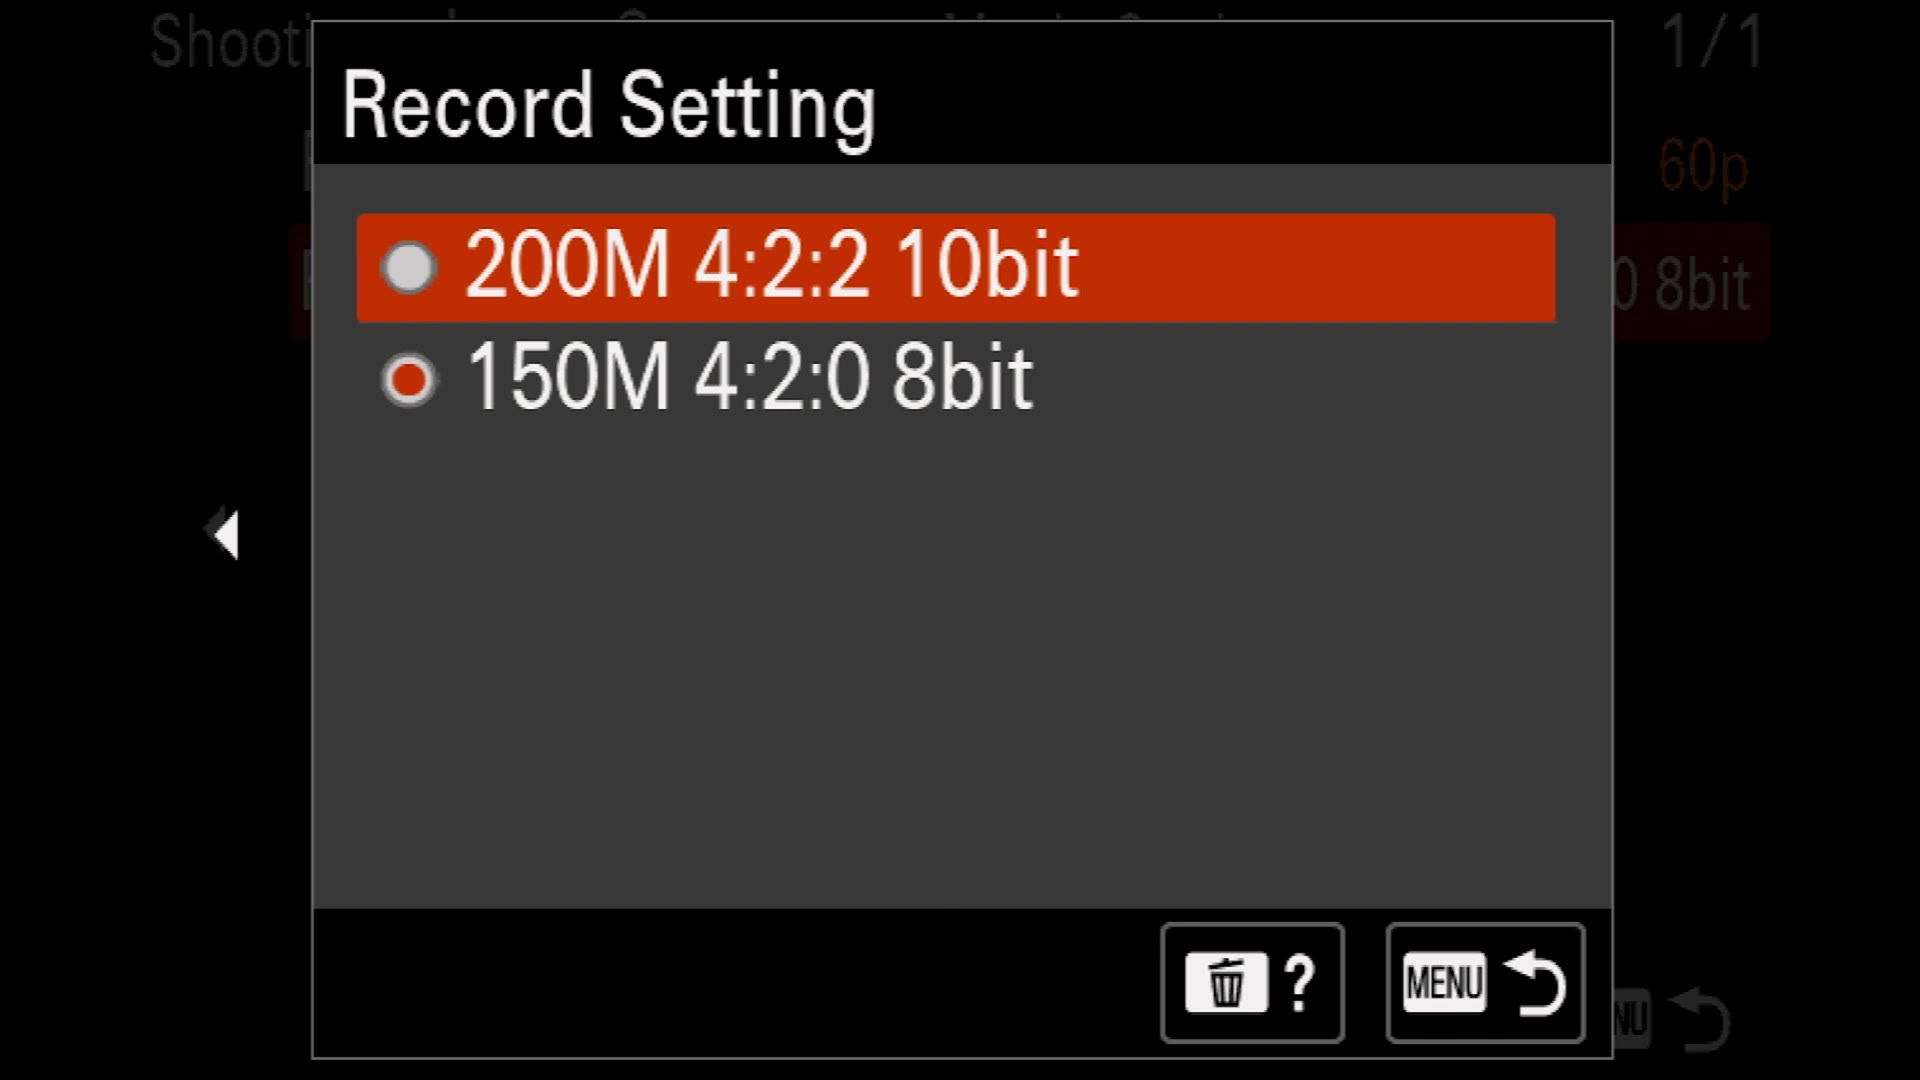
Back out to the main screen and set your shutter speed to 1/125, which is roughly double 60. Everything else is fine. Press menu, Shooting Mode, Camera Set. Memory, select preset 3.
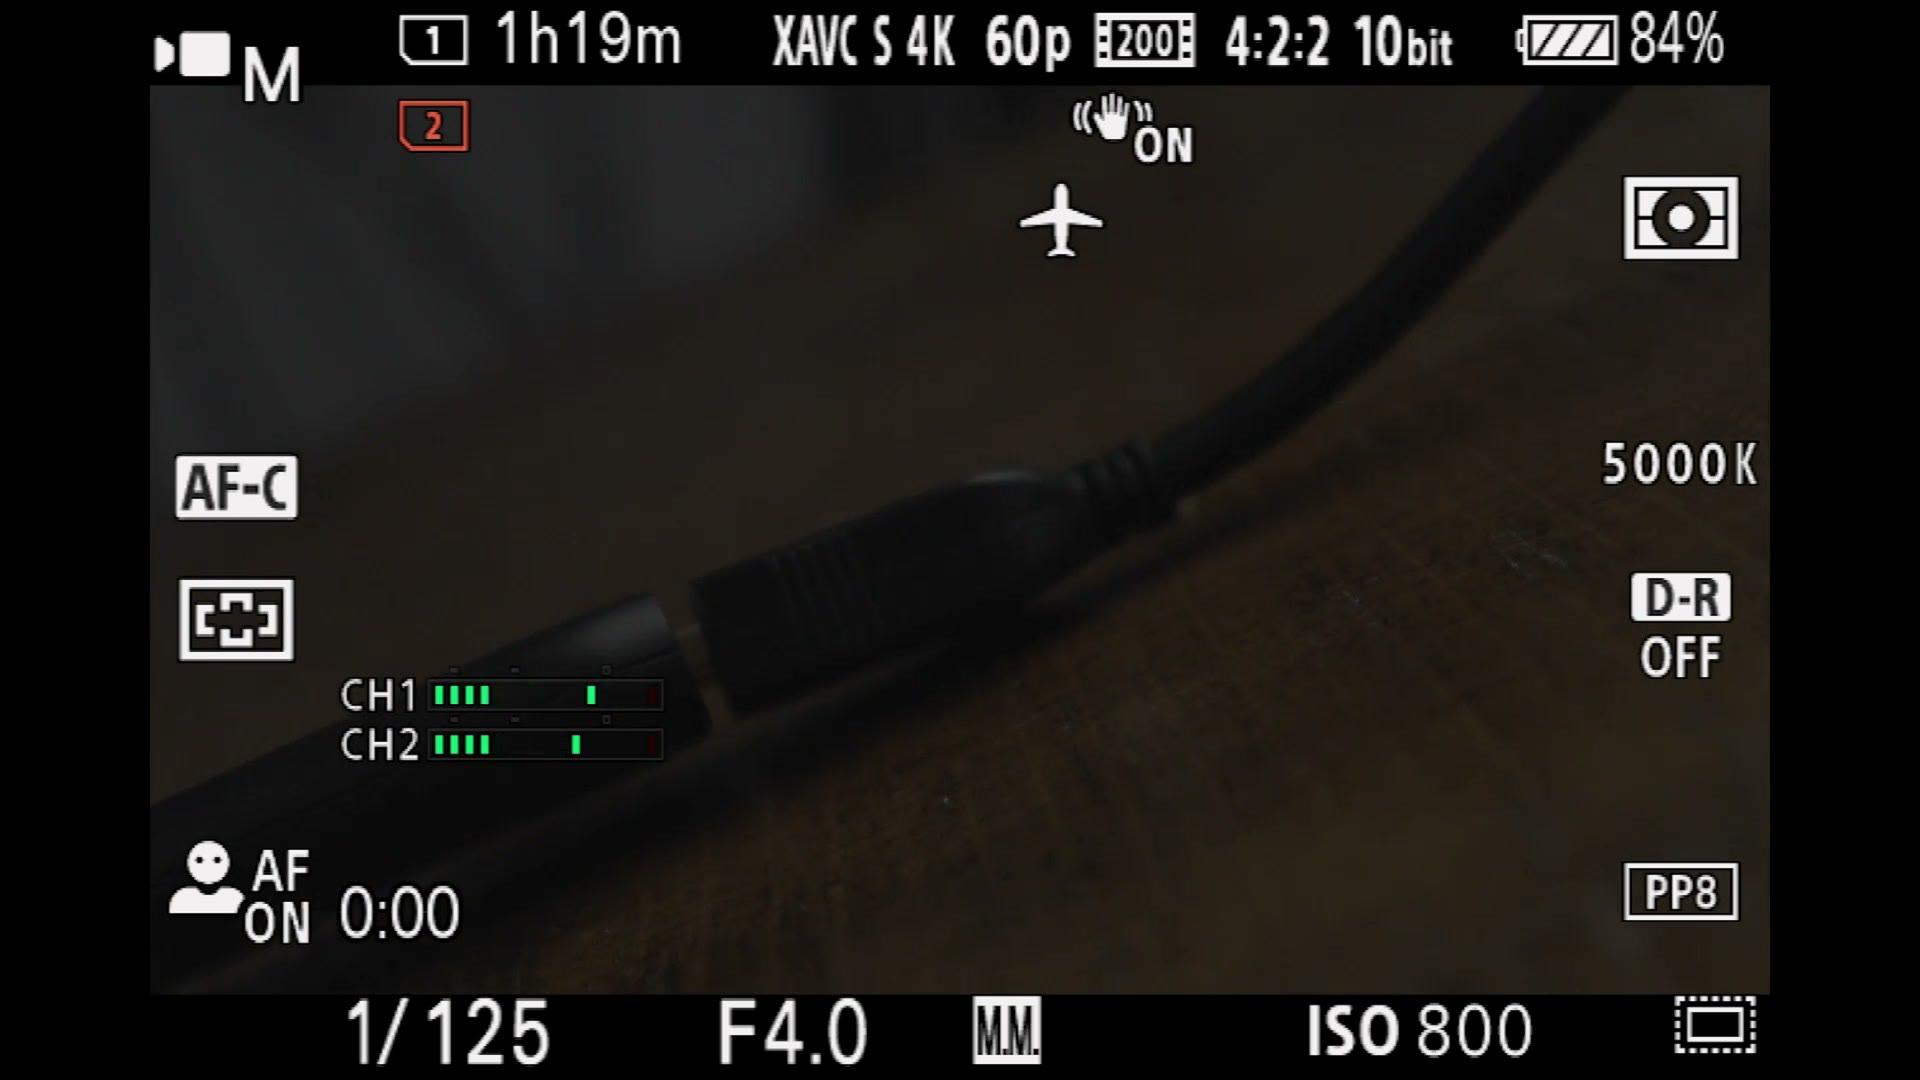
And that is every frame rate this camera can film at, sitting on the dial. Mode 1 is 24, mode 2 is 30, mode 3 is 60. This makes filming so fast and easy.
Custom Buttons Setup
These are what people usually mean when they talk about customizing a Sony. The camera is covered in buttons labeled C1, C2, C3, where the C stands for custom. What is cool is that basically every button and dial on this camera is customizable, not just the ones with a C on them.
That said, I would not go changing a button that is already labeled for something too far from what it says on the label, because then if you borrow a friend’s camera or hand yours to a second shooter, using it becomes a major pain. So we are not going completely crazy here. We are making some really nice tweaks.
Open the menu and go to Setup, Operation Customize, and you will find Custom Key/Dial Set. for both photo mode and video mode.
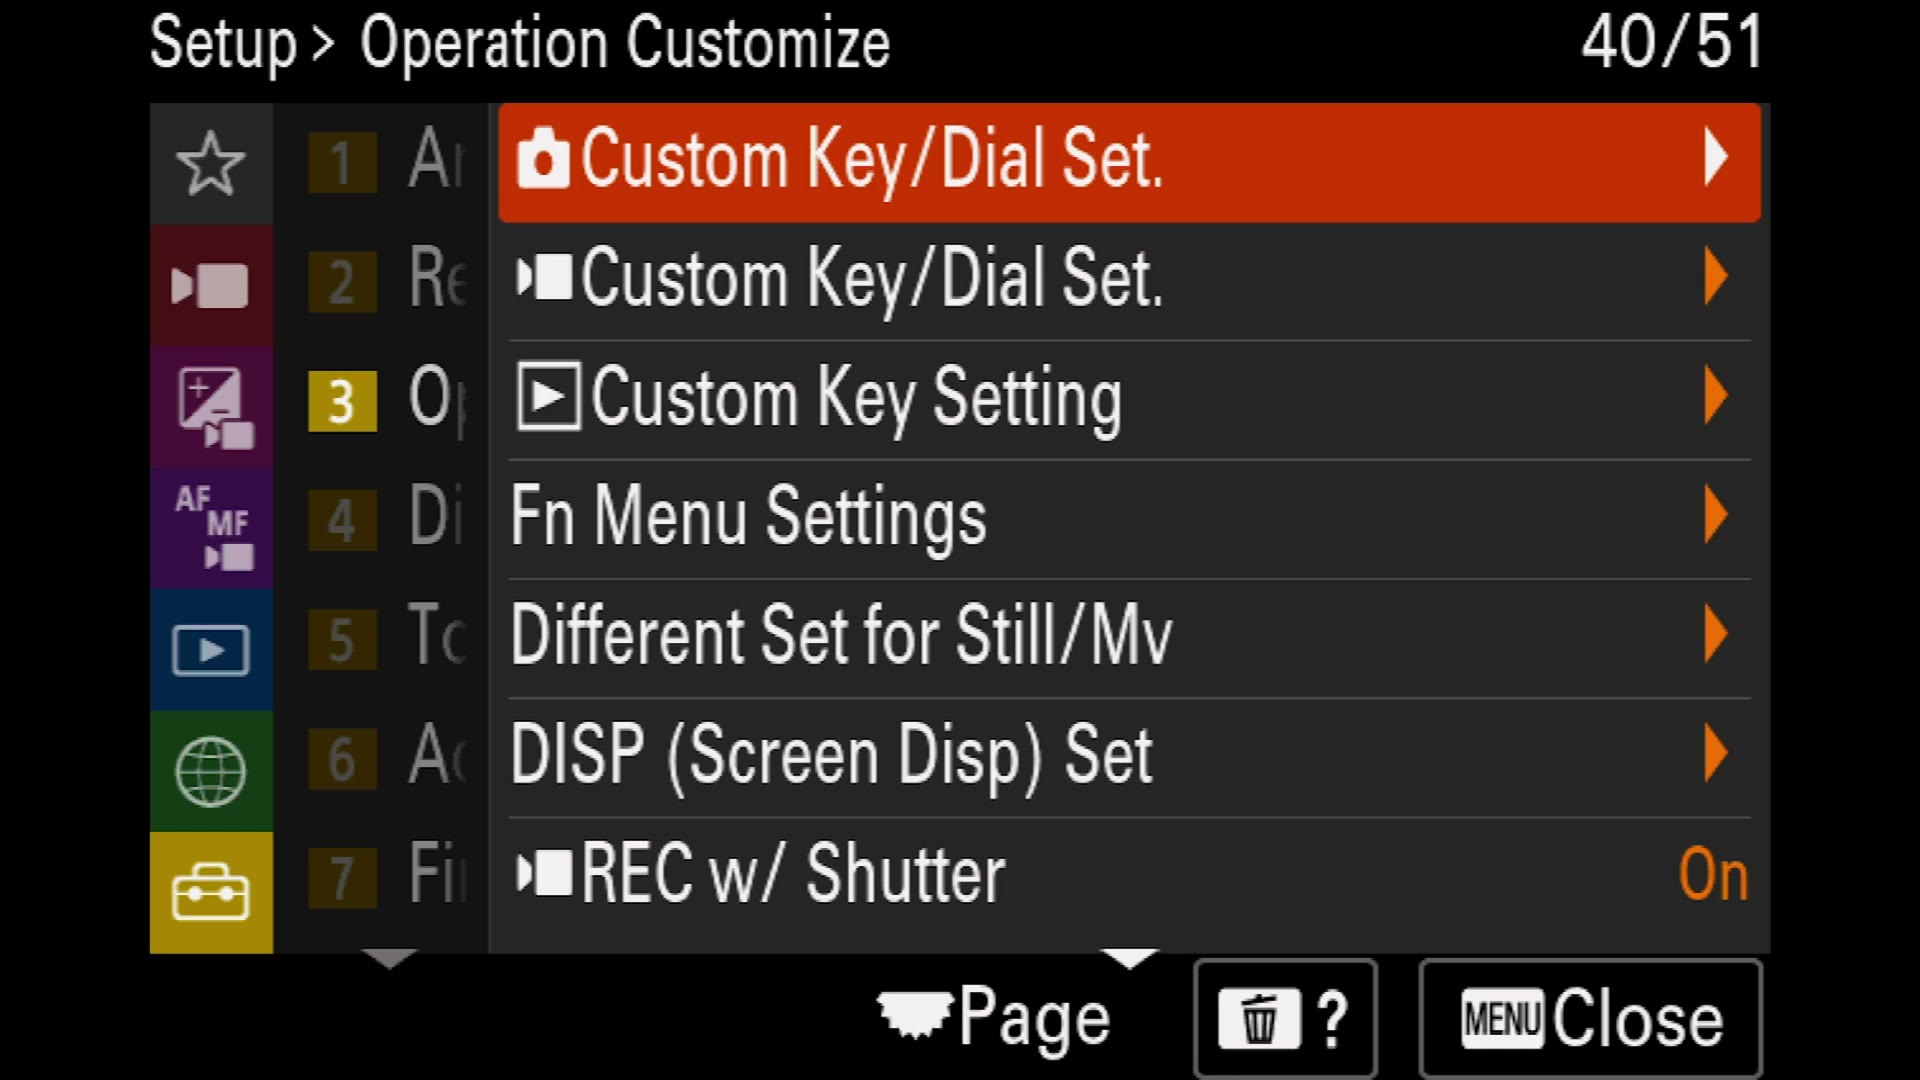
Here is a thing worth understanding. If you open the video mode list, everything says “Follow Custom”, meaning video mode is inheriting all its buttons from photo mode. So if you are using the a7 IV as a video camera, you can customize the photo buttons and they apply to video too. That is what we are doing, because it means there is no weird overlap between the two and everything stays consistent.
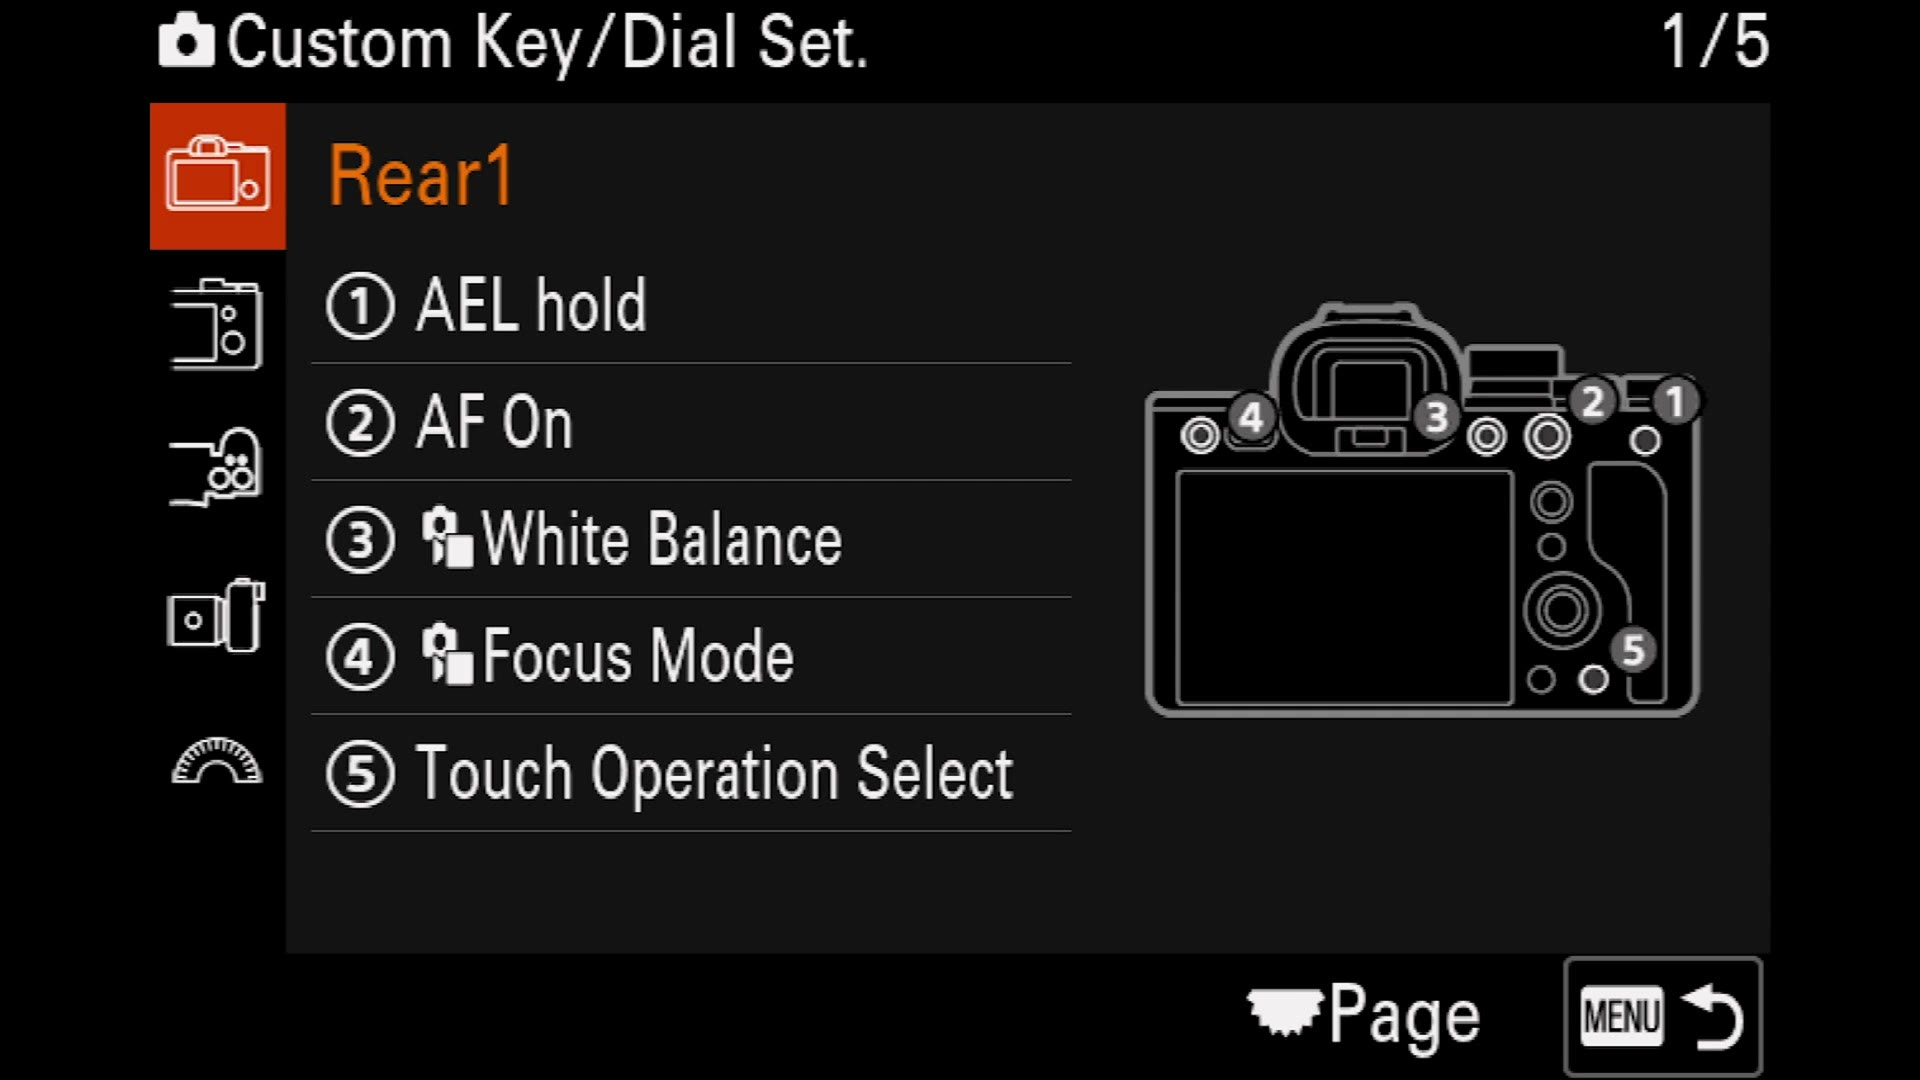
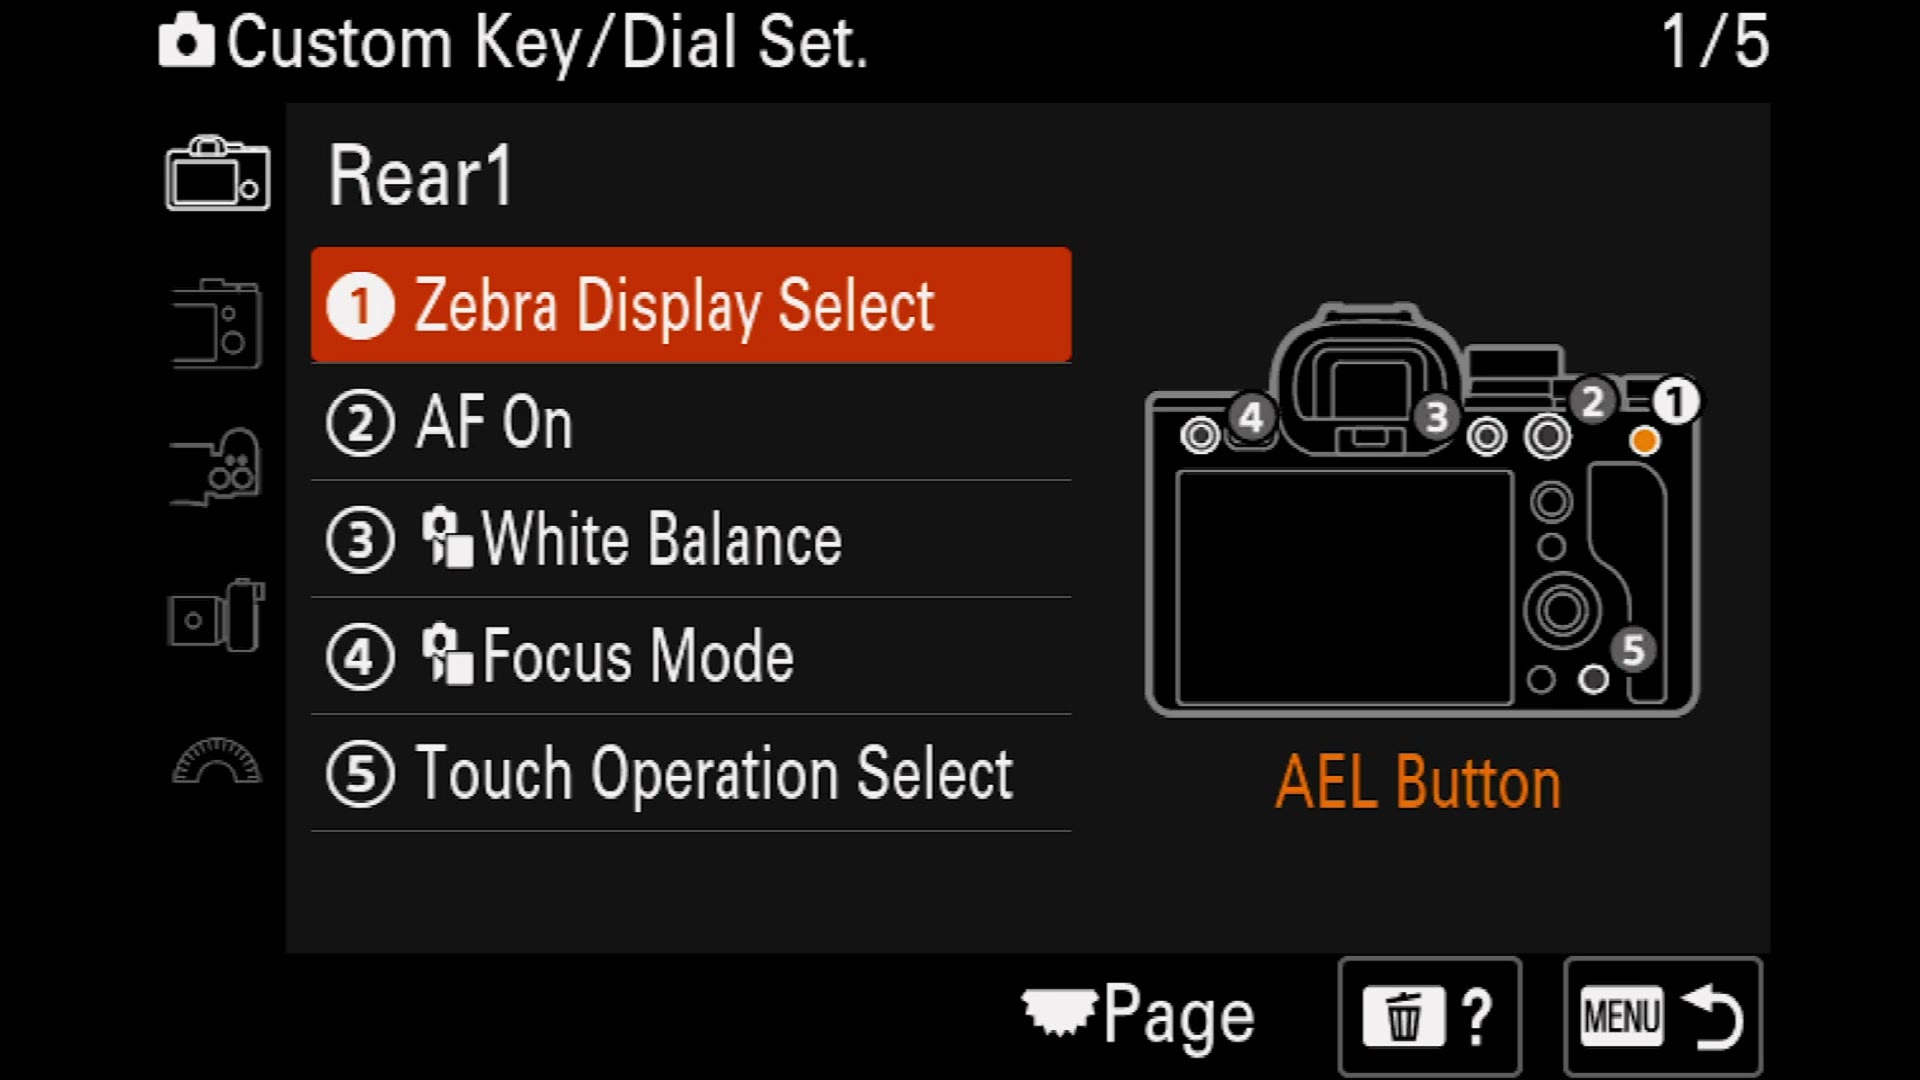
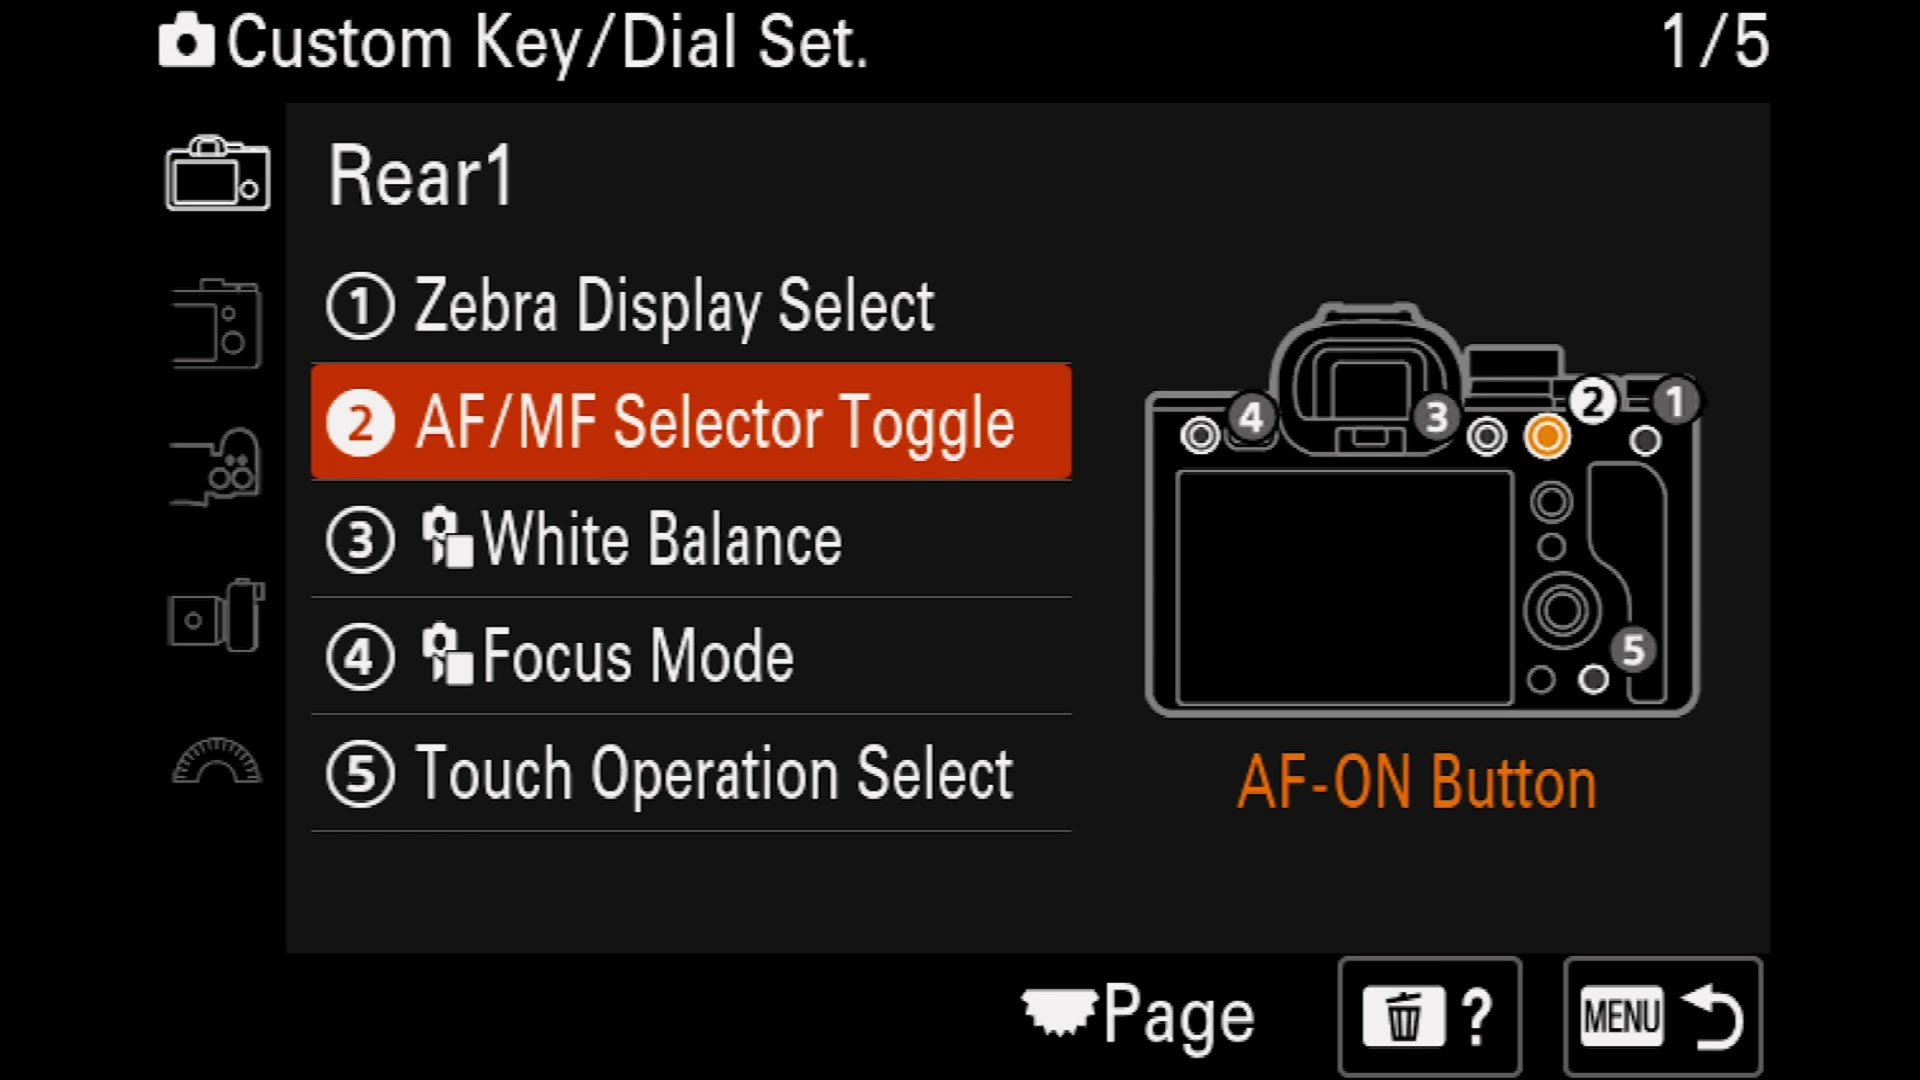
A nice touch: as you scroll through, the camera shows you a picture of the body on the right with the exact button you are editing highlighted, so you never have to guess which one is which.
Rear 1
Button 1, the AEL button. Instead of AEL hold, change this to Zebra Display Select. This lets you instantly toggle zebras on and off so you can check whether any part of your shot is blown out. I love this one.
Button 2, the AF-ON button. By default you hold this down to turn autofocus on and off. I set it to a toggle instead. Go to AF/MF and select AF/MF Selector Toggle. Now one press flips between autofocus and manual focus, which is great whenever the autofocus starts getting squirrely and you need to say no, I know what I want you to focus on.
Button 3, C1. This is set to white balance and you can absolutely leave it there. Alternatively, if you are coming from the a7 III, you can set C1 to Record so the camera feels more like what your hands already know. If you do that, just remember to change the red record button on the a7 IV to be your white balance button, so you still have a way to get to it.
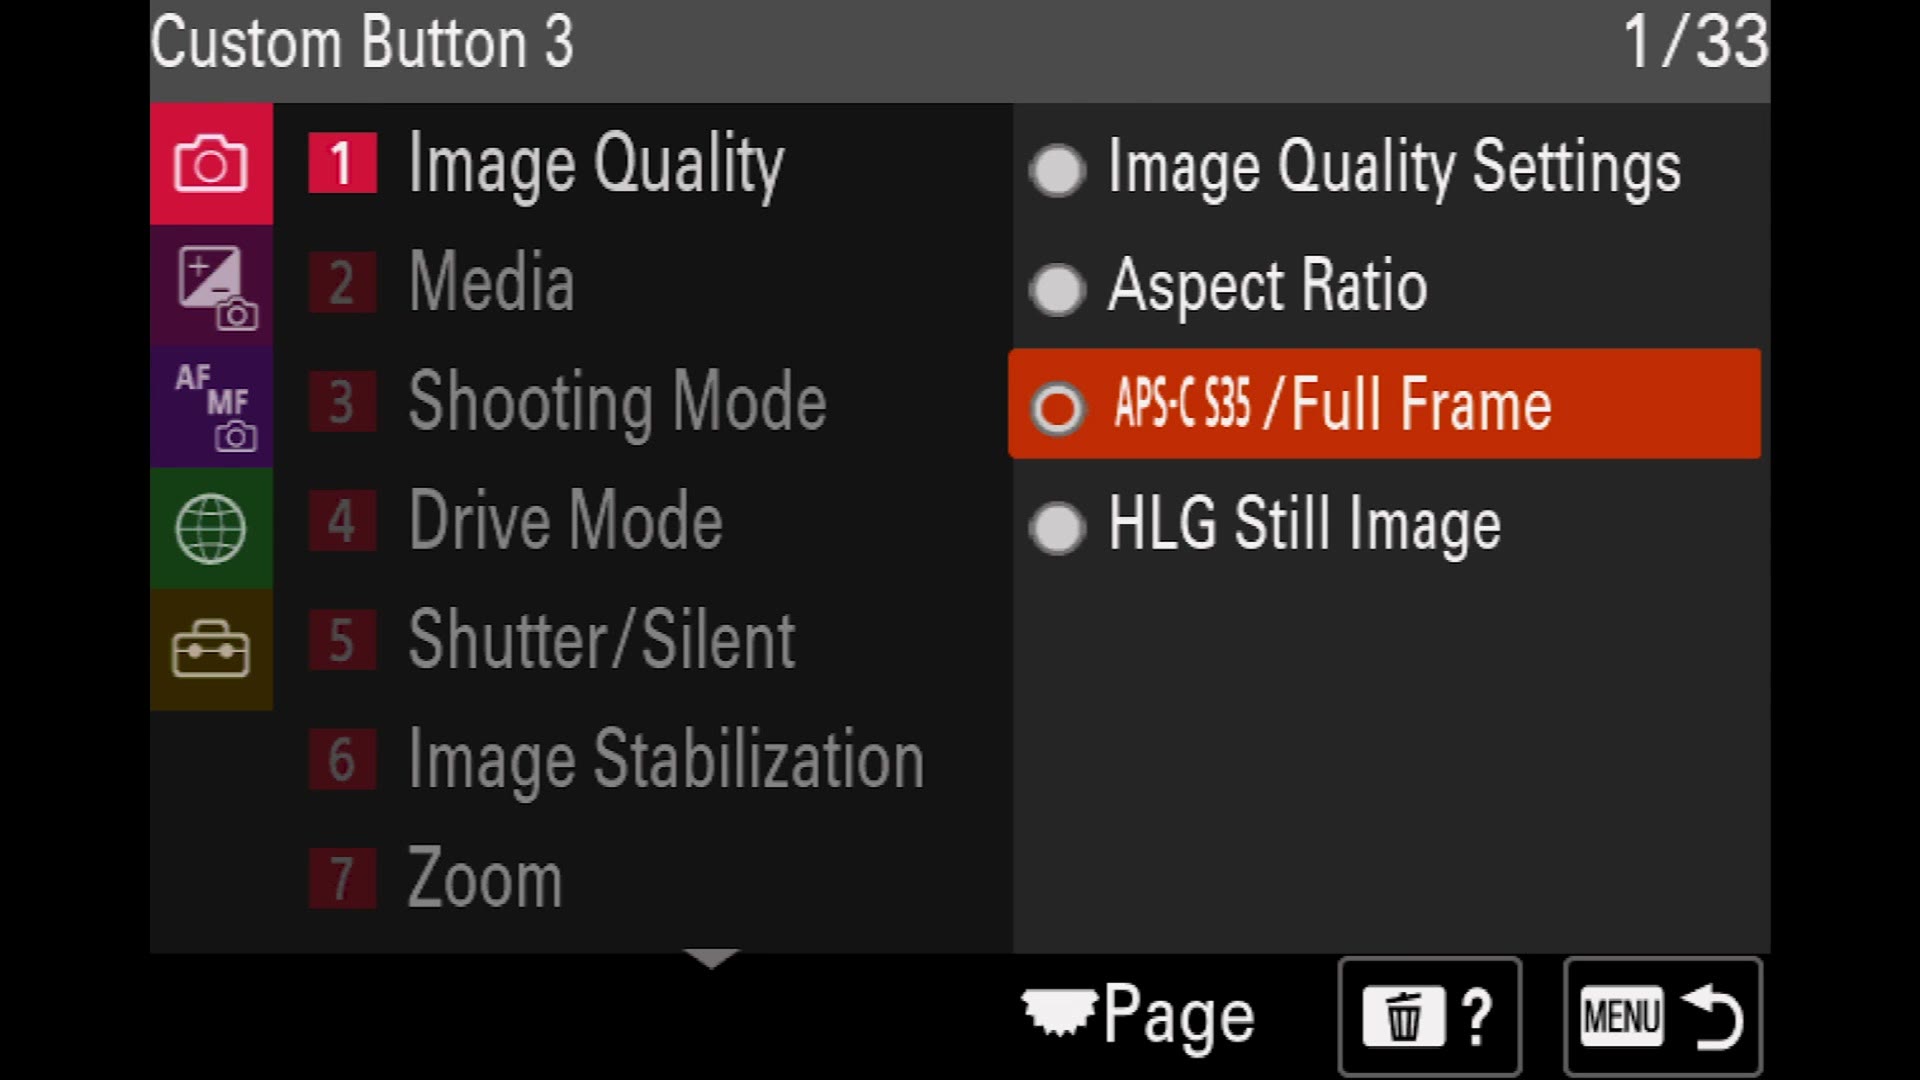
Button 4, C3. This one is super cool. Change it to APS-C S35 / Full Frame, which lets you jump between full frame and cropped Super 35 with one button press. You can zoom in and out instantly. It is a magical one button press.
Button 5, the trash can, which is also C4. Change this to Zoom. Because in the previous video you set Zoom to Clear Image Zoom in the menu, C4 now zooms in and out on the sensor.
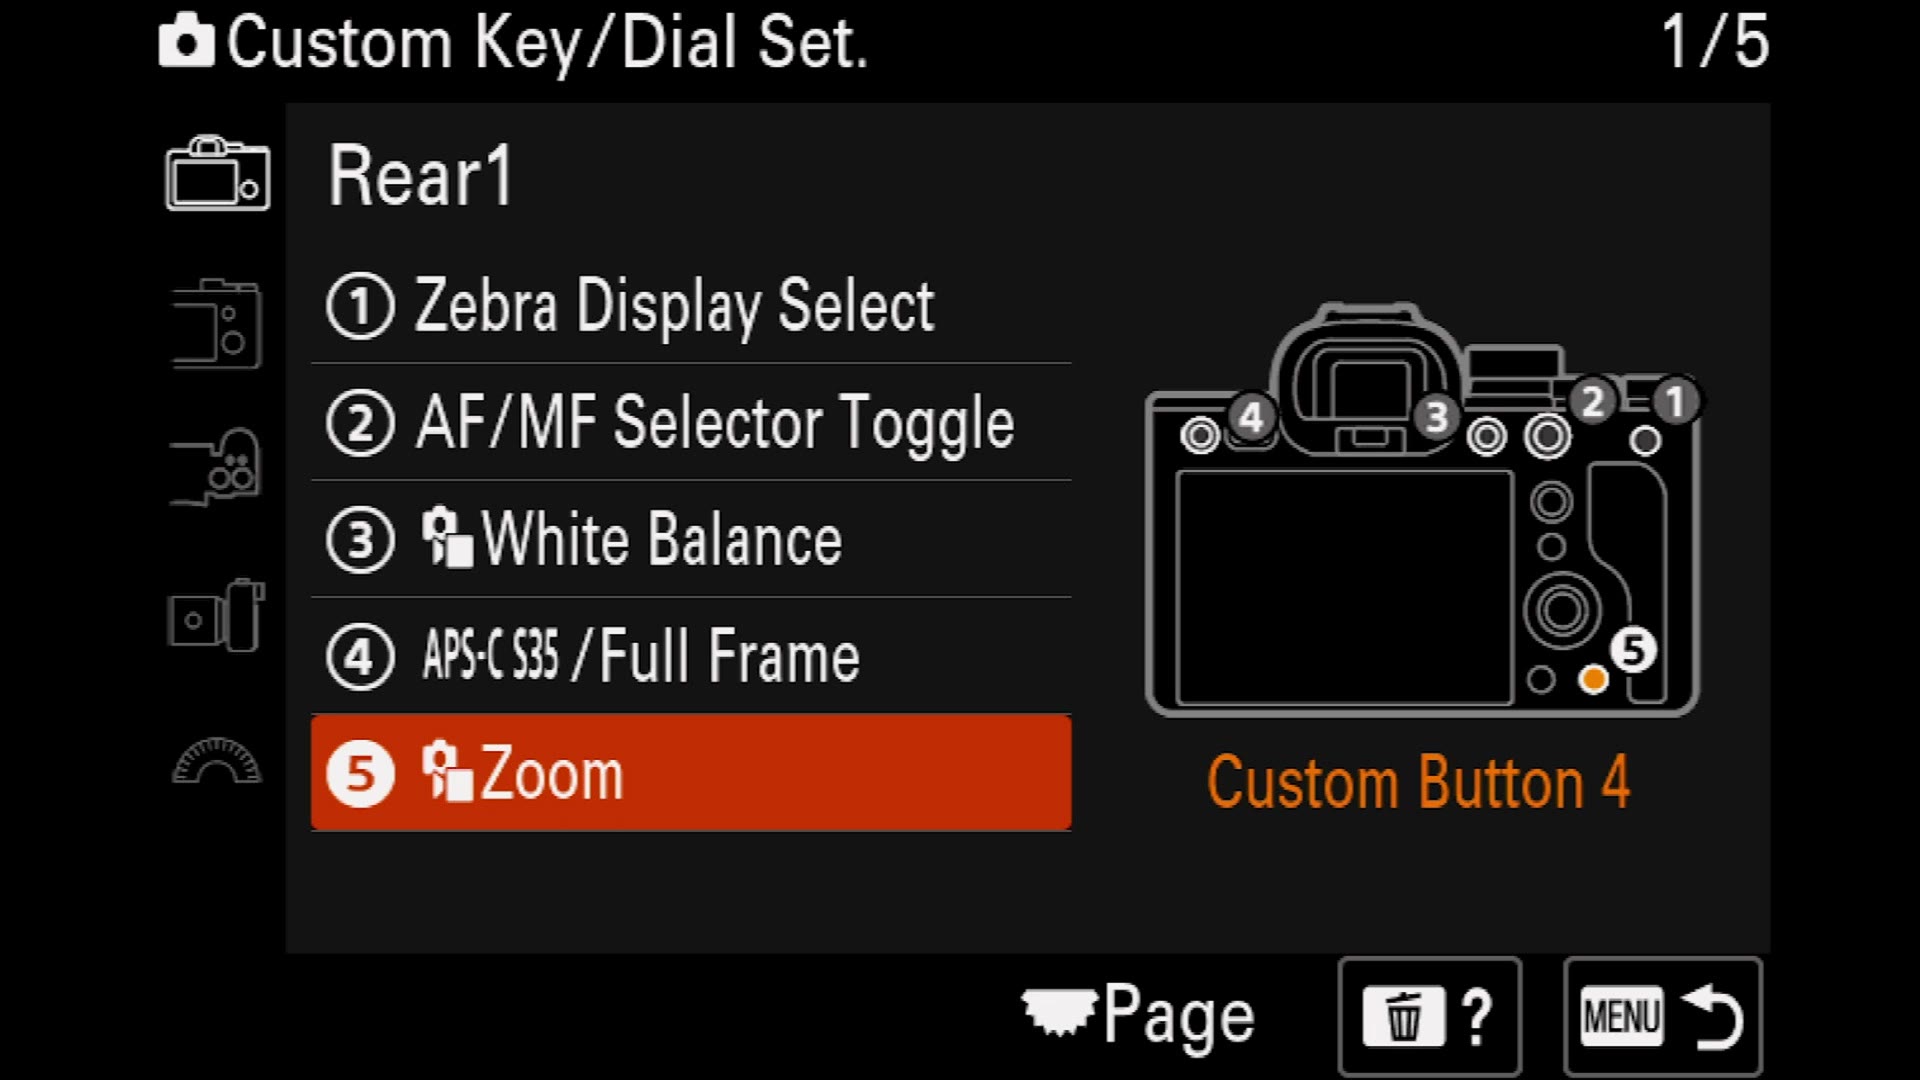
And you can do this in conjunction with the APS-C crop mode, which is pretty magical. Crop in, then zoom in even further, another 1.5 times.
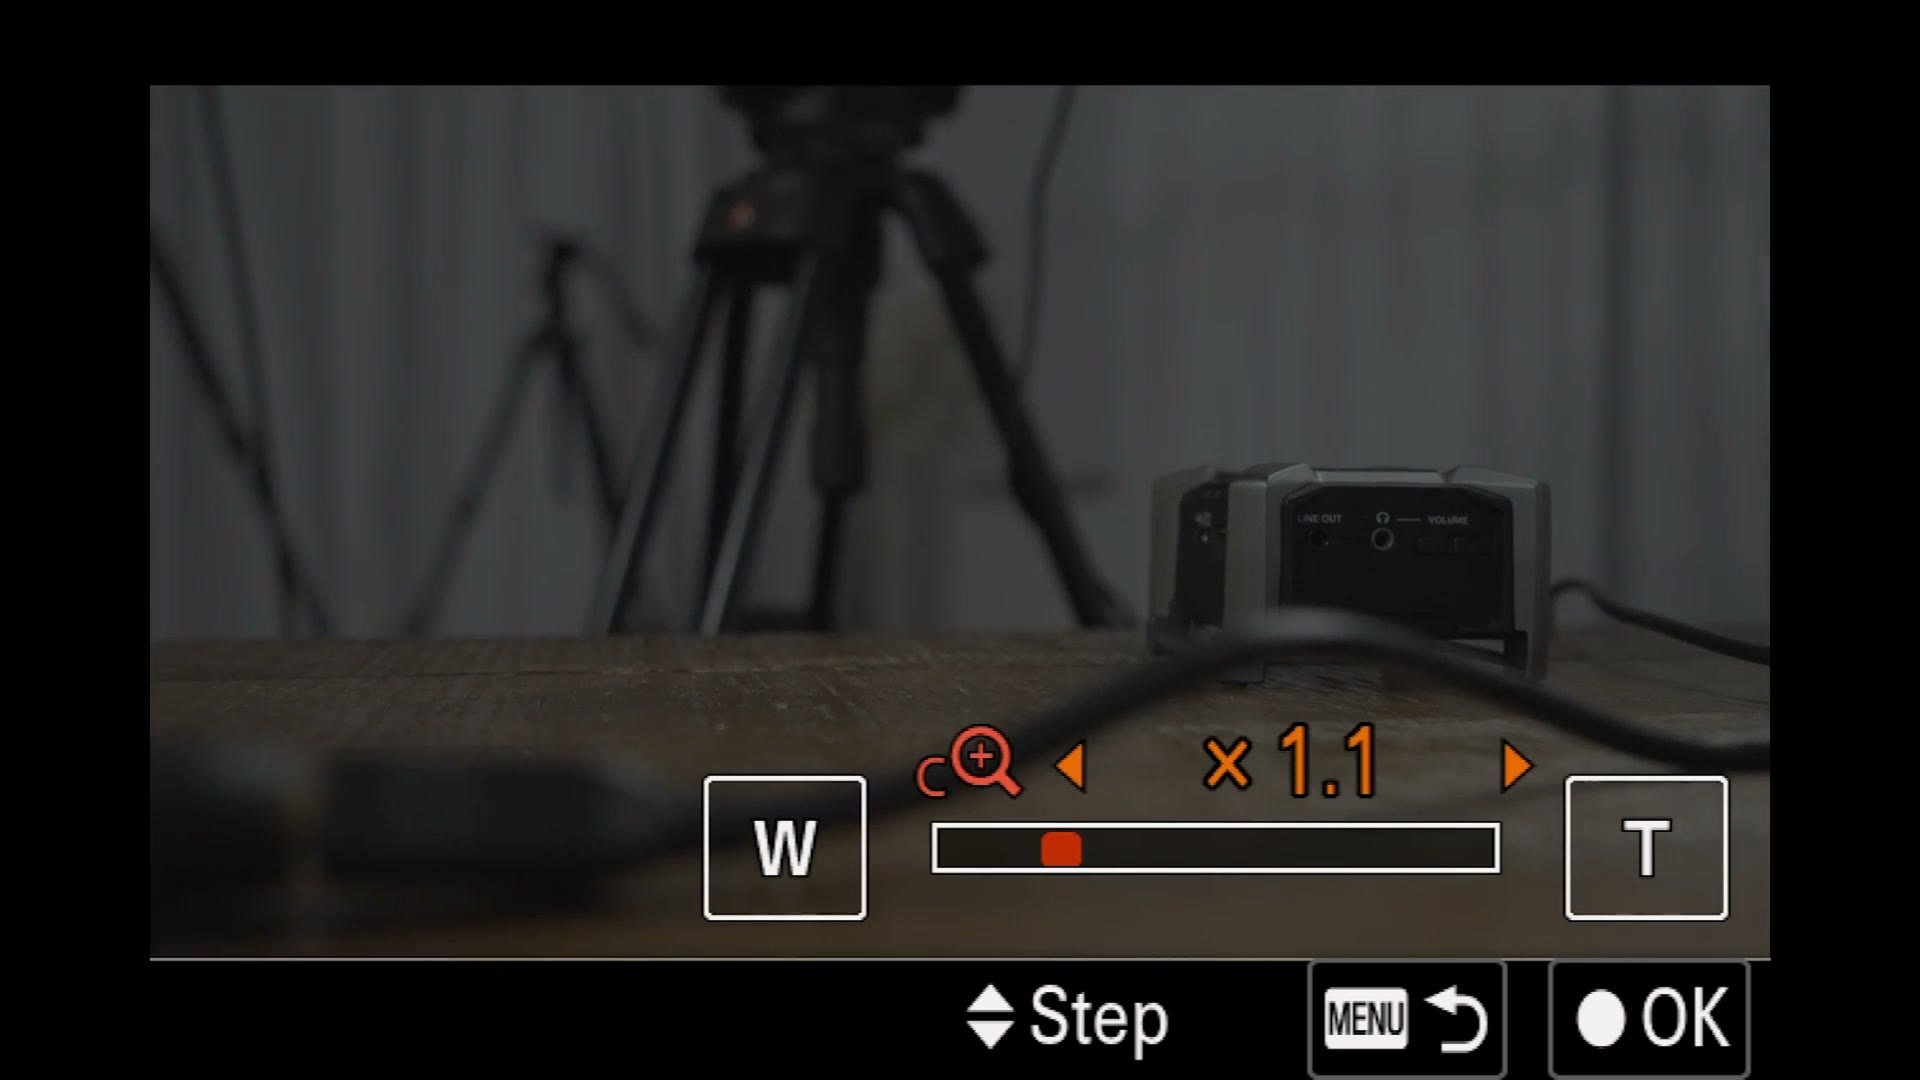
Rear 2
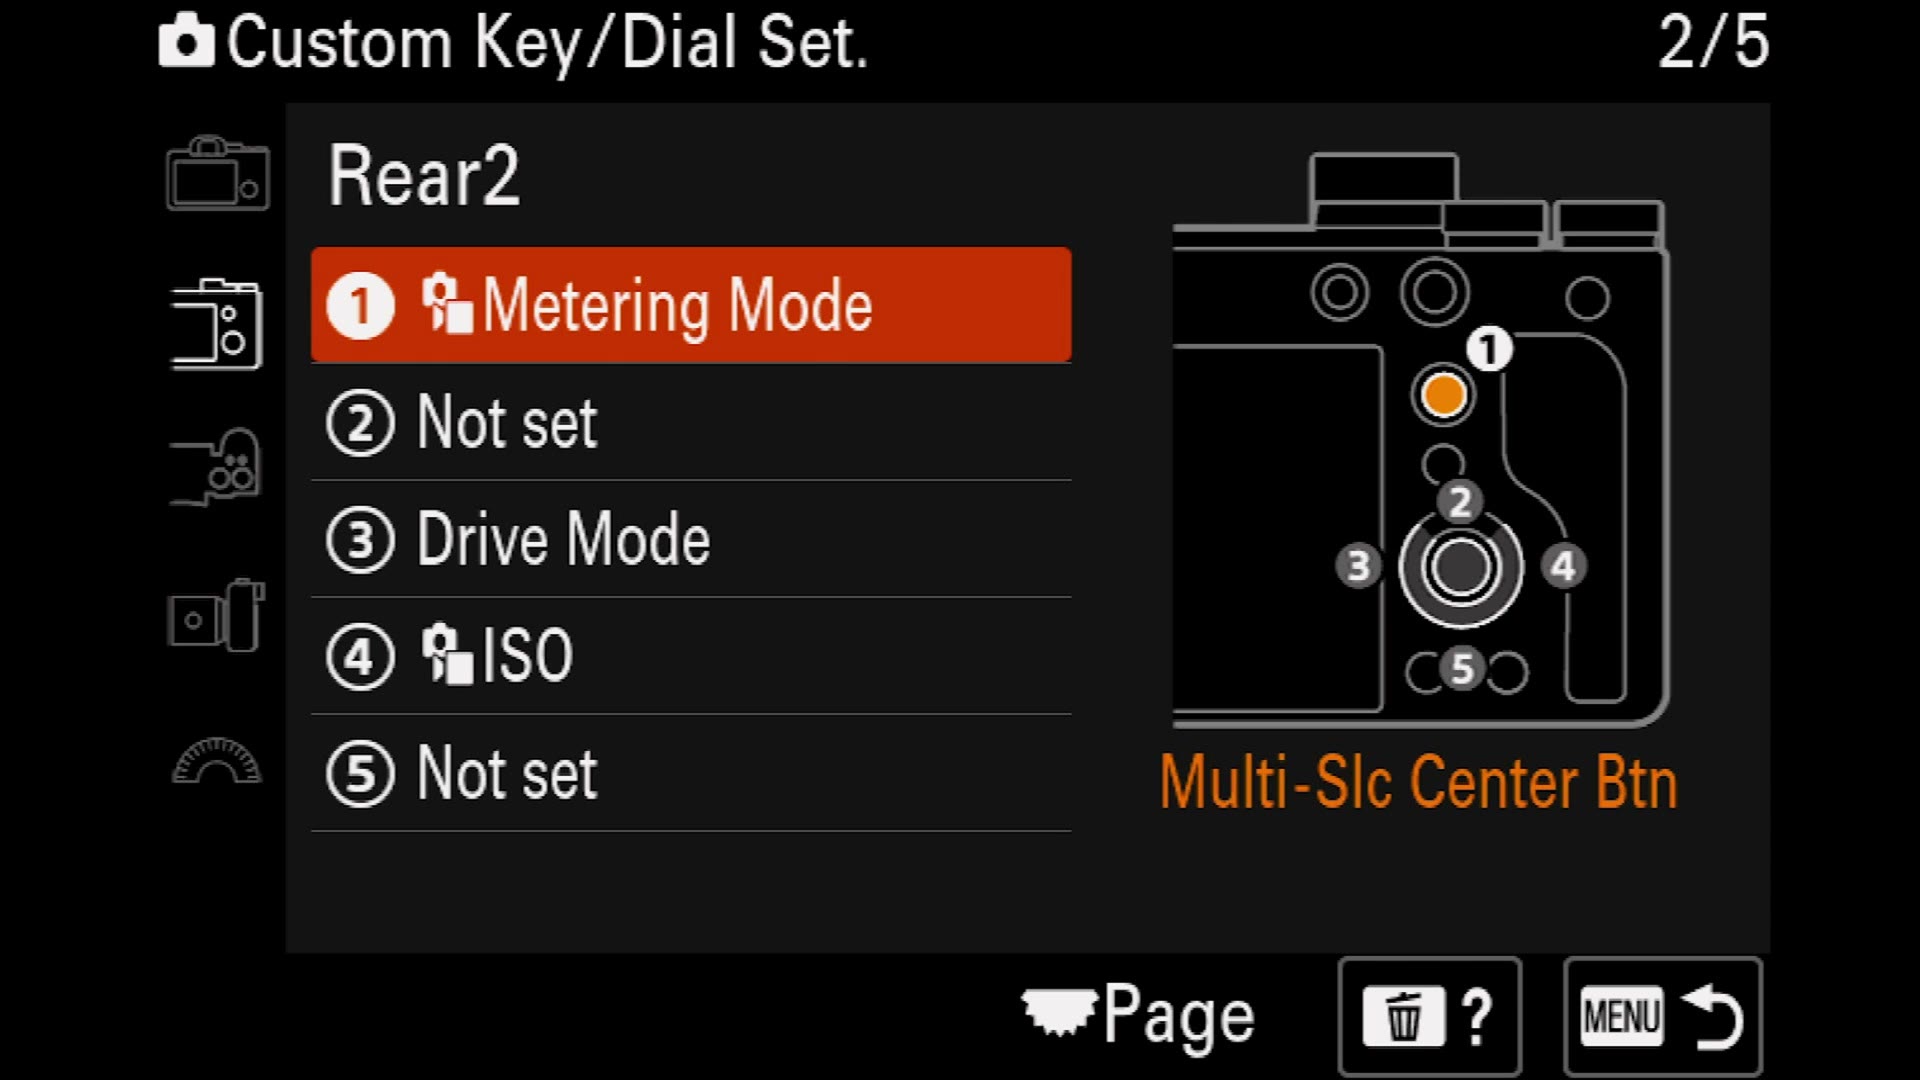
Button 1, the control joystick. Change this to Metering Mode, which lets you flip between multi and spot metering and double check your exposure without digging.
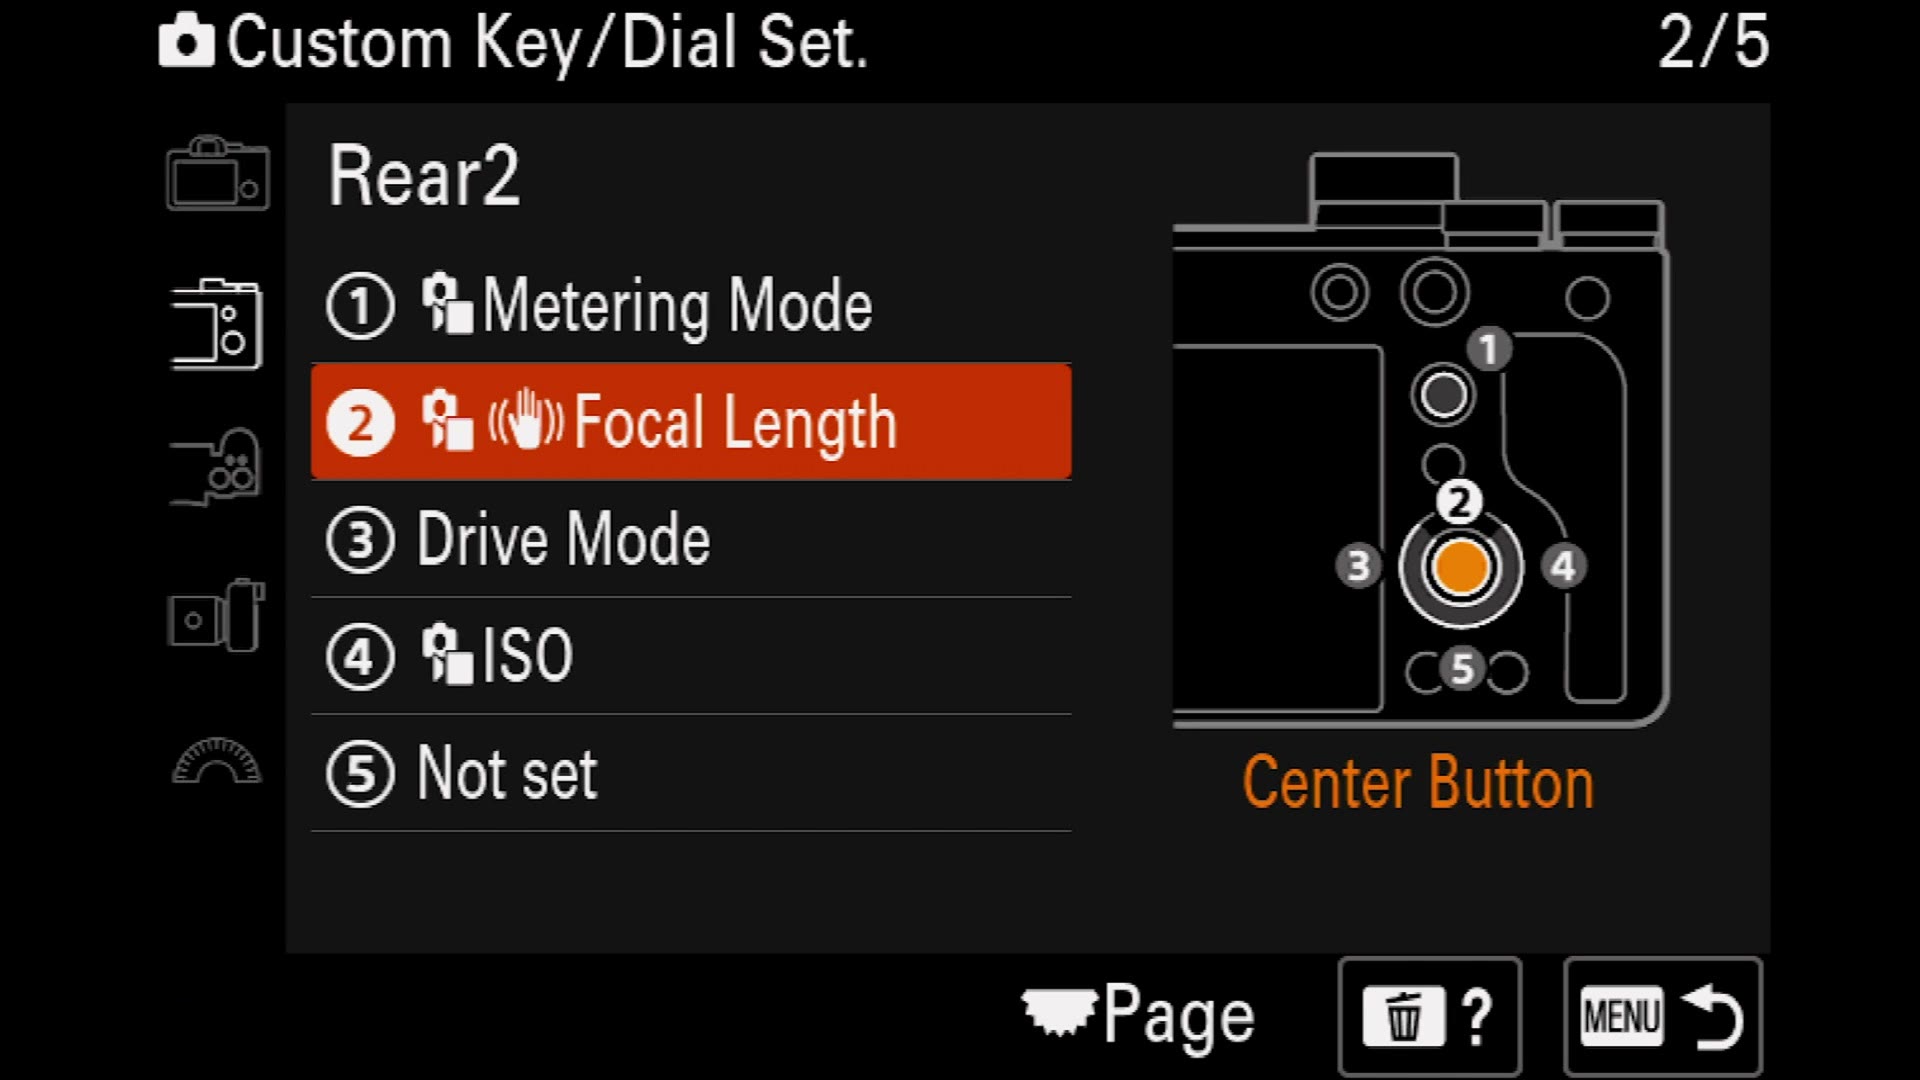
Button 2, the center button, which is not set by default. Set it to Focal Length. This is a good one. If you are filming with a manual lens, you press the center button and tell the camera the focal length of what is mounted, so the IBIS matches the lens and your footage comes out smooth and stable instead of swimming around.
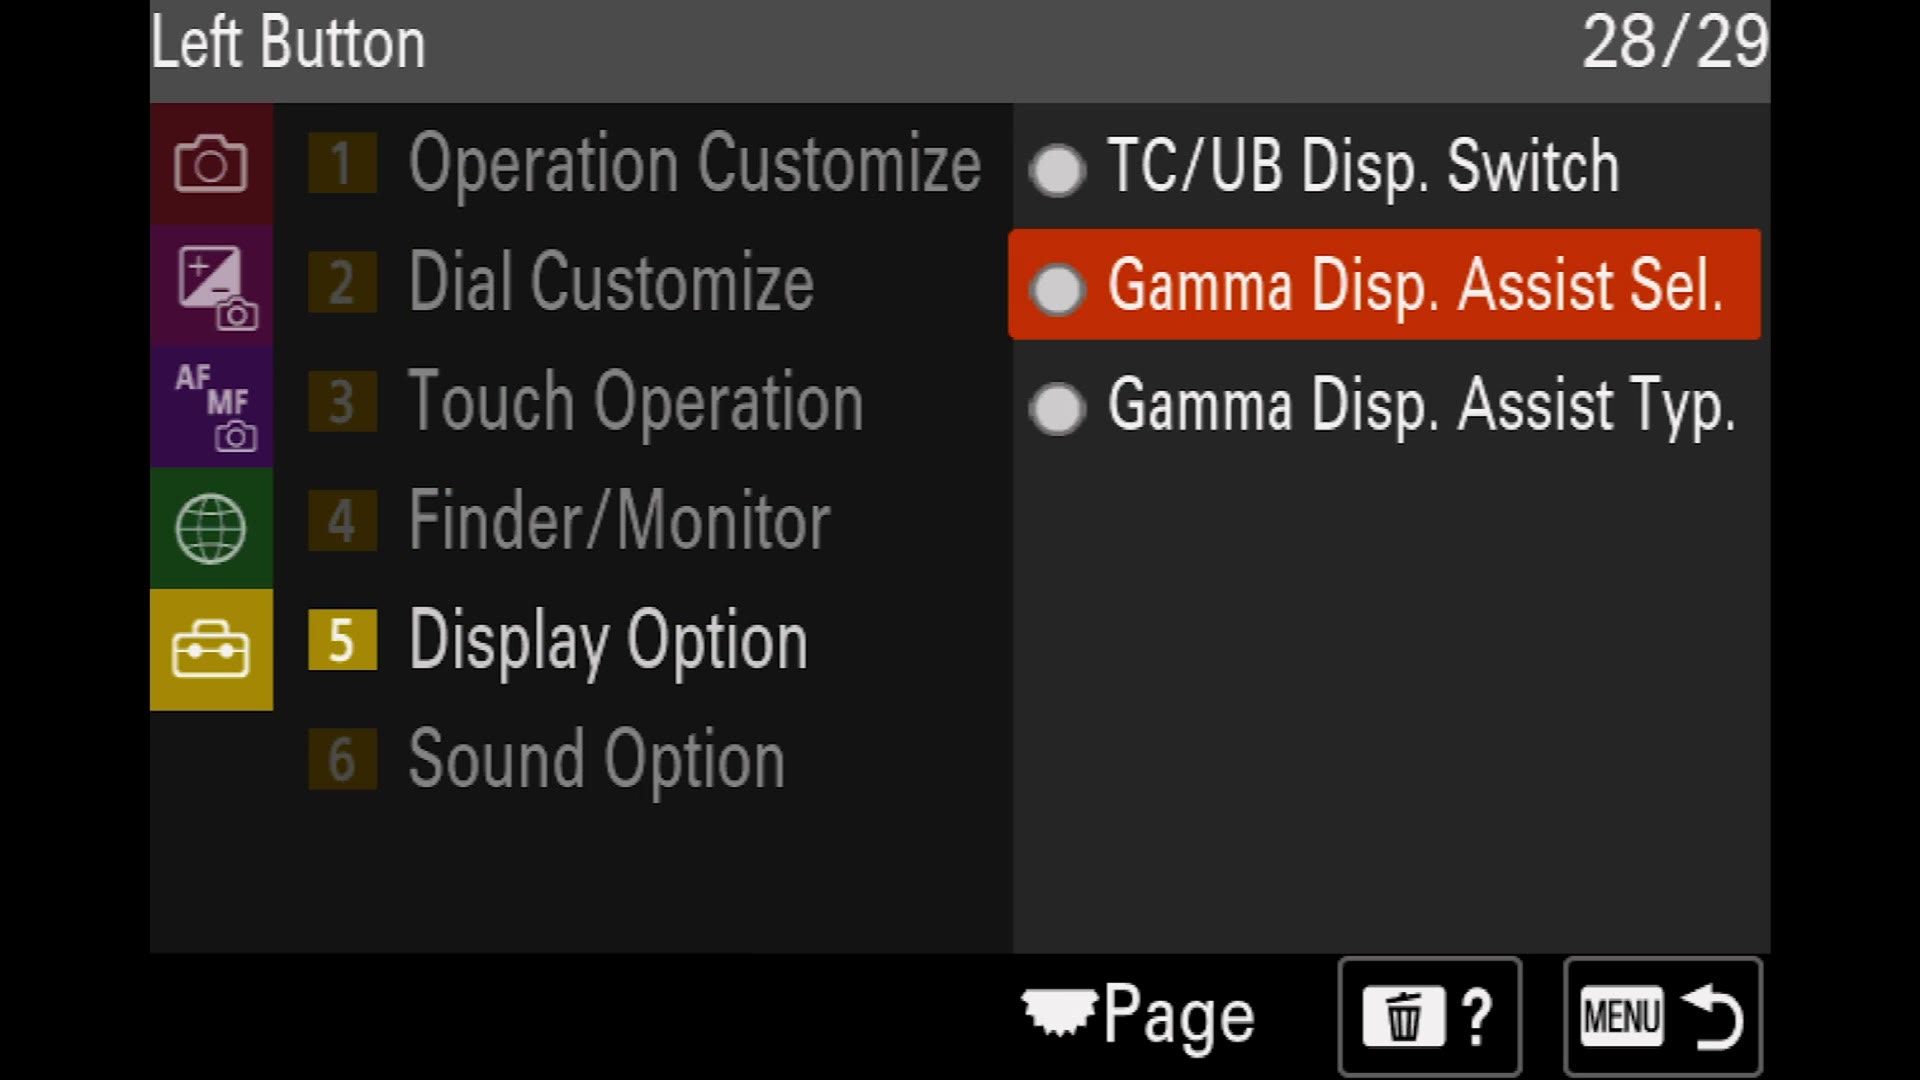
Button 3, the left button on the control wheel. Set this to Gamma Disp. Assist Sel., which lives under the Display Option section. Now you can enable or disable gamma display assist with a thumb, which is great whenever you are filming in S-Log and want to see a corrected image instead of a flat gray one.
Button 4 is ISO, and it is already labeled ISO. I have always found ISO is great right there, so I would not change it. Leave it alone.
Button 5, the down button. This one is super, super useful. Set it to Finder / Monitor Select. Now any time you need to switch between the screen on the back and the viewfinder, you press down and it toggles.
Top and lens
Button 1 up top is the red movie button. Leave it as Movie Shooting if you want. I personally use the shutter button as a record button too, so it is nice to have both. That said, this is also the button to turn into white balance if you moved record down to C1 to match the a7 III.
Button 2, C2. It is set to Focus Area, but change it to Focus Magnifier. Now you press C2 to punch in and confirm you are actually in focus.
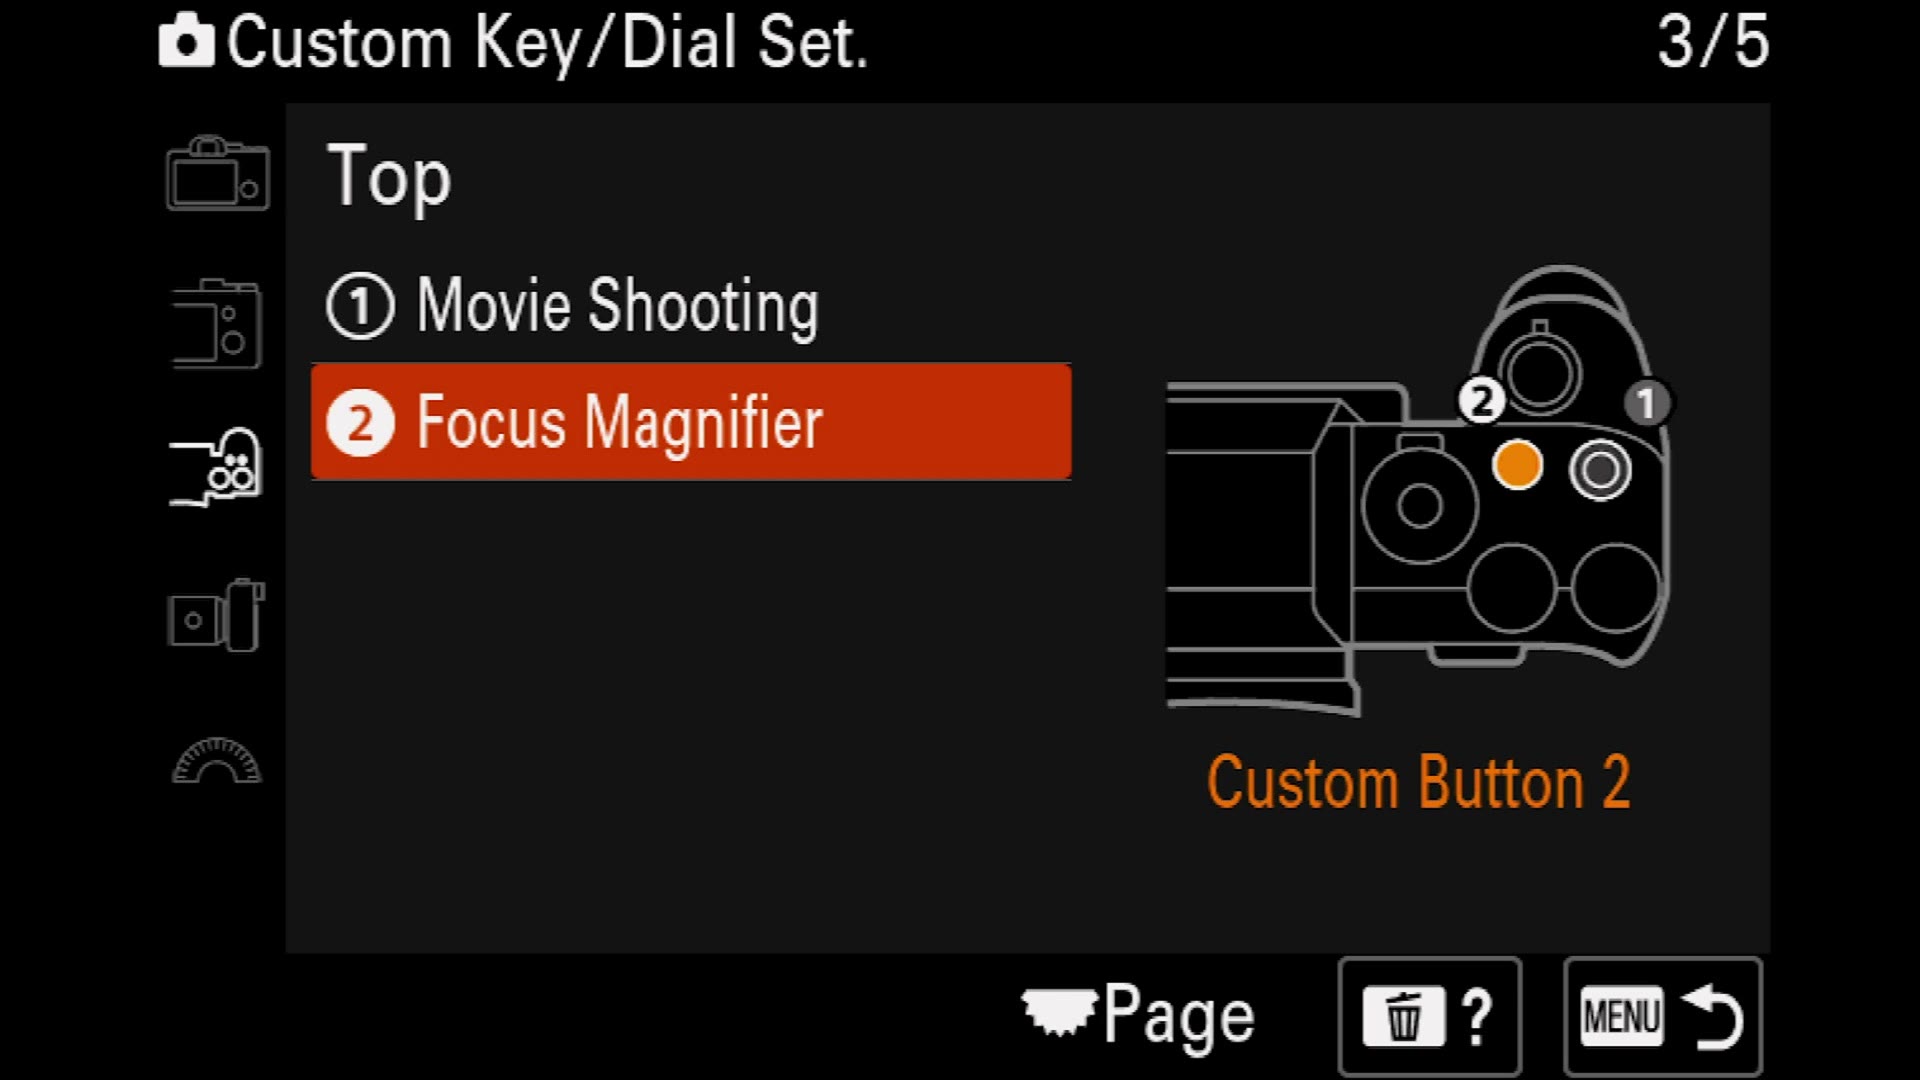
And the lens button. A lot of lenses, not the one I am using unfortunately, have a custom button on the barrel. By default it is Focus Hold, so you hold it and the focus stops moving. I would leave it there, but if you have something else you want on it, that slot is yours.
And that is your custom buttons.
Function Menu Setup
We have to keep moving, because the function menu is not nearly as customized out of the box as I would like it to be.
Go back to the main menu and into Fn Menu Settings. Like the buttons, there are separate settings for photo mode and video mode, and this time we are editing the video mode row, the bottom one.
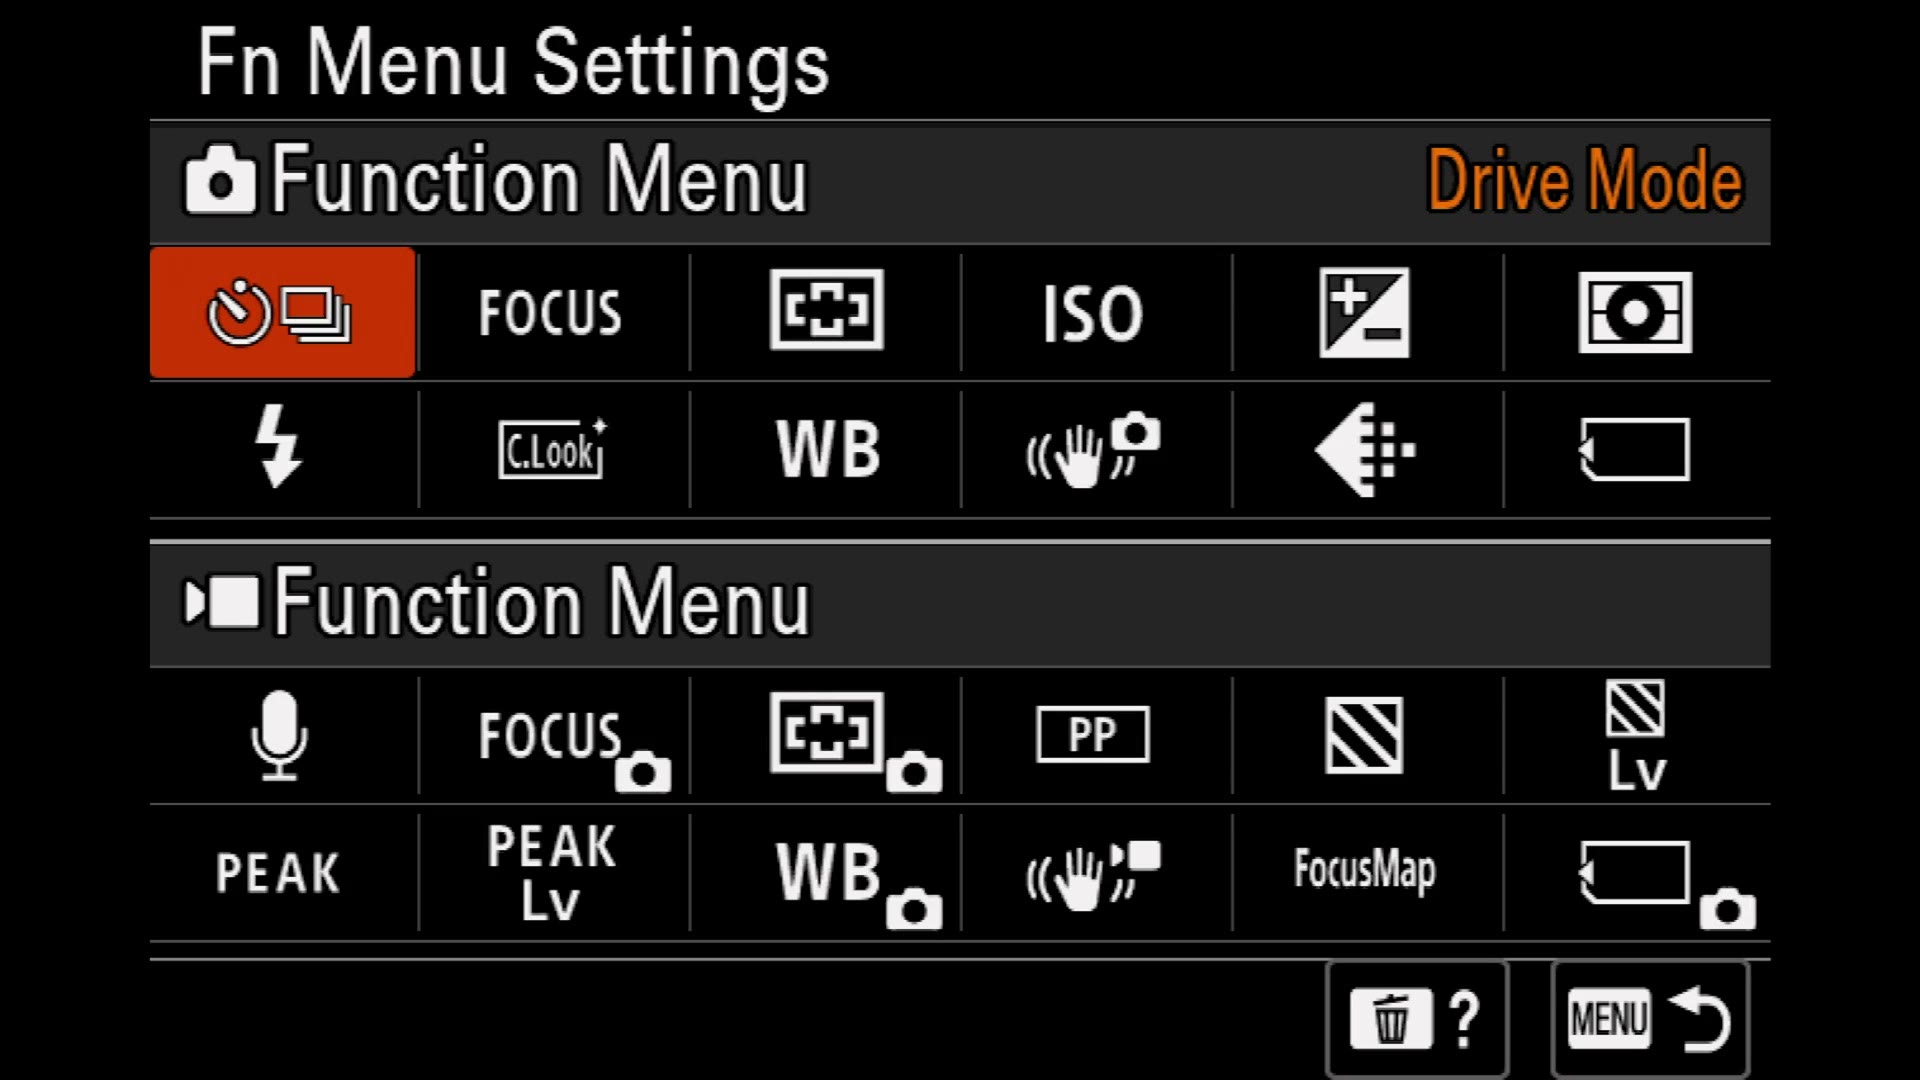
Here is what I keep and what I swap.
- Audio Rec Level. Keep it. You are going to need to adjust your recording volume constantly, so this earns its slot.
- Focus Mode and Focus Area. Keep both. They are inherited from the photo function menu, and it is genuinely nice to be able to change how the camera focuses and where it is focusing without leaving the shot.
- Picture Profile, swap it out. Sony puts picture profile here by default, but this is not something you change often. That belongs in a custom menu, which we get to in a minute. Replace it with Face/Eye Prior. in AF, so you can turn face and eye detection off whenever the camera keeps locking onto a person and you want it on something else. Being able to kill that on demand is really powerful.
- Zebra Display and Zebra Level. Keep both. Turning zebras on and off and adjusting the level from here is great.
- Peaking Display and Peak Level. Keep both. They help you focus, and being able to change the intensity on the fly is worth having.
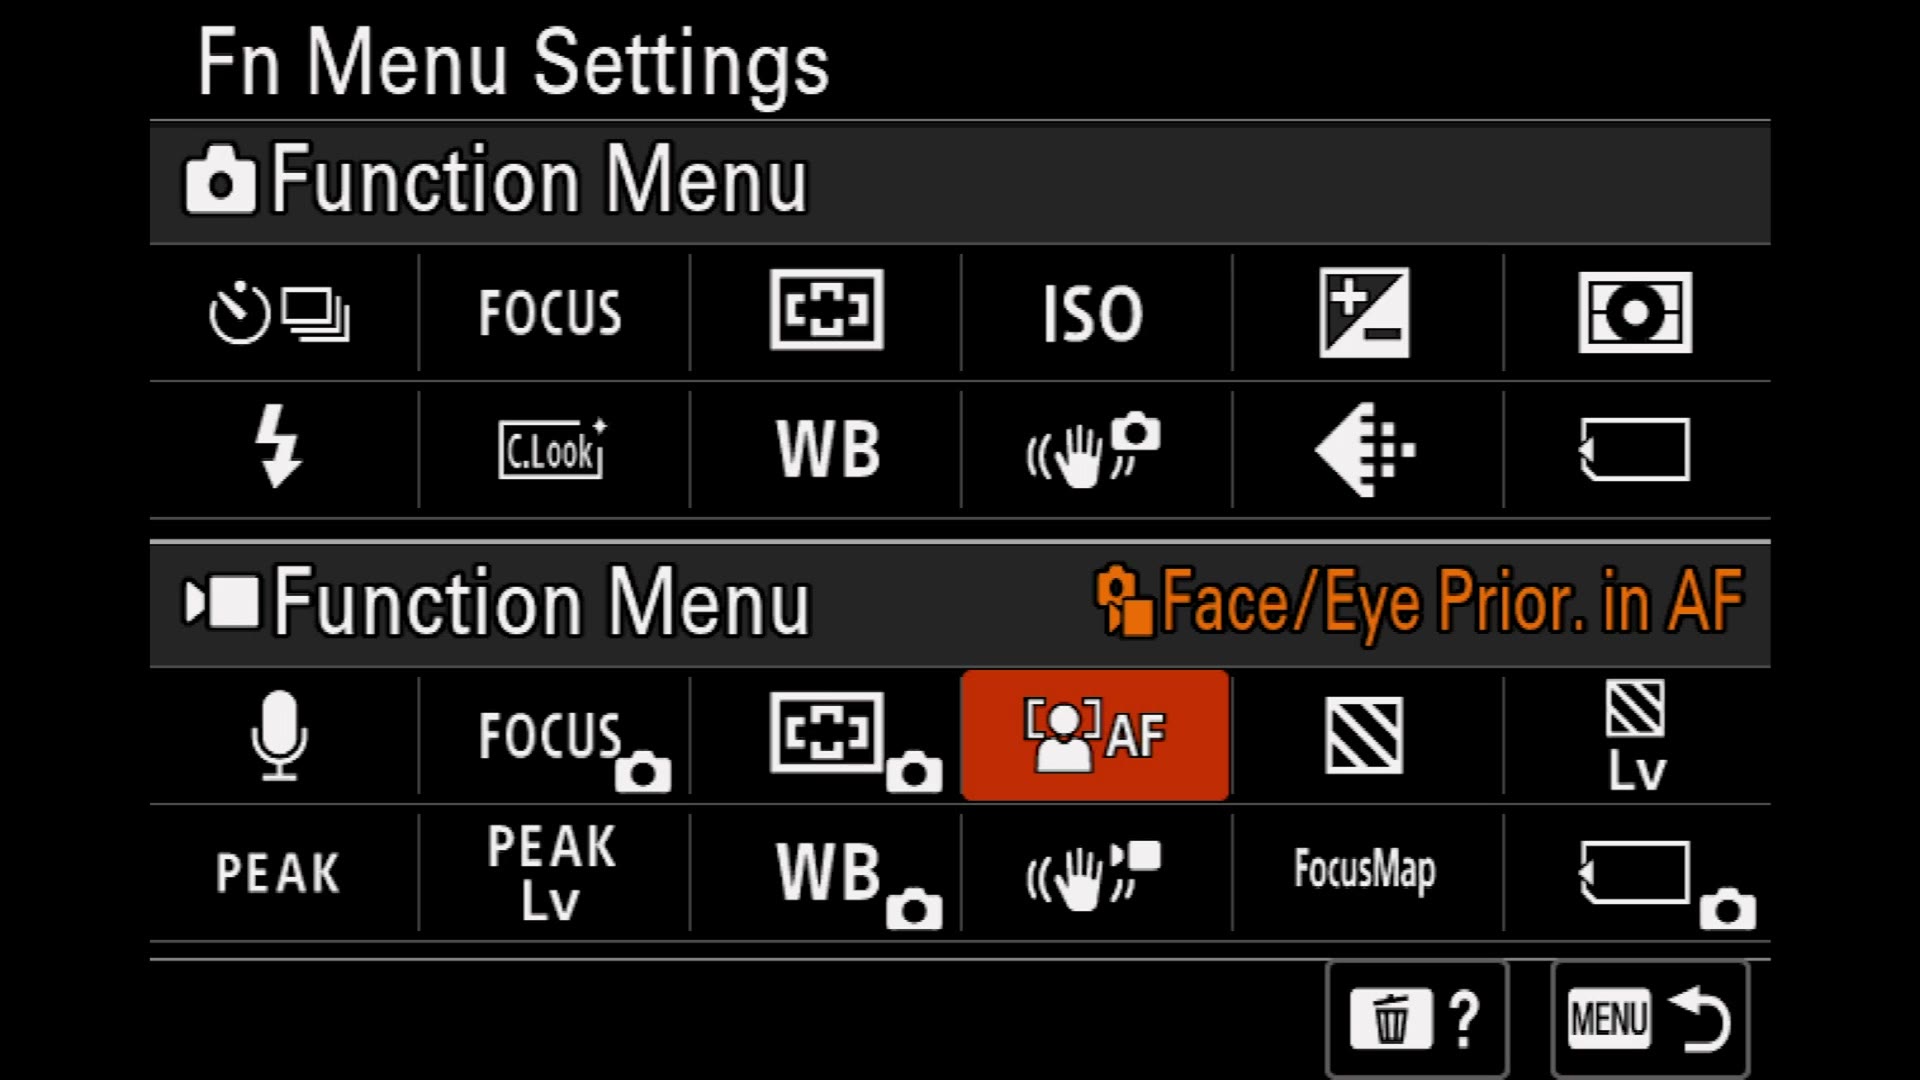
Then the bottom row.
- White Balance, swap it out. We already put white balance on a custom button, so it is redundant here. Go up to Shooting Display and change this one to Grid Line Display. Now you can turn your grid lines off and on, which matters if you frame to guides, and kill them the second they are in your way.
- SteadyShot Adjust. Keep it. This lets you switch your in camera stabilization between standard and active, and active makes your footage noticeably smoother at the cost of a 1.1x crop. It is already there by default and it is great.
- Focus Map. Keep it. Another fantastic way to check focus.
- Rec Media Settings, swap it out. As nice as it is to reach your recording media settings, you are almost never doing that mid shoot. Replace it with something much better. Go to Image Quality and scroll all the way down to Breathing Comp., which is hidden right at the bottom.
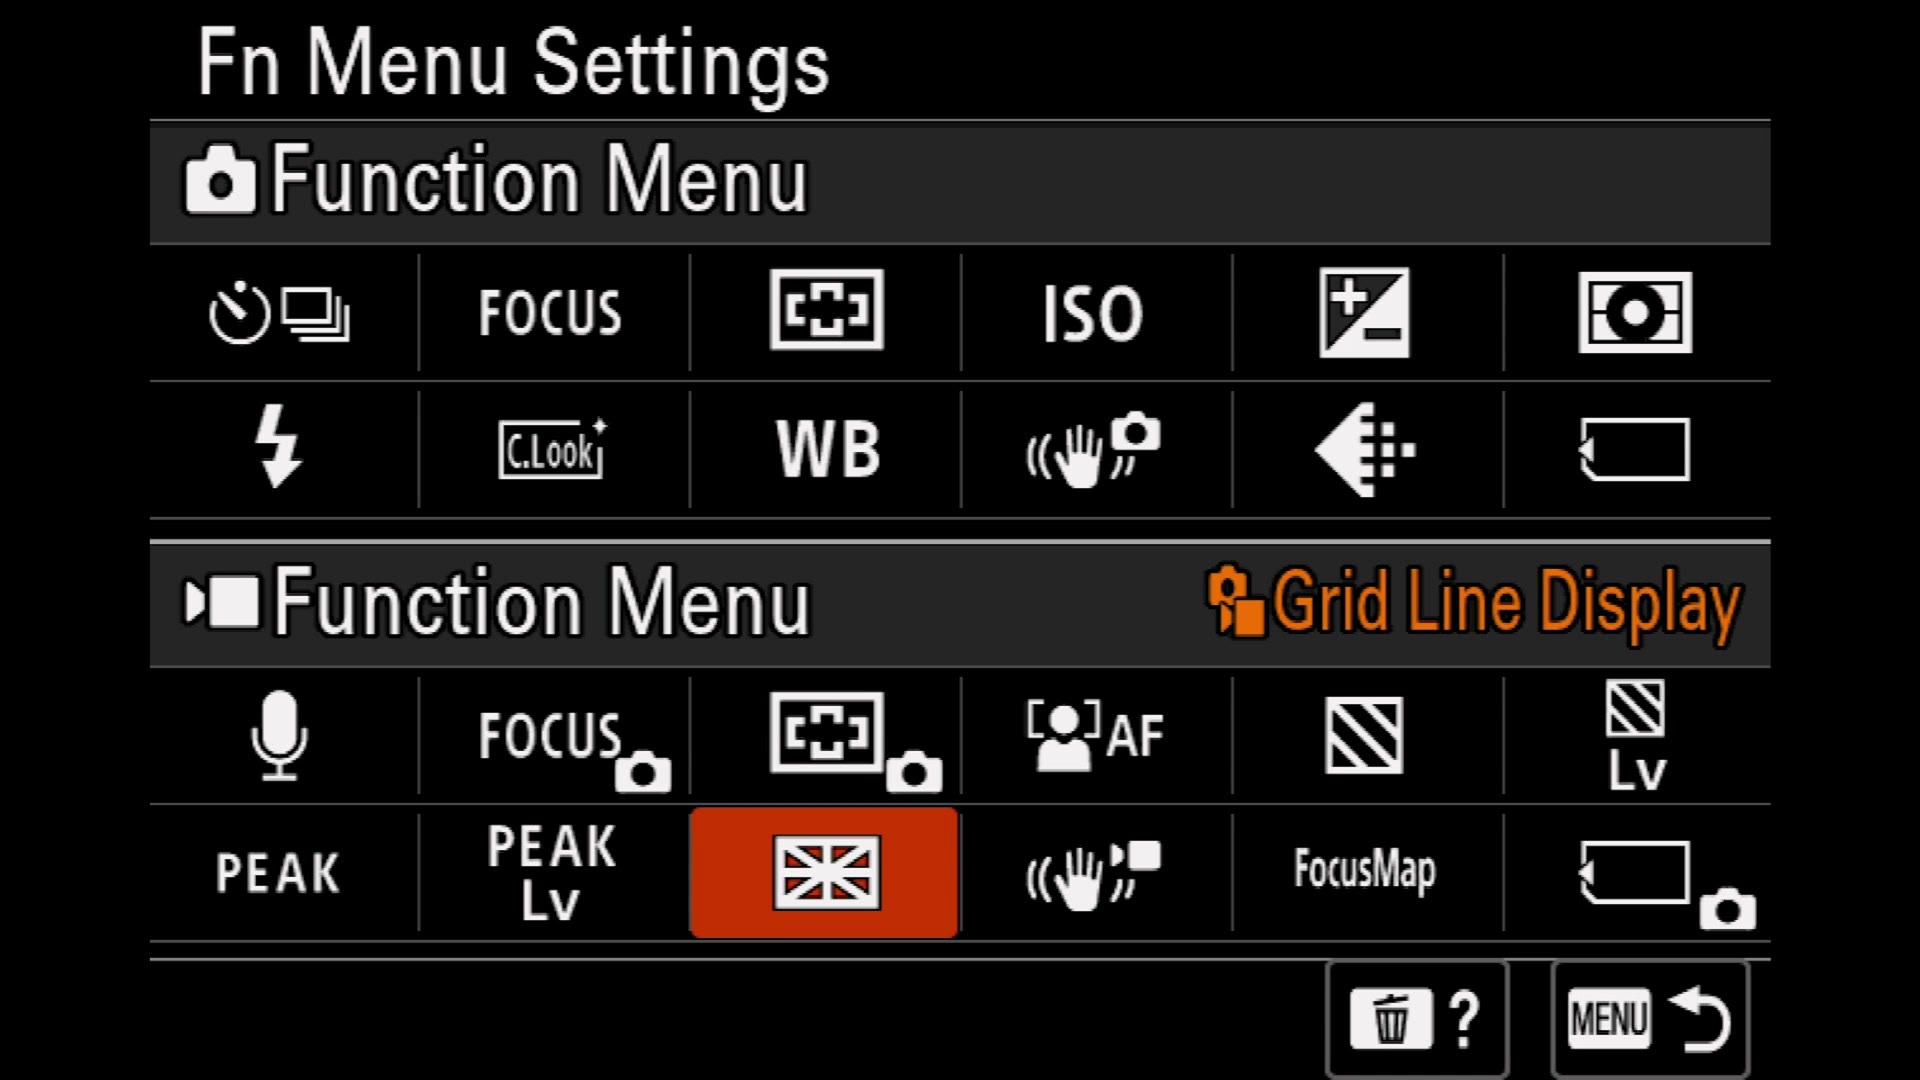
Breathing compensation is incredible, because toggling it on removes the focus breathing your lenses have, and having that reachable from the function menu means you can flip it depending on the shot rather than committing to it for a whole day.
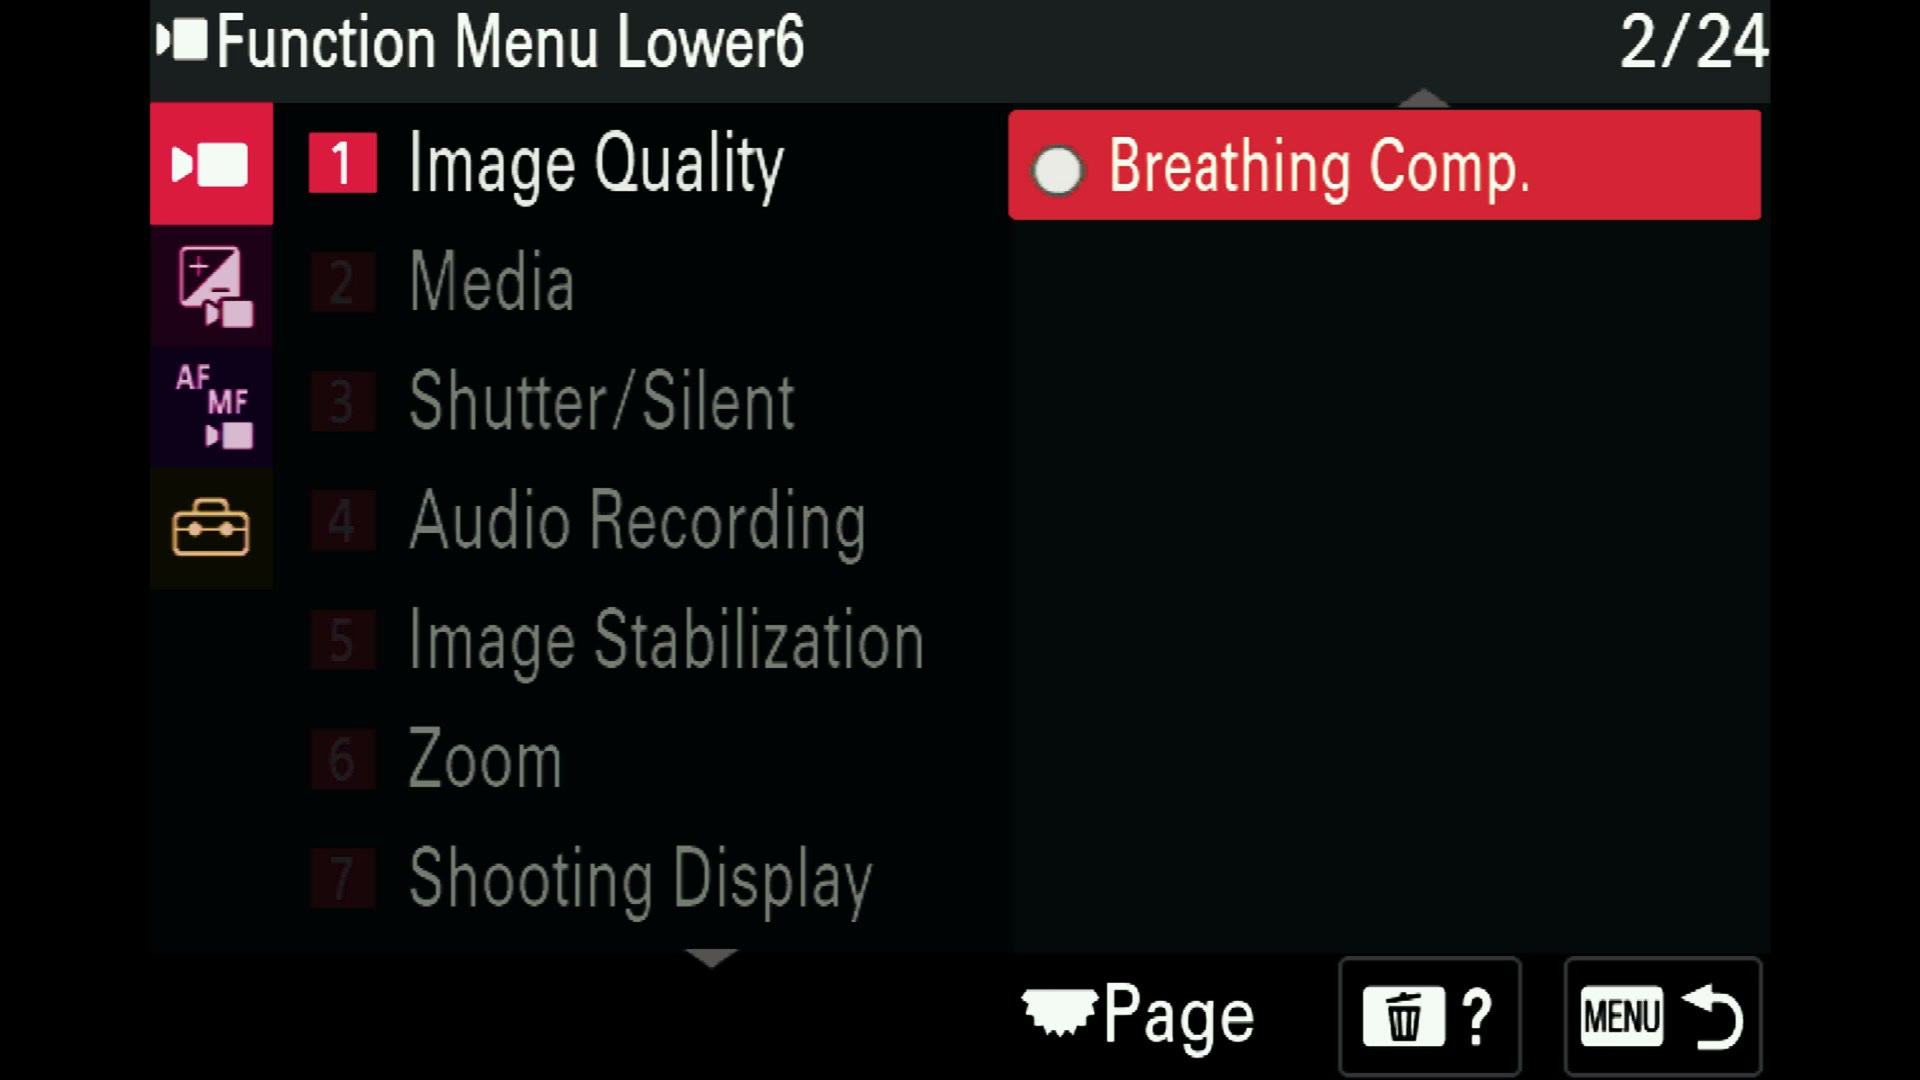
And that is it for the function menu.
Custom Menu Setup
Yes, this camera has a custom menu too. Go to the top of the menu and you will find a gray star that says My Menu Setting. You can populate that with whatever you want from anywhere else in the menu, which is incredible for the settings you do not need constantly but absolutely need occasionally.
First thing to do in there: scroll down to Display From My Menu and turn it On.
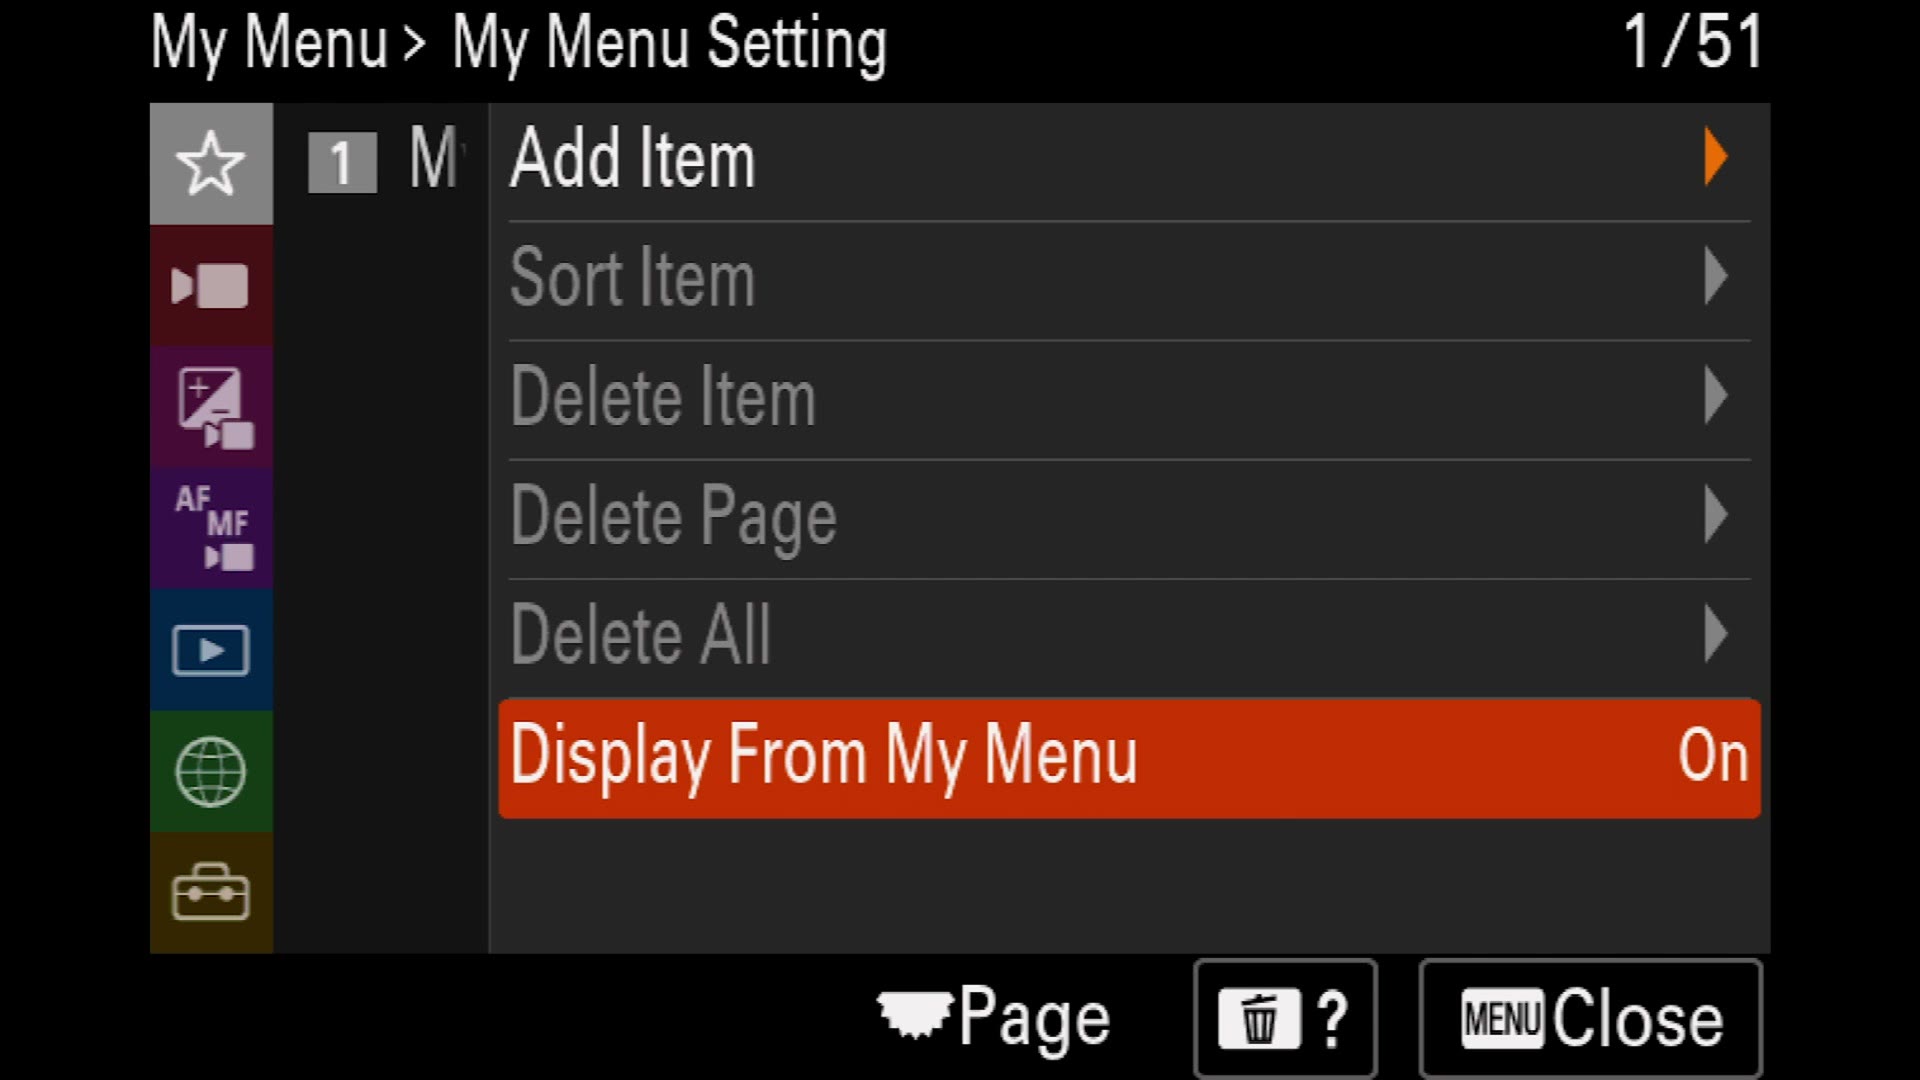
This setting is really awesome. It makes the menu always open to My Menu whenever you press the menu button. So if you are buried five levels deep in some submenu and you want out, one press of menu drops you right back at your own shortcuts. It saves time and it helps you film faster.
My Menu 1: the stuff you reach for
Go to Add Item and add these three:
- File Format, in case you ever need to change it.
- Movie Settings, right underneath it.
- Interval Shoot Func. I often find myself using my Sony as a time lapse intervalometer, so having this one press away is nice. If you never shoot time lapses, skip it.
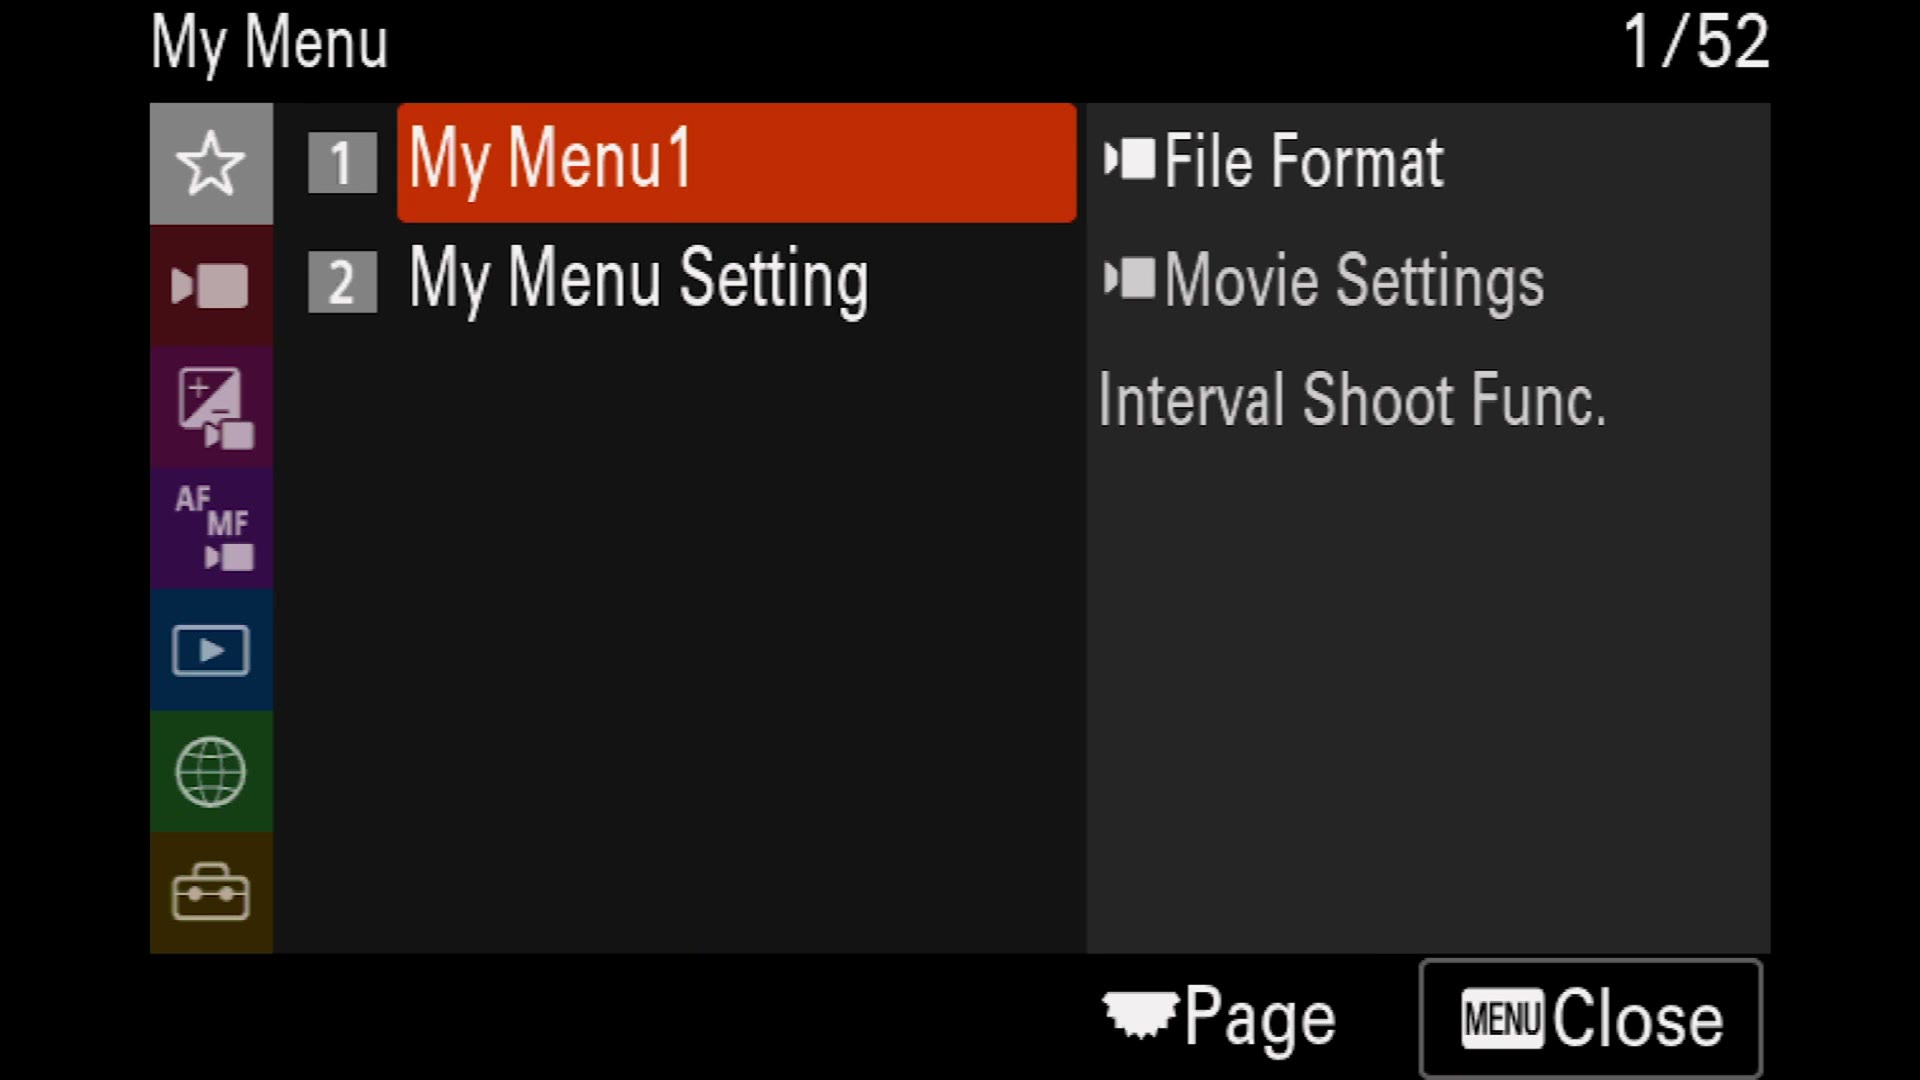
That is all I put on page one. Three items, all instantly reachable, none of them scrolling.
My Menu 2: the stuff you reach for less
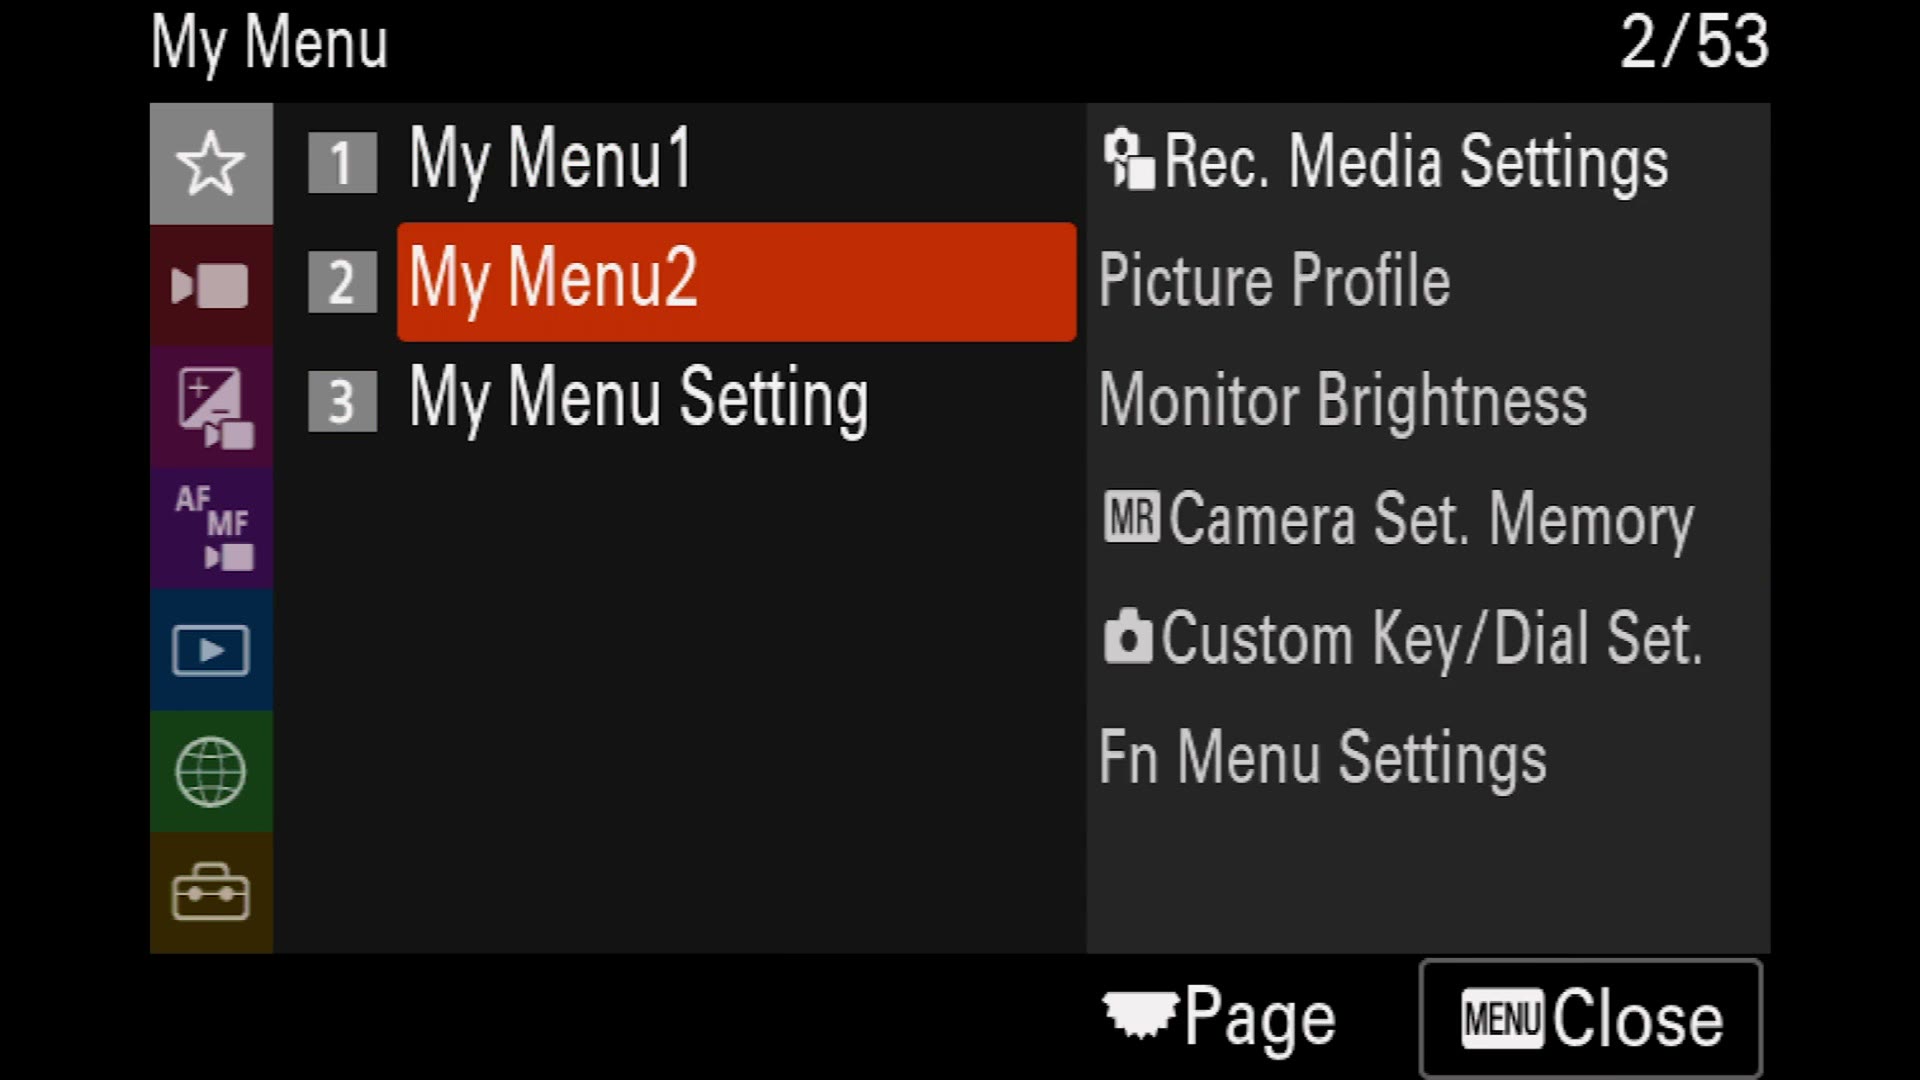
Everything here is still nice to have quickly, just not quite as often. Add these, choosing My Menu 2 as the location each time:
- Rec. Media Settings, which we just pulled out of the function menu.
- Picture Profile, under Color/Tone. Now if you need to jump between S-Log3 and S-Cinetone, you can do it fast.
- Monitor Brightness. Very important. You go from indoors to outdoors constantly and you will want the screen brighter.
- Camera Set. Memory and Memory Recall, under Shooting Mode, so you can re-record your mode dial presets whenever you need to.
- Custom Key/Dial Set., in case you want to tweak any of the buttons we just did.
- Fn Menu Settings, for the same reason.
My Menu 3: the scary one
One final thing. Go to Media, then Format, and add that to My Menu 3, all by itself.
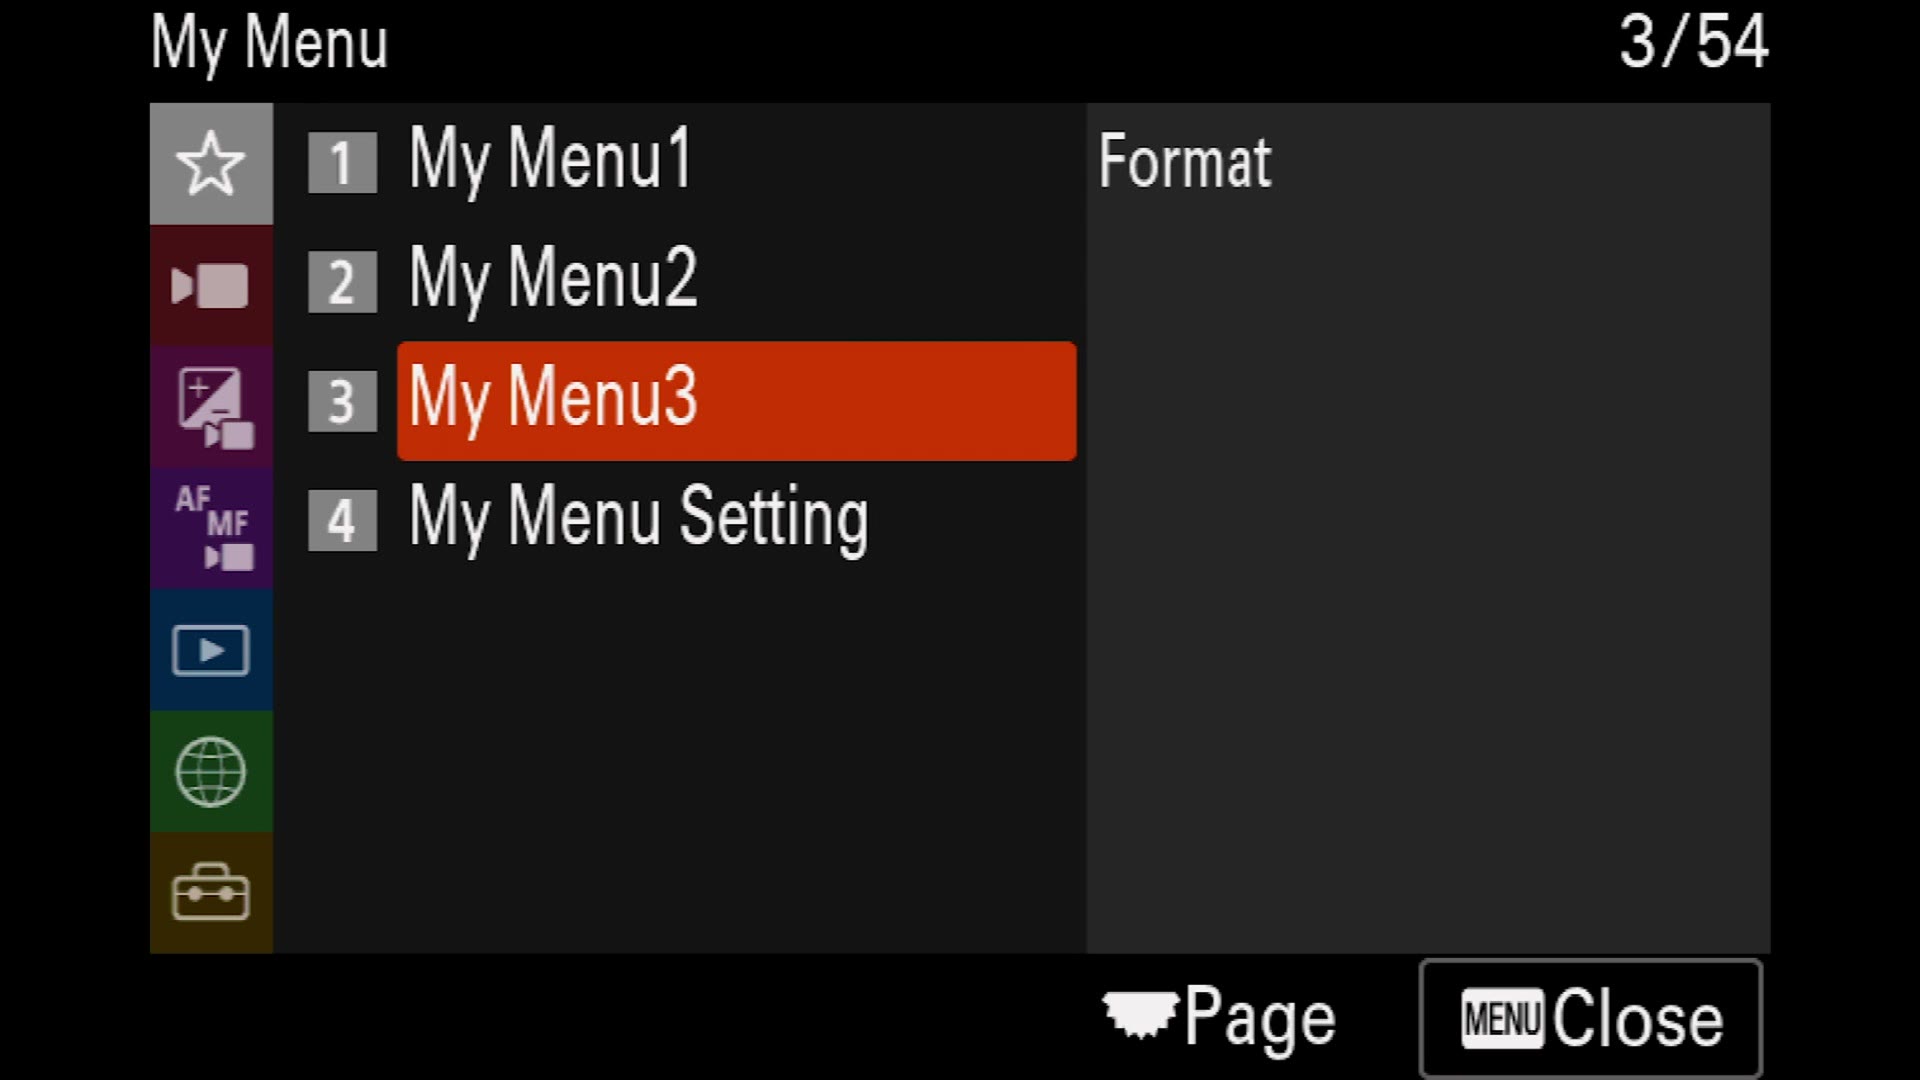
You are going to need to format cards constantly, especially after you copy everything off and before a new shoot. But you do not want that sitting next to the settings you press all day, because formatting the wrong card at the wrong moment is a genuinely bad afternoon. Giving it its own page off to the side means you can get to it whenever you need to, and it stays out of the way the rest of the time.
Download My Free a7 IV Settings Preset File
And that is how you customize your a7 IV for fast filmmaking. Mode dial for frame rates, custom buttons for the things you touch mid shot, function menu for the things you touch between shots, and three pages of custom menu for everything else.
Remember that you can still download my a7 IV settings file for free and load every single one of these settings onto your camera at once. No digging through menus required.
A few other things that go with this one:
- Part one, the full a7 IV menu settings guide, which is where all of this starts.
- How to film in S-Log3 with the a7 IV, which covers exposing 1.7 to 2 stops over, zebra levels and the two ISOs worth living on.
- Sony a7 IV vs a7S III for wedding filmmakers, if you are still deciding between the two.
- The a7 IV memory card guide, and the a7S III, FX6 and FX3 memory card guide.
- The a7S III and FX3 video formats guide, and the a7S III overheating test.
- My color presets, which work great with the a7 IV and make the footage you shoot with it look incredible.
- My filmmaking courses and my full gear list.
Thank you so much for reading, and have a great day!