
People notice that in my wedding films and drone videos I shoot at a lot of different frame rates. 24, 30, 60, sometimes 120. And I get two questions about it constantly: why shoot so many, and how do you edit all of them together in Premiere and make it look good?
Here are both answers.
Why I Shoot Each Frame Rate
My rule is simple. Anything with audio I need to sync gets 24 frames per second, because that matches my timeline. A groom reading a letter, a ceremony, a toast. If you shoot those higher and then slow them down, everybody talks slowly and nothing lines up.
Anything that doesn’t need synced audio, like prep footage, gets 30. Two reasons. Slowing 30 down to 24 makes it look dreamy and magical. And more importantly it takes out the small bumps and shakes, and me getting the camera caught in my beard, which has genuinely happened. It’s a smoothing pass you get for free. I need all the help I can get in that department.
And 60 is for the big emotional moments. The couple looking at each other. That’s a moment I want to drag out as long as possible, and slowing 60 down to 24 makes the look last and look really pretty.
The thing I want you to take from that is: be intentional in camera. Don’t shoot everything at 60 because you might want to slow something down later. Look at the shot, decide, and commit. Your footage will look better because you made the choice at the point of shooting rather than waiting until the edit.
Build The Timeline At 23.976
Go to File, New, Sequence. I pick one of the RED R3D presets, then HD 4K, then 4K HD 16×9 23.976. I didn’t shoot this on a RED, I shot it on an a7S II, and that doesn’t matter. What matters is that the preset’s settings match my footage.
Pay attention to that frame rate: 23.976. And yes, you still choose 23.976 even though you’ve shot at 30 and 60 and 120, because all of that footage is about to become 23.976 anyway.
What Happens If You Just Drop Clips In
Drag a 23.976 clip onto that timeline and it matches perfectly. No pop-ups, plays smooth as butter.
Drag a 29.97 clip in and it looks a bit stuttery, because Premiere is having to throw away six frames every second to make it fit. Drag a 59.94 clip in and it’s worse, because now it’s dropping more than half the frames.
It doesn’t look terrible. But it isn’t smooth, and there’s no way to make 30 or 60 play back smoothly on a 24 timeline unless you actually make the clip slow motion. Which is exactly why I only shoot higher frame rates when I already know that shot is going to be slowed down.
One more rule while we’re here: never put footage on a timeline whose frame rate is higher than the footage. Don’t drop a 23.976 clip onto a 30fps timeline, because Premiere then has to invent six frames a second out of thin air, and it looks weird.
The Slow Way To Slow Things Down
You have a couple of obvious options. Right click a clip on the timeline, go to Speed/Duration, and for a 60fps clip set it to roughly 40%. That works, and it doesn’t look bad.
Or press R for the rate stretch tool and drag the end of the clip out. Also works, still slightly stuttery.
Editing in something else? I covered How To EASILY Edit Mixed Frame Rate Video In DaVinci Resolve too.
But there’s a much better way, and it’s the one I actually use.
Interpret Footage, Which Is The Real Answer
This is one of the first things I do every single time I edit anything. Shoot a big event, import all the footage, then do this before you cut a single clip.
In the Project window, click your first clip, then shift-click your last clip so everything is selected. Imagine hundreds of clips. Select all of them.
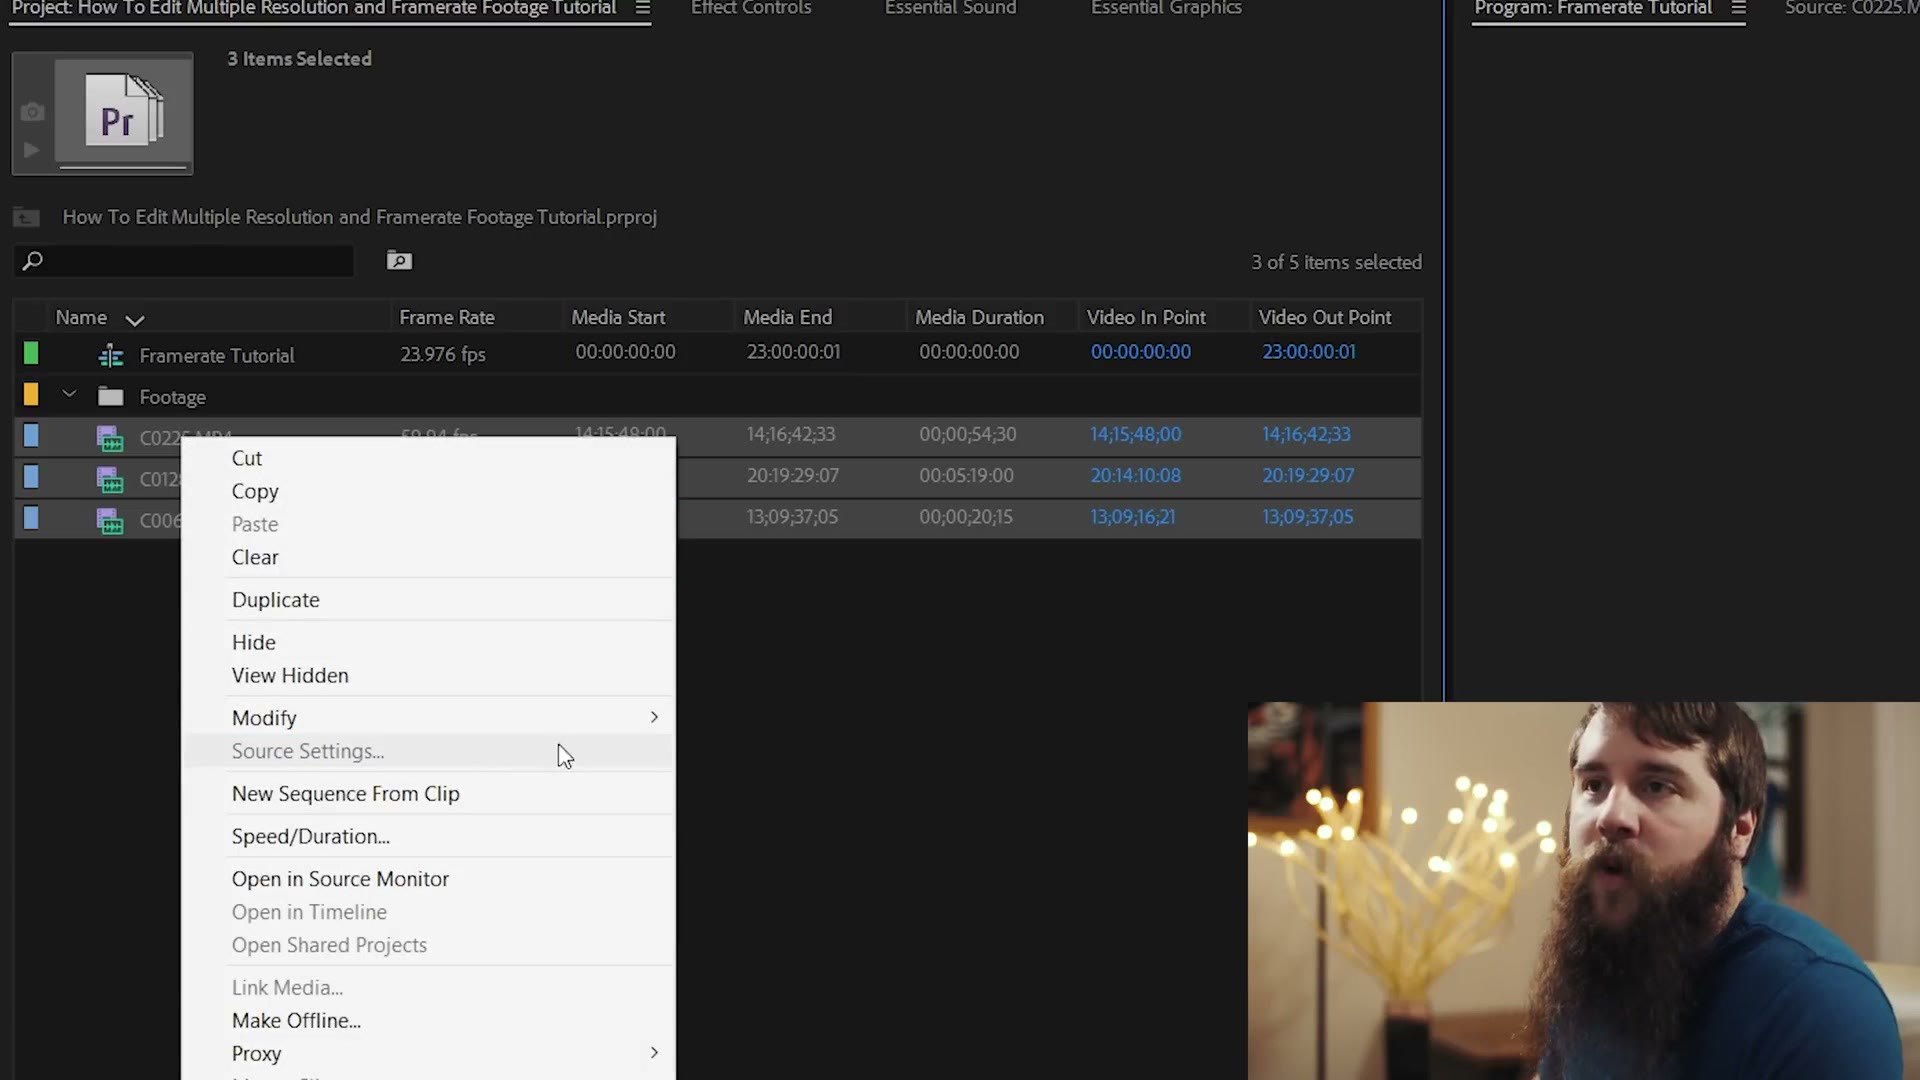
Right click any one of the names, go to Modify, then Interpret Footage. In the Modify Clip dialog, look at Frame Rate. It says “Use Frame Rate from File.” Change it to “Assume this frame rate” and type 23.976. Click OK.
Now look at the frame rate column. Every clip says 23.976. Instead of Premiere reading whatever each file claims it is, it now treats all of them as 23.976.
Drag them in again. The 30fps clip is slightly longer and slightly slower, almost imperceptibly, and I’m a big fan of how it looks. The 60fps clip is significantly longer, and oh my gosh, look at it. It’s so smooth. It looks incredible.
And it took a few clicks to make every clip in the project slow motion at once. As far as Premiere is concerned there are no mixed frame rates any more. They’re all the same, and they all look great.
If You Also Have Mixed Resolutions
You may have noticed my clips weren’t all the same size either, two at 4K and one at 1080p. For this tutorial I just upscaled the 1080p to 4K, but I’ve covered editing mixed resolutions in one timeline properly elsewhere. Between the two, resolution and frame rate are both handled.
If you want the neighbouring fundamentals, I’ve also explained shutter speed and white balance, and there’s a speed ramping tutorial using interpreted footage that builds directly on this technique. There’s a whole playlist on export settings too, for 4K, HD and Instagram.
Don’t have Premiere? There’s a free trial.