
This is the second video in my series all about fast filmmaking settings for the Sony FX30. The first one was a deep dive into the menus of the camera, and this one expands on that and shows you all of the settings I use for the custom modes, the custom buttons, the custom menu and the function menu.
So if you film weddings, documentaries, basically anything where you need to be able to shoot very quickly, I am going to show you how to put the exact settings you need at your fingertips so you can film fast with this camera and never waste time trying to remember where something is buried in the menus.
If you have not watched the menu settings video yet, I highly recommend it, because this one builds on it.
And more importantly, if you want to save time, you can download my FX30 settings file, load it into your camera, and immediately start using all of these settings without following along with any of this. That file is completely free. My gift to you.
Custom Modes Setup
Custom modes are going to let you switch between frame rates and resolutions very fast. If you press the mode button on the top left of the camera, you will see we are in the movie settings, and down at the bottom you have three of them: MR1, MR2 and MR3.
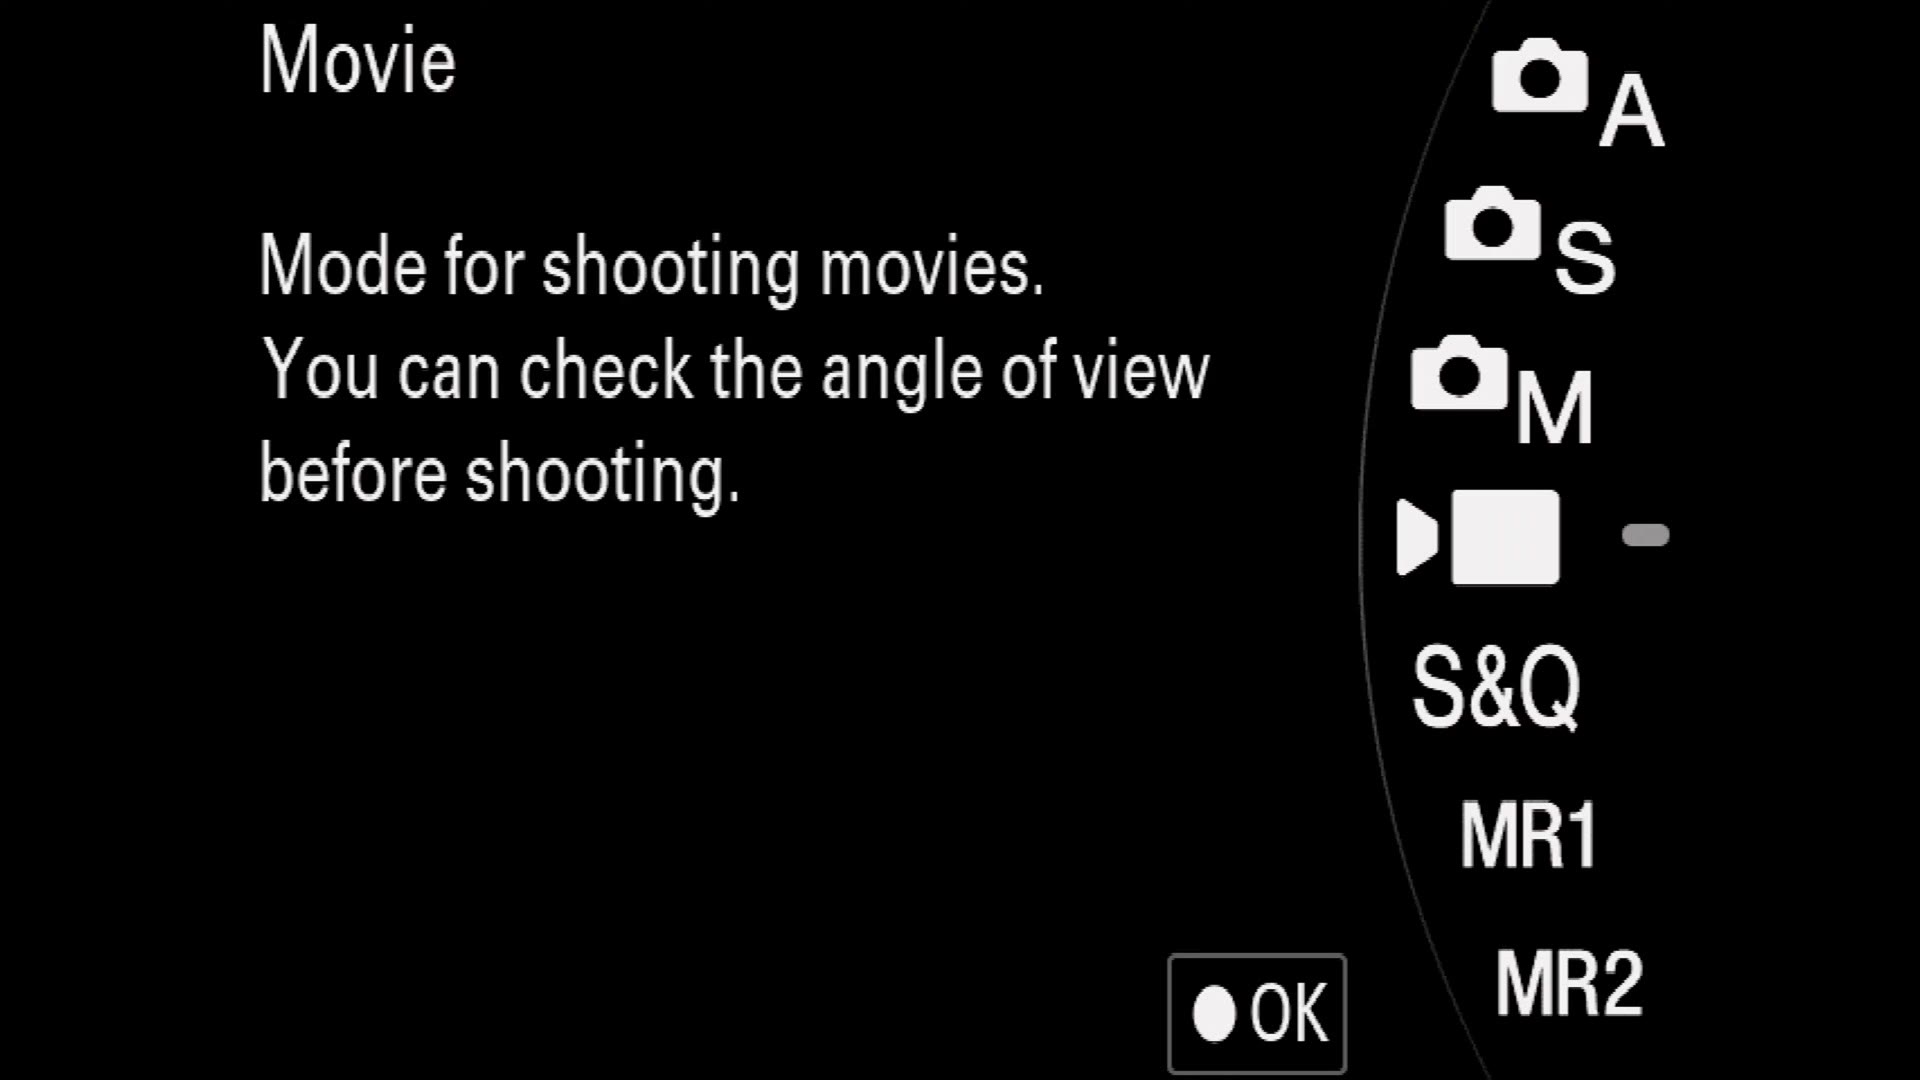
If you have used a Sony photo camera like the a7S III or the a7 IV, those have a mode dial on the top with three custom modes. The FX30 has just internalized them into the menu, but they work exactly the same way.
Side note. Whenever you are in there you are also going to see four more custom modes labeled M1 through M4. Do not trust those, because they are only saved to your memory card, and whenever you format the card it deletes them. So yeah. You do not want that.
MR1: 4K 24p
Go into the menu, down to the red camera icon, into Image Quality / Rec, then File Format. Here you have two options: XAVC S 4K or XAVC HS 4K.

The reason I usually recommend XAVC S 4K is that if you go down to Movie Settings you will see you have access to 30p, which is the frame rate I prefer for certain parts of weddings. If you never film in 30p, go back up to File Format, change it to XAVC HS 4K, and you will only have 24 or 60. That is fine, do not worry about it. For now I am leaving mine on XAVC S.
Under Movie Settings, make sure your Record Setting is on the highest bitrate available, which is 100M 4:2:2 10 bit. Then back out of the menu.

Now for the camera settings. Use the big wheel on the back to set your shutter speed to 1/50. Your ISO should be 800 if you are using S-Log3. For aperture I am setting F4 because this is an F4 lens, but if you have a wider lens, F2.8 is a great option.

Then press the number 2 button, which is how you get to white balance, and go down to the Kelvin setting. I would set this to 5000K, which is a nice white balance for outdoor filmmaking. You can of course change it whenever you go indoors, but by default 5000K is great.
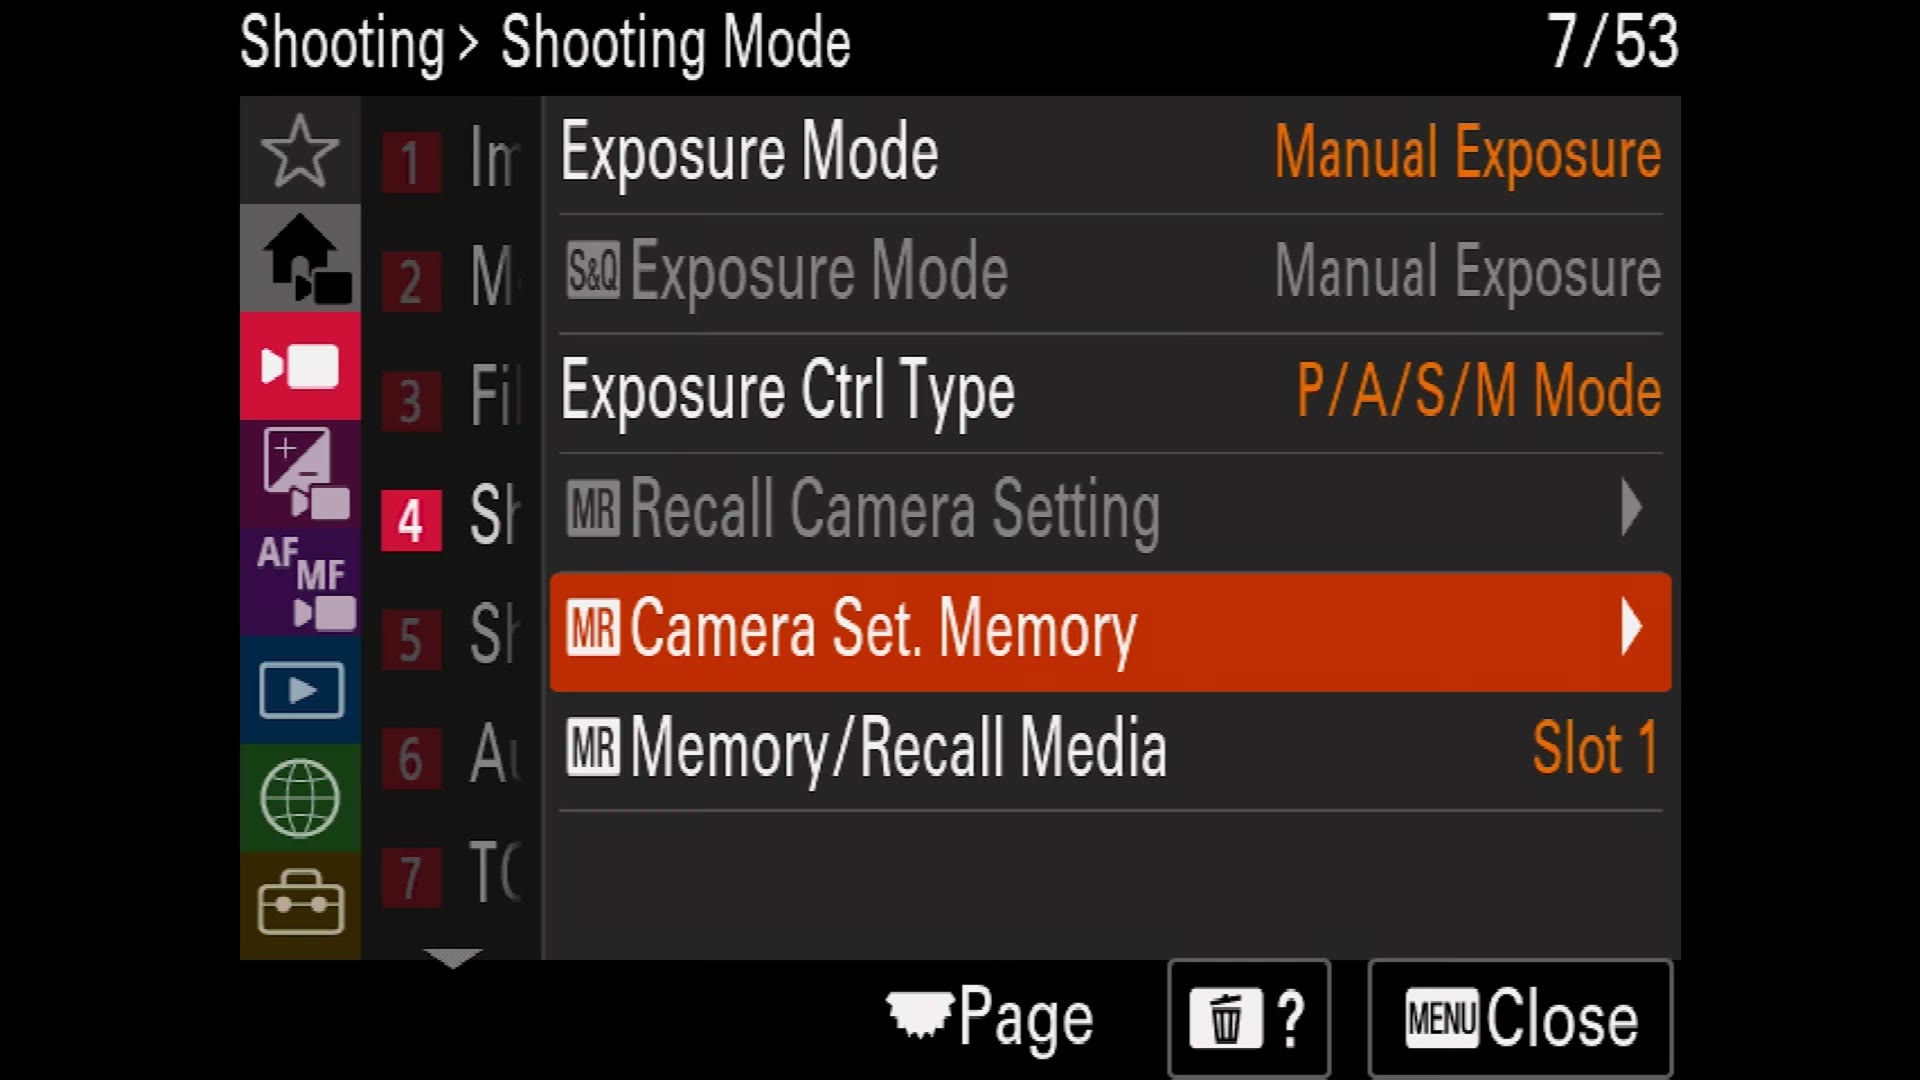
Now let’s save it. Press menu, go to the shooting menu, down to Shooting Mode, then Camera Set. Memory. You will see 1, 2, 3 and then M1 through M4. You never want to use M1 through M4, but you do want 1 through 3. Select 1 and it will say registered.
Which means that any time you press the mode button and go to MR1, your camera instantly jumps to 4K at 24 frames per second. This is what I use whenever I want to film at normal speed, and it is especially important for any clip you need audio for, like a ceremony, or toasts, or an interview, where your audio and video have to match up. 4K 24p. Great setting to have right there in the mode menu.
MR2: 4K 60p
Everybody loves slow motion, right? And because the FX30 can record beautiful 60 frames per second in 4K, it is definitely worth having as a custom mode.
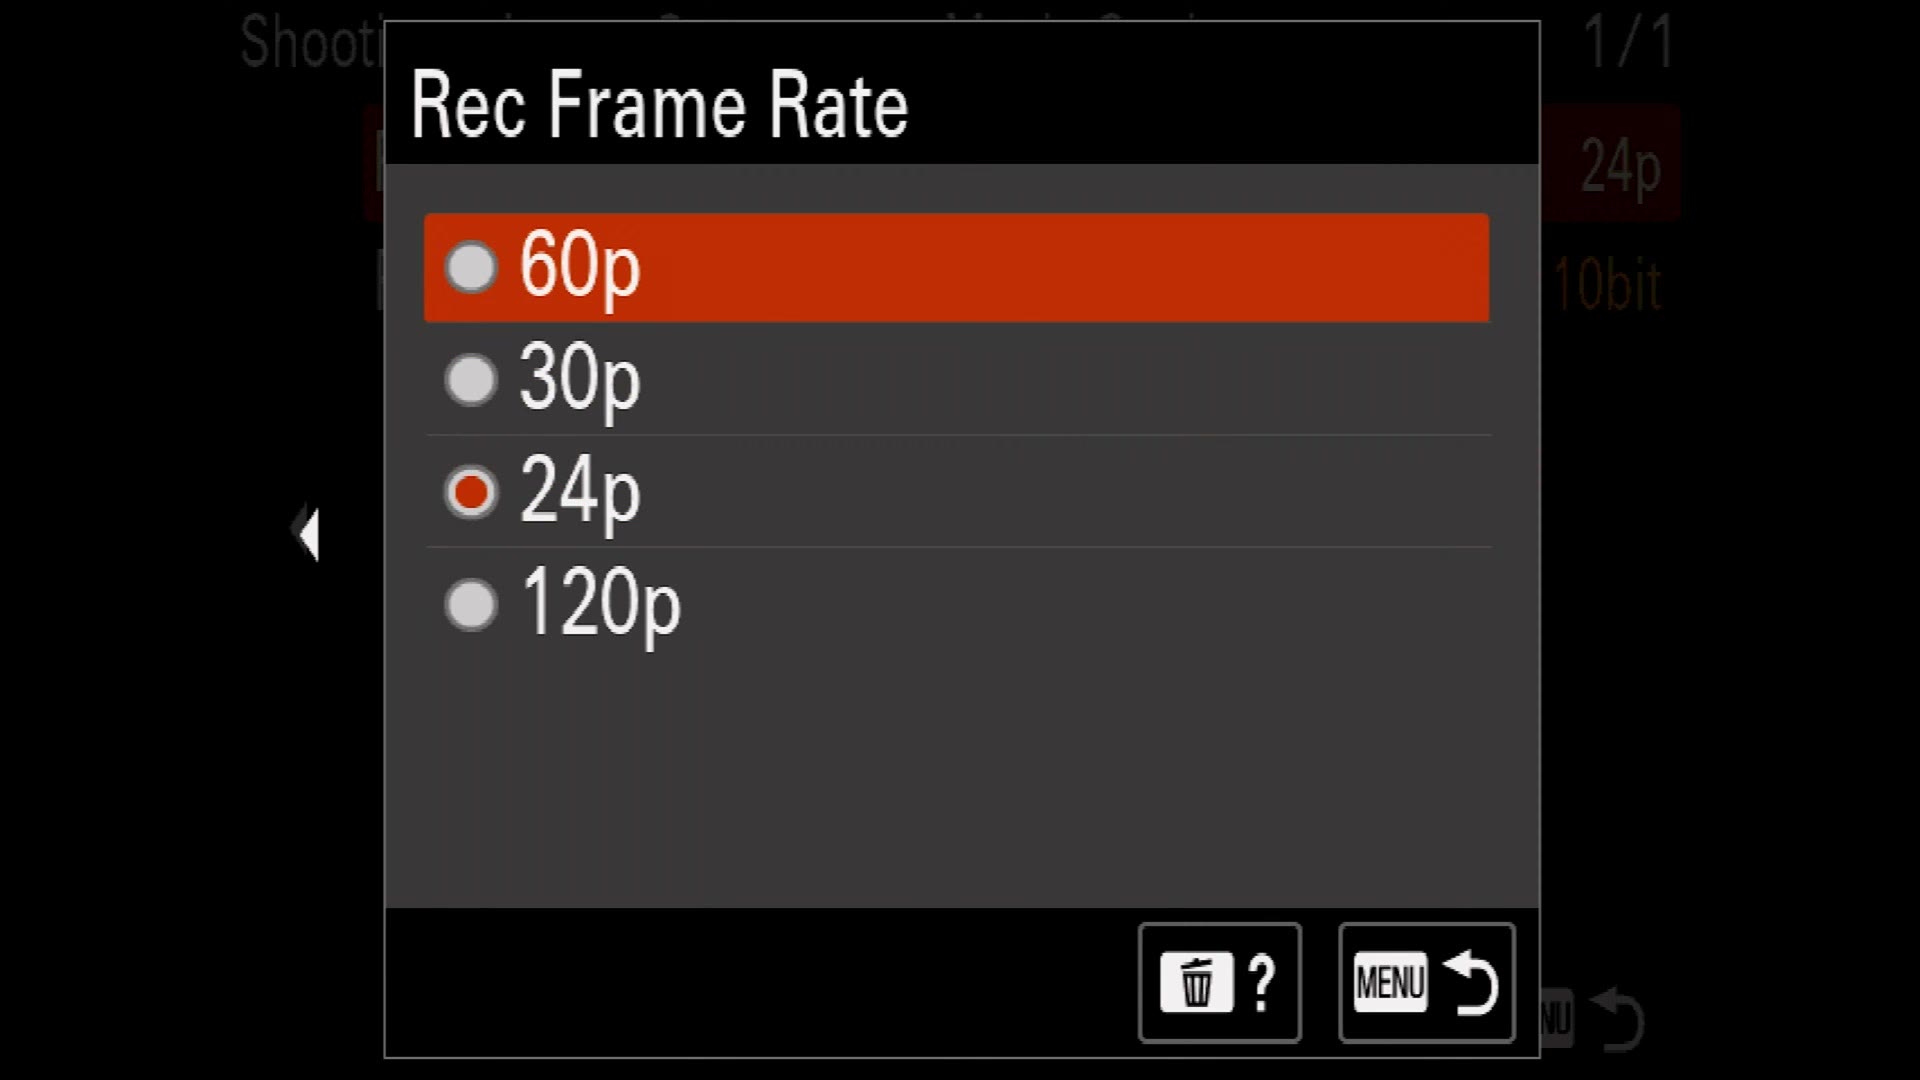
Press menu, back up to Image Quality / Rec, down to Movie Settings, and change the recording frame rate to 60p. For Record Setting, make sure you are on the higher 200M 4:2:2 10 bit. Better quality. You want that.
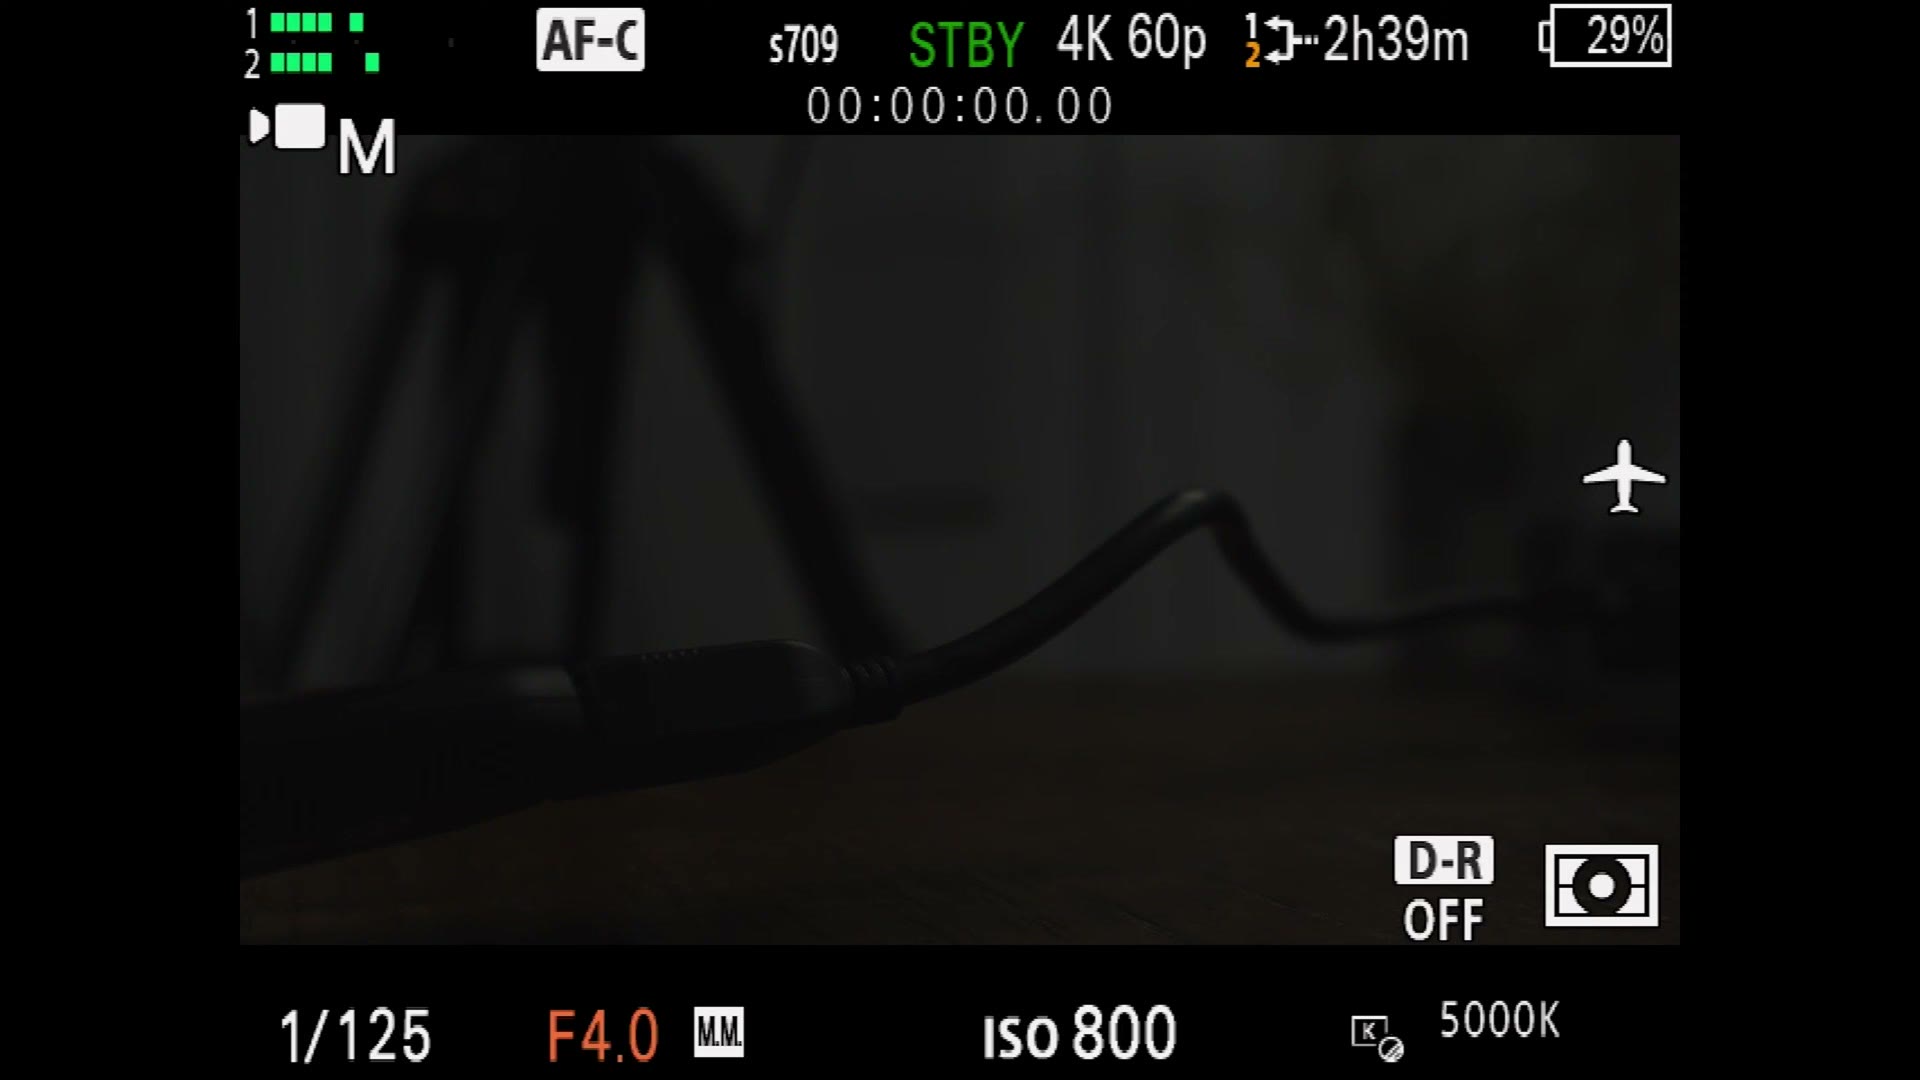
Back out, and increase your shutter speed from 1/50 to 1/125, which is roughly double the frame rate. Roughly. I cannot give you exact, unfortunately. If they ever add a shutter angle feature then we can get exact. Sony, add shutter angle. That would be fantastic.
Leave your aperture where it is, leave ISO at 800 and white balance at 5000K, then press menu, go back to Shooting Mode, Camera Set. Memory, and save this to preset 2. Now any time you press the mode button, MR1 is 24 frames per second and MR2 is 60.
MR3: 4K 120p
Sony managed to cram the ability to record 4K at up to 120 frames per second into this thing, so you should definitely make room for it in the third position.
Press menu, up to Image Quality / Rec, Movie Settings, and pick 120p. Make sure Record Setting is on the highest bitrate too, 280M 4:2:2 10 bit. Gorgeous. Then crank your shutter speed up to 1/250, leave F4, ISO 800 and 5000K, press menu, Shooting Mode, Camera Set. Memory, set this to 3. Bam. Registered.

Now, I am personally more selective about when I film in 120fps, as I find it a bit too slow at times. But if you are filming something that happens really fast, like a couple running, or you just need to maximize how much footage you can get, 120 will do that for you.

Keep in mind though that the FX30 crops in 1.6 times whenever you record 4K 120. Look how tight that is. I am on a 24mm right now. Yeah. Pretty tight. So keep that in mind.
You have now set up your custom modes. Any time you want them, press the mode button and pick MR1 for 24fps, MR2 for 60 and MR3 for 120, all in 4K. It is so fast, you are going to love it.
Custom Buttons Setup
Custom buttons are what most people think of whenever they think about customizing a Sony camera. This camera is covered in buttons labeled 1 through 6, and there is even one hidden up top. Look at that little 6 hidden up there. That is cool. What is great though is that basically every single button on the camera is customizable, not just the numbered ones.
That said, you do not necessarily want to change a button that is already labeled for something too far from what it says, because if you ever borrow a friend’s FX30 it can make using it a major pain. So we are not going to go completely crazy here, but we are going to make some really nice tweaks.
Go to the menu, down to the yellow toolbox at the very bottom, Operation Customize, and make sure you select the video camera icon rather than the photo one.
The Rear Buttons

Rear 1 is set to Focus Magnifier and that is great. Leave it. It is labeled that way, and you can just move your thumb over and punch in and out.
Rear 2 is not set, so let’s set it. Select button 2, go up to Color / Tone, and choose Select LUT. This lets you toggle your LUT off and on while you are filming, which can be really helpful.
Rear 3 is the middle button in the center of the wheel. Go to the red camera icon, into Image Stabilization, and change it to Focal Length. This way, if you are using a manual focus lens and you need to dial in the focal length, you can get to it instantly. If you never use manual lenses you do not have to set this.
Rear 4 is Zebra Display Select by default. That is great, so you can turn your zebras off and on. Leave it.
Rear 5 is Peaking Display. You can turn your peaking lines off and on. Really fun. Leave it on the default.
Rear 6 is a long press for Tv Auto/Manual. That is cool if you want it, but considering we already have the camera set up for all manual filmmaking, you are not going to need auto anything. So go into Autofocus / Manual Focus, Focus Assistant, and choose Focus Map Display Select. This is fantastic, because now any time I want the focus map I just press down. Bam. Super helpful whenever you are adjusting focus. Love it.
The Top Buttons
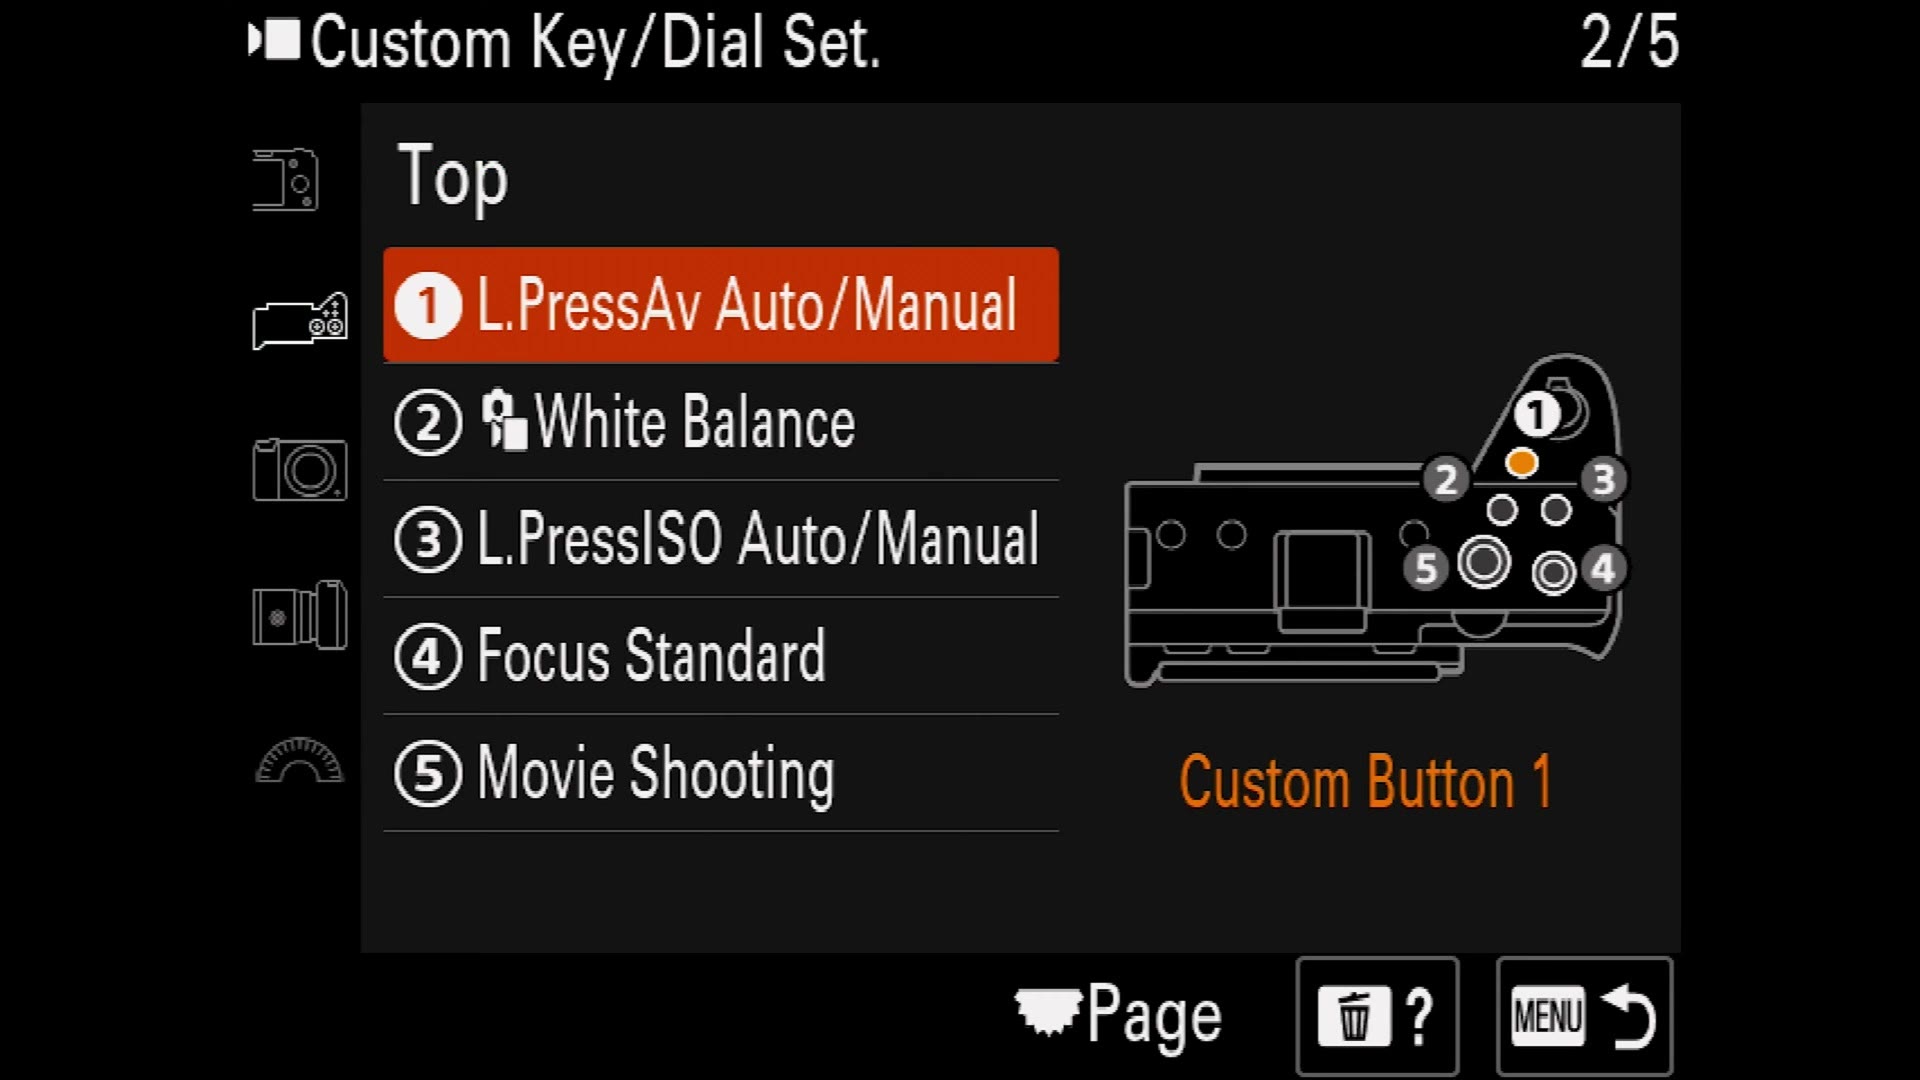
Top 1 is another long press for Av Auto/Manual. Nope. We are filming manually here, we do not need it. Change this to the AF/MF Selector Toggle. This way you press one button, literally the number 1 button, and you can switch from autofocus to manual focus with your lens. This is wonderful if you need to change things very quickly.
Top 2 is White Balance by default. I love this. Leave it.
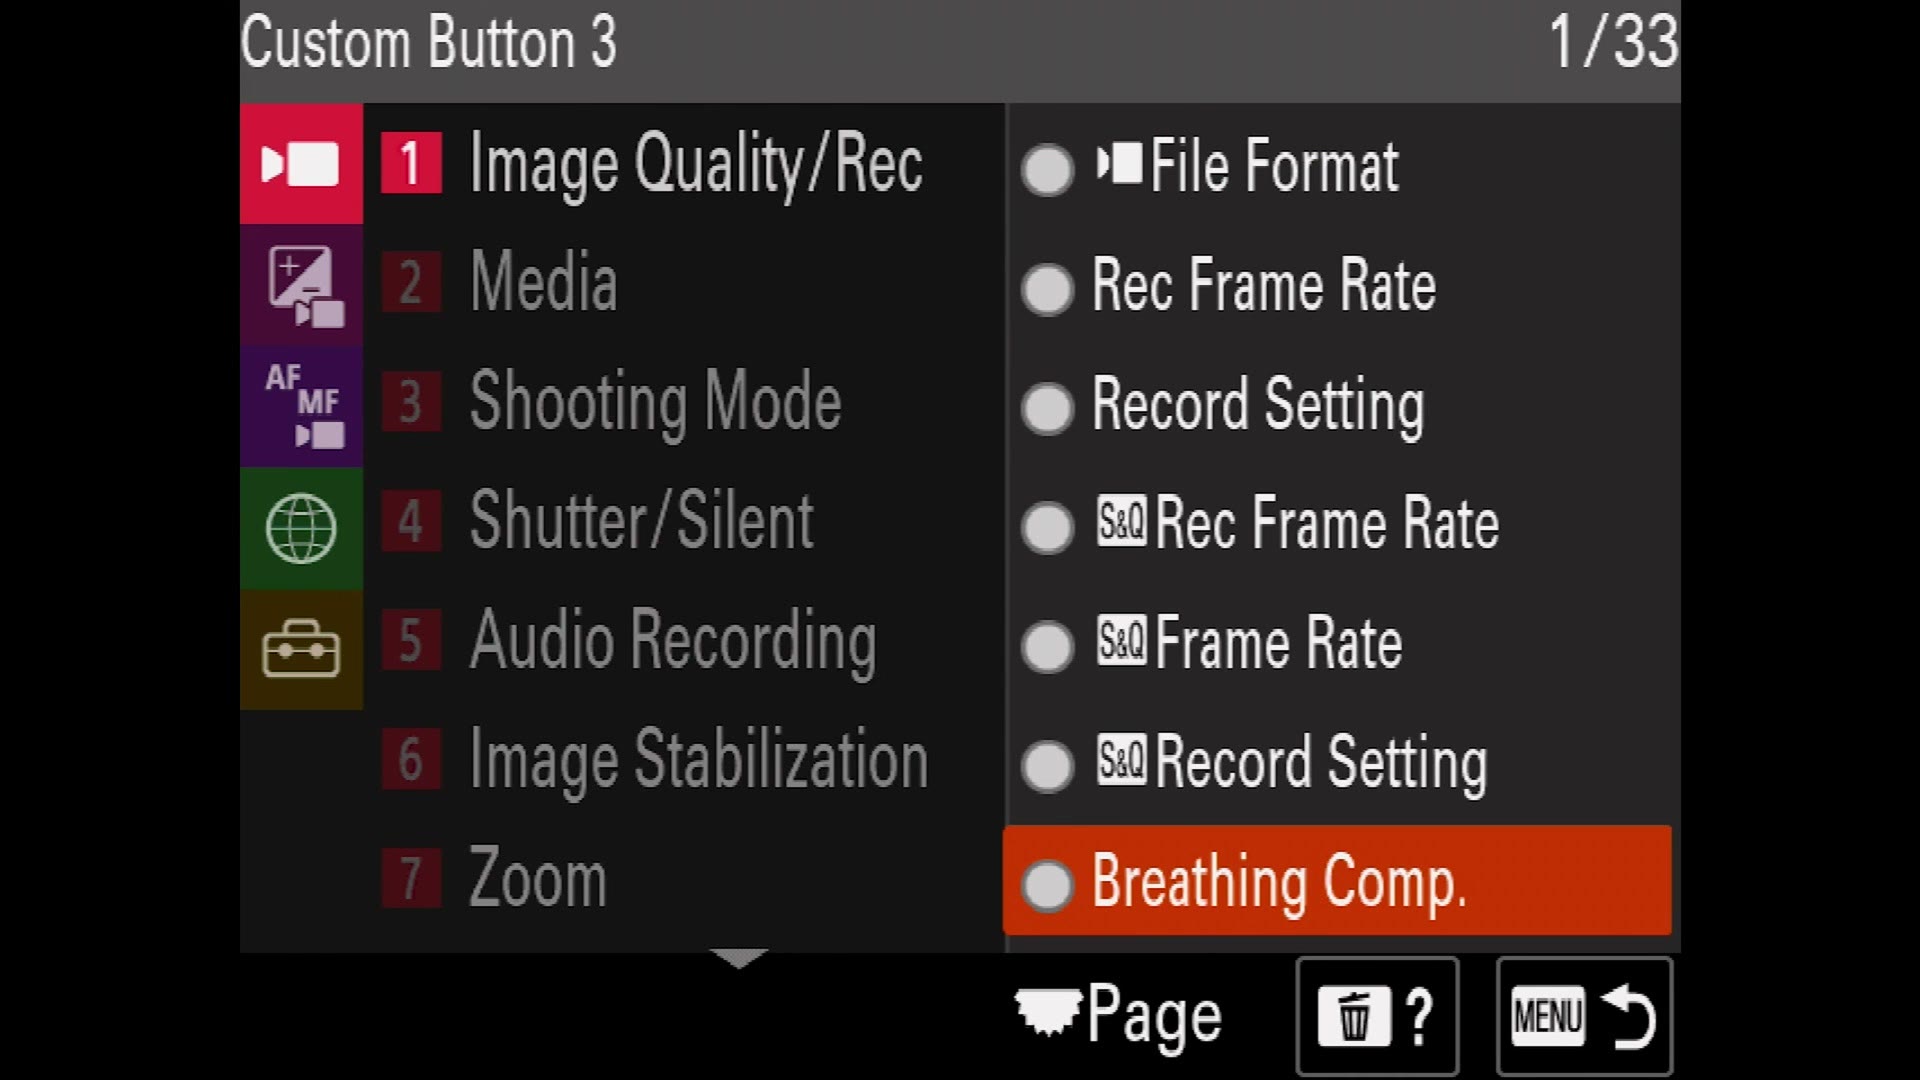
Top 3 is a long press for ISO by default, but we already have the scroll wheel on the back set to ISO, so we do not want that. Go up to Image Quality / Rec and choose Breathing Compensation. This is fantastic if you are using a native Sony lens and you want very smooth focus transitions with no breathing. Now all you have to do is press button 3 on the top to turn it off or on.
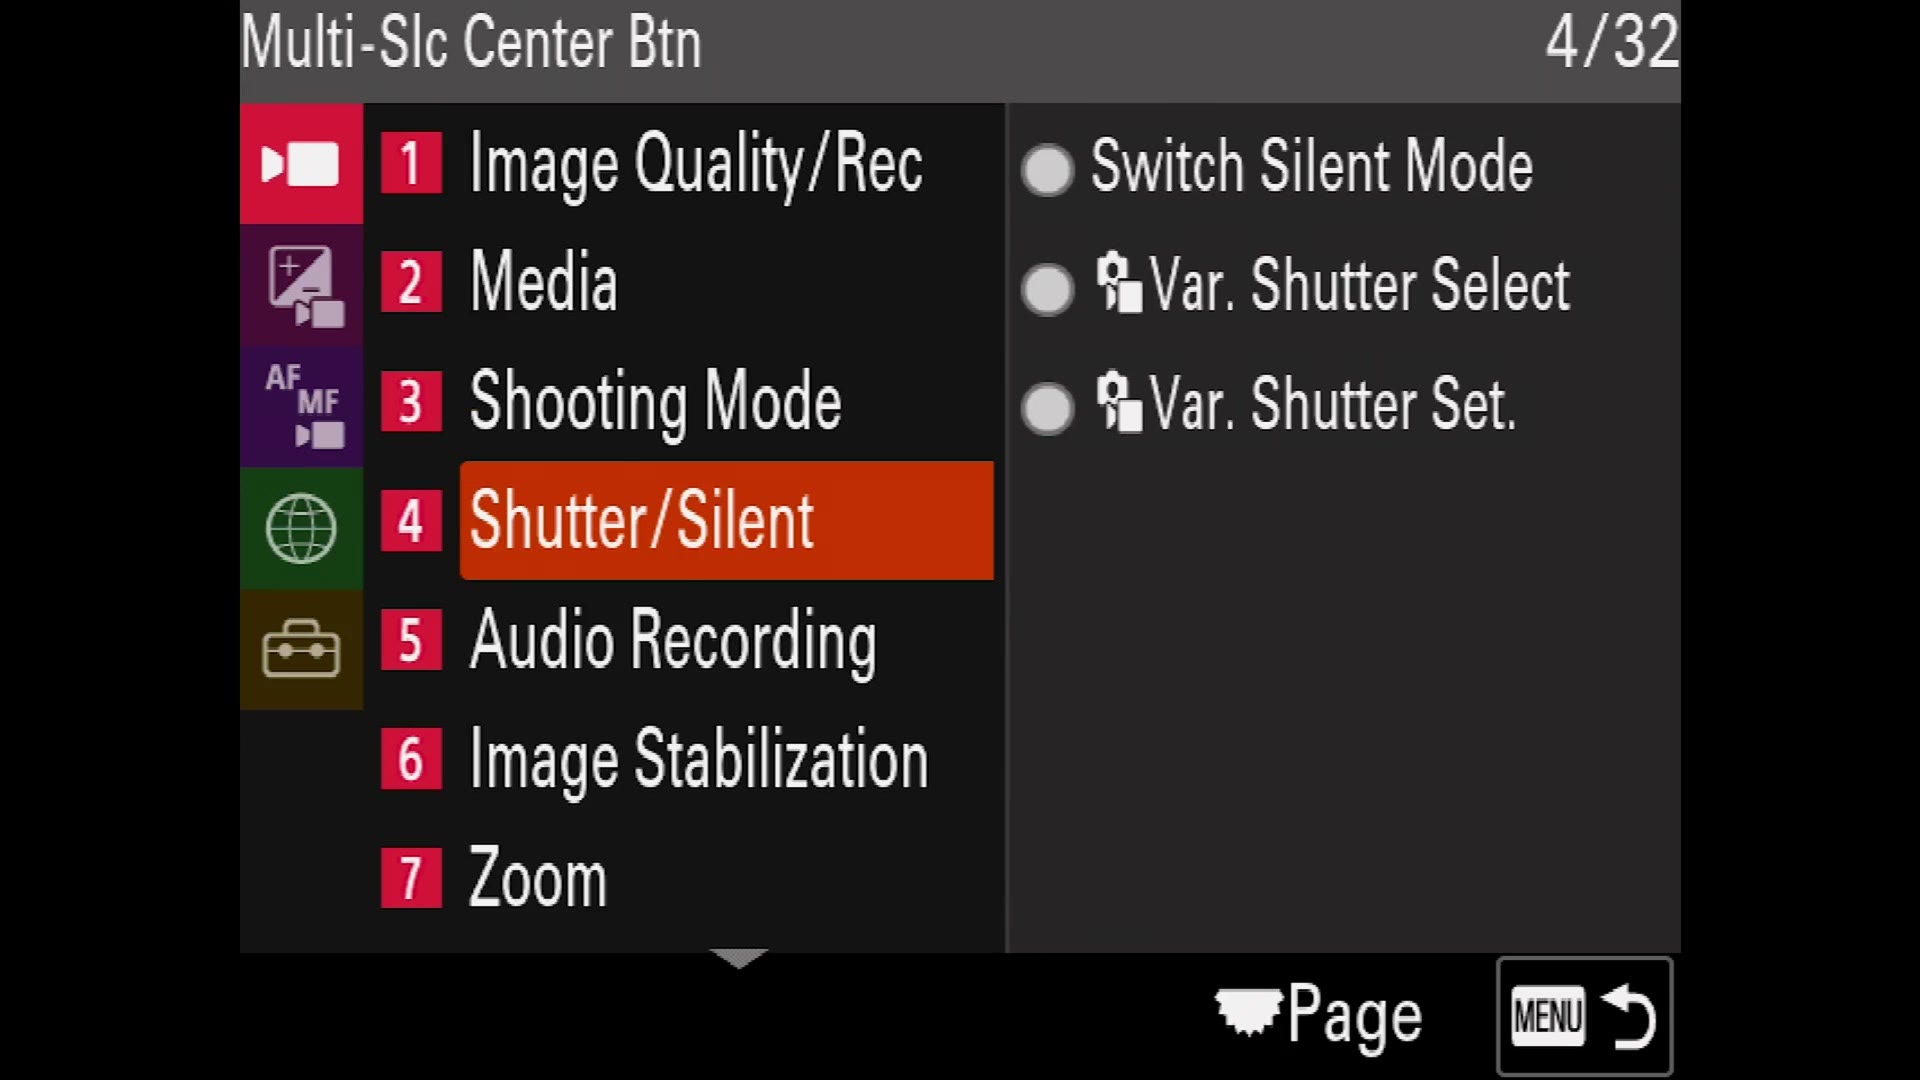
Top 4 is the little joystick nipple thing at the top. That is what people usually call it. By default it is set to Focus Standard, which basically just makes the camera focus again, and you do not need that. Go to Shooting, Shutter / Silent, and select Variable Shutter Setting. The variable shutter can help you whenever you are dealing with flicker from odd lighting. As the camera is set up right now this will not actually work yet, but we are going to fix that in the function menu in a moment.
Top 5 is the big red record button, set to Movie Shooting. Yeah, let’s leave that on record. Seems like a good idea.
The front button is also set to Movie Shooting by default, and you know what, I like that. Good to have it there.
Next is Lens. Certain Sony lenses have a custom button on them you can assign. This old 16-35 F4 does not, but if it did, the default is Focus Hold and I would just leave it there.
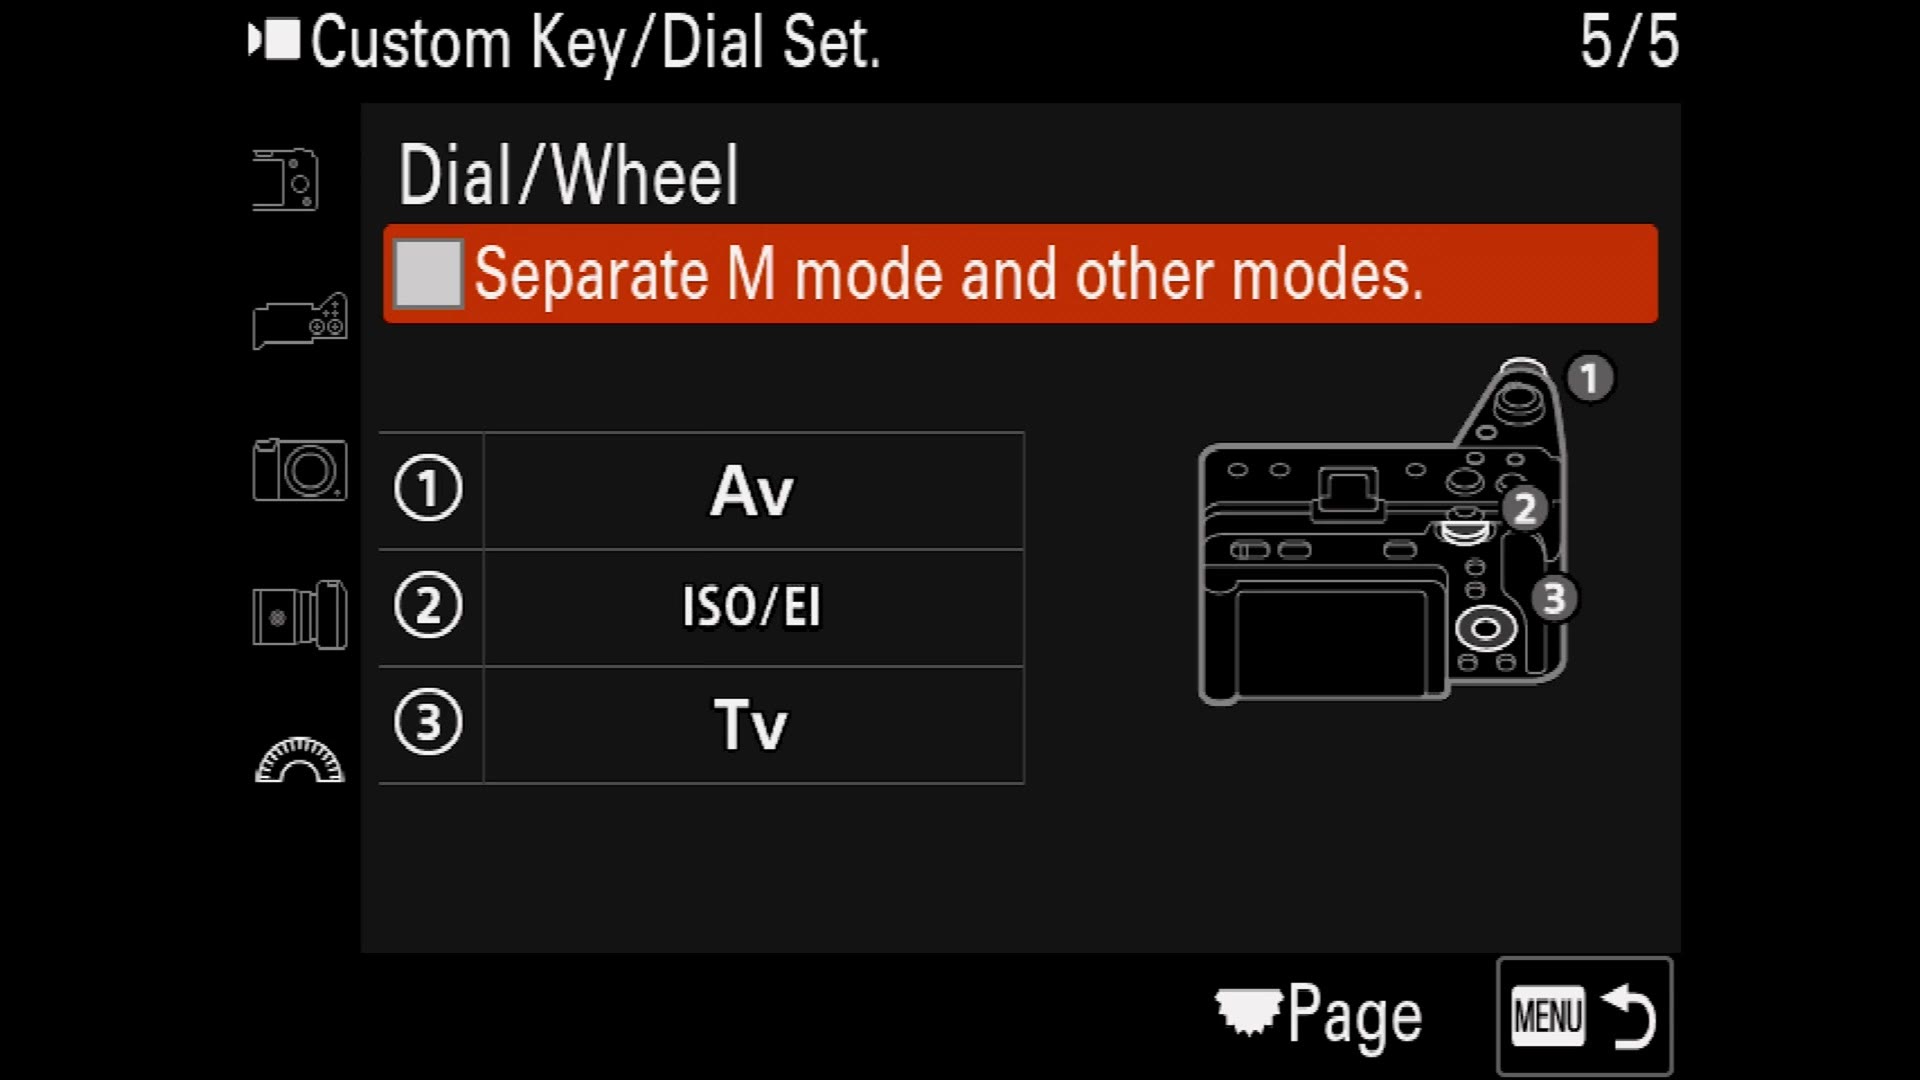
At the bottom you have Dial / Wheel. By default the front dial adjusts aperture, the wheel adjusts ISO, and the rear dial adjusts shutter speed. I leave all of those on default. They work great. But if you want to tweak them, that is where you do it.
Function Menu Setup
Now for the function menu, which is the little menu that comes up whenever you press the Fn button on the back. Go to the menu, into Function Menu Settings, and make sure you are only changing the settings for video mode rather than photo mode.
The Top Row
By default it starts with Audio Recording Level. You definitely want access to that. Leave it.
Next is Focus Mode. Leave that, so you can change focus modes quickly. Then Focus Area, which is where you change where the camera is choosing to focus. That is good by default too.
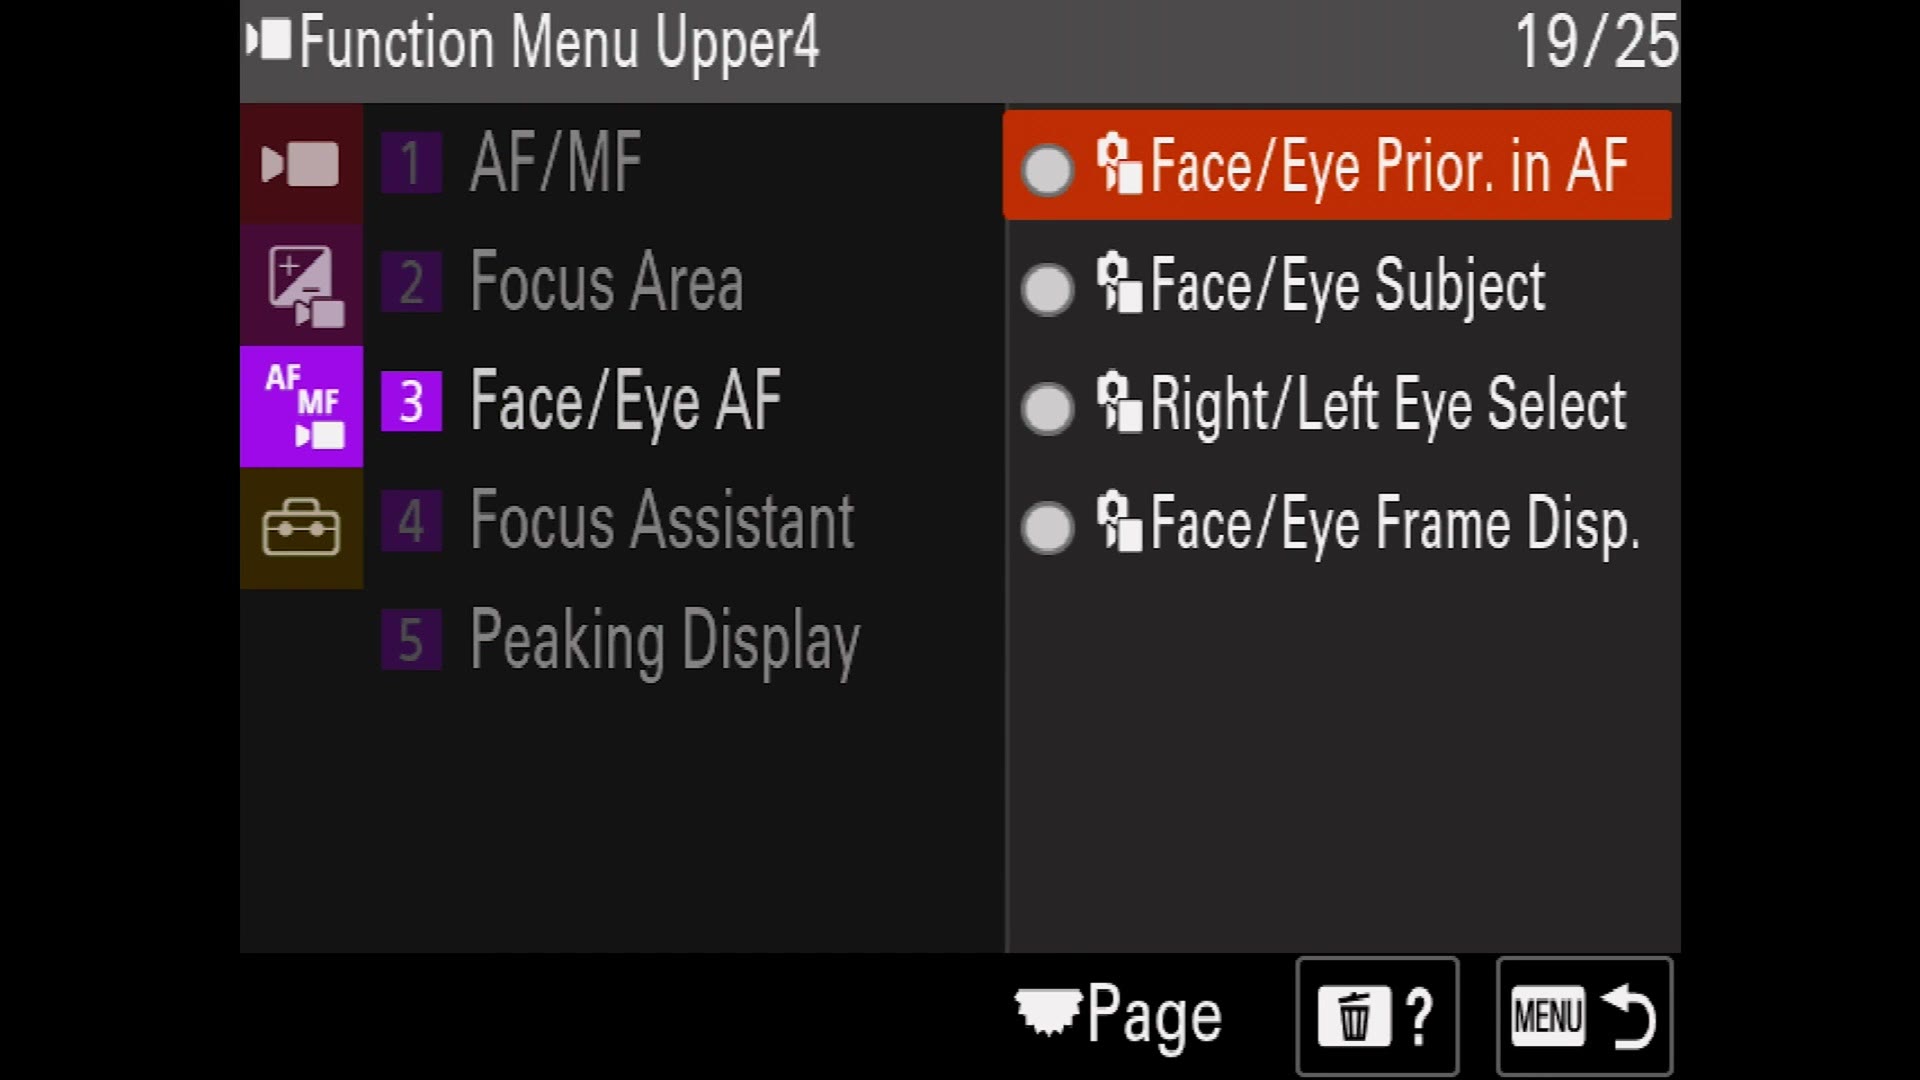
Then we get to Recording Frame Rate. We already have our custom modes set up, so we do not need to reach the frame rate from here. Change it to Face / Eye Priority in AF instead. That way if the camera is trying to focus on somebody’s face and you want it on something else, you can just switch it off. Nice feature to have whenever you need it.
Next is S&Q Frame Rate, which we do not need either. Change that to Zebra Display. And then at the end there is Picture Profile, which we are also going to change, over to Zebra Level. That way you can not only turn your zebras on and off from the function menu, you can adjust the level of them too. I know we set a custom button for zebras, but it is nice to have it right here as well in case you ever forget.
The Bottom Row
We basically need to change every single one of these. By default you have settings for zoom in and out speed controls, and if you wanted those you could keep them, but I do not think you are going to need them.
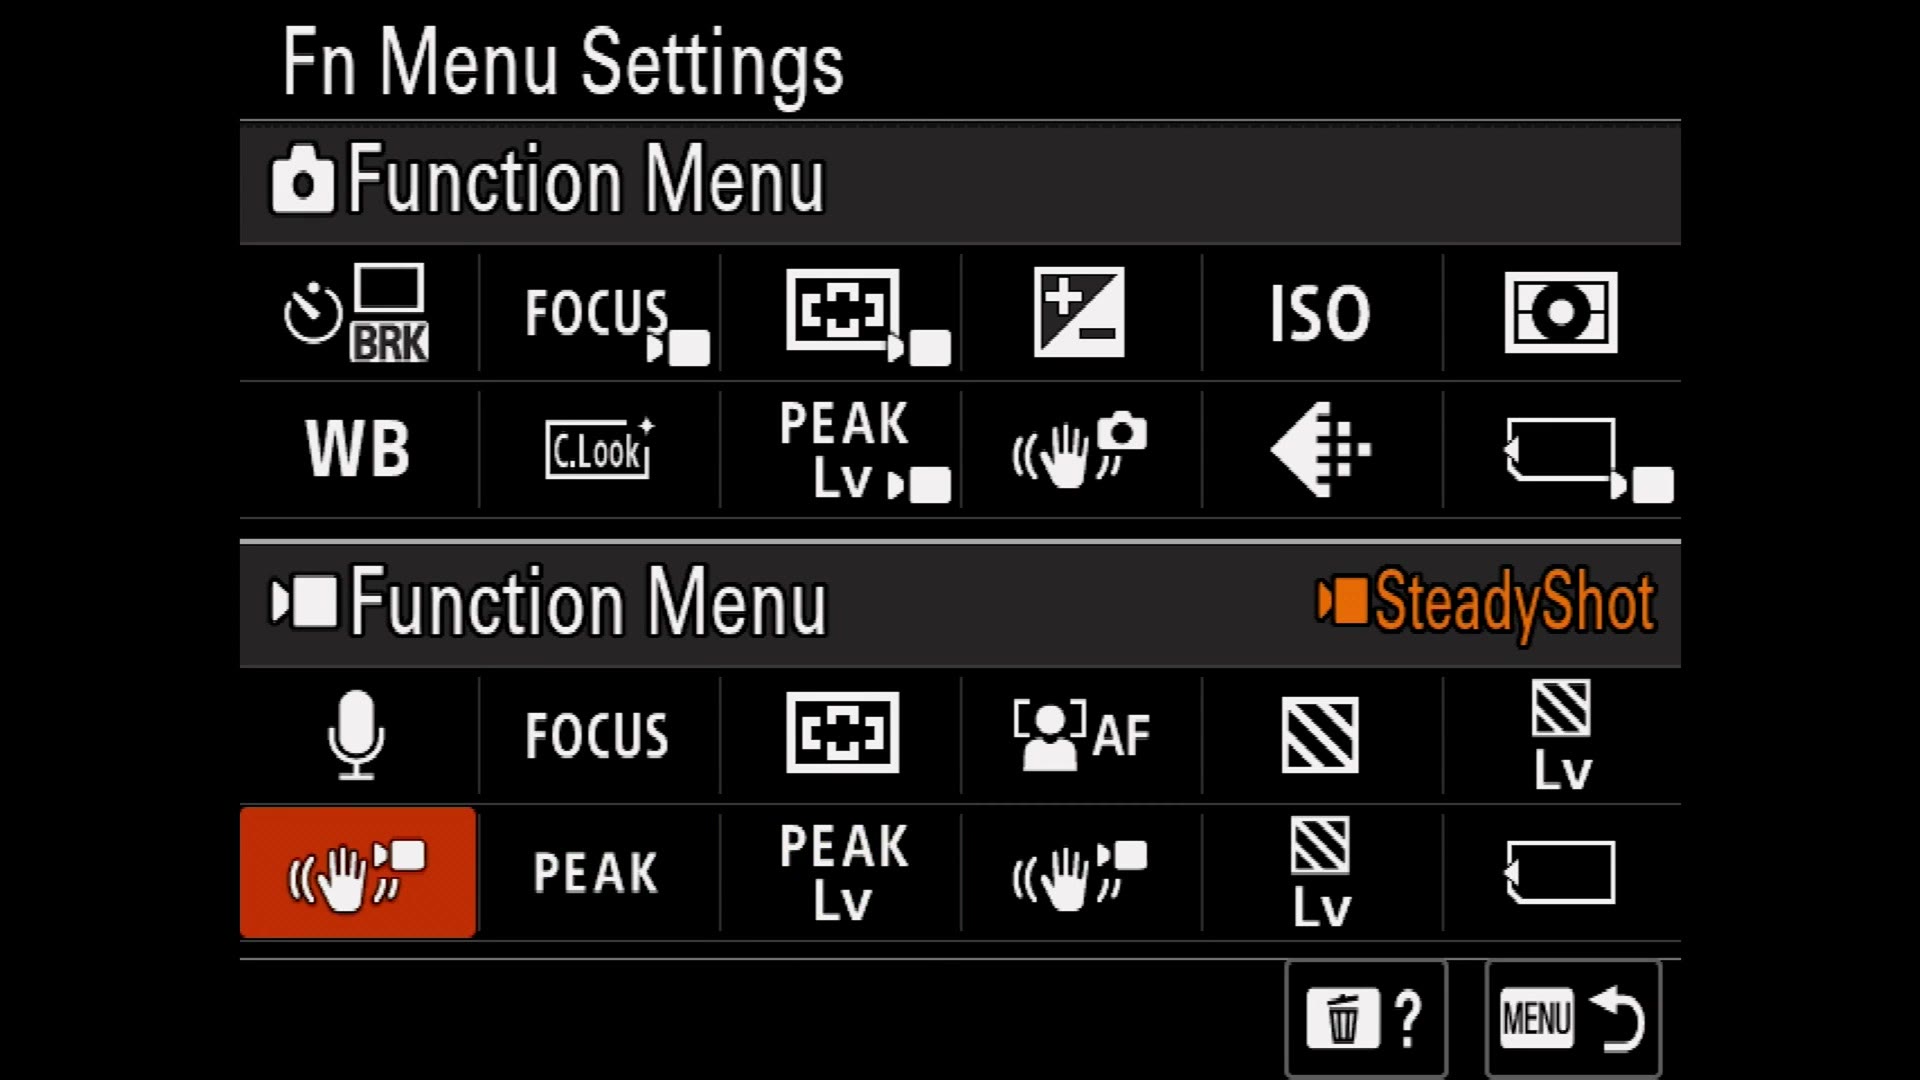
First, go to Image Stabilization and select SteadyShot, so you can toggle between standard and active modes right from the function menu.
Next, change the other zoom speed slot to Peaking Display, and the one after it to Peaking Level. That way you can turn peaking off and on and control the level, just like the zebras.
Then set Grid Line Display and Grid Line Type, so if you want rule of thirds for a bit, or you want to see your 2.35:1 aspect ratio, you have it right there.
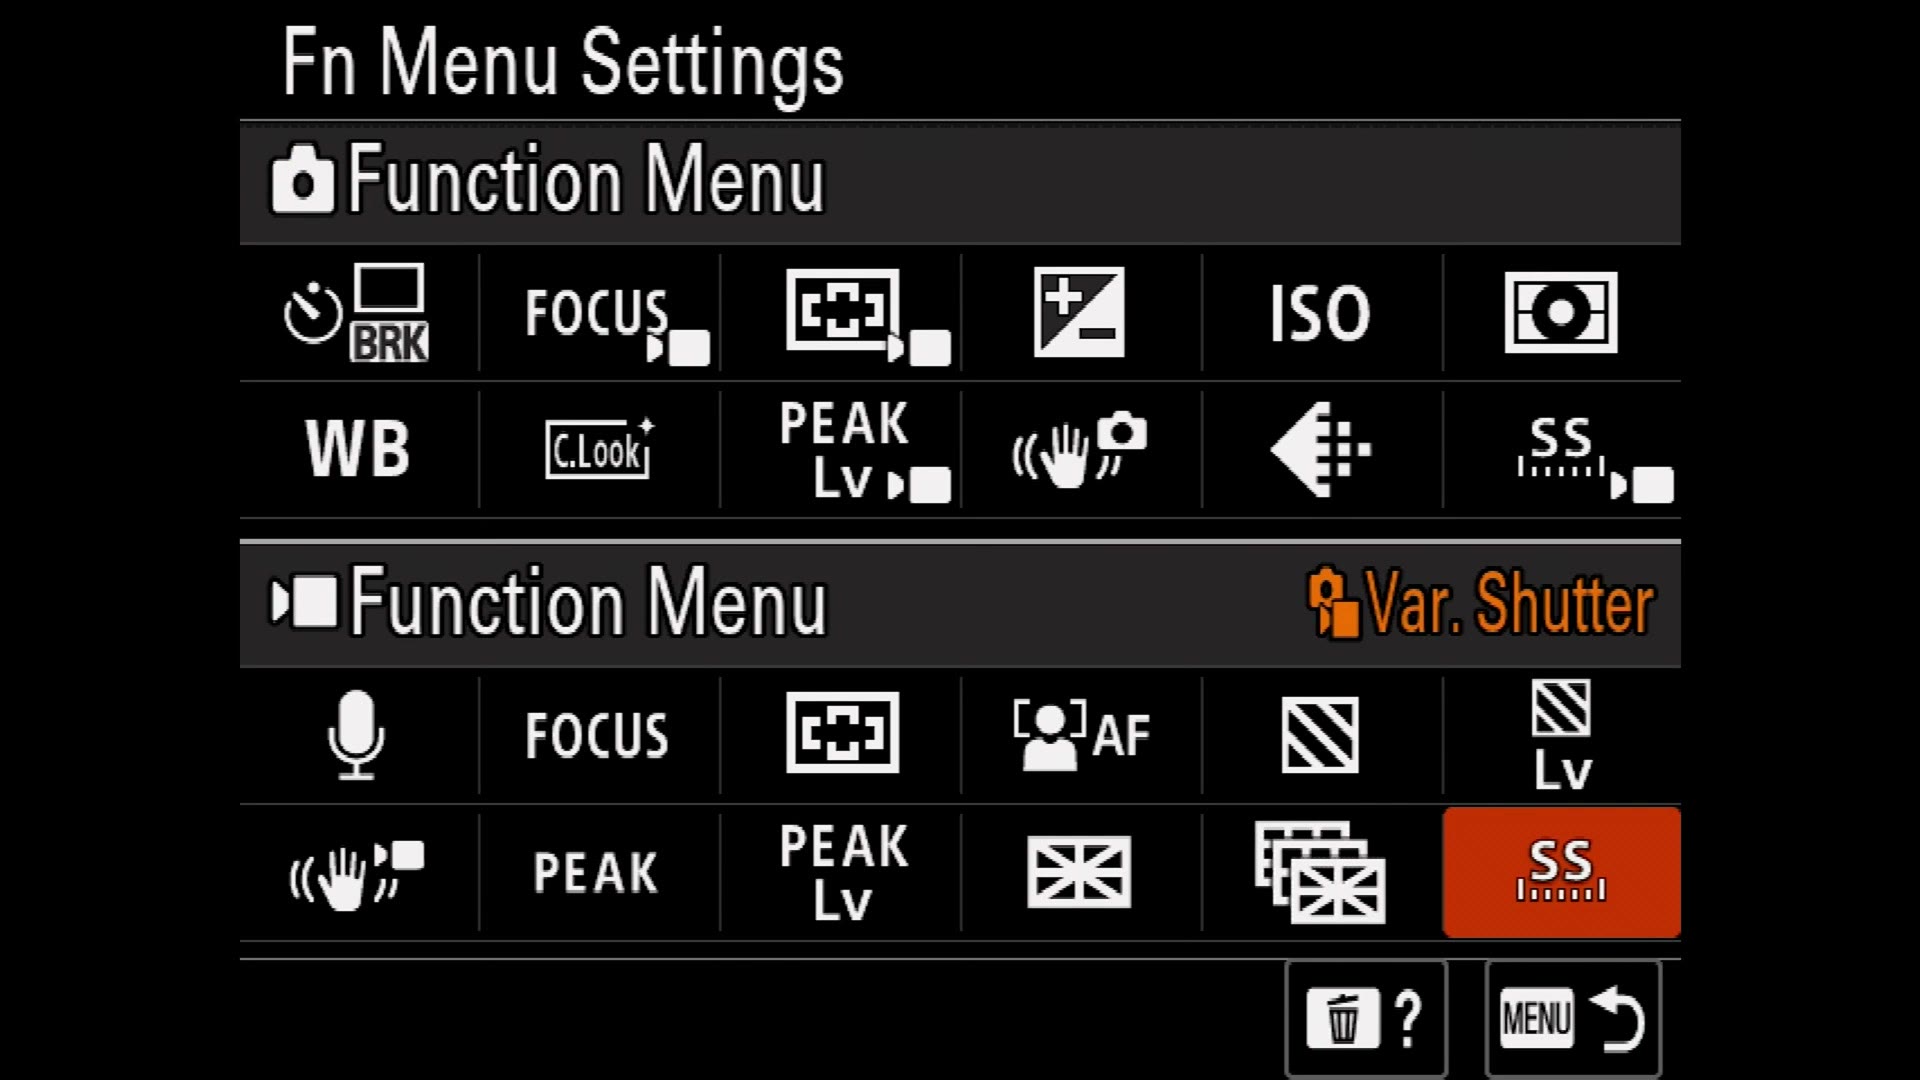
And lastly, very very important. Remember we set that custom nipple on the top to variable shutter? Go into the last slot, change it from Recording Media Settings, which we do not need to worry about, to Variable Shutter. Now you can turn variable shutter off and on in the function menu and then use the button on the top to adjust the shutter speed up and down.
Custom Menu Setup
Even with the custom modes, custom buttons and function menu all set up, you are still going to need to occasionally dig into the menus. Thankfully Sony gives you one last option called My Menu, which is the big star up at the top. It is a customized menu that only includes the settings you want, so you do not have to dig through pages and pages.
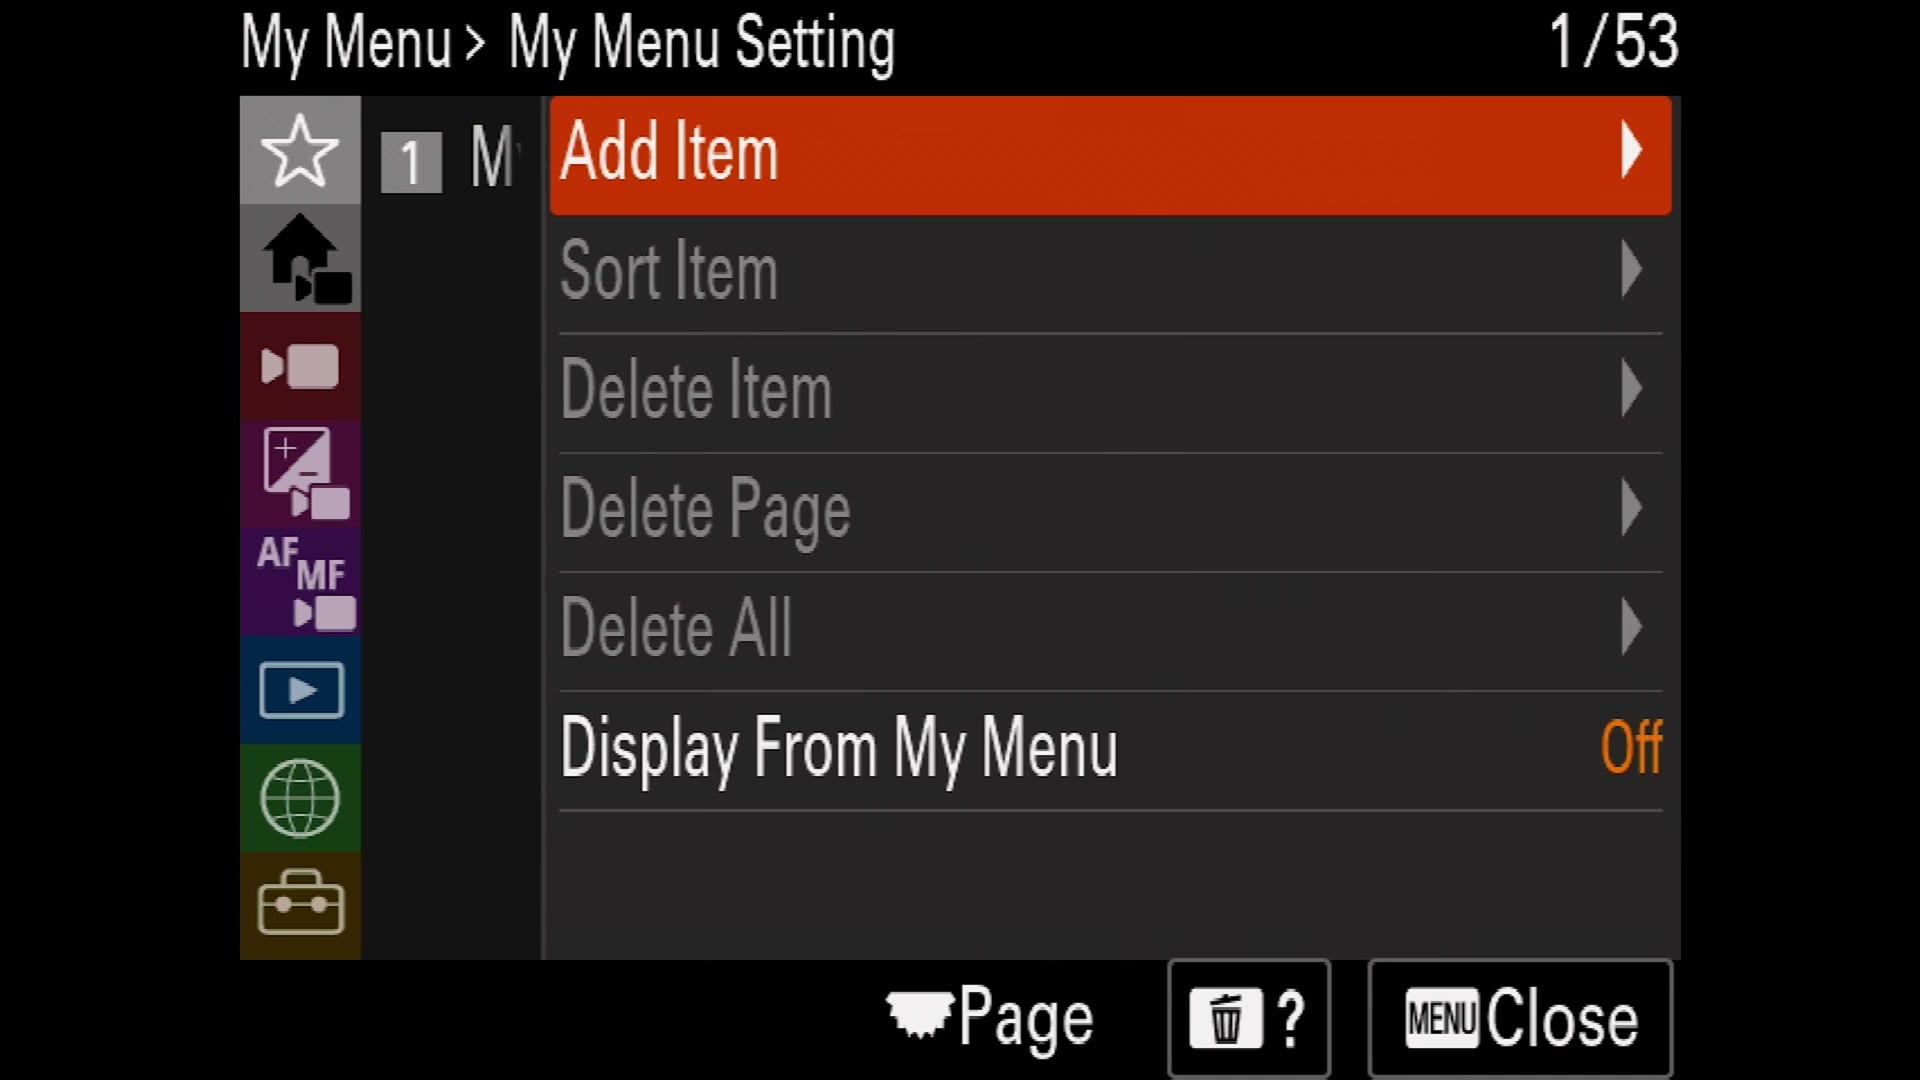
Go to My Menu Setting and you will see an option called Display From My Menu. What this does is awesome, because it makes it so that every single time you press the menu button it opens straight to your My Menu. Even if you were buried deep in something else. I would not turn it on yet though, because we are about to be digging through the menus a lot. Once we are done, turn it on.

My Menu 1 is for the things you use most. Go to Add Item, Image Quality / Rec, File Format, and add it to My Menu 1. Then add Movie Settings right below it. Now any time you need those, they are right there.
My Menu 2 is for the settings I rarely use but still like having access to. Add Record Media Settings, Picture Profile, and Monitor Brightness. And what the heck, let’s throw in Camera Set. Memory in case you need to re-save those custom modes. I would also add Custom Key / Dial Settings and Function Menu Settings, so if you need to tweak those on the fly you can get to them without going all the way down to the toolbox icon.
My Menu 3 is what I call the dangerous menu. I want this setting far removed from everything else. Add Item, Media, Format, and put it in My Menu 3, buried way down at the bottom. You are going to need to format your cards after you shoot, so you want it accessible, but you also do not want to hit it by accident.
And that is how you customize the FX30 for fast filmmaking.
Remember, you can still download my FX30 settings file for free, load it onto your camera, and immediately have all of my settings and custom buttons without digging through any of these menus.
My other FX30 videos are worth a look too: part one, the full menu setup, my memory card guide, which applies to the FX30 as well, and my guide to Sony video formats. And my color presets work great with FX30 footage and make it look incredible.
Thanks so much for reading, and have a great day!