
Is your computer too slow to edit 4K? Or do you have a fast computer that still chokes on 4K, 6K or 8K footage? Proxies fix that, regardless of your specs.
This is my whole proxy workflow, including the exact preset settings. You can also download my proxy preset for free and skip building your own. If you need Premiere, there’s a free trial.
At the end I cover the thing that trips everyone up: making proxies when you’ve interpreted your footage, where the proxy frame rates refuse to match the originals.
Toggle Proxies
Before anything else, know that once proxies are attached there’s a Toggle Proxies button that swaps the whole timeline between the small files and the originals. That’s the payoff. You edit on the small ones and export from the real ones.
Building The Encoding Preset
This happens in Adobe Media Encoder, not Premiere.
Go to the Preset Browser. Ignore the plus icon marked Create New Preset and choose Create Encoding Preset instead. Don’t name it yet.
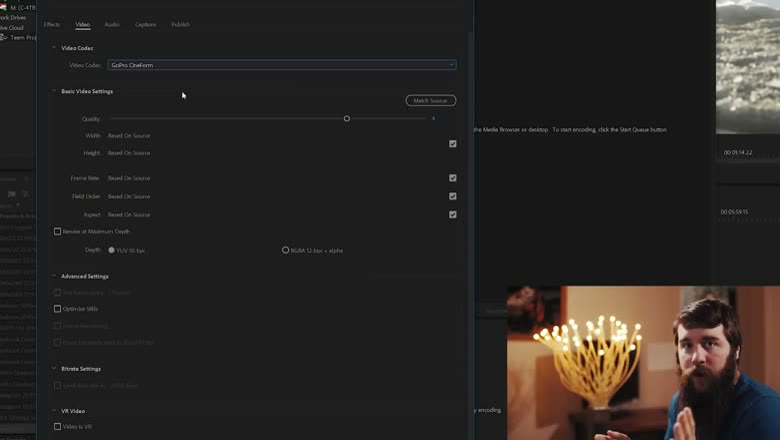
- Format: QuickTime.
- Include video and audio. Your proxies need both.
- Video Codec: GoPro CineForm. CineForm is an intermediate codec and, importantly, it’s platform agnostic, so the same preset works on Mac and PC.
- Frame size: 1280 by 720. This is a proxy. It does not need to be beautiful and it does not need resolution. 720p is the sweet spot for me.
- Frame rate: match your sequence. Mine is 23.976.
- Quality: 1. Lowest.
- Depth: not maximum. Again, it’s a proxy.
Add A Watermark
Under Image Overlay, point it at a PNG. Mine says PROXY across the frame.
This sounds cosmetic and isn’t. When you’re deep in an edit it is genuinely easy to lose track of whether you’re looking at proxies or originals, and an overlay answers that instantly. The preset download includes the image.
Name It Properly
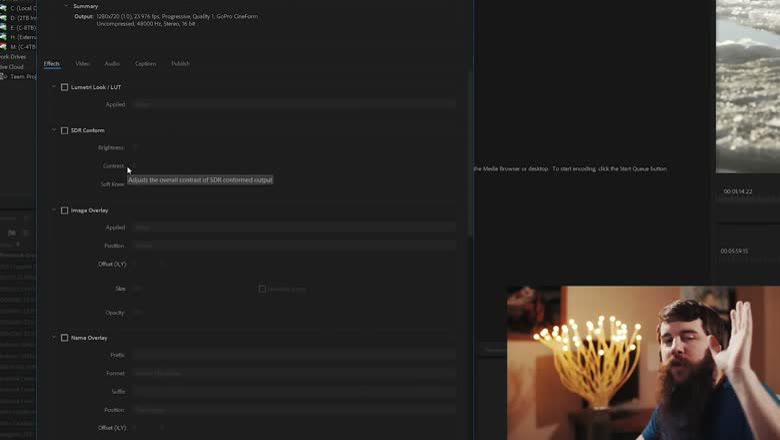
Now name the preset, and be specific, because you’re about to have two presets that look identical. Mine is Cineform 1280×720 23.976 Quality 1 Watermarked. When you’re picking from a dropdown in six months you’ll be glad.
Then Build An Ingest Preset
Here’s the bit that isn’t obvious. Premiere does not accept an encoding preset for proxies. It wants an ingest preset, which is a different thing, so you have to make one that wraps the encoding preset you just built.
Back in the Preset Browser, choose Create Ingest Preset. Set format to QuickTime, then select the encoding preset you just made from the preset dropdown. Name this one something similar but distinguishable, so you can tell the two apart.
Editing in something else? I covered How to use Proxy Files to Edit SUPER FAST in DaVinci Resolve! and How to EDIT FASTER with Proxy Files in Premiere Pro (2022) too.
Then import the preset file into Premiere and you can attach proxies to your clips.
The Interpreted Footage Problem
If you shoot mixed frame rates and interpret your footage in Premiere, and you’ve tried this before, you’ll have found that your proxies come out at the wrong frame rate and refuse to line up with the originals. (If you’re not sure what interpreting is, that’s a separate video on frame rates.)
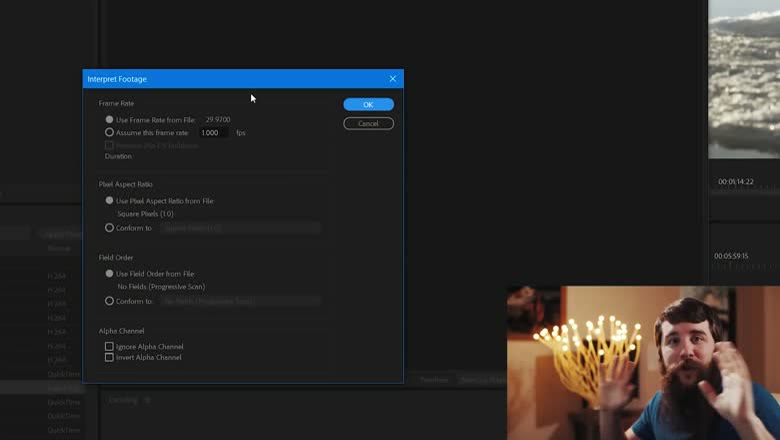
The fix is to interpret them again, in Media Encoder, before rendering:
- Select all your clips in the queue with Ctrl+A.
- Right-click and choose Interpret Footage. Yes, the same dialog as in Premiere.
- Under Frame Rate choose Assume this frame rate and type the frame rate of your native files. Mine is 23.976.
- Press OK, and wait.
A warning about that waiting. With 400, 500 or 1,000 clips, opening the Interpret Footage dialog can take five minutes. Ten minutes. I have had it take twenty, depending on your machine and your drives. Applying the change can take a while too.
If it looks like Media Encoder has frozen, it almost certainly hasn’t. It’s grinding away in the background. Adobe really ought to fix this, but until they do, just leave it alone.
You can confirm it worked by right-clicking a single clip and reopening Interpret Footage. Then hit play and it renders your proxies out, very fast.