
Here is how to quickly and easily film in the V-Log Photo Style with your Panasonic cameras, like the GH7 I have right here.
Also, to save you time and make this Photo Style super easy to film with, I have created an entire guide for the Panasonic GH7 in particular, which is going to show you how to completely master all of the settings of this camera and get the best possible image quality out of it. Oh, and it comes with color presets I made specifically for filming in V-Log with the GH7 as well.
V-Log Photo Style Setup
First, grab your camera, navigate to the Photo Style menu, and then go all the way over until your camera is set to V-Log. As you can see, whenever you select this, all of the customization settings for the camera on the right are going to be grayed out except for two at the bottom, and they are kind of hidden. Sharpness and noise reduction.
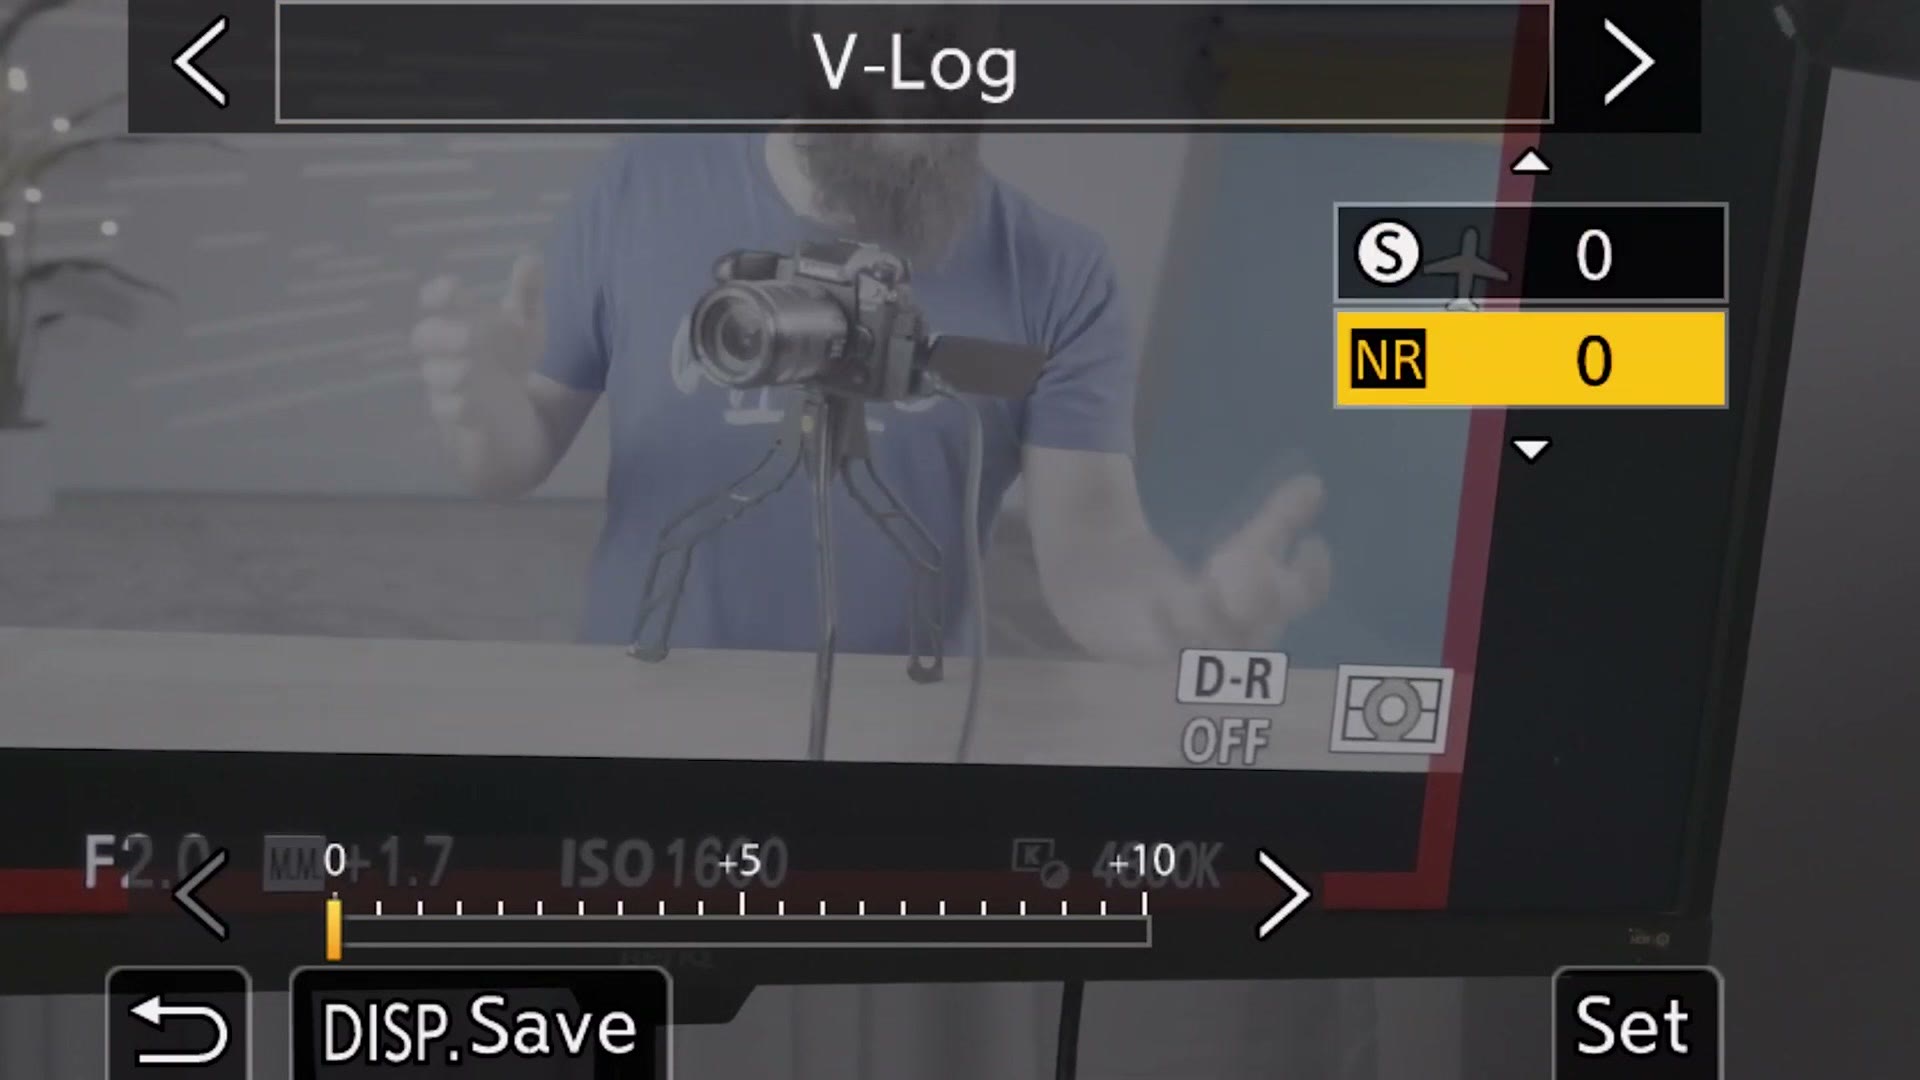
Both of these are going to be set to zero by default, and you may be tempted to change them, but I would never recommend it. You can always add noise reduction and sharpness in your editing software, and you are going to have way more control over how much you add by doing it that way. So leave them set to zero. You do not want to bake extra sharpness or noise reduction into your footage.
Make Previewing V-Log Easy
Warnings out of the way, once you press the set button to select V-Log and go back to the preview screen on your camera, this is where you may start to feel really intimidated, because your image preview is going to be this really low contrast, really flat and desaturated image. It can be really difficult to tell if your footage is bright enough or dark enough, not to mention trying to guess the correct white balance, because the footage is just so desaturated and flat.
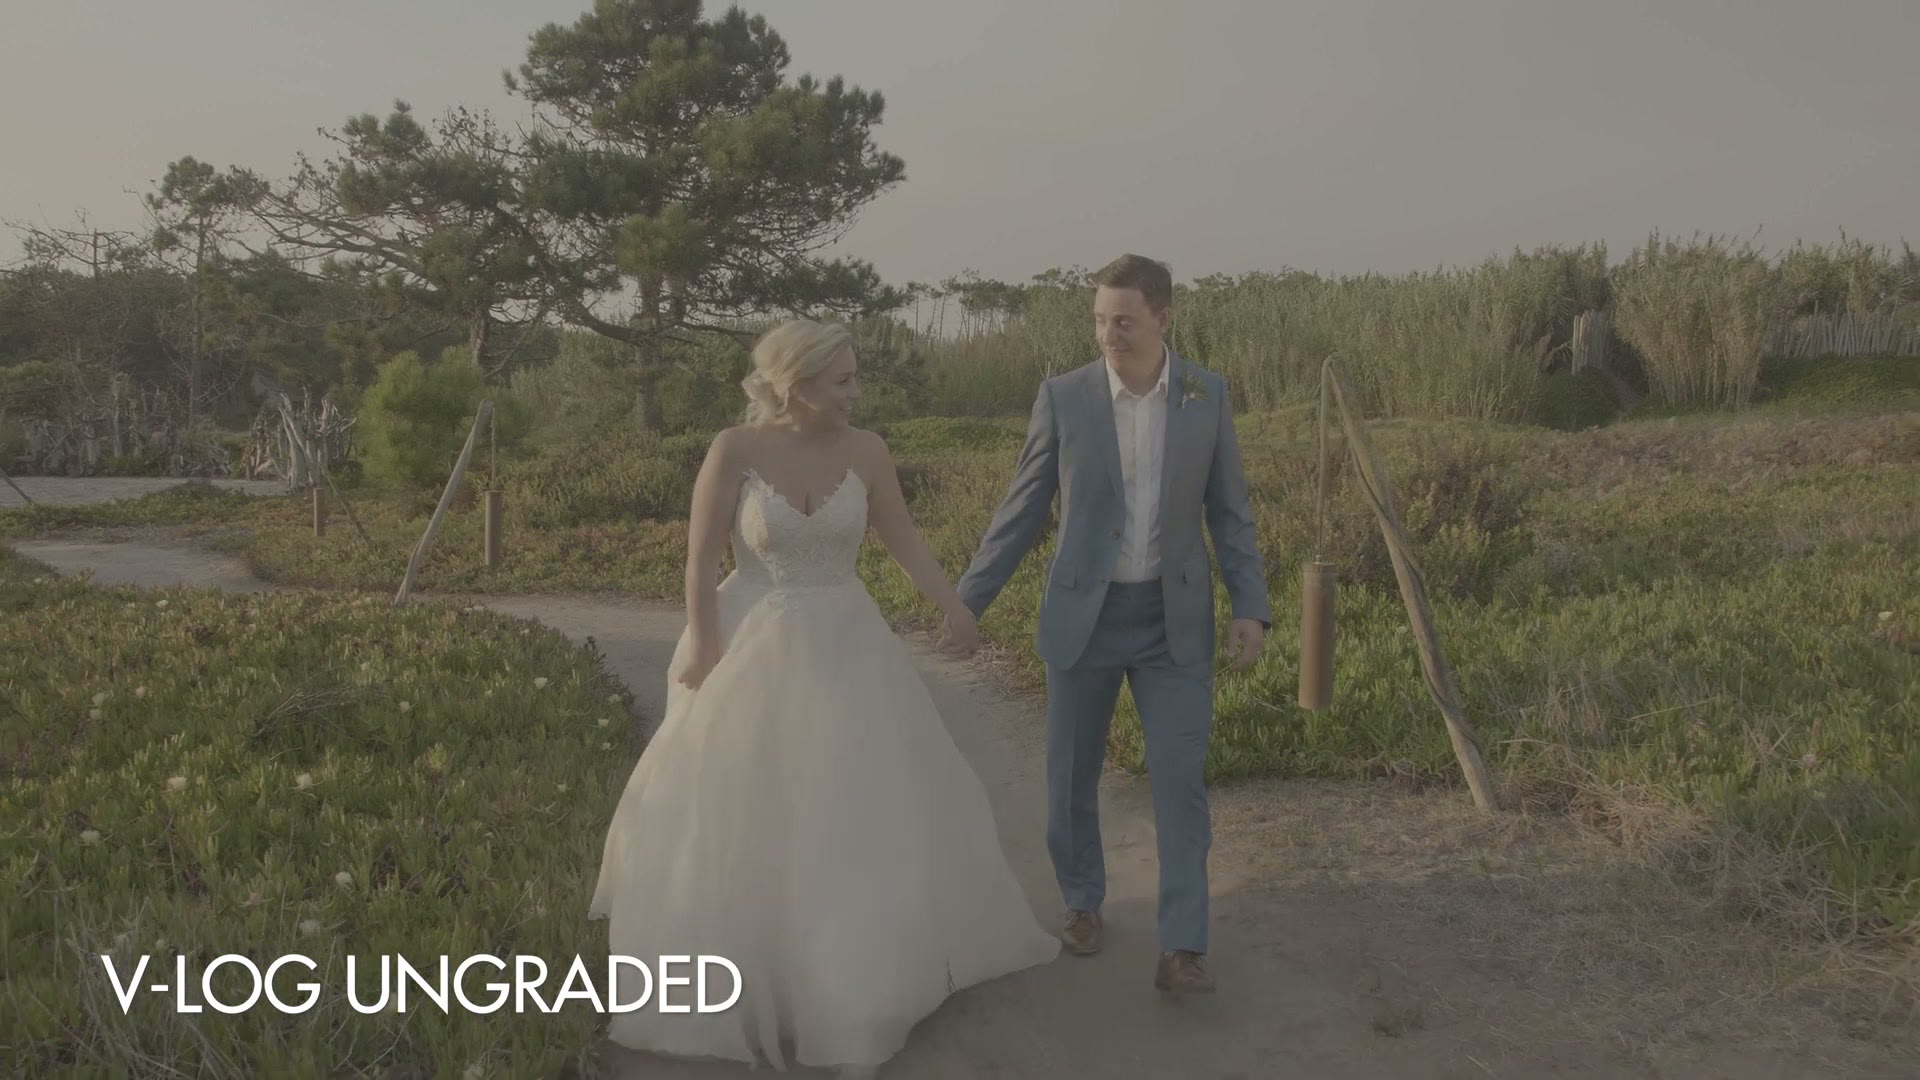
Well, here is where I have really good news for you. You do not need to film with your camera showing this V-Log preview. You can actually tell the camera you want it to show a preview of how the footage will look after you color grade and add that saturation and contrast back to it.
To enable this saturated and contrasty preview, go back into the menu, over to the gear icon, then down to the second monitor icon, which is Monitor / Display (Video), and select Log View Assist. Then for LUT Select (V-Log), make sure that Vlog_709 is selected.
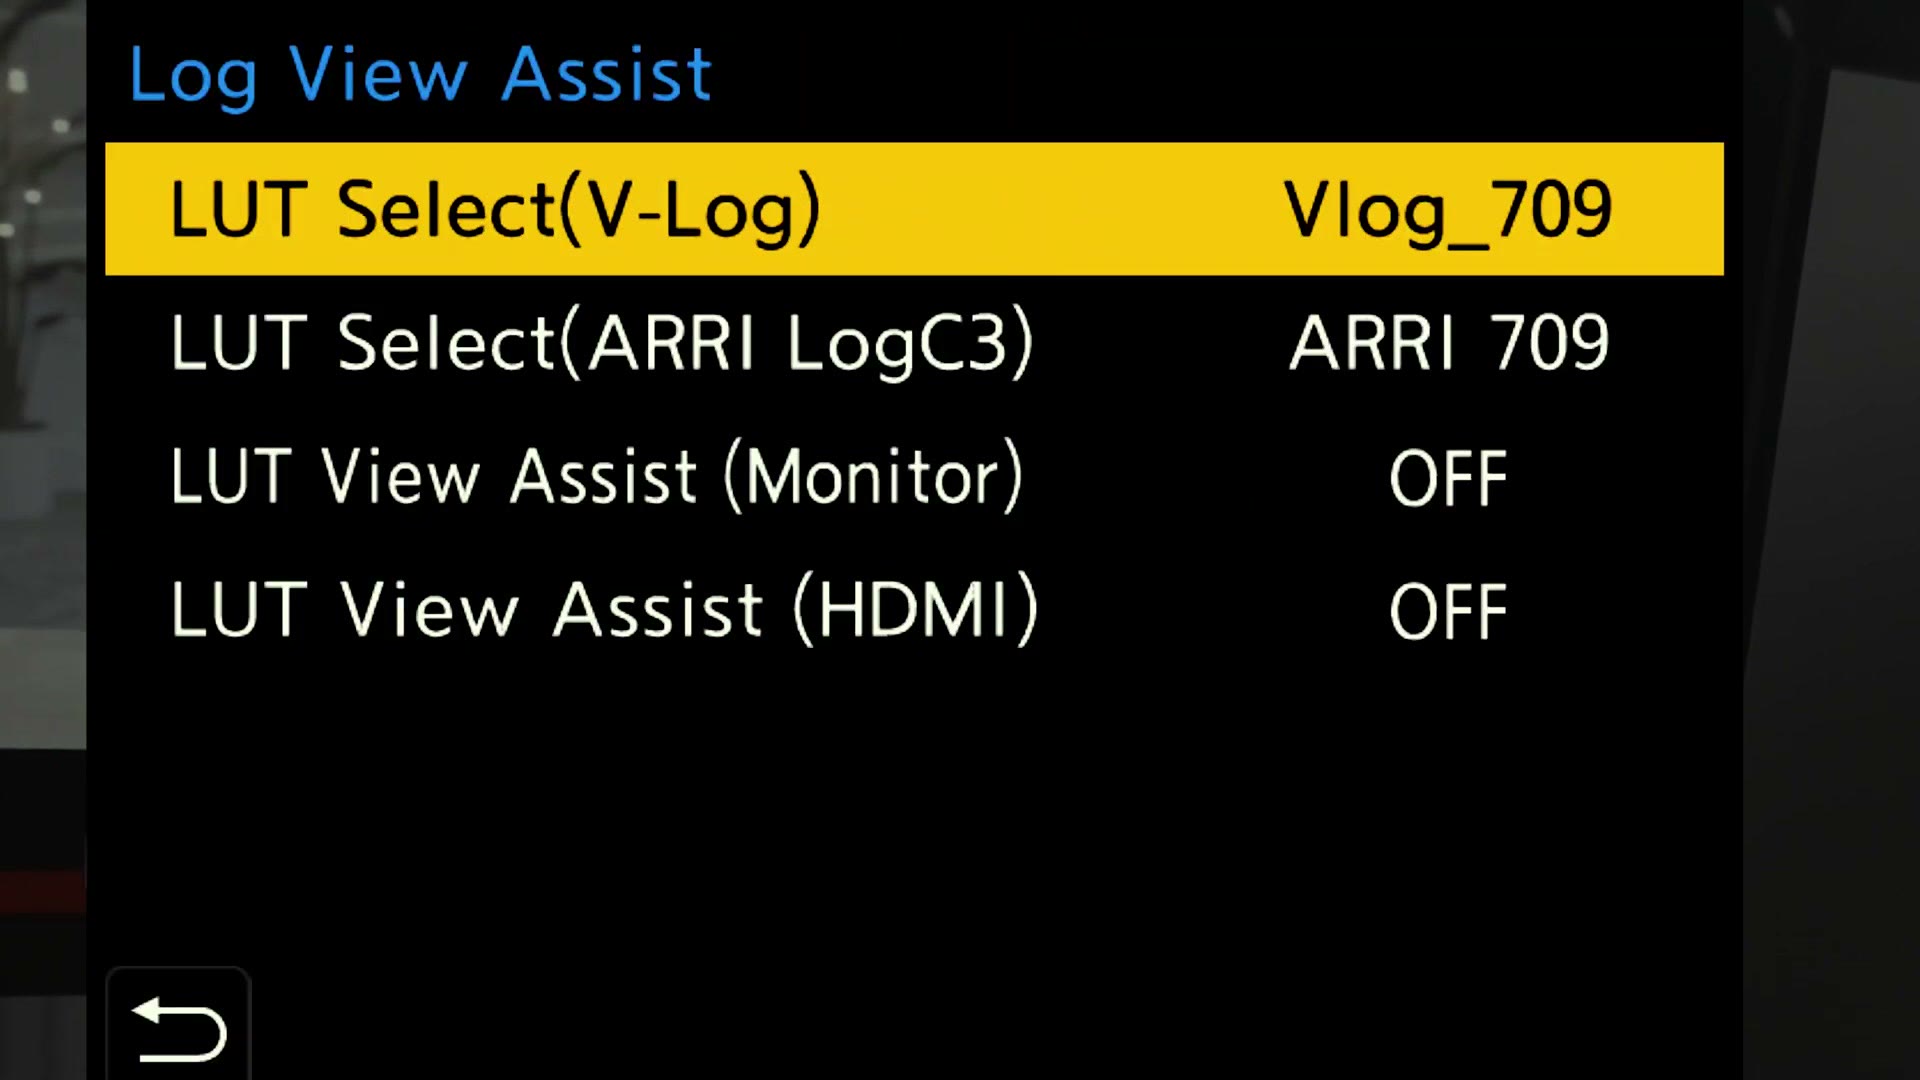
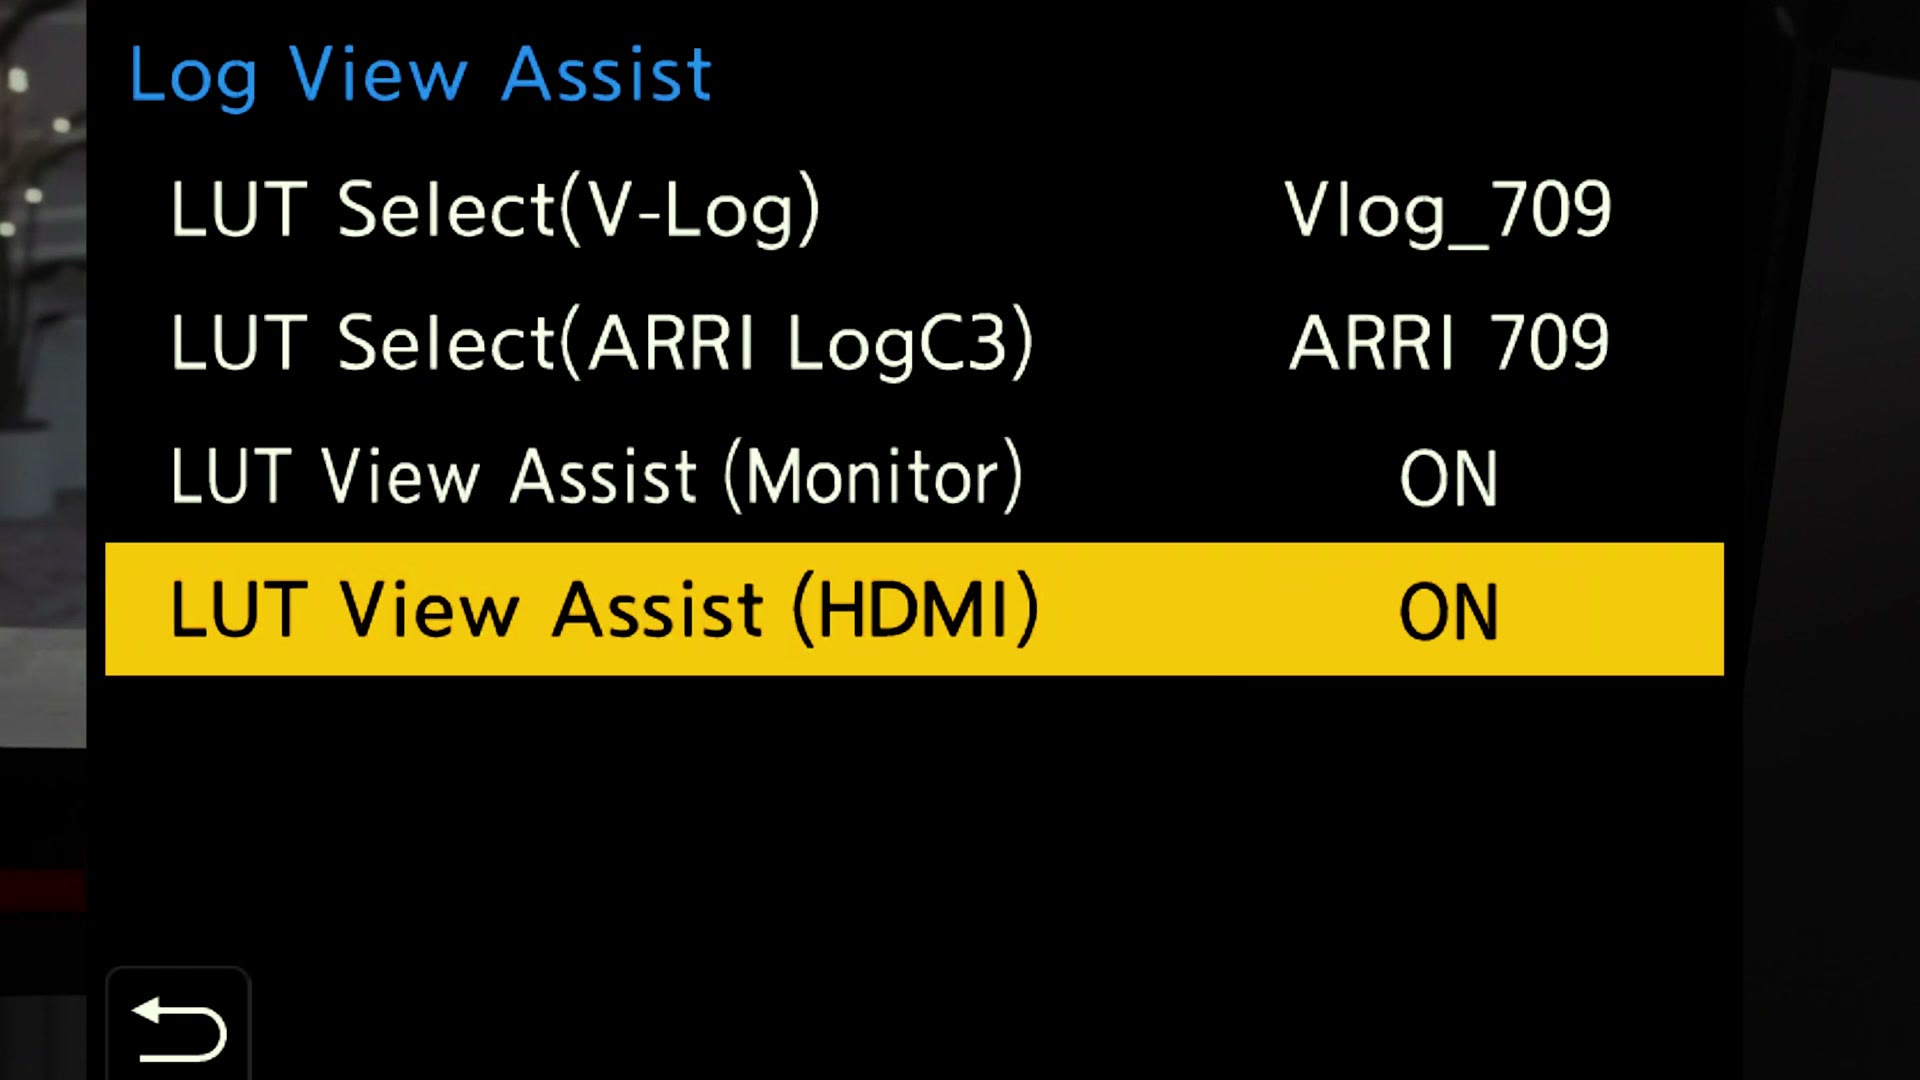
Then go down to LUT View Assist (Monitor) and turn it on. Suddenly you have contrast and saturation, and a much better looking preview of how the image is going to look after you color grade it.
Exposing V-Log To Avoid Noise
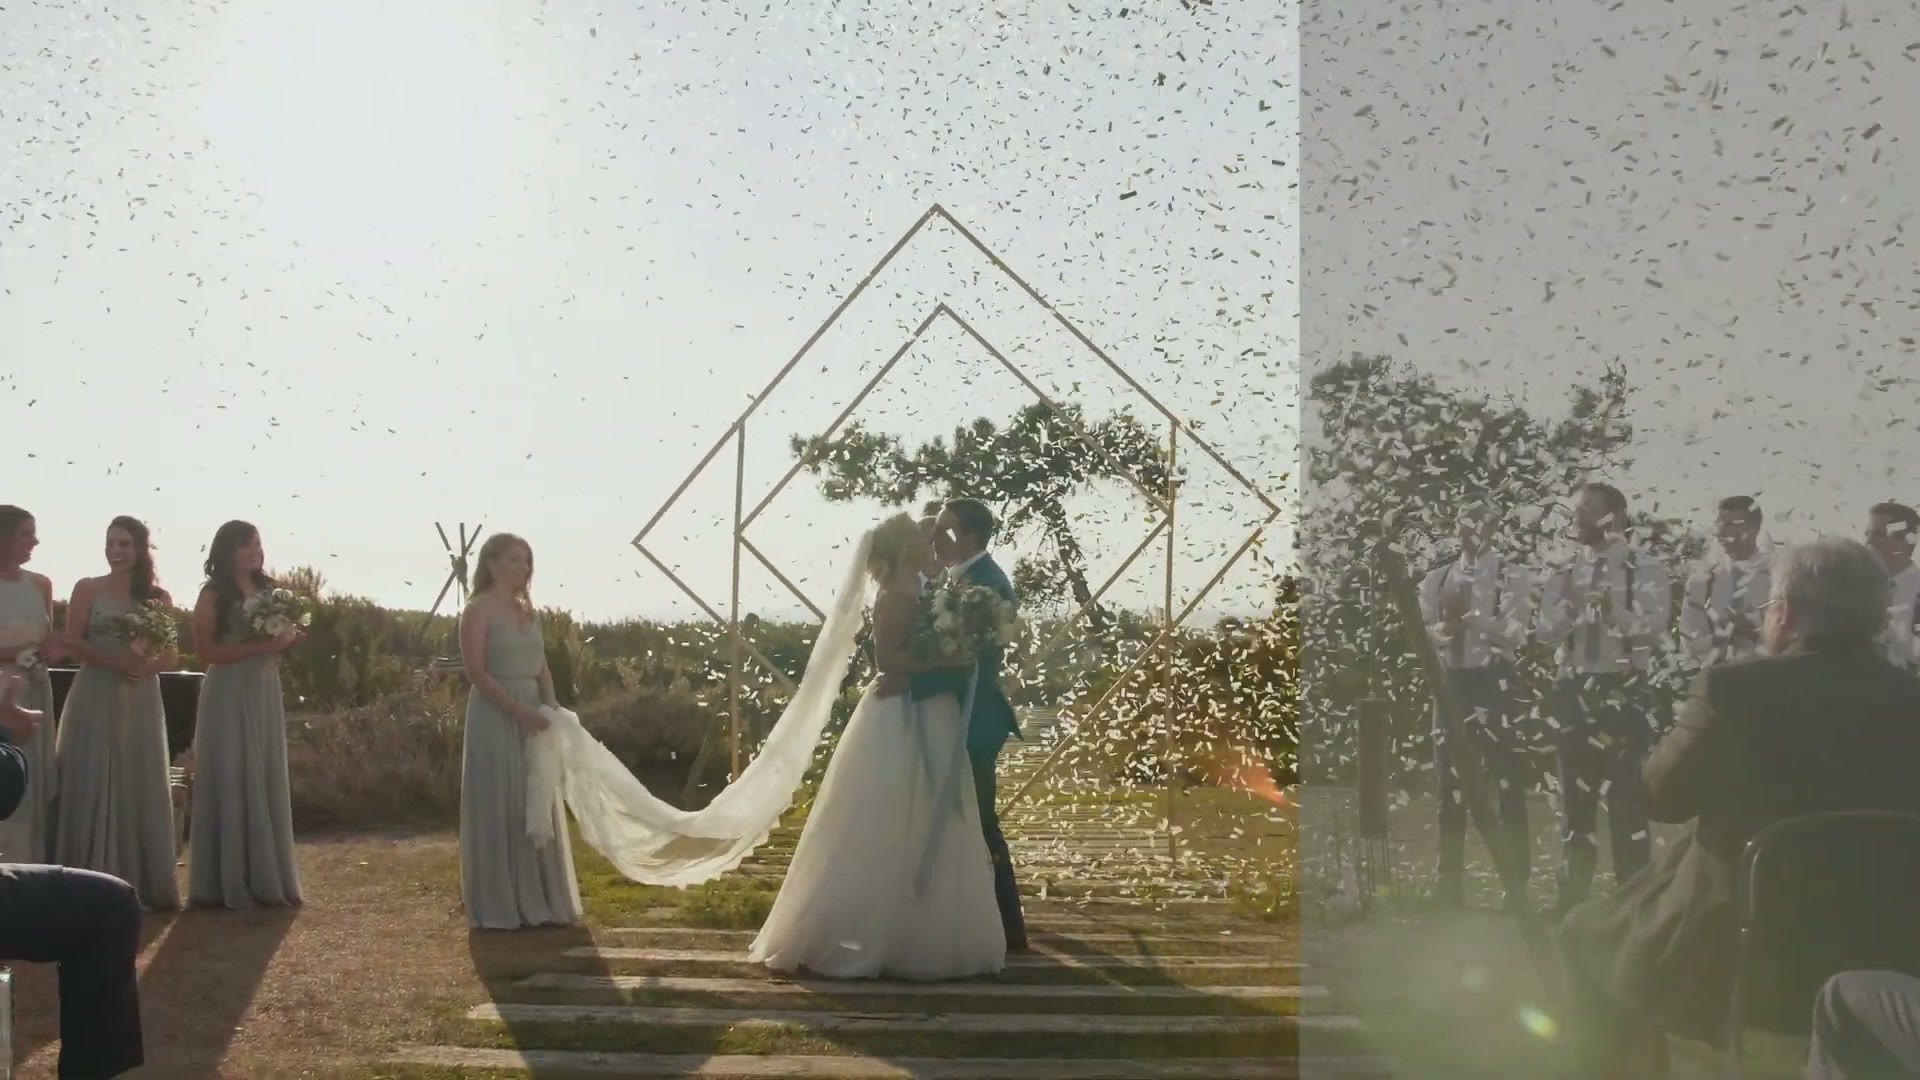
If you want the best possible image quality out of your Panasonic camera with minimal noise, you need to make sure you are exposing properly whenever you are filming in V-Log. So how do you expose properly? This may seem a bit counterintuitive, but you actually want to overexpose your footage when filming. Then whenever you color grade, you will bring the exposure back down as you add contrast and saturation, and that lowering of your exposure will hide any noise in your footage.
Because avoiding noise is so important, I am going to show you some very important tools in your Panasonic camera that will help you expose V-Log perfectly every single time.
Let’s start with metering. Metering is how your camera determines how bright the image is that it is recording, and that is represented by the letters MM at the bottom of your camera screen and the number to the right of it. If this number is lower than zero your image is underexposed, and if it is over zero, so say one third, two thirds, plus one, then it is overexposed. And remember, because you are filming in log, you are going to want to overexpose your image. The amount you are going to want to overexpose is between one and two stops over, which means you ideally want that number to read plus one or plus two, or some fraction in between like one and one third or one and two thirds.
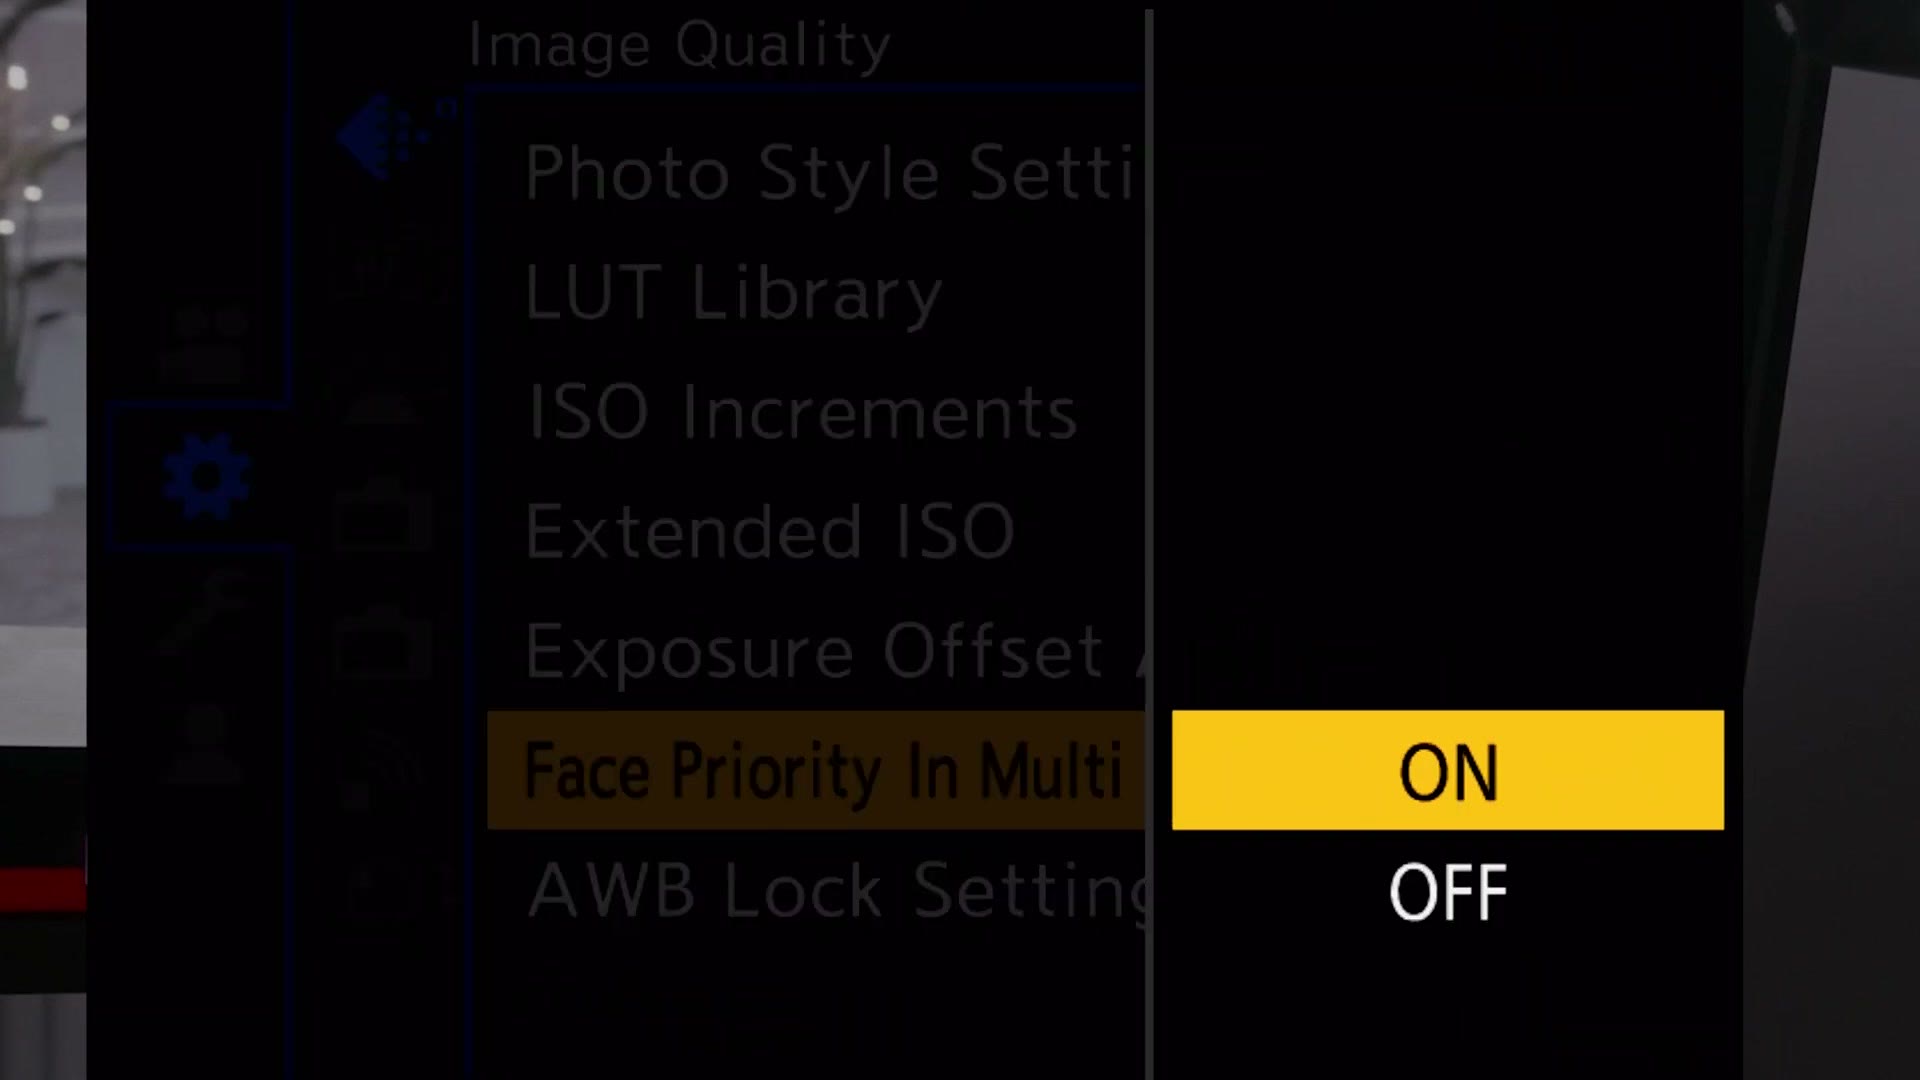
Before we go any further, you need to make sure your metering is set up properly in your camera. Go to the menu, down to the video camera icon, then to Image Quality 1, and for Metering Mode make sure it is set to the option with the rounded rectangle and the black dot in the center with the half circles around it. In addition, go to the gear icon, to Image Quality, and go down to Face Priority In Multi Metering and make sure that is turned on as well. That way it is going to help the camera tell you how well exposed the faces in your scene are, and that is always a good thing.
Zebra Setup (Not The Animal)
Now we need to talk about zebras. And no, not the majestic African animal. Zebras are a feature of most modern cameras, including basically all Panasonic cameras like the GH7, and zebras are going to show you animated black angled lines over any footage that is overexposed.
To access them, open your camera menu, go to the blue gear icon, then down to Monitor / Display (Video), and go all the way down to Zebra Pattern. Here you are going to have a few options, but you are going to want to select Zebra 1, then select it again, go back down to Set, and set Zebra 1 to 85% if you are on the Panasonic GH7. If you are on a full frame Panasonic camera you should be able to set this higher, to 95%.
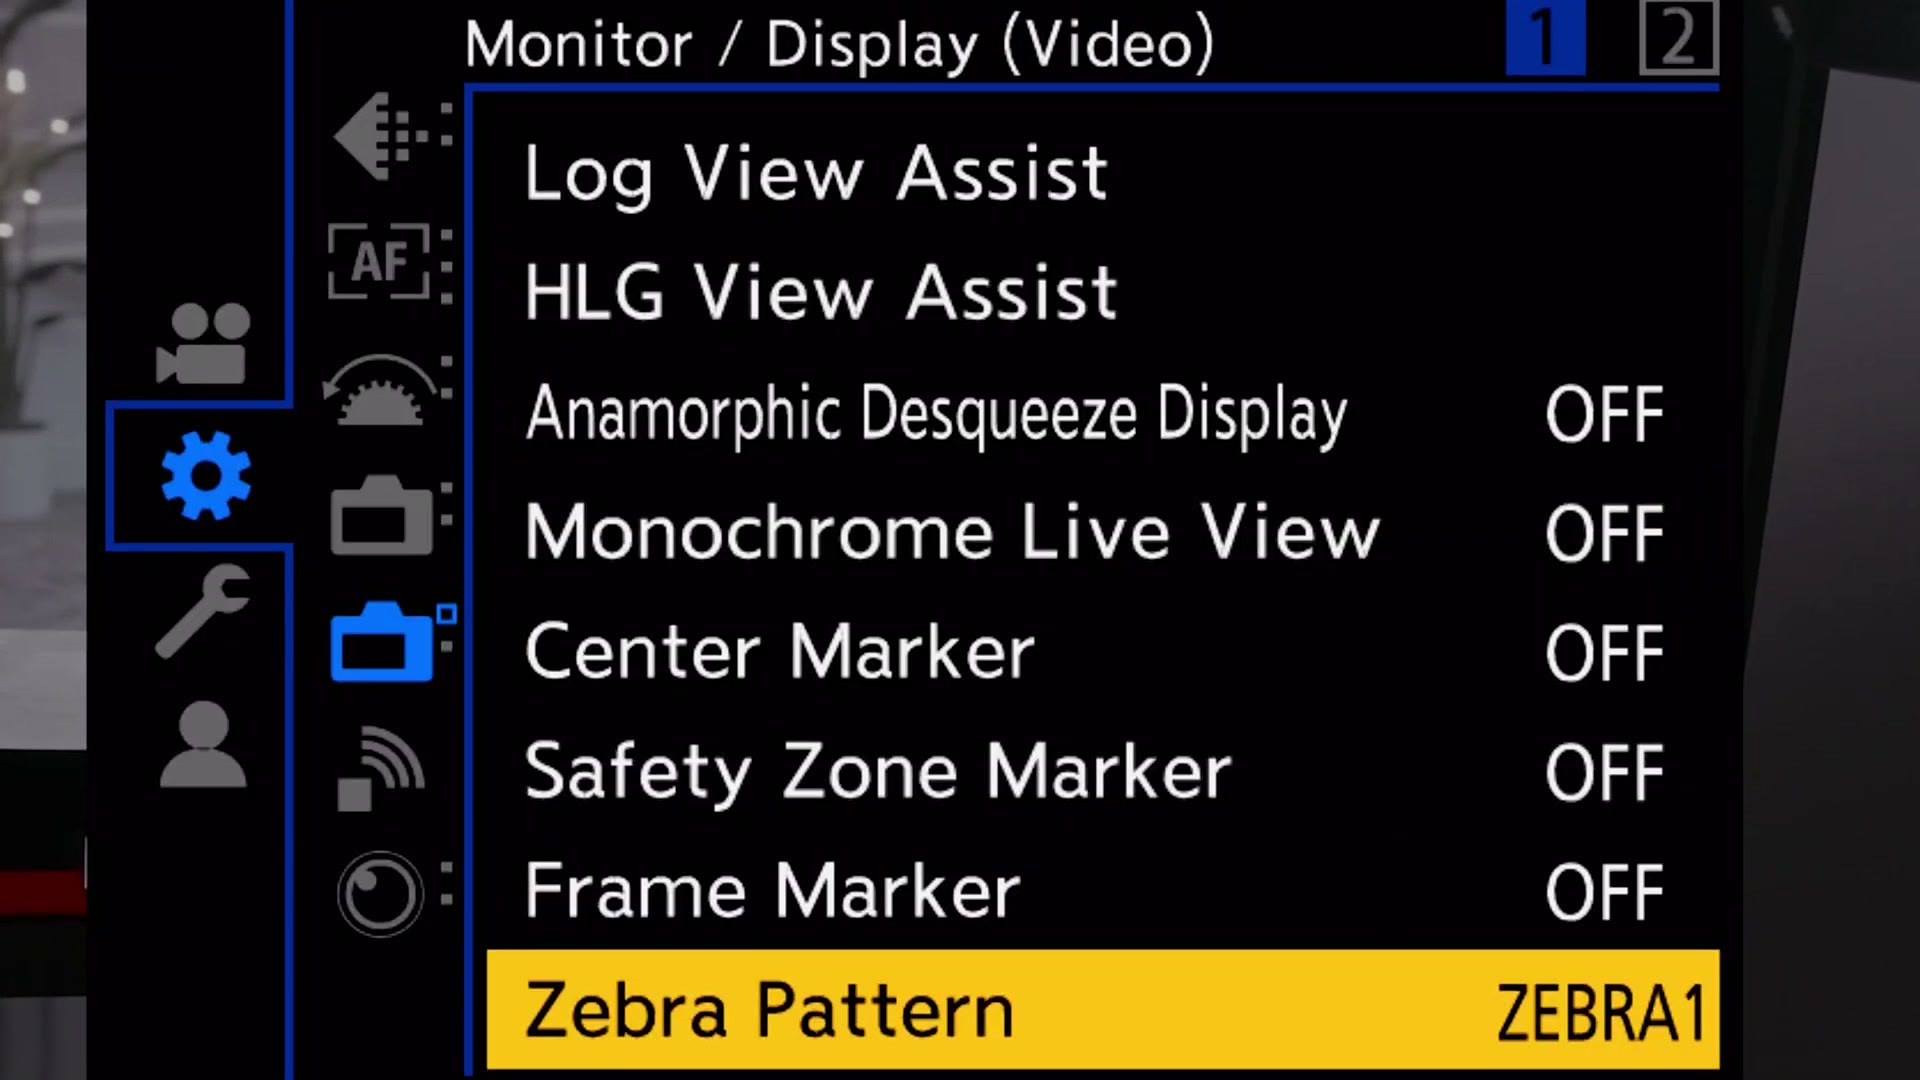
The reason this maximum zebra level varies on different Panasonic cameras is that each of these cameras has a different level of dynamic range, so you are going to want to choose the maximum level your camera offers to make sure you are recording the most amount of detail in your highlights. On the GH7 in particular, anything higher than 85% is considered overexposed without any more highlight information.
So by setting your zebras to 85%, your image preview on the back of the screen is going to start showing you zebras in the highlights if they are too bright, and then you may want to lower your exposure so you are going to be able to recover them while editing.
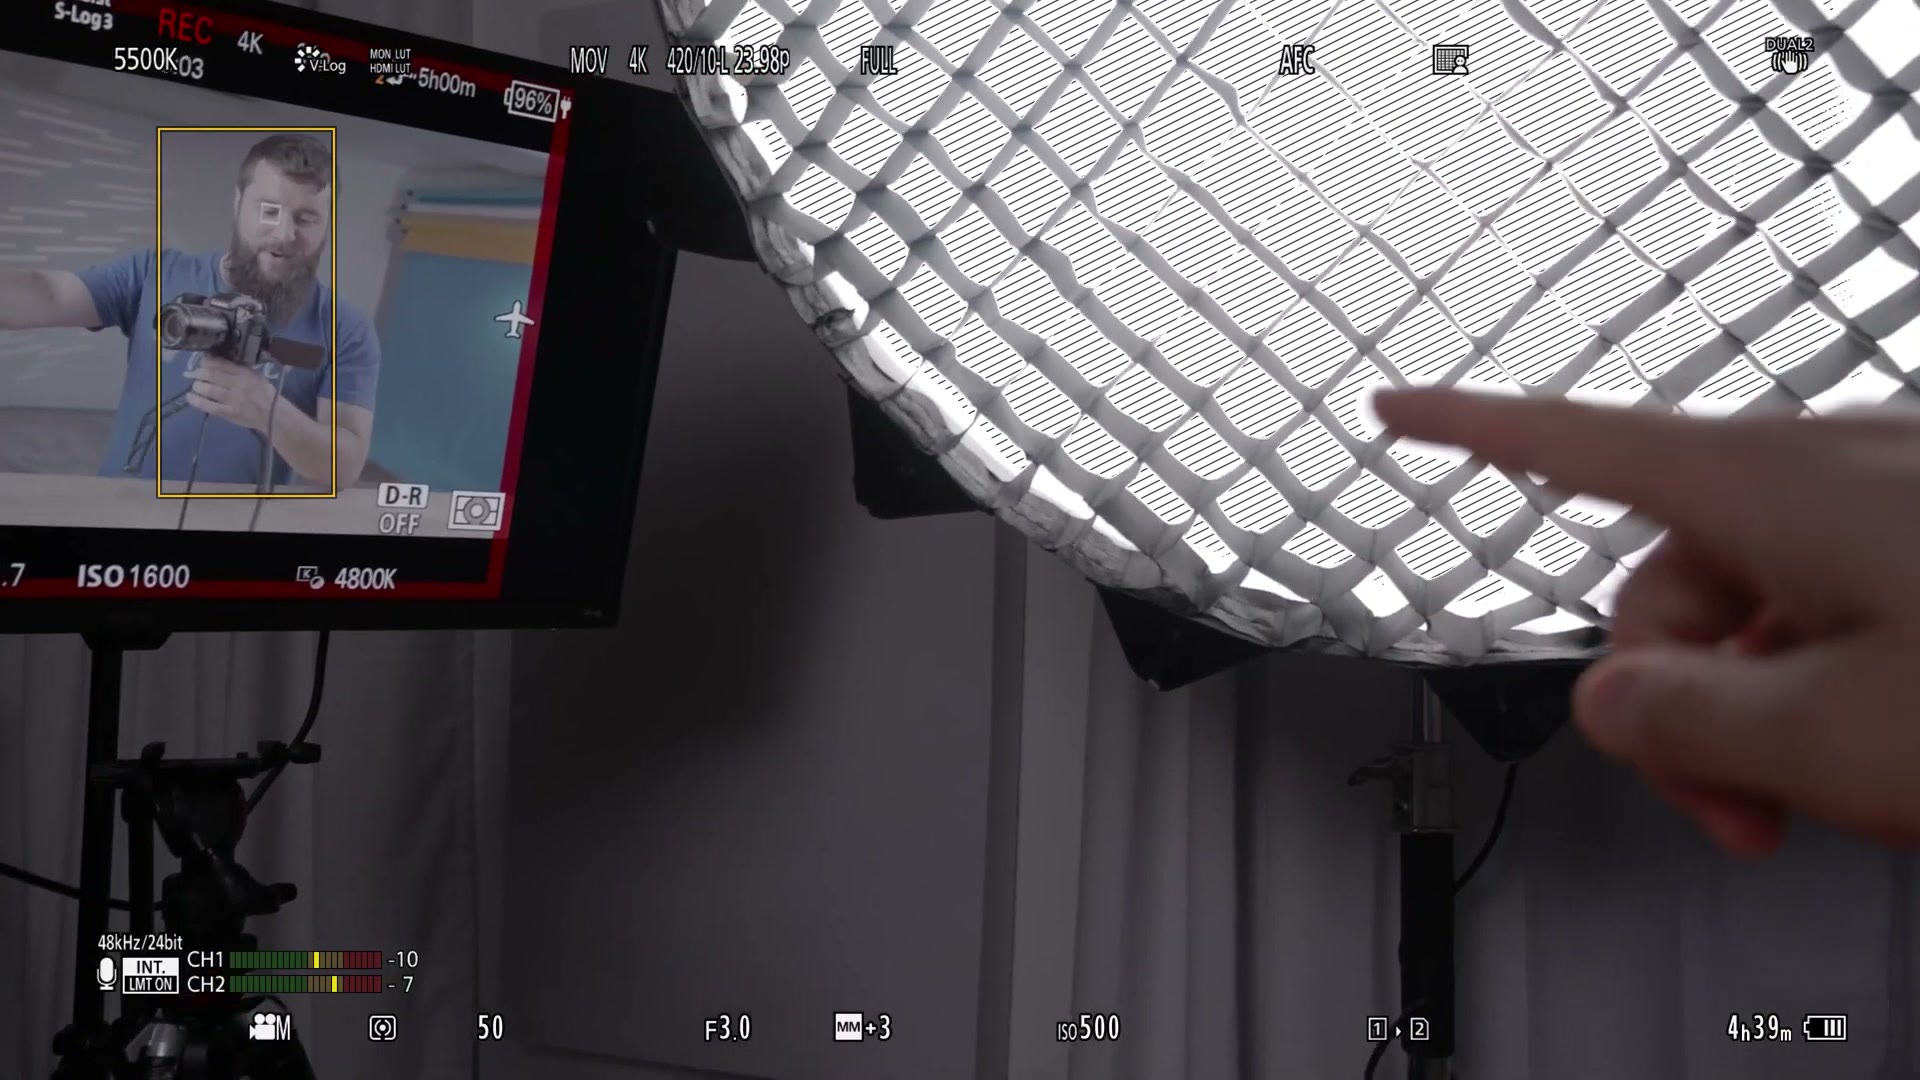
You are probably going to see some zebras in the background around a light, and that is okay, because you still want the person in front of that light to be bright enough and not underexposed. But if you are seeing zebras on a person’s face or skin, that means your footage is definitely too bright and your exposure needs to be darker.
The main thing you need to remember is that your camera’s metering is not that smart. While we enabled the setting earlier to have the camera prioritize exposing for faces in a scene, that is not perfect, and if your metering is telling you the footage is between one and two stops overexposed like it should be, but in reality you are filming a person with a very bright light behind them, the odds are the metering is just picking up that bright light instead of the person, and the person may still be underexposed. Then you are going to have to bring up the exposure in post and possibly introduce a lot of dreaded noise, especially on them, which would be a bummer.
Waveform Monitor Setup (Robot Vision Time)
To help you with this, I have great news, because the next tool is going to massively help you with your exposure and help you tell whether the camera’s metering is accurate no matter what you are filming. This tool is the waveform monitor.
Go into the camera’s menu again, go to the blue gear icon, down to the Monitor / Display (Video) subheading 2, and here you will see WFM / Vector Scope. Spoiler, WFM stands for waveform monitor. Select the waveform monitor and a large green rectangle is going to appear on your screen with a lot of dotted lines and three solid lines. One solid line at the top, one in the middle, and one at the bottom.
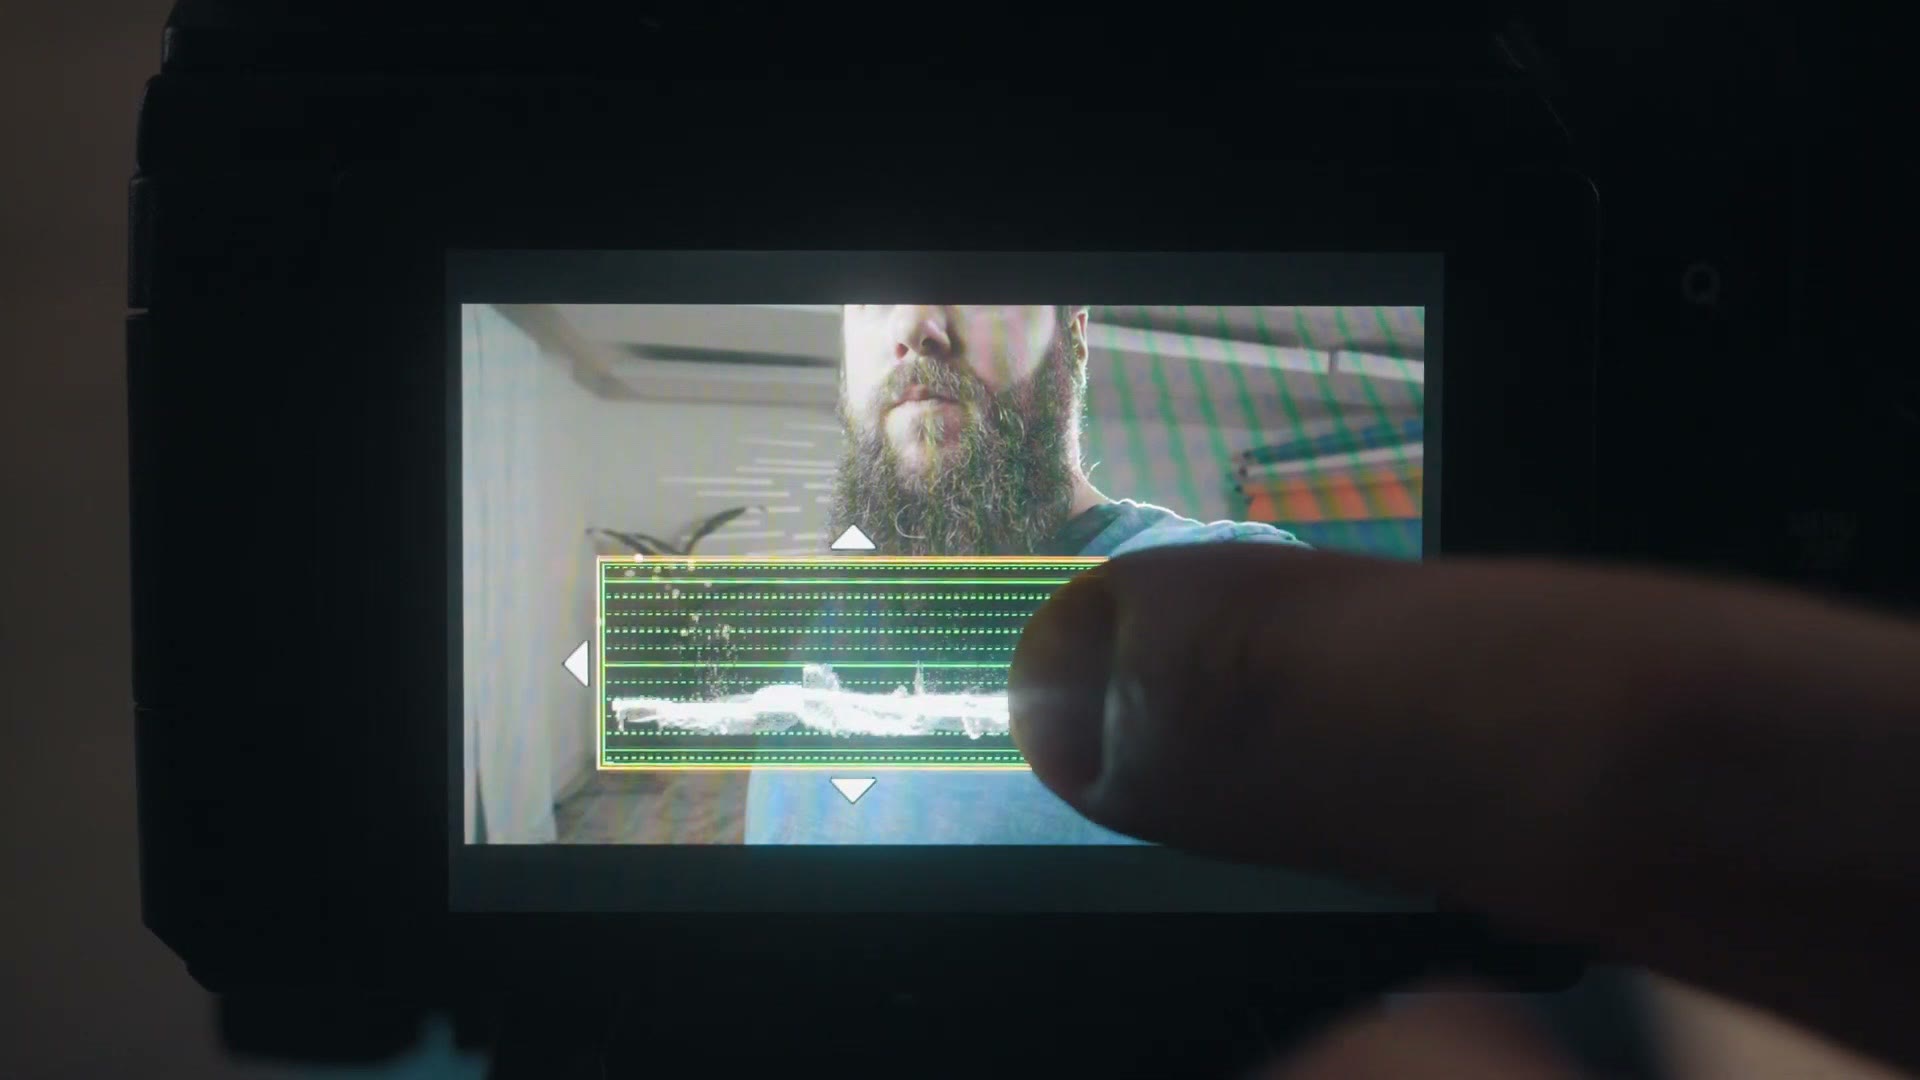
Tap on your screen and you can move the waveform monitor around using the touchscreen on the back of your camera. I recommend putting it in the bottom right, because it nestles down there very nicely to the right of your audio meters. Press set, and do not stress if you are not happy with where it is, because you can always tap it on the back of your screen and move it around whenever you want to. As a side note, you can also assign the waveform to a custom button to make it super easy to toggle on and off. Showing you how to do that is a little outside the scope of this post, but I do cover it in my GH7 setup guide.
The way the waveform monitor works is that it is going to show you the brightness level of any object your camera sees. Remember those three solid lines? The bottom solid line represents something that is completely black with no detail, the top solid line represents something that is too bright and overexposed, and the solid green line in the middle means something that is properly exposed, right about where you want it to be. Darker things are going to be lower and brighter things are going to be higher.
What is great is that this is all presented horizontally across the waveform monitor, so any object on the left of your preview screen is going to appear on the left side of the waveform monitor, and anything on the right side of your preview is going to appear on the right side. If you move your camera around you are going to see that brighter things have higher mountain peaks and darker things have deeper valleys. This is almost like having robot vision, because you are seeing objects in the waveform monitor, but you are only seeing their brightness, not actually what the objects are.
I put together How To EASILY Film In Apple Log With The iPhone 15 Pro as well, which covers the part I skipped over here.
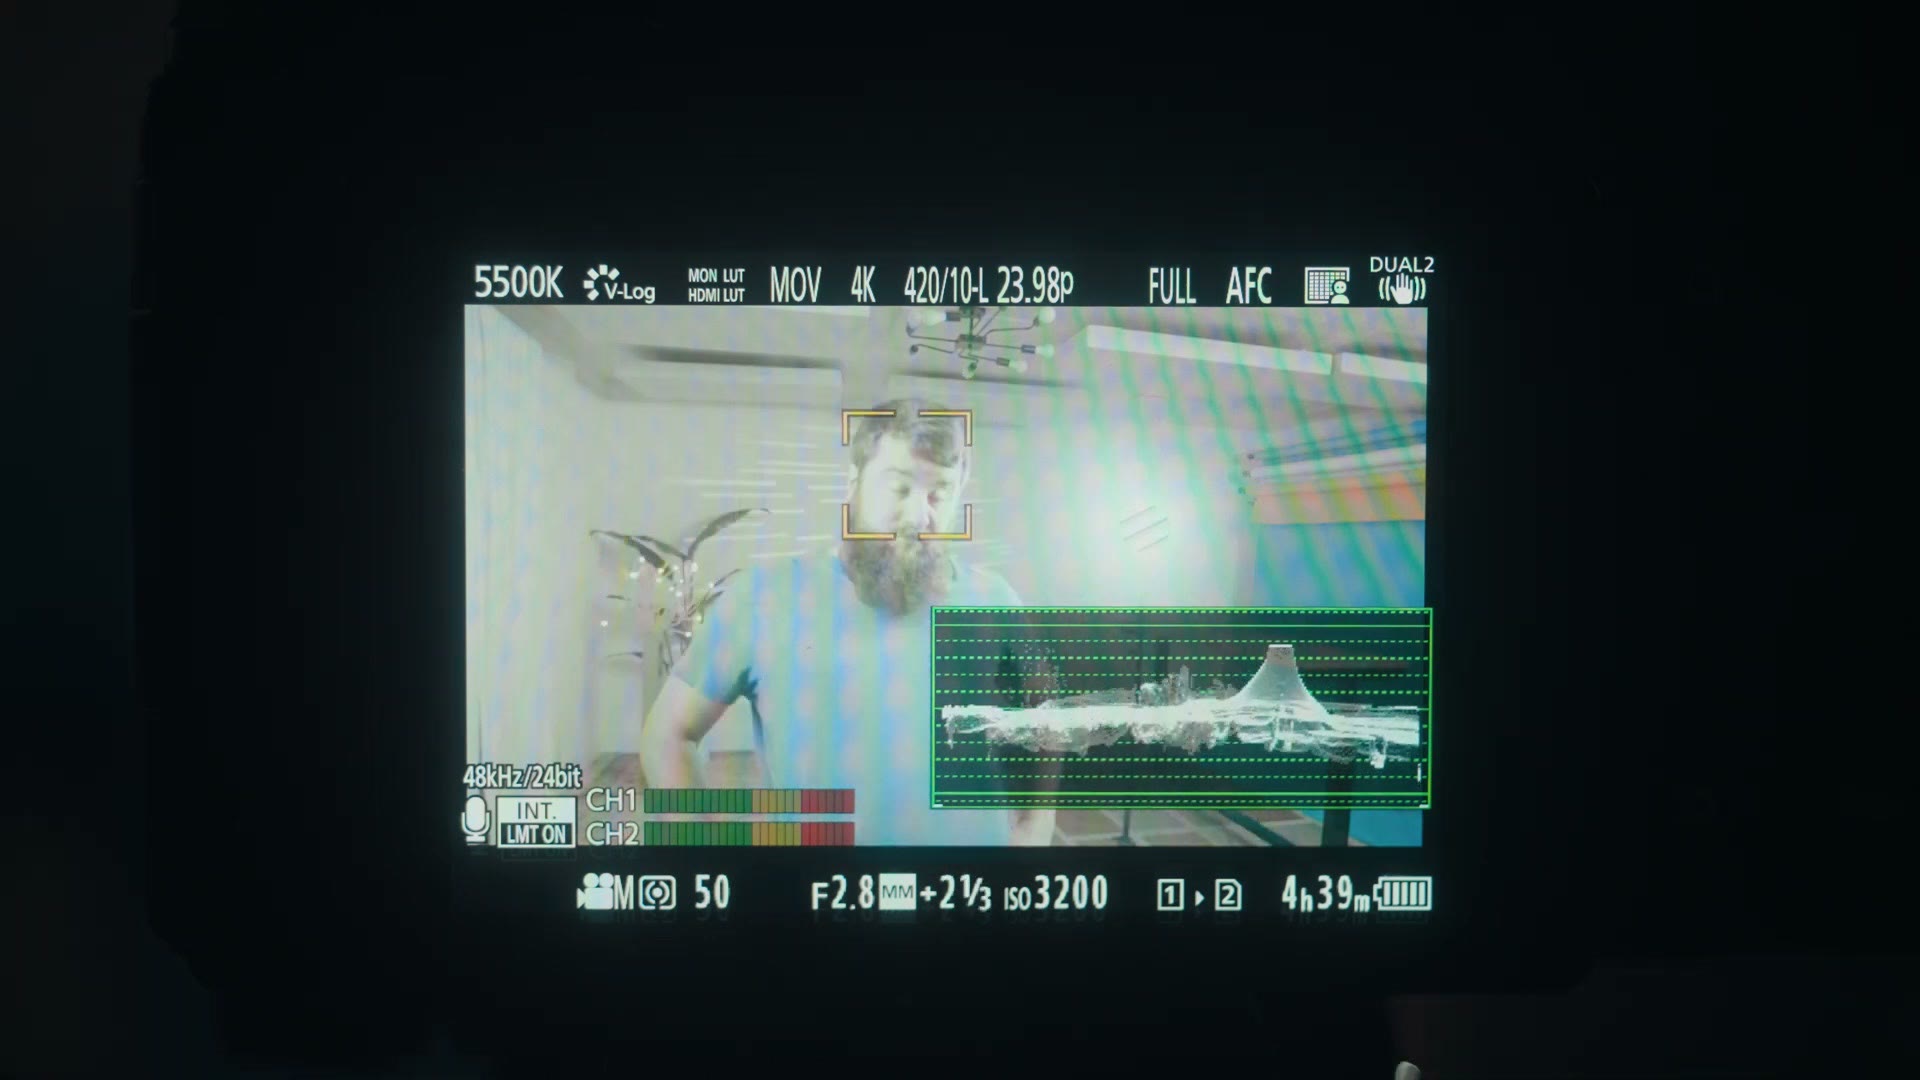
So as you are filming something in V-Log and you want to make sure it is properly exposed, I would first recommend checking your camera’s metering and seeing if it is telling you that you are between one and two stops over. If it is not a particularly challenging scene, maybe you are filming on a cloudy day or indoors where you have full control of your lighting, and you are not seeing any zebras in your preview, at this point you should be good and you do not need to change anything else.
But if your scene is more challenging and you want to double check that your footage is properly exposed, this is when I would turn on the waveform monitor. If you are filming someone in front of a bright light, for example, and the camera is telling you it is overexposed, the waveform monitor will show you the brightness level where the light is in the background that is too bright, but it is also going to show you the brightness of the person in front who is too dark. Then you are going to be able to tell that their brightness levels are actually much lower and you need to raise them. It is just a much more accurate way of being able to tell how well exposed the subject you are filming is.
Speaking of your subject, that leads us into skin tones, because you want the brightness level of a person’s skin tones to be closer to the solid middle green line running across your waveform monitor. It does not matter if the skin tones are one line below or one line above the middle green line, you do not have to be super precise. What matters is that if you are filming a person and you check their brightness with the waveform monitor, and the background behind them is super blown out and bright but their skin tones are way down at the bottom of the waveform, that is bad, because whenever you color grade your image you are going to need to bring up the skin tone brightness levels and you are going to get noise on your subject.
So when in doubt, use the waveform monitor in conjunction with your camera’s metering and zebras to help you dial in your brightness for more difficult scenes. Very quickly you should be able to get to the point where you can get all of your exposure set up in ten seconds or less, regardless of what you are filming, which will help you keep filming fast.
ISO Setup
We have one final tool to talk about, and this final one is arguably the most critical when it comes to avoiding noise with your camera. So we ain’t done yet. Spoiler, this final tool is not really a tool. It is actually just your camera’s ISO. But the ISO you use whenever filming in V-Log is really important, because if you have ever filmed in a dark room before, I am sure you have experienced this. Increasing the ISO of your camera to bring up the exposure can introduce more noise into your image, which is exactly what we are trying to avoid.
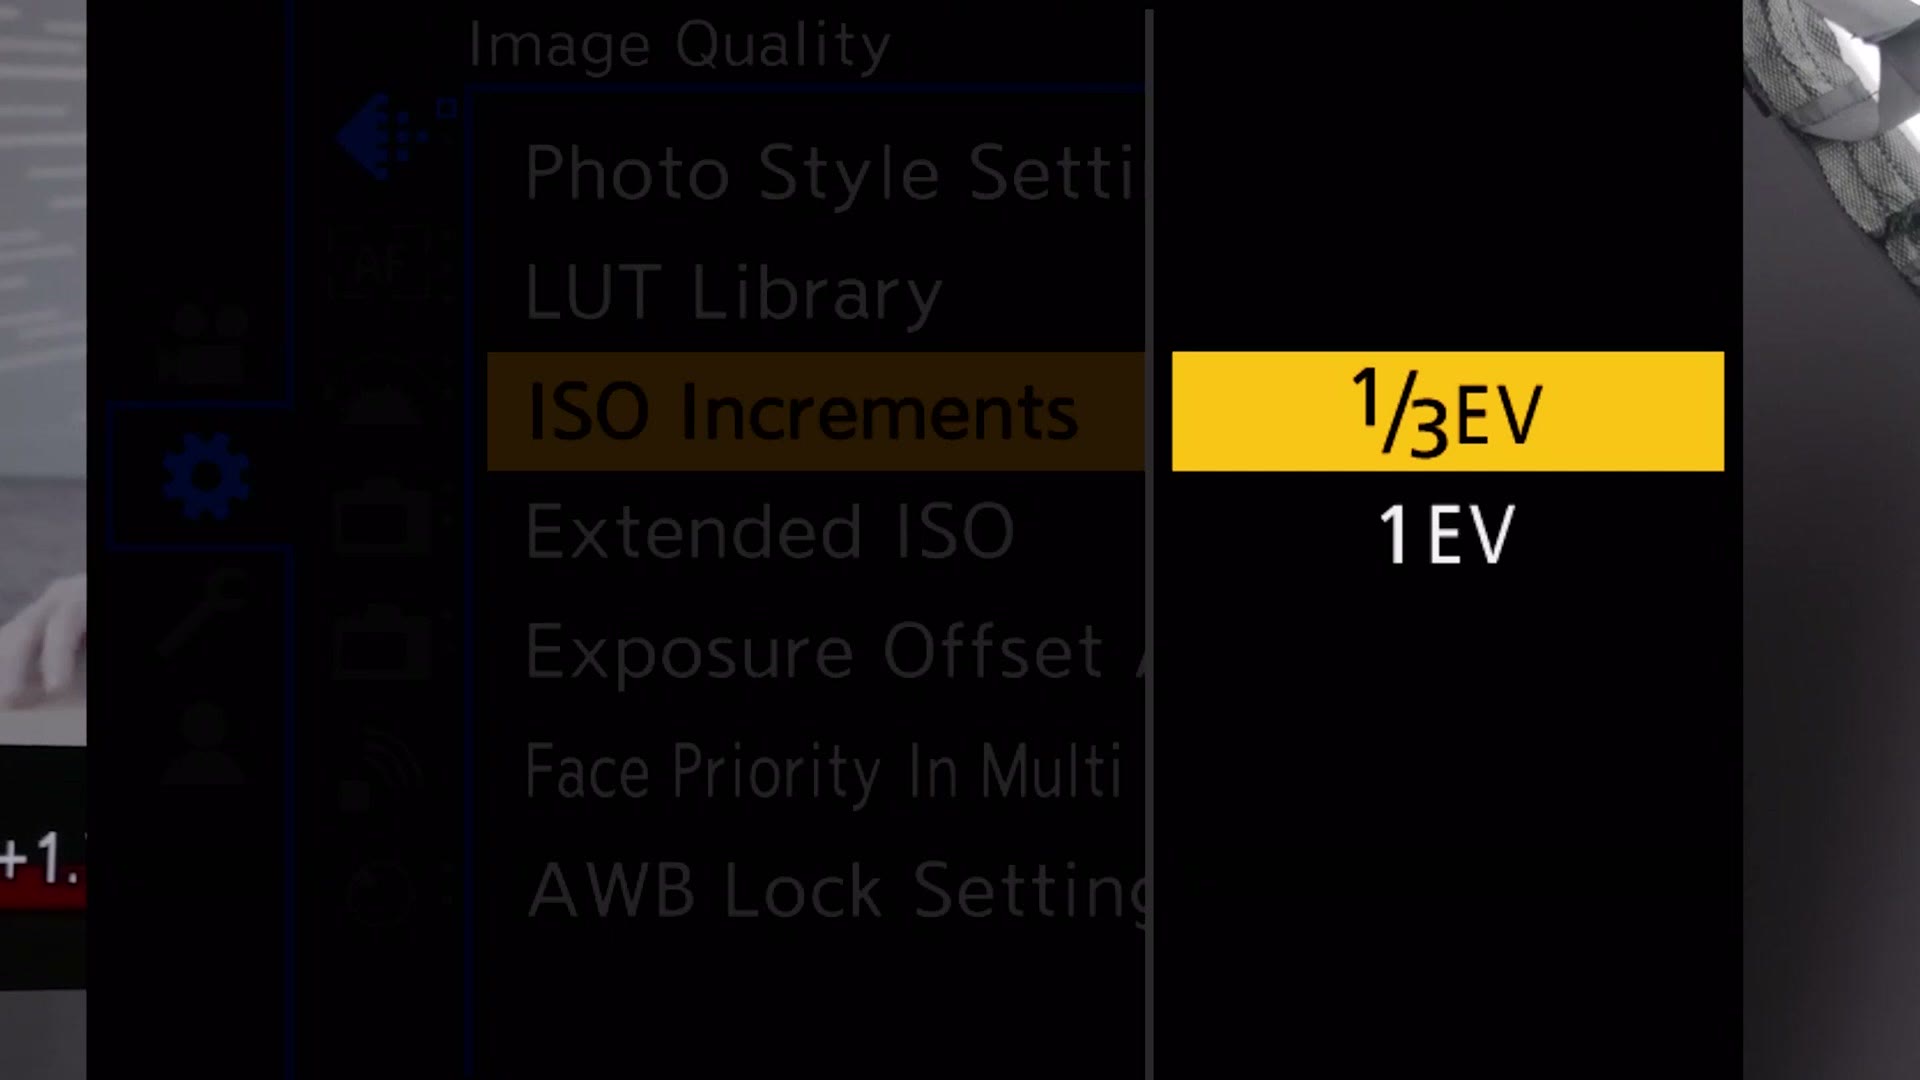
So first, to help you dial in your ISO properly in V-Log, open up your camera menu, go back over to the gear icon and then up to Image Quality, and for ISO Increments make sure this is set to 1/3 EV. This setting is going to give you more fine tuned control over how much you can raise or lower your ISO.
ISOs To Avoid
With that done, there are two specific things you need to keep in mind when it comes to ISO on your Panasonic camera. First, if you want the minimum amount of noise with the maximum amount of dynamic range, you are going to want to set your Panasonic camera to its native base ISO. This is going to vary depending on the specific Panasonic camera you are using, but an easy way to tell is to simply open up your ISO menu and look for the lowest ISO level that does not have an L next to it.
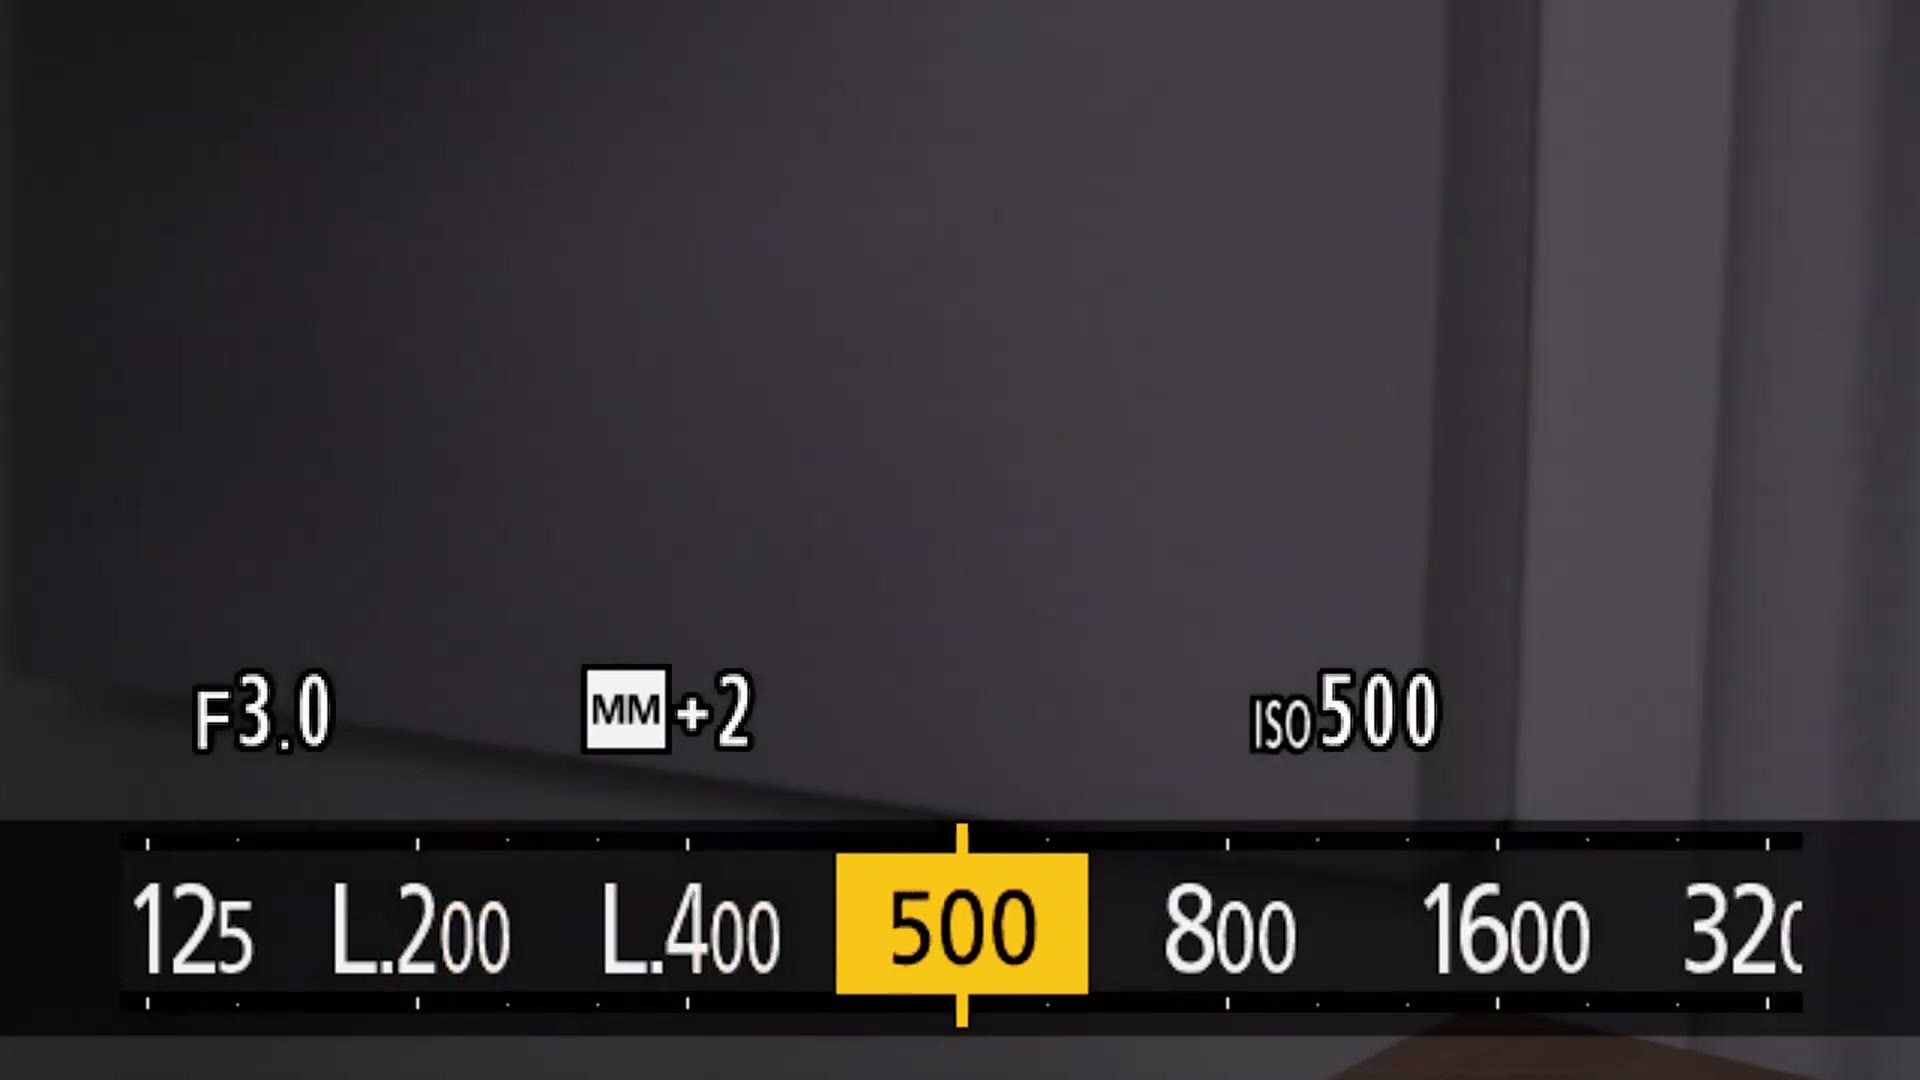
If you see an L next to an ISO value, that is an extended ISO, which means the camera is going to do some work in the background to lower the shadows of the image while keeping the highlights bright. But your camera is also going to have a lower dynamic range whenever you use one of these extended ISOs, so I would avoid all of them and just stick to the ones that do not have any L next to them. That lowest ISO is going to be your camera’s base ISO. On the GH7 that is ISO 500, but on a camera like the Panasonic S5II or S5IIX the base ISO is going to be 640.
In addition, to complicate things further, some Panasonic cameras have what is known as a dual native ISO, meaning there are two ISO levels where they look their best with the most dynamic range and the minimal amount of noise. It would be a weird post if I just gave you a big long list of the ISO levels of every Panasonic camera, so my best recommendation is to go to Google and type the name of your camera followed by the words dual native ISO. There you are going to be able to find the two ISO levels that work best for your camera.
Back to the GH7, which is the Panasonic camera I have with me. This camera does not have a dual base ISO, it just has one base ISO, and like I said, that is ISO 500. So I would try to stay at ISO 500 whenever you are filming, and if you need your footage to be brighter, try using a lens with a wider aperture or bringing in more lighting before you raise your ISO, so you can keep your video quality as high as possible.
Get My V-Log Color Presets
Whenever it comes time for you to color grade your V-Log footage, if you want to save time and get vibrant, true to life colors that look great, I want you to know I have a set of color presets called WhoisMatt LUTs that I have tested extensively with Panasonic V-Log footage, and they work great.
And if you have a GH7 and you want to become an absolute pro at using it, including optimizing all the settings, learning all of the hidden features, and being able to record the highest quality video from it, you have to check out my GH7 setup guide. There are over 40 lessons showing you how to use the GH7, plus it comes with setting presets that are going to help you dial in the best camera settings in just a few seconds. Oh yeah, and there is also a set of LUTs I created specifically for the GH7 camera sensor, so if you want to get great colors with your GH7 in particular, I am going to help you do that in just a few clicks too.
Thanks so much for reading and have a great day!