
Today I want to show you how to make and export Facebook Page cover videos using Adobe Premiere Pro. This is the fourth in a series I have been making about export settings, alongside 4K, 1080p and Instagram.
Facebook’s Recommended Cover Video Settings
Let’s start on Facebook, not in Premiere, because Facebook’s own recommendations are where the trouble begins.
- Your video needs to be 20 to 90 seconds long.
- Minimum size is 820 x 312 pixels.
- Recommended size is 820 x 462 pixels.
Why 820 x 312? Because that is the actual display size of the cover video slot. In a perfect world you would make a video at exactly that and it would fit perfectly. But nobody shoots 820 x 312, so Facebook offers 820 x 462 as a workaround, which is much closer to 16:9. If you have HD or 4K footage at a normal widescreen resolution, exporting at 820 x 462 saves you from having to cut drastically off the top and bottom.
The Problem With Facebook’s Recommendation
The issue is that you are cutting off parts of your video either way.
Upload an 820 x 462 video, the size Facebook recommends, and it looks fine at first. Then you notice it says “drag to reposition.” Start dragging and you discover there is a lot of video hidden above and below the visible strip.
And it is hard to fine-tune, because you are choosing one position for the entire video. Maybe the bottom looks right for one shot, but then a later shot really needs to sit lower so you can see more sky. Because the video is made of multiple clips, you cannot keyframe the reposition per clip.
What you actually want is a video that is already exactly 820 x 312, which drops straight into the window with no repositioning at all. So that is what we are going to make.
New Sequence
In Premiere, go to the New Item button and choose New Sequence, or press Ctrl+N / Cmd+N.
There are a lot of presets in there. Pick Digital SLR > 1080p > DSLR 1080p24. I know you did not shoot on a DSLR and you did not choose that frame rate. It does not matter, because we are about to customize all of it. Click over to the Settings tab.
Editing mode DSLR, timebase 23.976 because that is what I shot. Then change the frame size: horizontal to 820, vertical to 312.
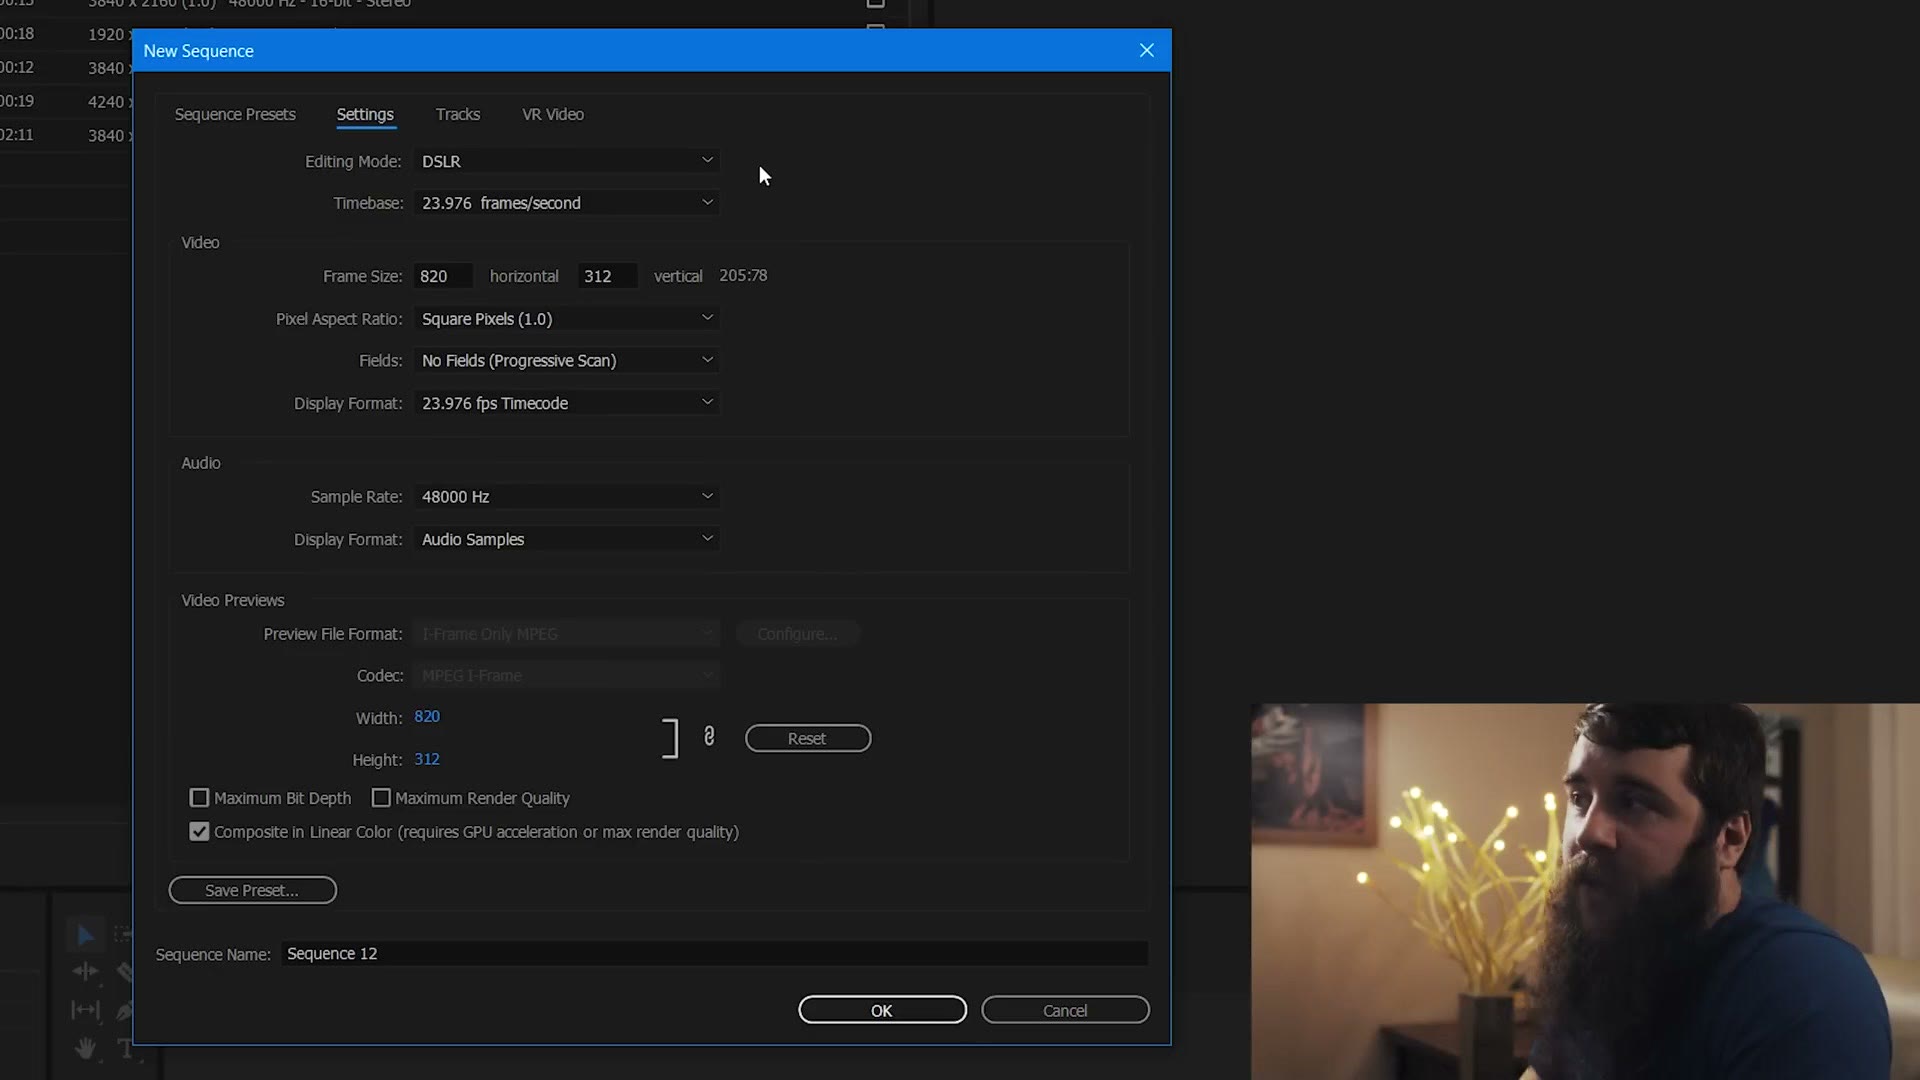
You will notice Premiere reports a genuinely bizarre pixel ratio of 205:78, which I had never seen before this and have not seen since. That is what Facebook does.
Leave everything else alone, click Save Preset and call it something like “Facebook Cover Video 820×312.” Now it sits under Custom and you never have to type any of this again. Name the sequence and hit OK.
Scale To Frame Size
Drag a clip onto the timeline and Premiere throws a clip mismatch warning, because the clip is 3840 x 2160 and the sequence is 820 x 312. Do not click “change sequence settings”, because that will drag your sequence back up to 4K. Choose keep existing settings.
The clip will then look weirdly stretched with black bars, because Premiere applies a setting called Scale to Frame Size by default, which squeezes your whole 4K frame down into an 820 x 312 window.
Right click the clip and uncheck Scale to Frame Size. Now you get an absurdly detailed crop of the middle of the frame, which is at least the correct approach.
Then go to Effect Controls and bring the Scale value down. From my testing:
- 4K footage: around 22% works well.
- 1080p footage: around 44%.
As long as you are not getting black bars on the sides, you are good.
The video is now very wide and very short, matching the cover slot. So use Position to frame each clip. The left number is horizontal and the right is vertical, and because there is so much image above and below the visible strip, you have real room to choose what is in frame. That is exactly the control you do not get when you let Facebook do the repositioning for you.
Do that for each clip, add your music, grade it, and you have a cover video.
Export Settings
Set your in and out points with I and O, then Ctrl+M or File, Export, Media.
Format: H.264. For preset, honestly pick anything, because we are about to change all of it. I use YouTube 1080p HD as a starting point.
Make sure Export Video and Export Audio are both ticked, then go to the Video tab.
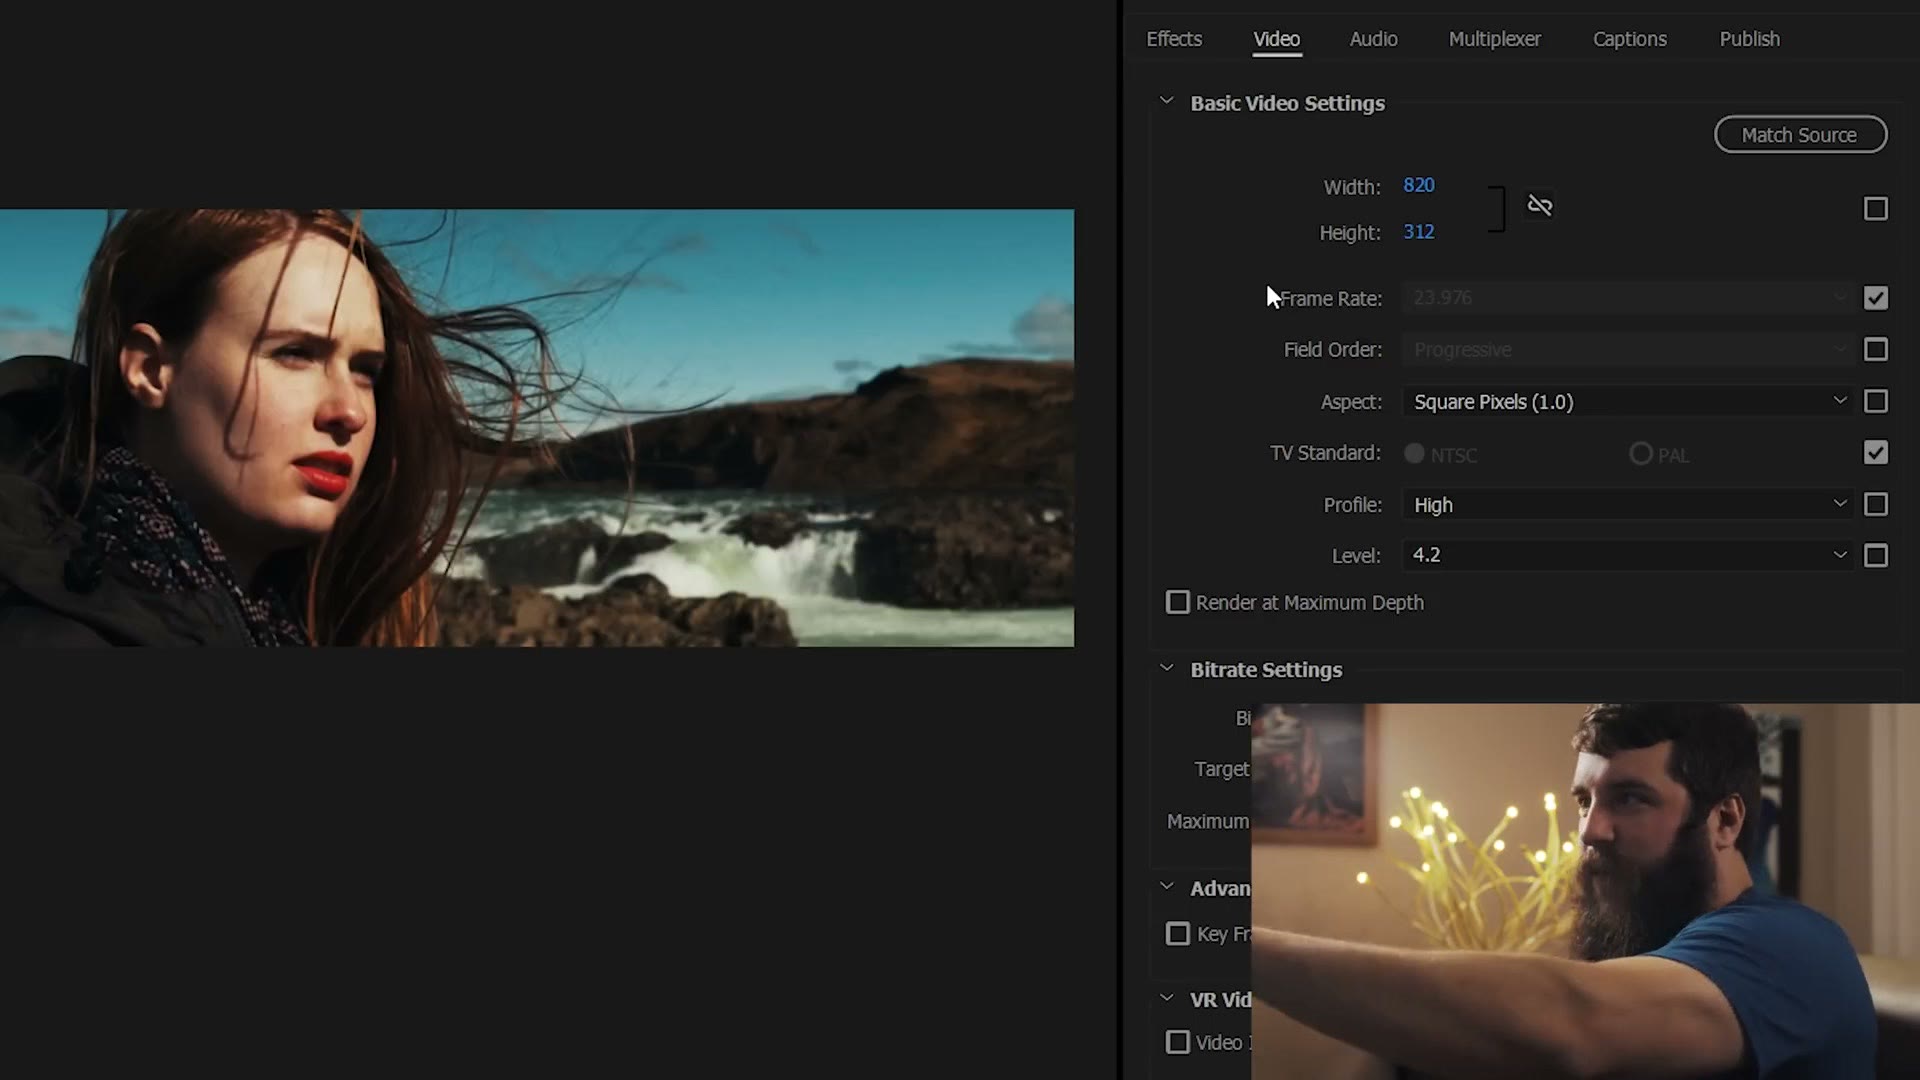
Under Basic Video Settings it will say 1920 x 1080. First, click the little chain icon so it has a slash through it, otherwise changing the width will drag the height along with it. Then set width to 820 and height to 312, which makes the video fit with no black bars.
Frame rate 23.976 to match the sequence. If you are ever unsure, go back and check your sequence settings. Progressive. Aspect 1.0 square pixels. NTSC. Profile High, Level 4.2, which is plenty for something this small.
Tick Render at Maximum Depth, then go to Bitrate Settings.
I go into enormous detail about bitrate encoding, target bitrates, maximum bitrates and VBR versus CBR in my 4K export settings video, so I will skip the why here. Use CBR and set your target bitrate to 25 Mbps.
While you’re here, take a look at Create HD Youtube Videos Using Sony Vegas.
I know what you are thinking. Matt, that is very high for a video this tiny. Watch the 4K video and you will understand why.
Tick Use Maximum Render Quality, then go to the Audio tab: format AAC, codec AAC, sample rate 48000 Hz to match what I recorded, channels stereo, quality high, bitrate at the maximum 320, and set it to give precedence to bitrate.
Save A Preset
Before you export, save all of that. Click Save Preset and give it a name that tells you everything at a glance. Mine is “Facebook Cover Video 820×312 23.976fps 25Mbps CBR.”
That is the video’s purpose, the resolution, the frame rate and the bitrate, which is basically everything you need to know when picking a preset later.
Then Export, or Queue if you would rather hand it to Media Encoder and carry on working.
Uploading It
On your Page, go to Change Cover, Upload Video, and pick your render.
Once it is up you will see “drag to reposition” again, but clicking and dragging does nothing, because your video is already exactly the size Facebook wants. It fits perfectly. Nothing to adjust.
Pre-Made Thumbnails, And The One Thing To Plan For
Click next and Facebook gives you 10 thumbnails it has picked out of your video. There are plenty of options and it works reasonably well.
What you cannot do is upload your own custom thumbnail, which is a shame, because some platforms still do not support cover videos at all. If one of Facebook’s ten choices is bad, you end up with a lovely video and a poor still for anyone on a device that will not play it.
So here is the thing to plan for: the first thumbnail Facebook offers is always the first frame of your video. If you are worried about the still, make your opening shot something that works as a photograph. Mine opens on a cliff, which I am happy with as a still.
Then hit publish. If someone’s device cannot play the video, they get a decent photo. If it can, the video loops in the background of your page, which is the whole point.
Do not have Premiere? There is a free trial here.