
Whenever you export a Reel out of Final Cut and post it, Instagram is gonna compress the heck out of it, and a lot of the time that isn’t even Instagram’s fault. It’s because a couple of settings way back at the start of your project were wrong, and nobody ever told you. I first dug into that compression back in 2020, and that earlier guide is still up, though Instagram has moved on since.
So here is every setting that actually matters, in the order you’ll run into them, plus the one step at the very end that actually unlocks the higher quality playback. Almost nobody is doing that last one.
And to save you time, I made a free Final Cut Pro export preset and safe zone template that gives you these exact settings instantly. It’s completely free.
Check Your Library Settings Before You Do Anything Else
Before you ever export your video, there are some important settings you’re gonna want to make sure are correct, and the first one is not in the export window at all. It’s on your library.
Select your library up in the top left, then over on the top right make sure your Inspector is enabled. You’re looking for the color processing setting. It needs to say Standard Gamut SDR.
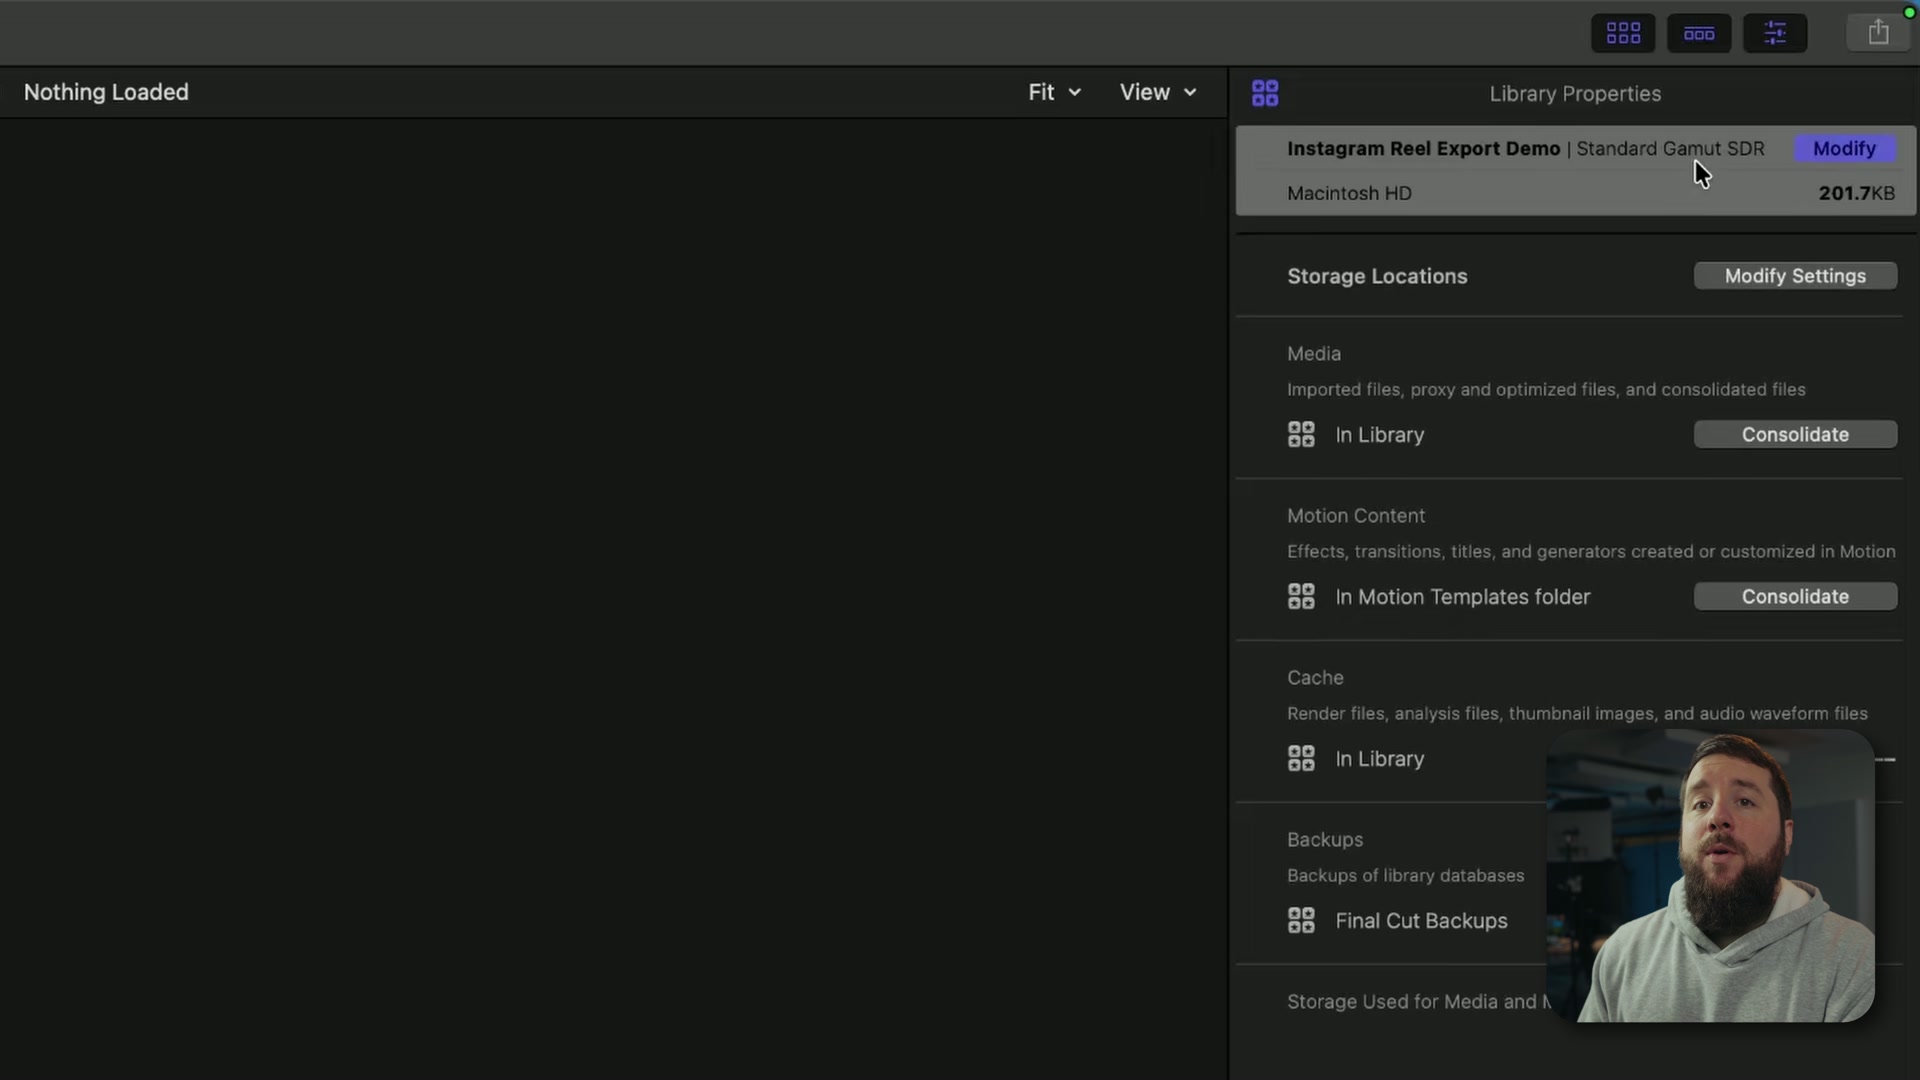
If it says Wide Gamut HDR, you’re working in an HDR project and your colors may end up looking very weird. Showing you how to export in HDR is way outside the scope of this, so just make sure it says Standard Gamut SDR. If it does not, click Modify, click Standard Gamut SDR, and click Change.
Set Up A Vertical Timeline The Right Way
With that done, you next want to make sure your project and timeline is set to the correct resolution. Whenever you create a project, which you do by clicking the Create Project button down at the bottom, you’ll see you can name your project, but there’s not many settings you can change there. Right? Well, you need to click Use Custom Settings.
Then this is the very important one for vertical video: change the orientation to Vertical. And notice that by default, Final Cut for some dumb reason is gonna default to 720 by 1280, which is way too low of a resolution and is gonna make your Reels look really pixelated. Change that to 1080 by 1920.
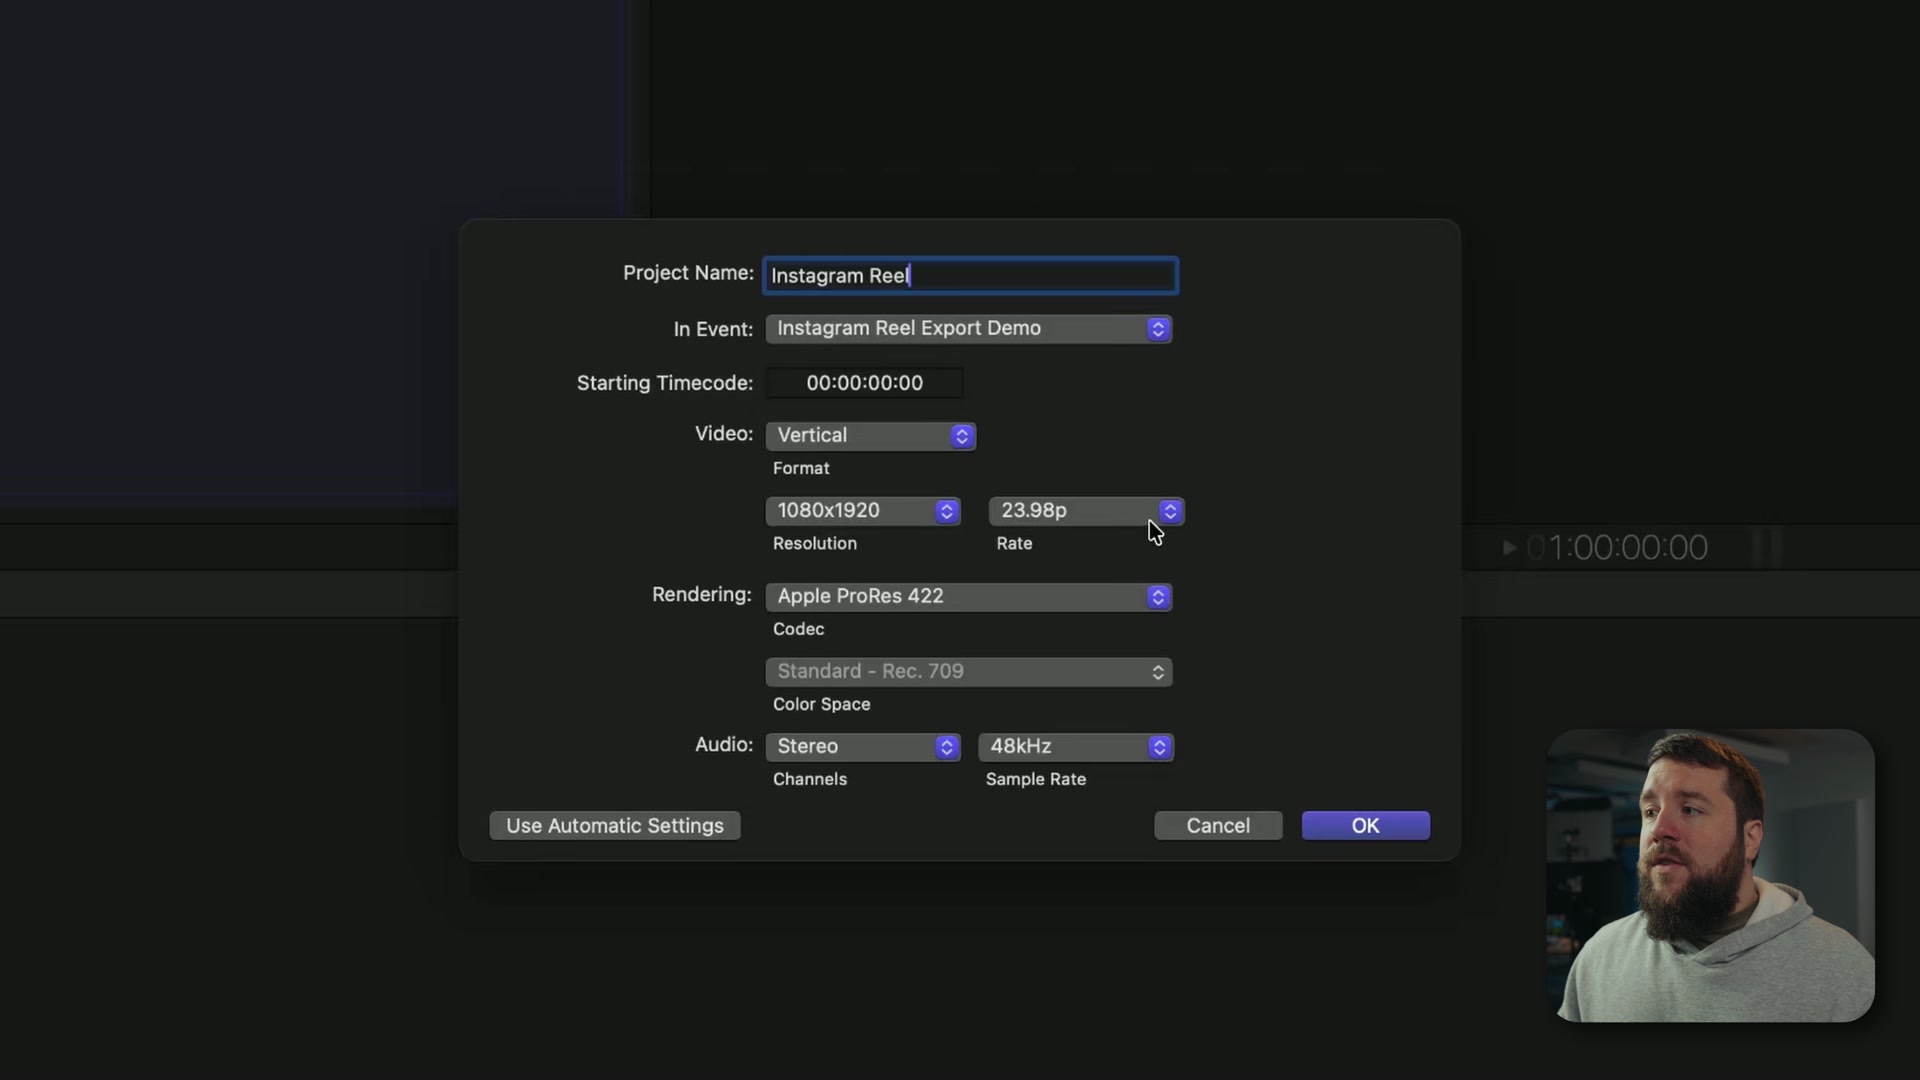
For frame rate, you’re always gonna want to choose either 23.98p, 29.97p, or 59.94p, depending on what you filmed your video at. In the past, Instagram used to convert any 24fps video to 30fps, which could make the footage stutter and not play back as smoothly, but in mid 2025 or so they started supporting more frame rates like 23.98 and 59.94, which is what most cameras are using these days. So you can use whichever option you like. I’m leaving mine on 23.98.
For your rendering codec, you can leave this set to Apple ProRes 422, and then make sure your color space is set to Standard – Rec. 709.
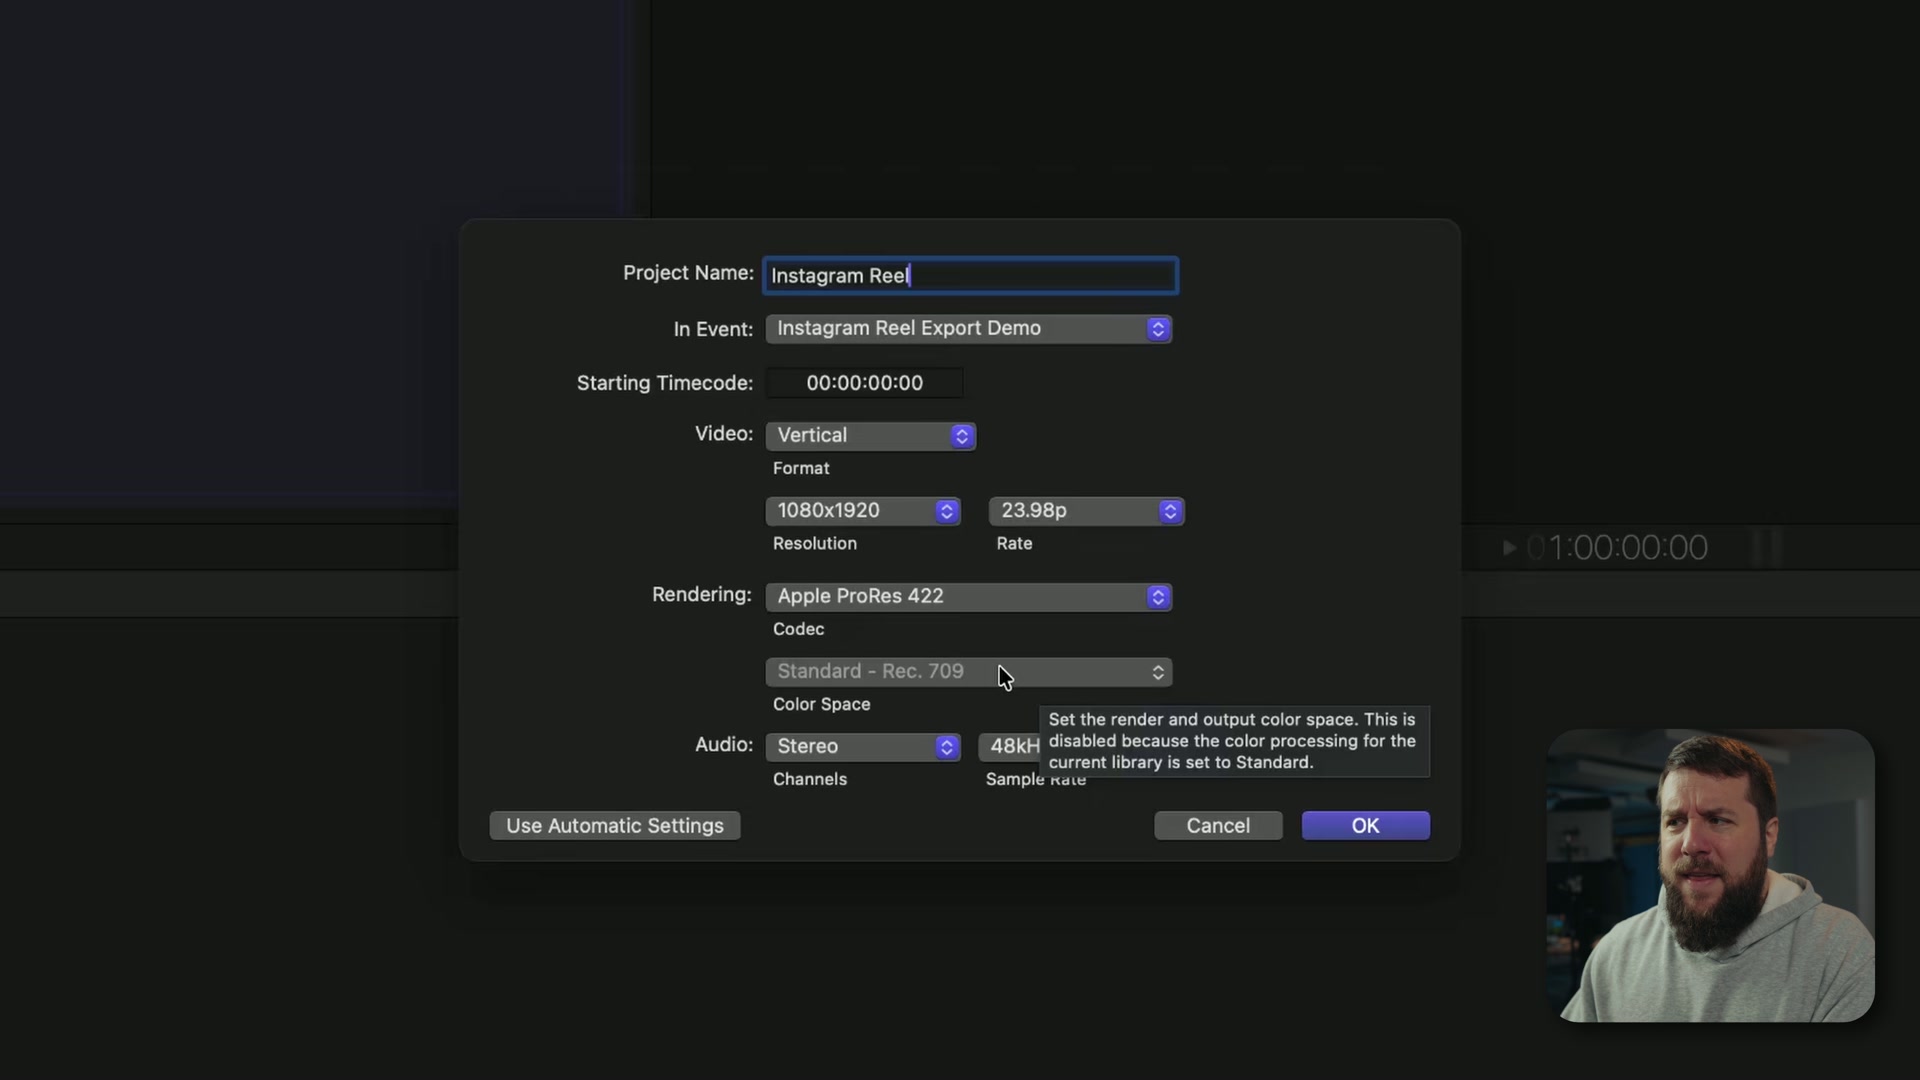
With earlier versions of Final Cut this sometimes defaulted to a weird Rec. 601 color space, which you definitely do not want. If it’s grayed out and showing Rec. 709, you’re good to go. Lastly, leave your audio channels set to stereo and your sample rate set to 48 kHz, and hit OK.
Use The Free Safe Zone Overlay So Your Text Doesn’t Get Buried
Anyways, with your timeline created, let’s pretend you have a video fully edited and ready to export right now.
If you want to make sure that all the elements of your video, the text and everything else, are properly positioned so they’ll actually be visible and not hidden behind Instagram’s buttons and app settings, I made a free overlay graphic you can click and drag down onto your timeline. It shows you instantly whether everything is positioned correctly.
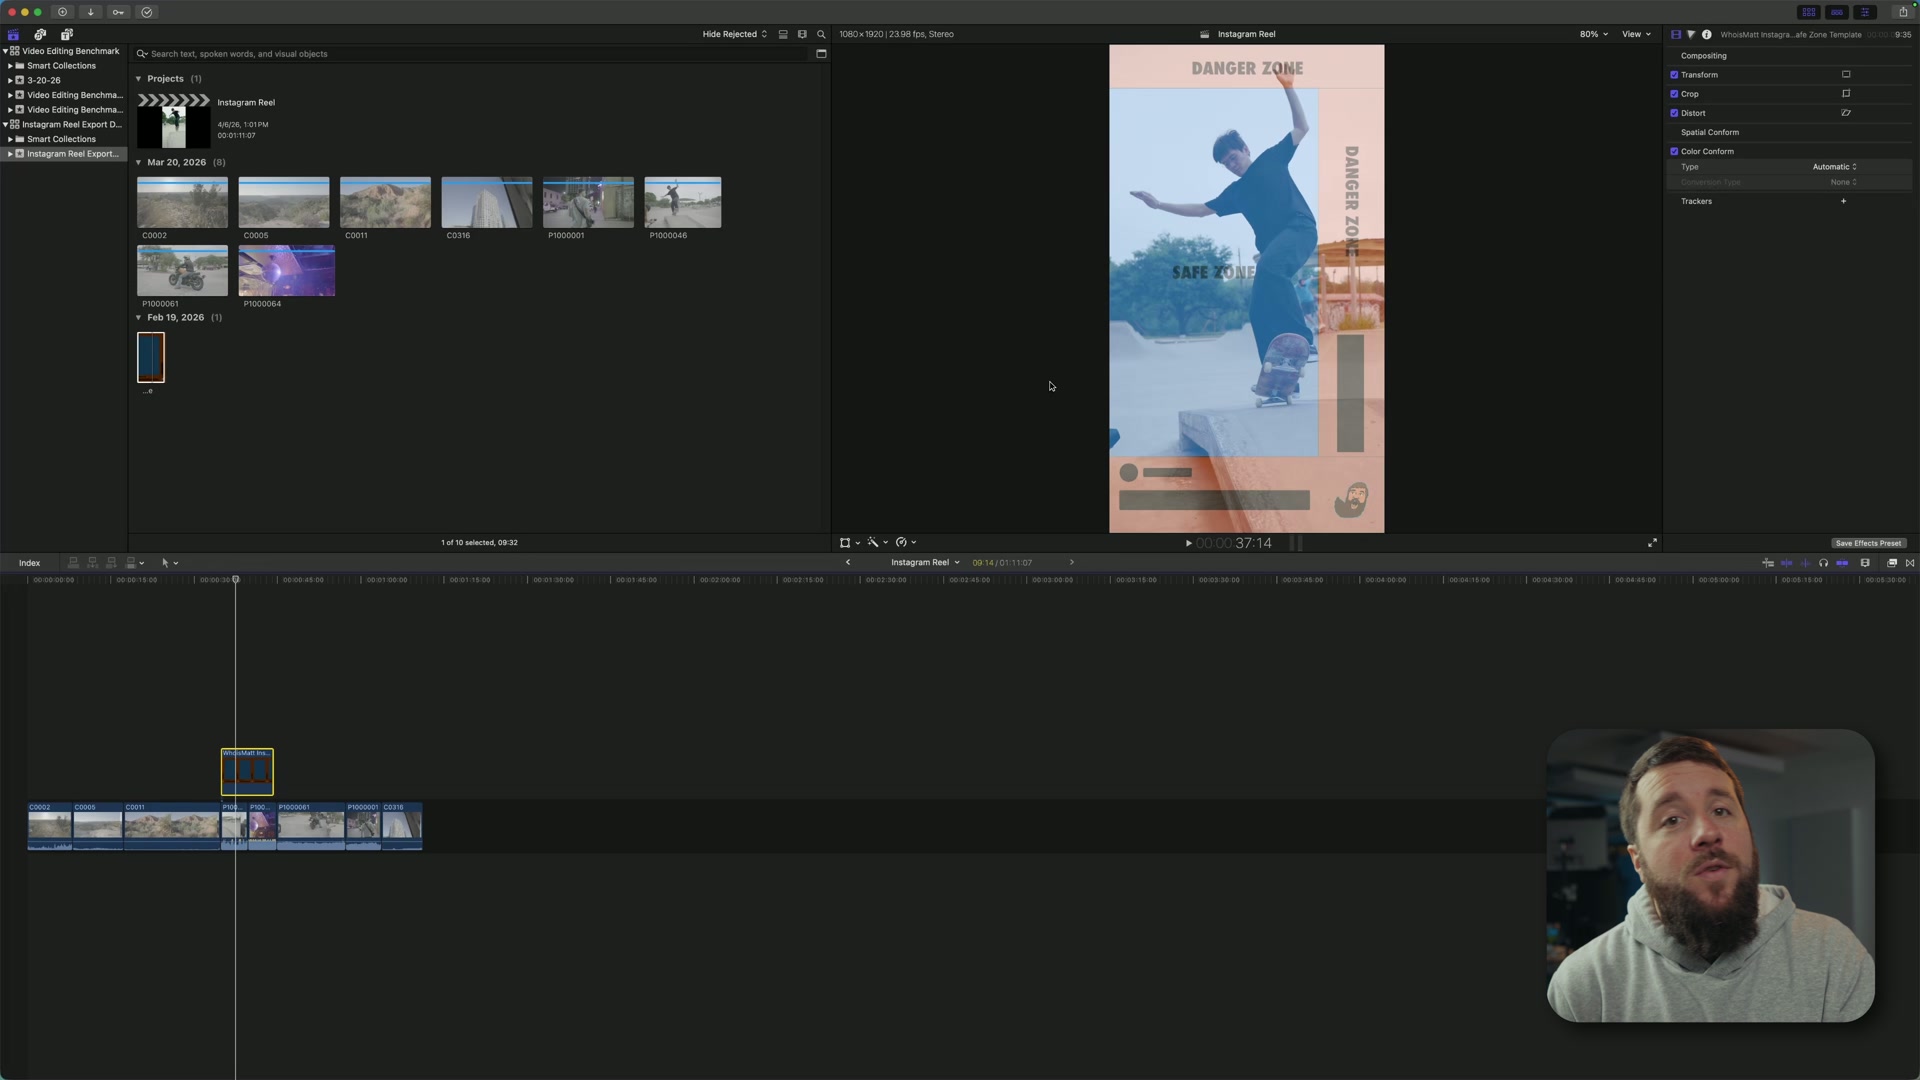
Then just make sure you delete that clip before you export your video. Otherwise you’re gonna be in big trouble.
The Best Export Settings For Instagram Reels In Final Cut Pro
Now it’s time to export. The easy way to do this is to download my free export presets, then click the export button up in the top right, select Instagram Reel, click next, and you’re good to go.
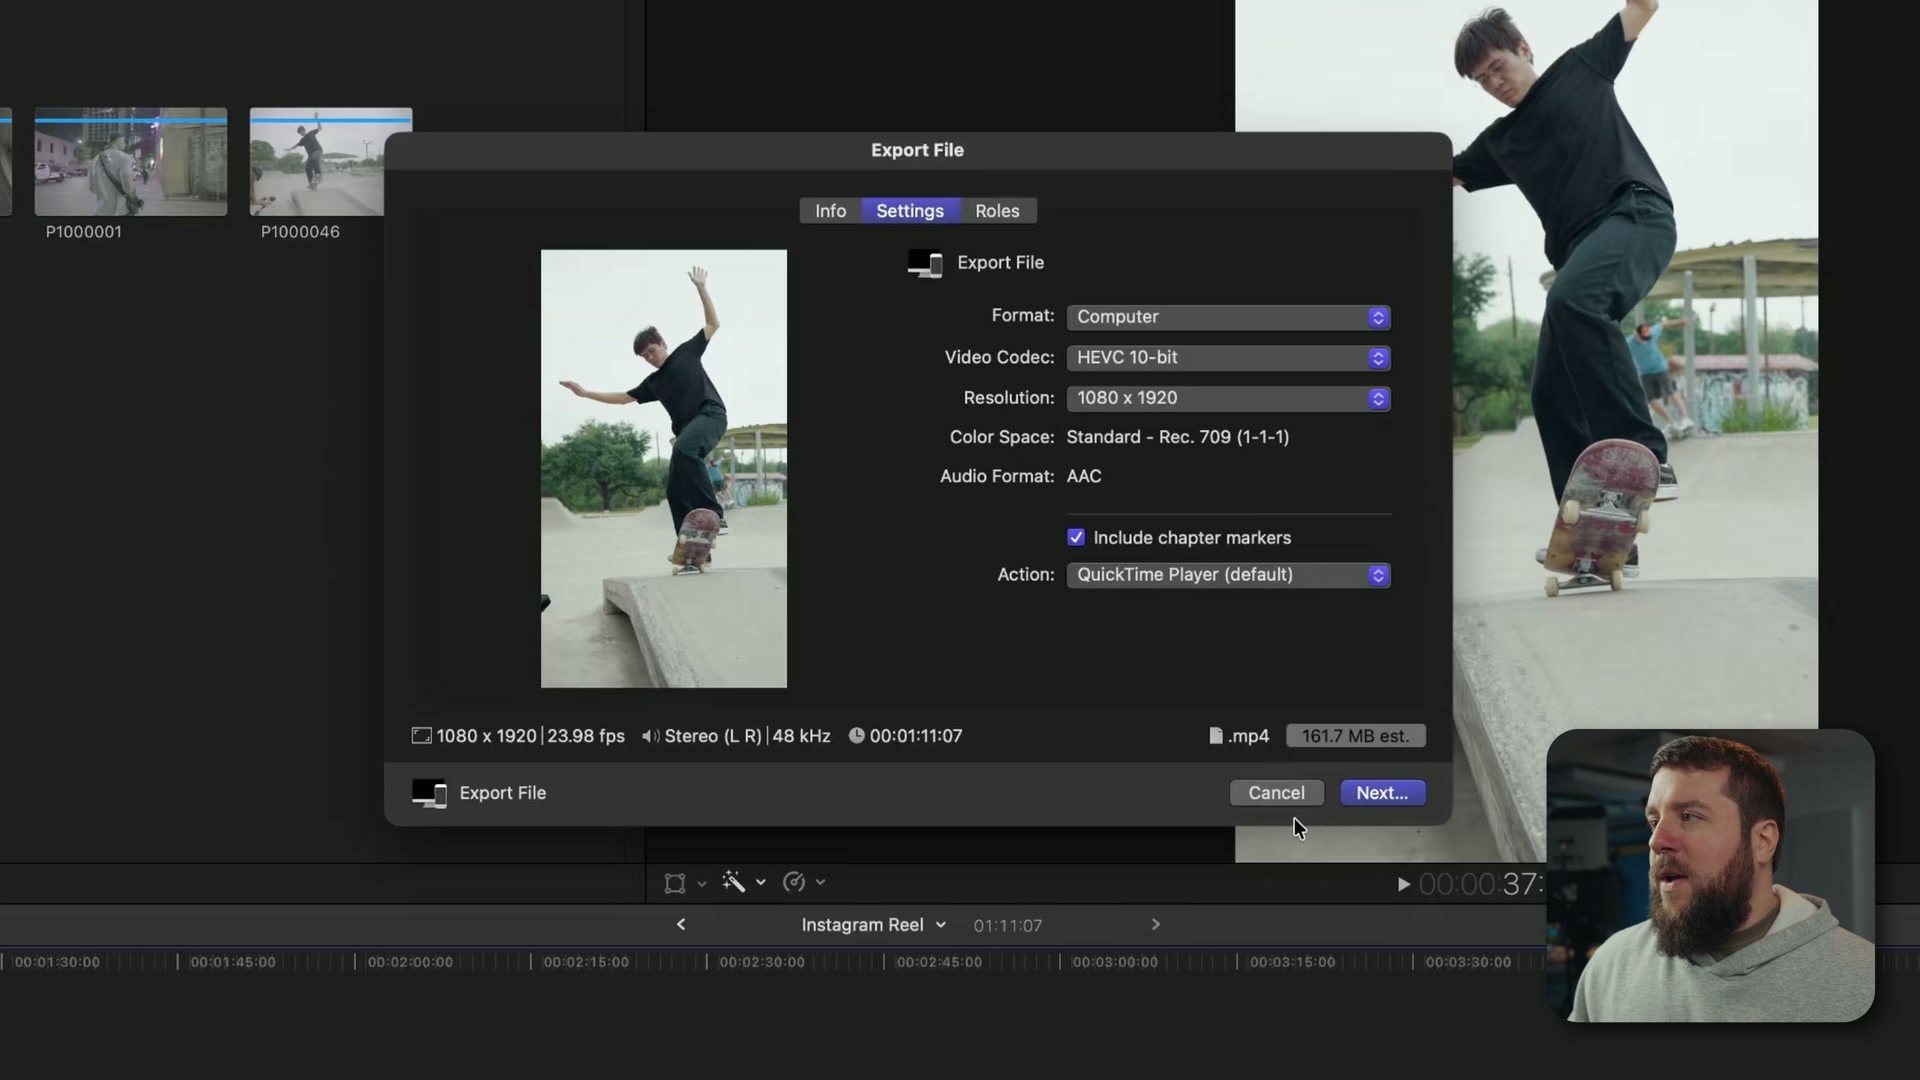
But if you haven’t downloaded those yet, here’s how you do it manually. Hold down Command and press E, which opens the export settings dialog box. Go up to the Settings tab at the top.
For format, you have the option of either Mastering or Publishing, with options like video and audio, Apple devices, computer, social platforms, and so on. Final Cut likes to default to Mastering, but whenever you do that it’s gonna export a .mov file. If you want maximum compatibility, you want to choose Computer, which gives you an .mp4.
Then for video codec, select HEVC 10-bit. Most phones are recording video in H.265, also known as HEVC, these days, and this is a format Instagram expects many videos to be uploaded at. Not to mention HEVC is a newer codec with better compression, so it’s gonna work very well. Then make sure your resolution says 1080 by 1920 so it is vertical, leave the rest at the defaults, and click next.
That’s where you choose where you want the file saved. Once you hit save, Final Cut will immediately begin rendering, and you can check the progress by clicking the little Background Tasks button in the top left, which will show you under Sharing where your video is exporting and when it’ll be done.
Once it’s exported, copy it to your phone with AirDrop if you’re on a Mac, or I really like using Dropbox because it works with everything.
If you’re not using this one, I went through Final Cut Pro Just Copied Premiere Pro’s WORST Feature as well.
The Secret To Actually Getting Higher Quality On Instagram
Here is another secret for the highest quality, because you may think you just want to take this video you’ve exported and copied to your phone, go to Instagram, and post it.
That is actually not gonna give you the highest quality video.
Instead, Instagram wants you to use their Edits app to edit and export your video, and when you do, they reward you with a higher quality video on Instagram. So download and open Edits. And to be clear, you don’t actually need to make any edits to your video in this app, because it’s already edited.
All you’re gonna need to do is go up to the export settings in the top right and select 4K resolution at 24 frames per second, or whichever frame rate you’re using.
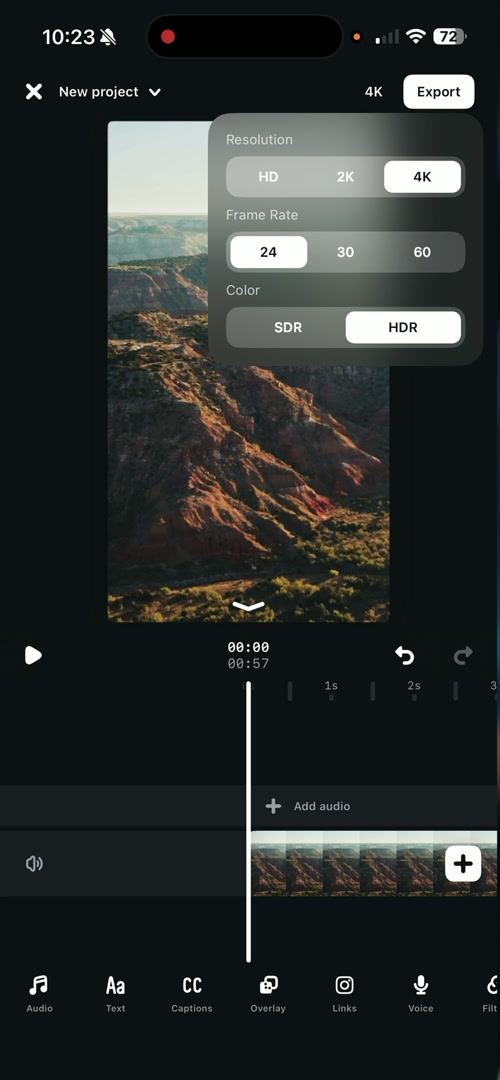
The reason you want to choose 4K is that it helps guarantee the Edits app uses a higher bit rate, which keeps the quality high whenever you upload to Instagram. This is also why the export quality out of Final Cut matters so much, because you’re re-encoding this video inside Edits, and you want the video you bring into that app to be as high quality as possible.
Then tap export and the video renders out in the Edits app.
Now here is the very important part. Once Edits has rendered your video, click the Instagram button in the bottom left, which sends the video straight to Instagram. This is how you unlock the higher video quality.
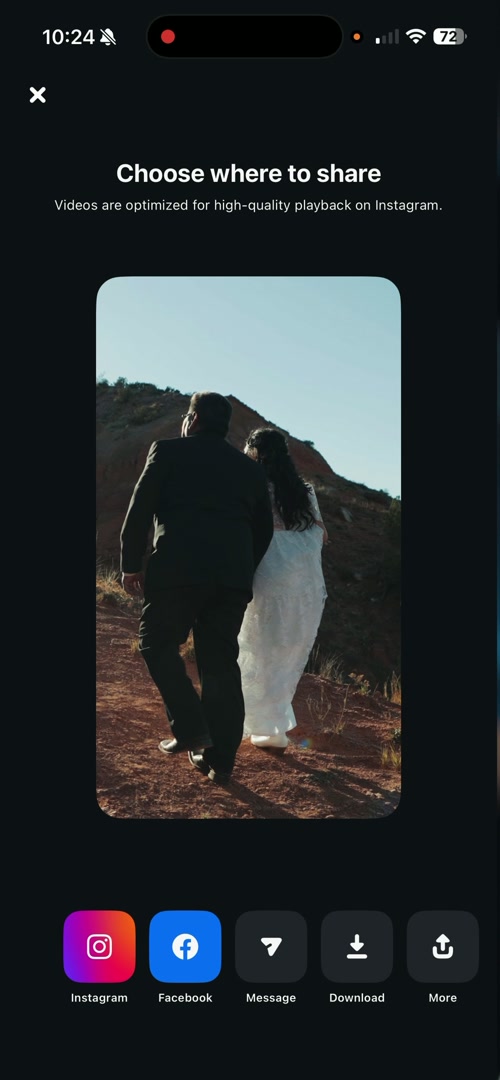
If you do not click that button, and instead choose to click download at the bottom and then copy it over to Instagram yourself, it will not work. You have to send the exported video from Edits to Instagram.
Once you do that, Instagram opens up the post settings page where you can add a thumbnail, write your description, and so on. If you were not using Edits, there would be a setting here you could toggle on to upload at the highest quality. But look at the very bottom of the screen: it says Reels made with Edits are optimized for high-quality playback on Instagram. So you don’t have to do anything else.
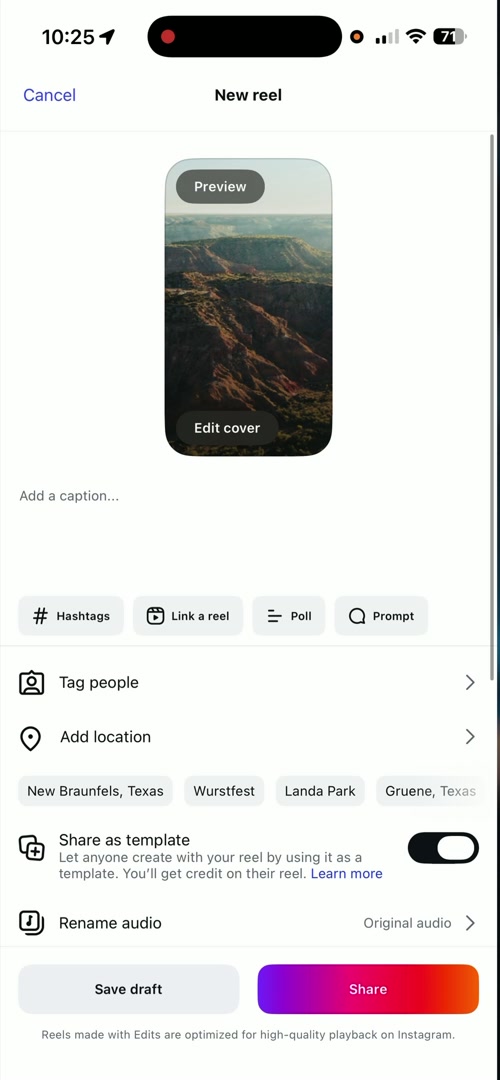
With that, all you have to do is tap share, and your video will be shared to Instagram in the highest quality possible.
Grab The Free Preset And Safe Zone Template
If you haven’t downloaded the export presets and the safe zone template overlay that makes sure you’re putting your text in the right place, what are you doing? It’s all free, and you can download it right here.
I make these export tutorials for all the platforms and all the major editing apps, so if you’re not in Final Cut, I’ve got you covered too. Here’s the same guide for DaVinci Resolve and the one for Premiere Pro. And if you’re exporting horizontal 4K for YouTube instead, I’ve written up the best 4K export settings for DaVinci Resolve and the best 4K export settings for Premiere Pro as well.
And if you want to get faster and better at the editing itself, not just the exporting, you can grab my Edit Videos Like A Pro guide completely for free.
Thanks so much for reading, and have a great day!