
Today I am going to show you how to export high quality Twitter videos out of Adobe Premiere Pro. And to save you the trouble of remembering any of it, I have made a set of free export presets that give you the exact settings for horizontal, vertical and square Twitter video.
Download the free Twitter video presets here.
These steps work identically on Mac and PC.
Sequence Settings For Twitter Videos
First we need a sequence that matches the resolution and frame rate Twitter actually supports.
Make sure you are in the Editing workspace, then click into the Project panel in the bottom left and press Ctrl+N on PC or Cmd+N on Mac to bring up New Sequence. Or go to File, New, Sequence.
There are a lot of presets in here, but we are going to build our own and save it. Select Digital SLR > 1080p > DSLR 1080p24, then click over to the Settings tab.
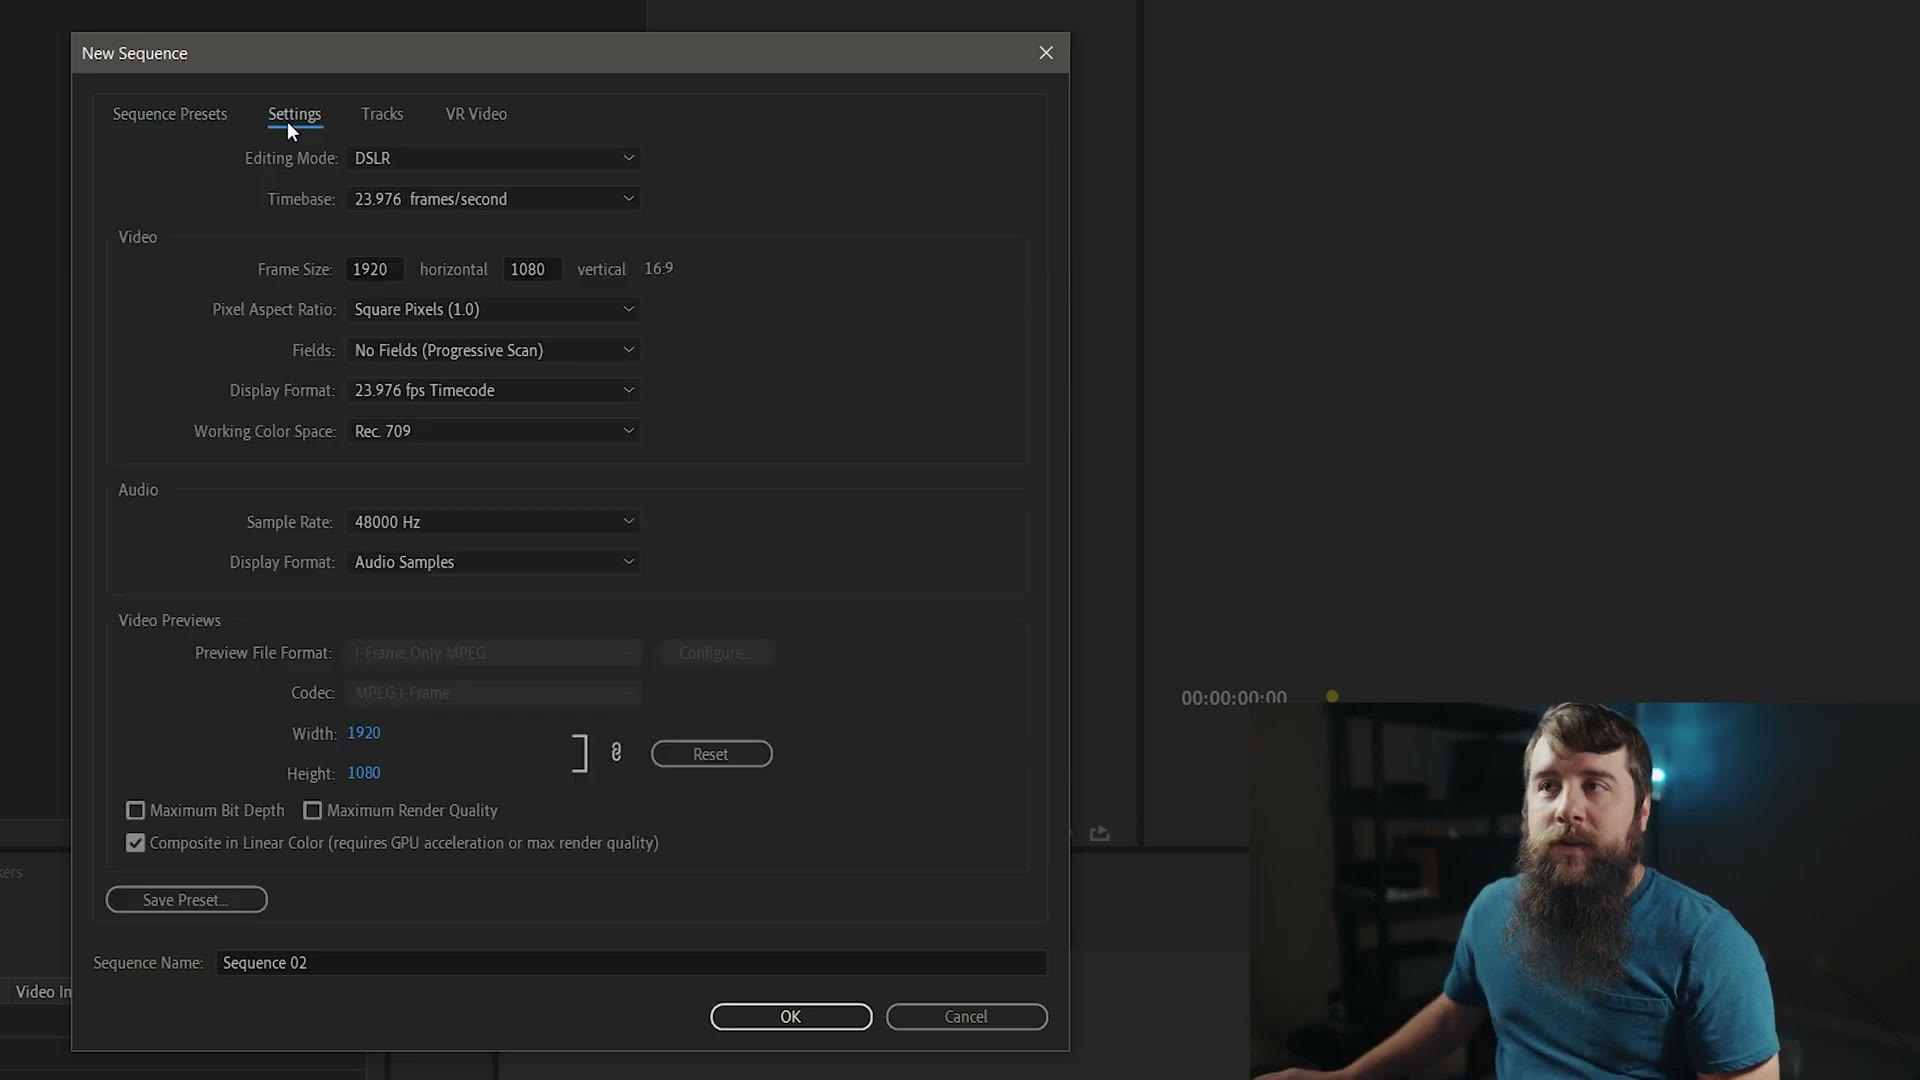
That preset gives you a frame size of 1920×1080, which happens to be the maximum resolution Twitter supports for video. If you want the best possible quality, always upload at the highest resolution the platform allows.
Be aware that this makes a normal horizontal video. For the other two shapes:
- Vertical: set horizontal to 1080 and vertical to 1920.
- Square: set both values to 1080.
For Timebase, which is your frames per second, match whatever you shot. My footage is 23.976 so I am leaving it there. If you shot 30, choose 29.97. If you shot 60, choose 59.94.
Now click Save Preset and give it a name. I call mine “Twitter Horizontal 24fps – whoismatt.” Premiere reloads for a second, and your new preset shows up at the bottom of the list under Custom. Next time you just pick it and move on.
Name the sequence and hit OK.
Twitter’s Max Video Length
Drag your footage onto the timeline and you may run straight into the wall I did. Seven minutes. Way too long.
The maximum length Twitter supports is 2 minutes and 20 seconds. To be safe, I would cut to at most 2:19, so you cannot accidentally tip over the edge.
Twitter Export Settings
With the timeline selected, press Ctrl+M on PC or Cmd+M on Mac, or go to File, Export, Media.
For Format, make sure H.264 is selected. Then open the Preset dropdown and scroll all the way down to Twitter 1080p Full HD.
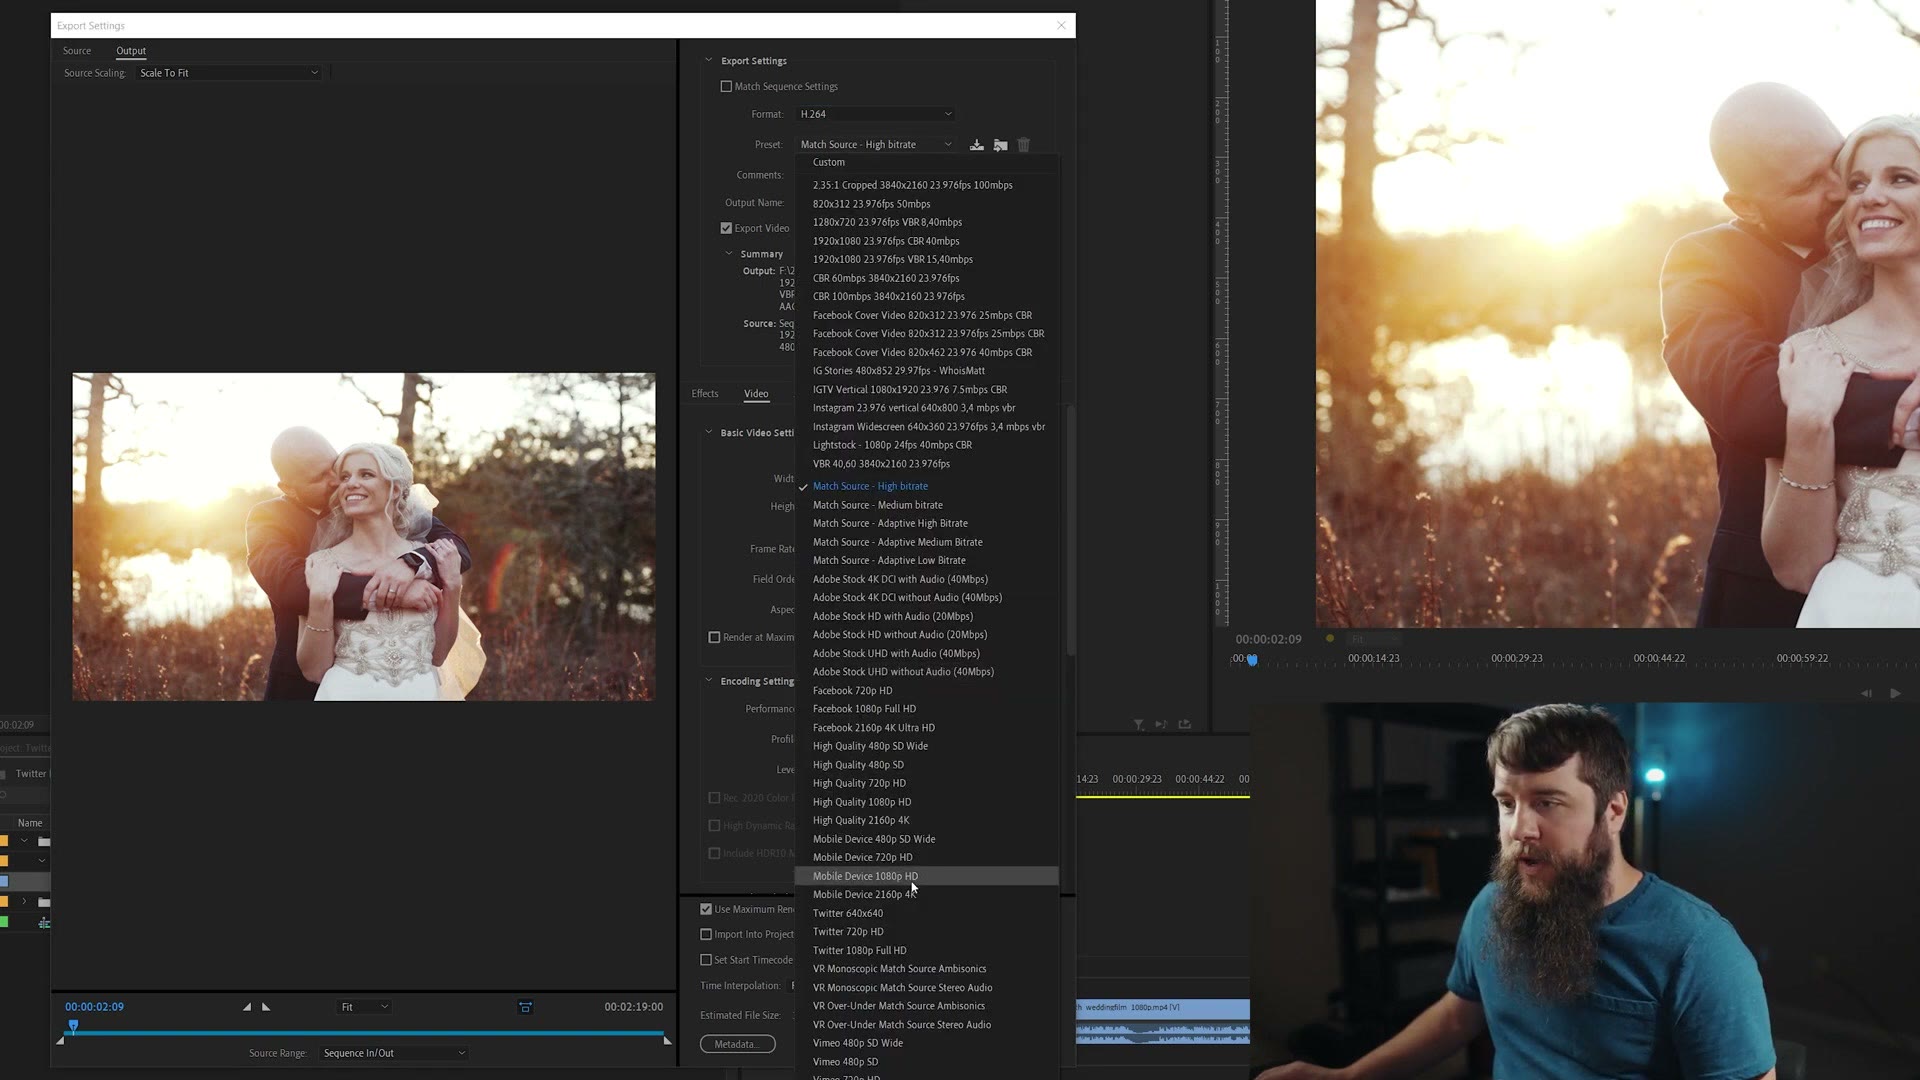
You might think great, they have a preset, we are done. That default will not give you the best quality though, so we are going to customize it.
For Output Name, click the blue text to choose where the file gets saved, and pay attention to which folder that is so you can find it later.
Make sure Export Video and Export Audio are both ticked, then go to the Video tab.
Width and height will default to 1920×1080. If you are exporting vertical, flip those to 1080×1920. Square, set both to 1080. Or download my presets and it is already done.
Frame rate should already match what you set in the sequence, so leave it. Tick Render at Maximum Depth, which helps quality.
Scroll down to Encoding Settings. Under Performance, choose Hardware Encoding if you have it, because it exports faster. If you only see Software Encoding that is completely fine, your video still exports. Leave Profile on Main and Level at 4.2.
The MOST Important Setting For High Quality Video
Now scroll to Bitrate Settings, because this is where you make the single biggest difference to how your video looks on Twitter.
Set Bitrate Encoding to CBR, constant bit rate. That means Premiere gives every part of the clip the highest bit rate and quality it can, regardless of what is happening on screen.
Then comes Target Bitrate, and this is where it gets a bit fiddly. In general, the higher the bit rate the higher the quality. The problem is that the higher the bit rate, the bigger the file, and Twitter caps video file size at 512 MB.
So you experiment. Look at the bottom of the Export Settings dialog and you will see Estimated File Size. Mine started at 106 MB, though yours will differ depending on length. That leaves a huge amount of headroom to spend on quality.
Here is what happened as I walked the target bit rate up:
| Target bitrate | Estimated file size |
|---|---|
| 10 Mbps | 176 MB |
| 15 Mbps | 263 MB |
| 25 Mbps | 437 MB |
| 28 Mbps | 489 MB |
| 29 Mbps | 506 MB |
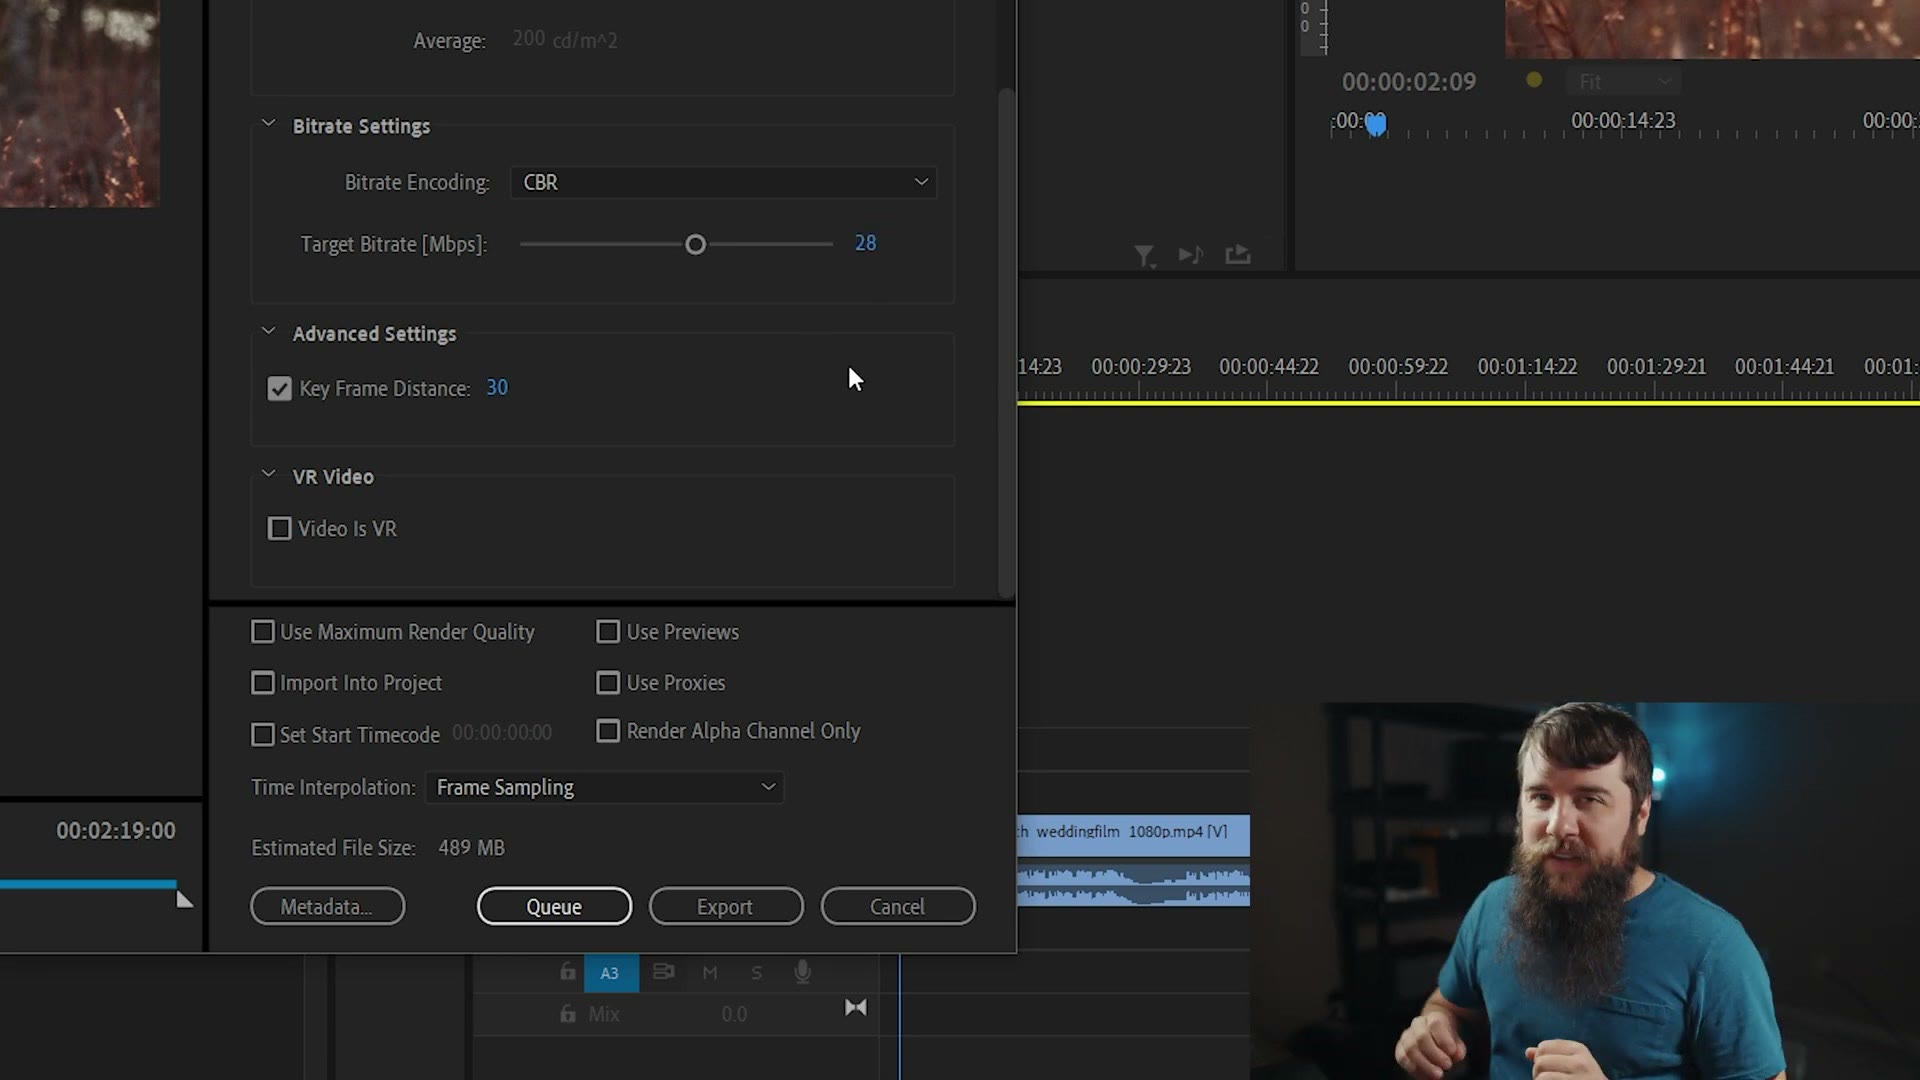
506 is uncomfortably close to 512, and remember the estimate is only an estimate. So I dropped back to 28 and stayed in the safe zone.
It is a bit like The Price Is Right. You want to get as close as you can without going over.
With that set, tick Use Maximum Render Quality, because we definitely want maximum render quality. Then head to the Audio tab. Everything in there is fine except one thing: change the bit rate from 128 to 320, which improves your audio.
Now save all of this as a preset so you never type it again. Click the little down arrow next to the Preset field and name it. Mine is “Twitter Horizontal 24fps – whoismatt.” If you downloaded my presets, it is already sitting in that list.
Exporting
You have two options. Click Export and Premiere starts encoding immediately, or click Queue and it hands the job to Adobe Media Encoder so you can carry on editing. I use Queue. In Media Encoder, hit the green play button to start.
Uploading Your Video To Twitter
Once it has exported, go to Twitter, click the media icon, pick your clip, hit open, write something like “I got this cool video, yeah,” and tweet it.
The video will go gray for a while. That can take several minutes or more depending on your upload speed. It will finish. And when it does, you have uploaded your video in the highest quality Twitter will accept.
If you have not grabbed them yet, the Twitter export presets are completely free. And if you want to do this for other platforms, I have a whole playlist on exporting from Premiere for any site.