Welcome to WhoisMatt.com v3.0

I remember registering whoismatt.com 12 years ago in 2018. I originally used Joomla to build the site, convinced that I didn’t want to run a blog for some reason. 🤦‍♂️

Thankfully, two years later I realized that a blog wasn’t so bad, and made the migration to WordPress and a new video-centric theme. For the next decade, I would use the same theme, which worked well for video watching but was severely lacking in readability. I consistently updated my site with new videos and news until mid-2017 when my YouTube channel began to be significantly more popular.

Blog posts became fewer and far between as I focused more on YouTube. Over time I had slowly fallen out of love with blogging, choosing instead to post text to Facebook and Instagram, but I would occasionally visit my site with a feeling of regret.

Something had to change for me to return to writing, and it needed to be big. Thankfully, two changes – one outer and one inner – were coming soon.

First the outer change: the Internet isn’t nearly as big as it once was. When I began my site, the Internet was still the wild west. Your choices were more than just Facebook, Instagram (which is still Facebook), Amazon, and Google. Anyone could have a blog and it could be popular!

Now this is still true to some extent, but the consolidation of sharing news and information to social network has in part done away with the need for blogs. Why post a blog when you can simply write a quick Facebook update in the walled garden shared by all your friends?

I tried this for years, but soon woke up to the reality like many other people, these social networking sites don’t care about what you have to share unless you pay them. Want to share a post on Facebook? Better pay for a boost if you want anyone to read it. The same goes for Instagram. Algorithmic news feeds are killing Facebook, Instagram, and Twitter.

What’s one of the few places you can post free of an algorithm? Hello blogging! That is the first (and one of the largest) reason why I’m returning to writing this blog. But it’s also more external, which brings us to my second reason to blog again.

Remember how I said the previous blog was lacking in readability? This was fine in 2010, but 20 years later, we’ve seen a huge growth in the area of font choices and styling of blogs. Anyone remember the grunge look? I’m glad that’s over!

Blogs have refocused on ease of use and readability, and I felt like my blog theme was stuck in the past. If I wanted to blog again, I knew that I wanted to present my readers with a better way to consume my words.

Kill the sidebar! Get a better font! Up the font size a bit too for mobile screens! All of these things add-up, to what I hope is a cleaner, easier to read blog that people will actually want to read. I’m genuinely excited to blog again, and to get there I had to be excited for you to read it.

So welcome to the 3rd generation of whoismatt.com. With a fresh coat of paint, and a newfound enthusiasm, I’m excited to share everything with you, without any algorithm or non-chronological order getting in the way.

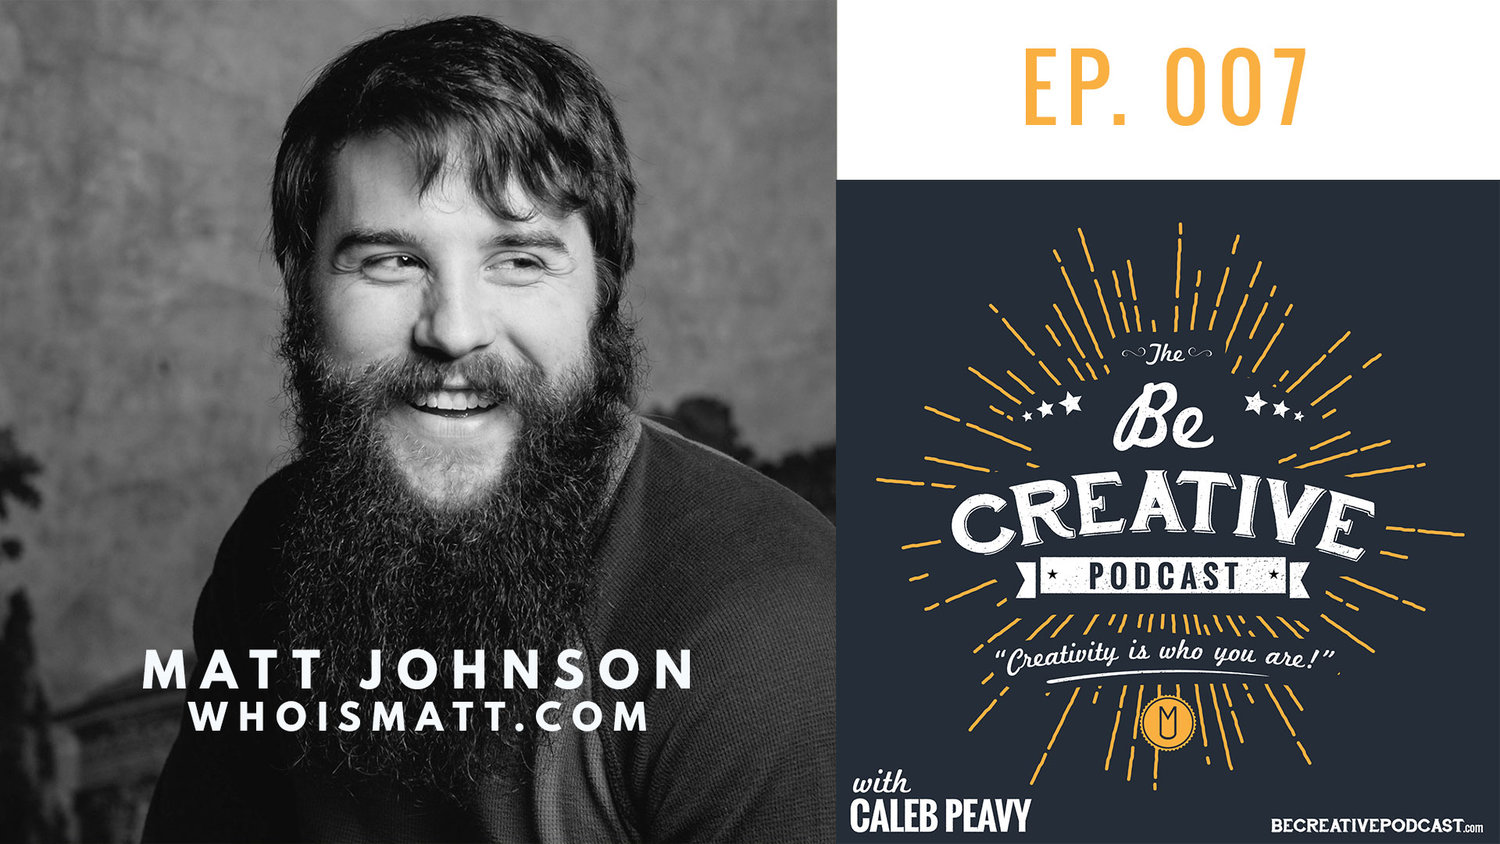
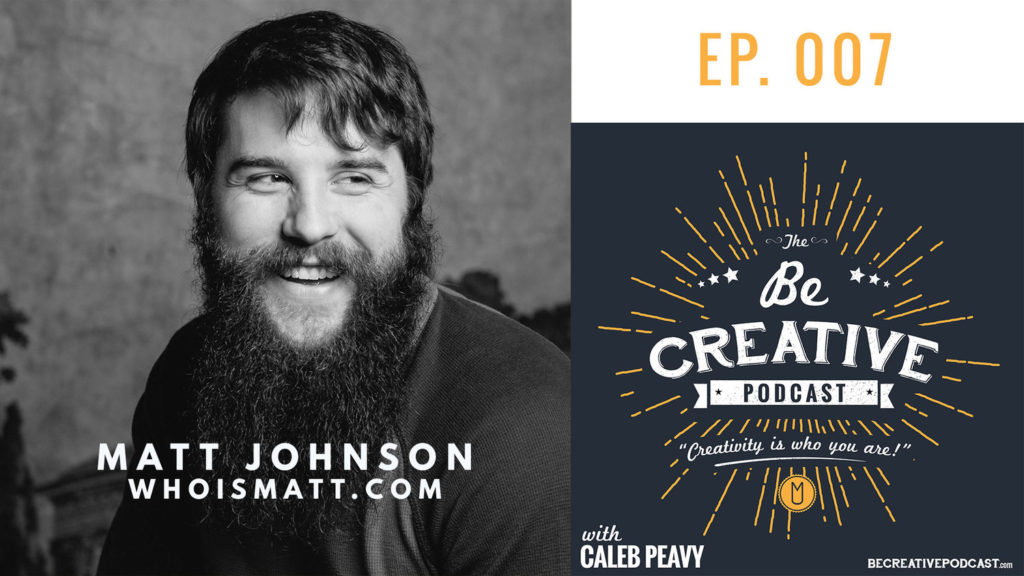
I was a guest on the Be Creative Podcast!

A few weeks ago, Caleb Peavy of the Be Creative Podcast asked me to be on and chat with him all about (what else?) being creative! Before I was on, I did some research and saw that most of his podcasts were going 20-30 minutes in length. “No problem,”  I thought, “Mine will be right in there at the average length of 25 minutes.” Welp, we talked for 53 minutes, so I hope you guys enjoy it. We talked about how I got into filmmaking, the origin of my website name, and then we went super deep about

Caleb and I touched on how I got into filmmaking, the origin of my website name, and then we went super deep about a lot of my creative insecurities and how I fight them off. Also, I found out that Seth Godin was going to be on the podcast a week after me so I can add “On the same podcast (but not at the same time) as Seth Godin,” which is easily one of my highest accomplishments now.

You can listen in your web browser here, or on the Be Creative Podcast site, or on iTunes.

I hosted the Wedding Film Academy Podcast!

This week I had the opportunity to not only be on a podcast, but host it! My good friend Jordan Bunch, the regular host of The Wedding Film Academy Podcast (which I was on back in March), reached out to me about interviewing him about a topic that I didn’t know much about: volume wedding film brands. Usually he runs the show but in this case, considering he wanted to talk about his own company, we decided it would be a great idea to have me ask the questions.

There are many ways to run a wedding film business, and one of the most interesting is the concept of a volume company – one that films hundreds of weddings per year, usually at a lower cost than competitors. To hear Jordan describe it, his company Ladybird Wedding Films is the Toyota of wedding filmmakers: cheap, reliable, and with good gas mileage (not sure about that last one in regards to wedding films). Because he runs this company very differently than how I run FilmStrong Productions, I ended up having a ton of questions about everything from video quality to business sustainability. I would highly recommend checking out the podcast on Jordan’s site or on iTunes if you would like to learn more about different styles of wedding filmmaking businesses.

Have any questions? Please feel free to get in touch!

Here’s a free watermark for your Adobe Premiere Pro CC Proxy Files

A gift from me to you!

Since last November, I’ve been filming weddings exclusively with the Sony A7Sii in 4K. Due to the large file sizes this produces, I often end up with hundreds of gigabytes of footage from a single wedding. As I edit these weddings, I’ve realized that I will soon need to either buy a new computer to help handle the high-resolution footage, or implement a proxy based workflow where I edit lower quality video clips, then re-link the high-quality clips for final rendering.

That is why I was incredibly excited to see that the 2015.3 update of Premiere Pro added a built-in proxy workflow. Instead of having to watch as my computer bogs down from playing back the native 4K files of the A7Sii, or having to implement a round-trip through Da Vinci Resolve to create proxies, Premiere now lets me create them in Adobe Media Encoder and automatically links them to my existing footage. Once linked, it is a simple button press to switch between the native file and the proxy.

As I was working through implementing the update, I realized that it was a little TOO good. Due to the high quality proxies I was generating in Premiere Pro, it was impossible to at-a-glance tell whether I was working with the native file or the proxy file. I needed an immediate way to tell, and after a bit of research, I hit upon this a solution.

Adobe Proxy Watermark

By adding a PNG file I created to the proxy export settings in Adobe Media Encoder, all my proxy files now include a transparent “Adobe Proxy” logo on the final rendered video. This makes telling the difference between native and proxy incredibly fast and easy.

To save you the work of creating your own transparent PNG logo, I’ve included a download link below. Simply download this file and follow the steps below to incorporate it into your Adobe Premiere Pro CC proxy workflow.

Download Watermark PNG:

Adobe Proxy Logo

Follow these steps to add the adobe PNG logo to your Adobe Premiere Pro proxy workflow.

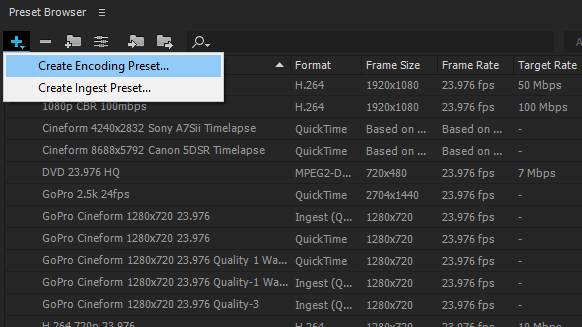
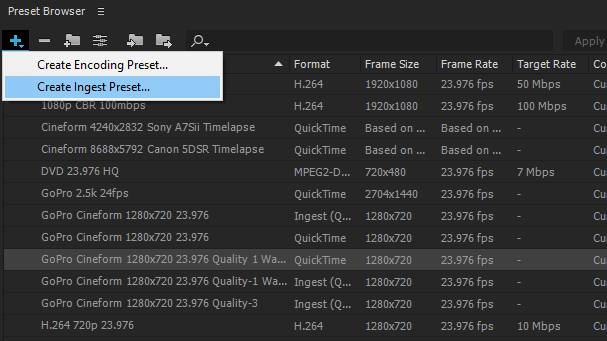
1. Open Adobe Media Encoder and in the “Preset Browser”, select the “Plus” sign and select “Create Encoding Preset.”

If you can't see it, go to "window" at the top and make sure "Preset Browser" is checked.
If you can’t see it, go to “window” at the top and make sure “Preset Browser” is checked.

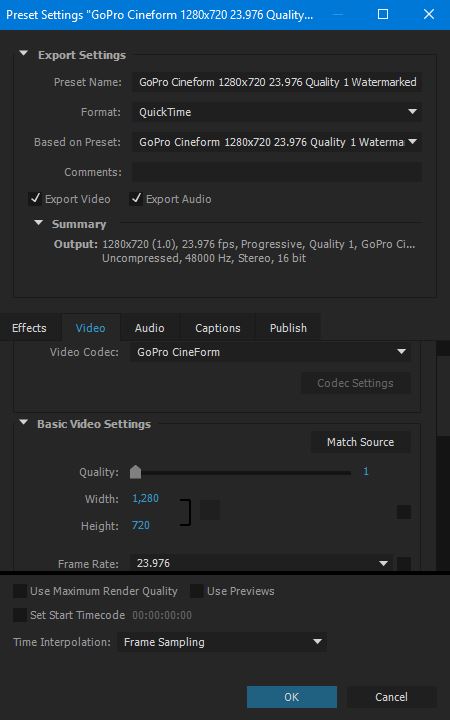
2. Create your proxy preset. In my case, I use GoPro Cineform at 720p.

Proxy Preset

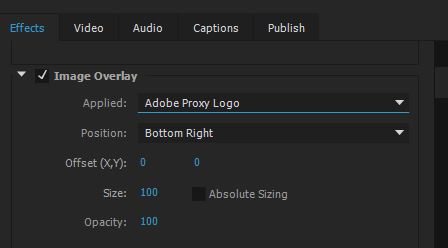
3. Open the “Effects” tab, and check the “Image Overlay” box. Click the drop down menu next to “Applied” and browse to the Watermark PNG file. Make sure you put the PNG file in a place where it will be consistent between video projects. For “Position” select “Bottom Right” or wherever you would like it to appear over your proxy video. Select “OK” and your Encoding Preset will be saved.

Image Overlay

4. Select the “Plus” sign again in the “Preset Browser”, and this time select “Create Ingest Preset.”

Create Ingest Preset

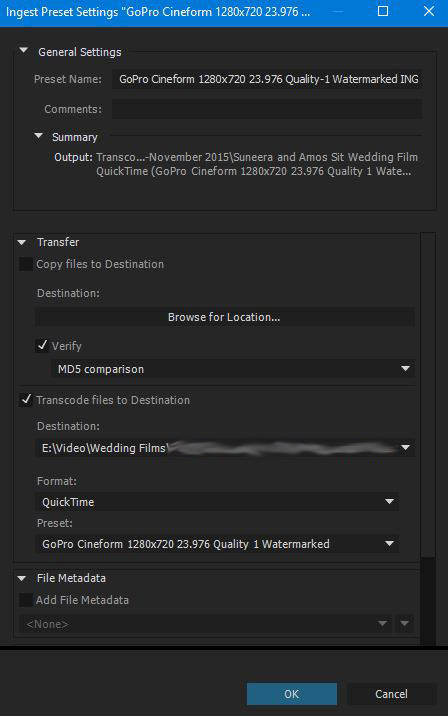
5.  Name your Preset. I named mine the same as my Encoding Preset but added the word “Ingest” at the end. Check the “Transcode files to Destination” box.

Ingest Preset Settings

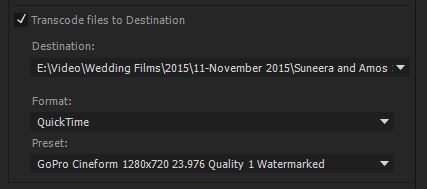
6. For “Destination” navigate to your current video project. Note: It really doesn’t matter where you tell it to navigate to, because when generating Proxies, Premiere will ignore this location and by default put the proxy files generated in the same folder as the native files. For “Format” and “Preset” select the Format and Preset you created as your encoding preset. In my case, it was “Quicktime” and “GoPro Cineform.” Click “Ok” and your Ingest Preset will be saved.

Destination Format Preset

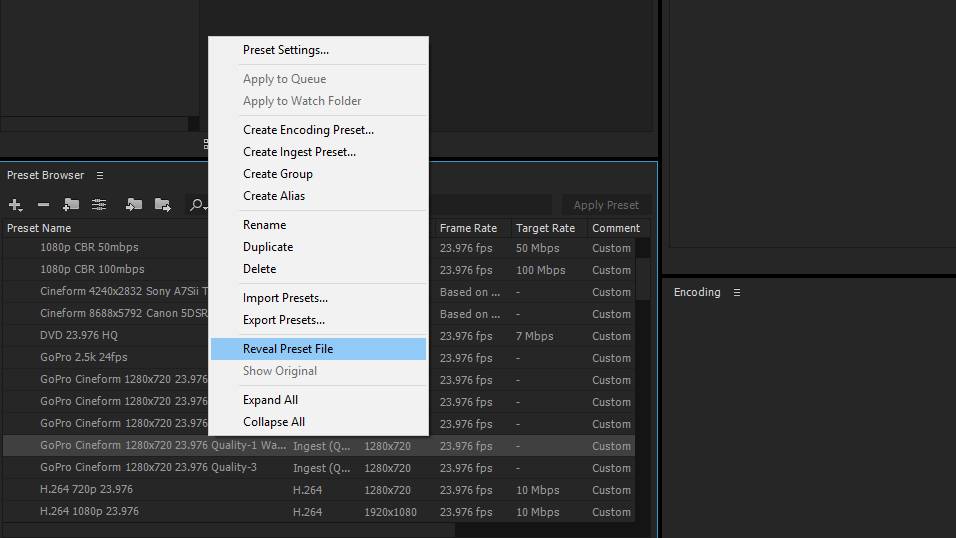
9. Right click on your Ingest Preset in the “Preset Browser” box and select “Reveal Preset File.” Make a note of where the file is in your computer’s file system.

Reveal Preset File

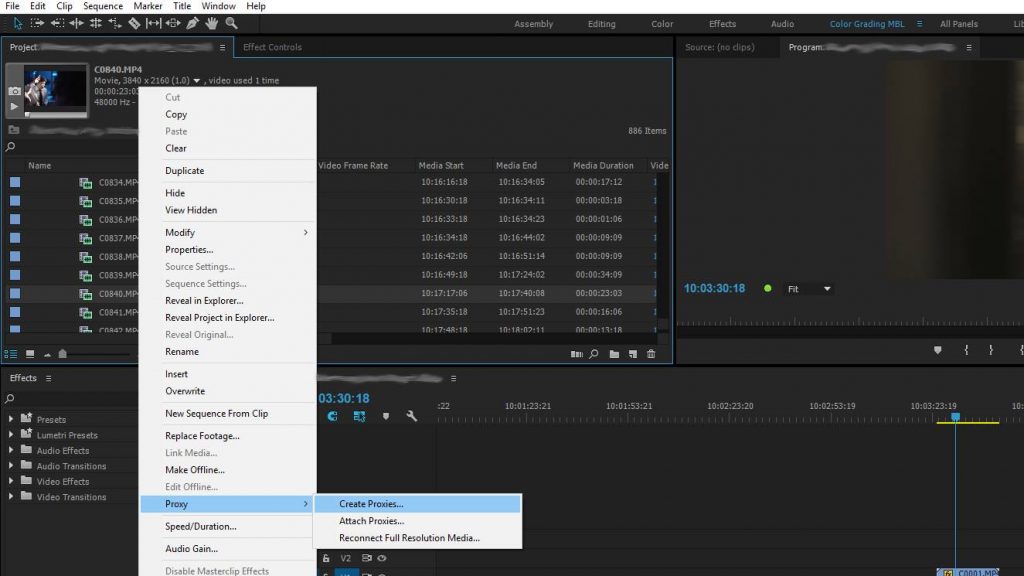
10. Open Premiere CC 2015.3, import your native video files, and in the “Project” window, select your video clips, right-click, and select “Proxy > Create Proxies…”

Create Proxies

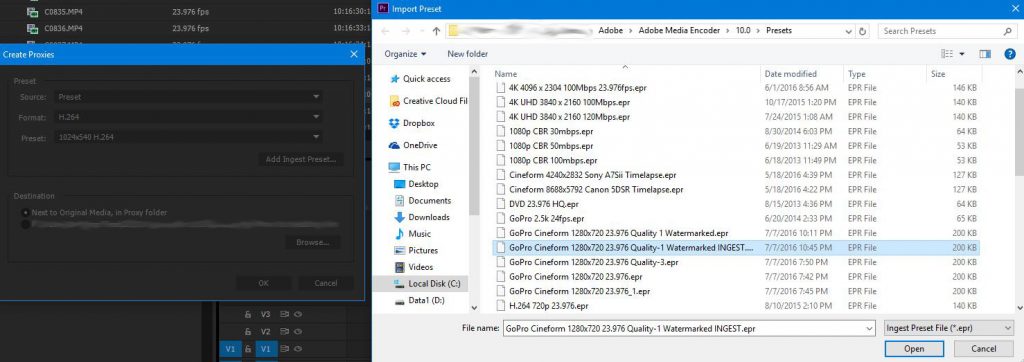
11. In the “Create Proxies” window, select “Add Ingest Preset” and browse through your file system to the Ingest Preset that you created. Select it and click “Open.”

Add Ingest Preset

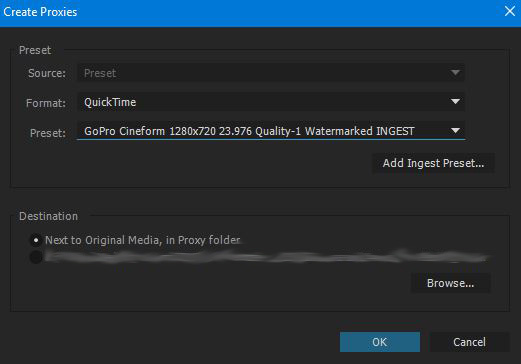
12. The “Format” and “Preset” should now match your ingest preset you created in Adobe Media Encoder. Under “Destination,” select “Next to original media, in Proxy” folder, which will cause Premiere to ignore the destination you set in step 10.

Format and Preset

13. Click OK and sit back as Adobe Media Encoder opens up and renders all your proxy clips with the settings AND watermark that you added.

That’s it! Now all it takes is a quick glance to see if you are editing the native video files, or their proxies.

If this video has been helpful to you, you may also enjoy my wedding filmmaking training videos and tutorials. If you have any questions or comments, please do not hesitate to leave one below, or get in touch.

The Fearless Man Project

Yesterday episode 011 of The Fearless Man Project was released on iTunes with the title “Matt Johnson: God is cultivating us to be great!”. I would encourage you to give it a listen, write a review, and share your story with Shawn on The Fearless Man Project’s site. Shawn is making something great, and I think everyone should be a part of it.

Continue reading