
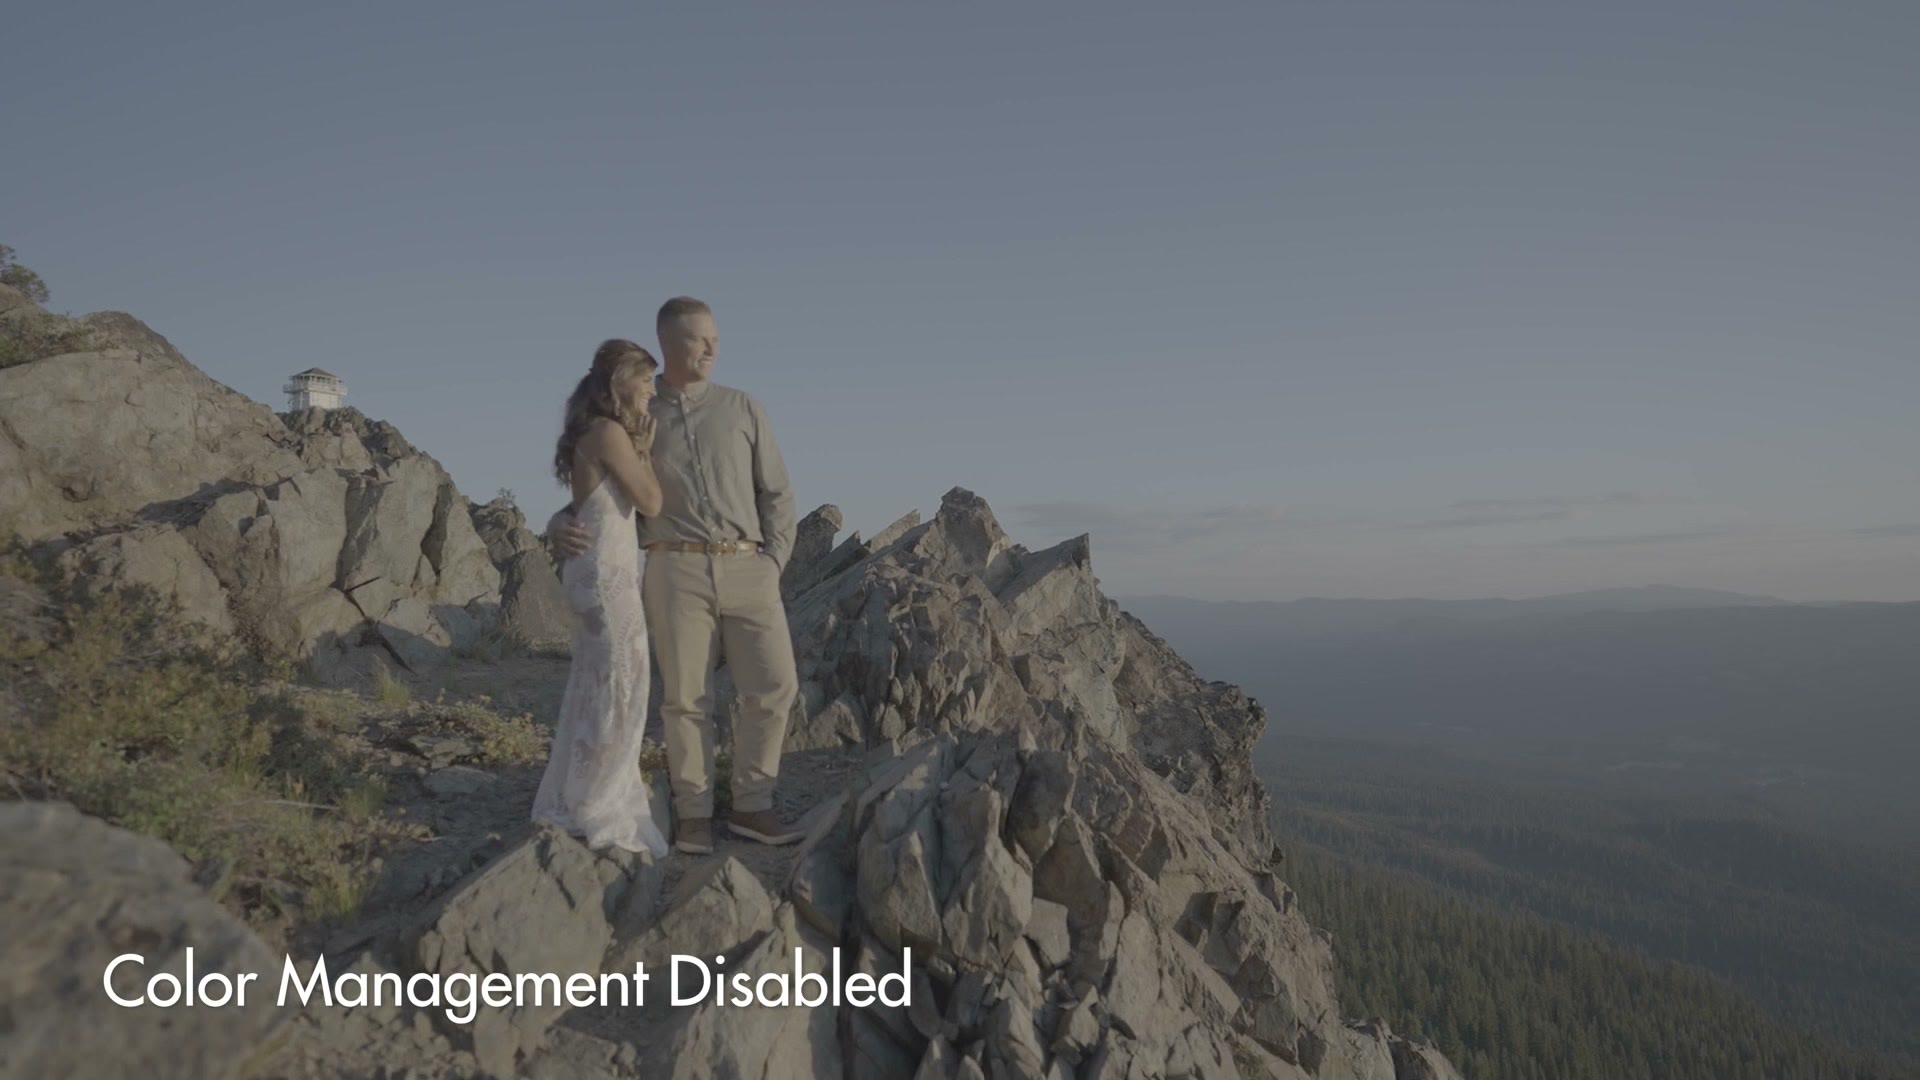
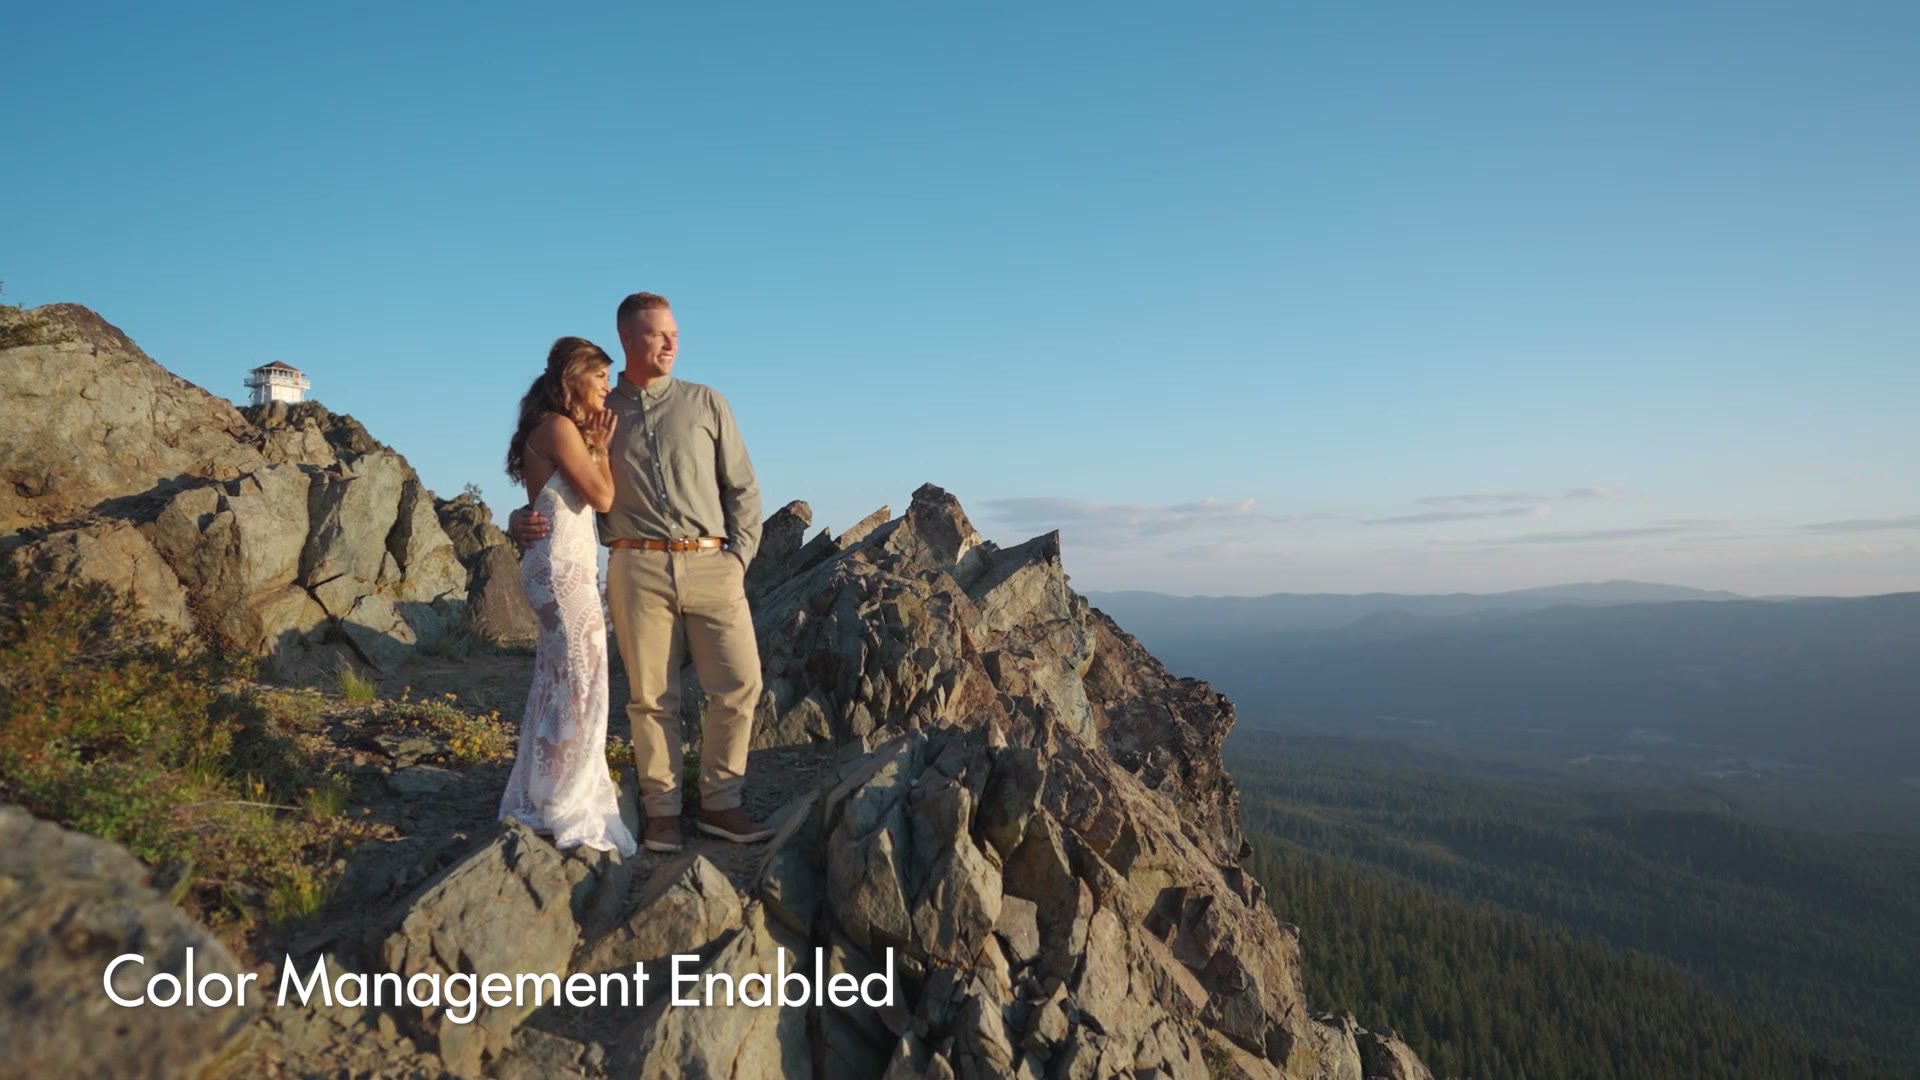
I’m about to show you how to use color management to take log footage you filmed with any camera, the kind that looks super flat and desaturated straight out of the box, and make it look colorful and contrasty instantly in Adobe Premiere Pro. No LUT required. And once you’ve set this up the first time, it just keeps working on every project after that.
Check Your Premiere Pro Version
The first thing you need to know is that at the time of writing I’m on Premiere Pro version 25.1, because Premiere Pro 25 was the version where Adobe introduced all of these color management features. So please make sure you’ve updated to at least that version if you want to follow along.
What I’ve got here is a brand new project with some footage I filmed in S-Log3 on my Sony a7S III, and I haven’t done anything to it yet, because there are a few settings we need to tweak first to make sure everything works the way it’s supposed to.
Project Settings You Only Need To Set Once
In your empty project, go up to File > Project Settings > Color. For the vast majority of videos you’re likely to be editing, leave HDR Graphics White (Nits) set to 203, because you’d only touch that if you were exporting in High Dynamic Range for viewing on an HDR screen, and at least at the time of writing most videos made for YouTube are still standard dynamic range. You can also leave 3D LUT Interpolation on whatever it gives you. My computer has a GPU so it’s allowing Tetrahedral, but you might get Trilinear, and it doesn’t really matter.
What is very, very important, and arguably one of the most important settings in all of Premiere Pro, is Viewer Gamma.
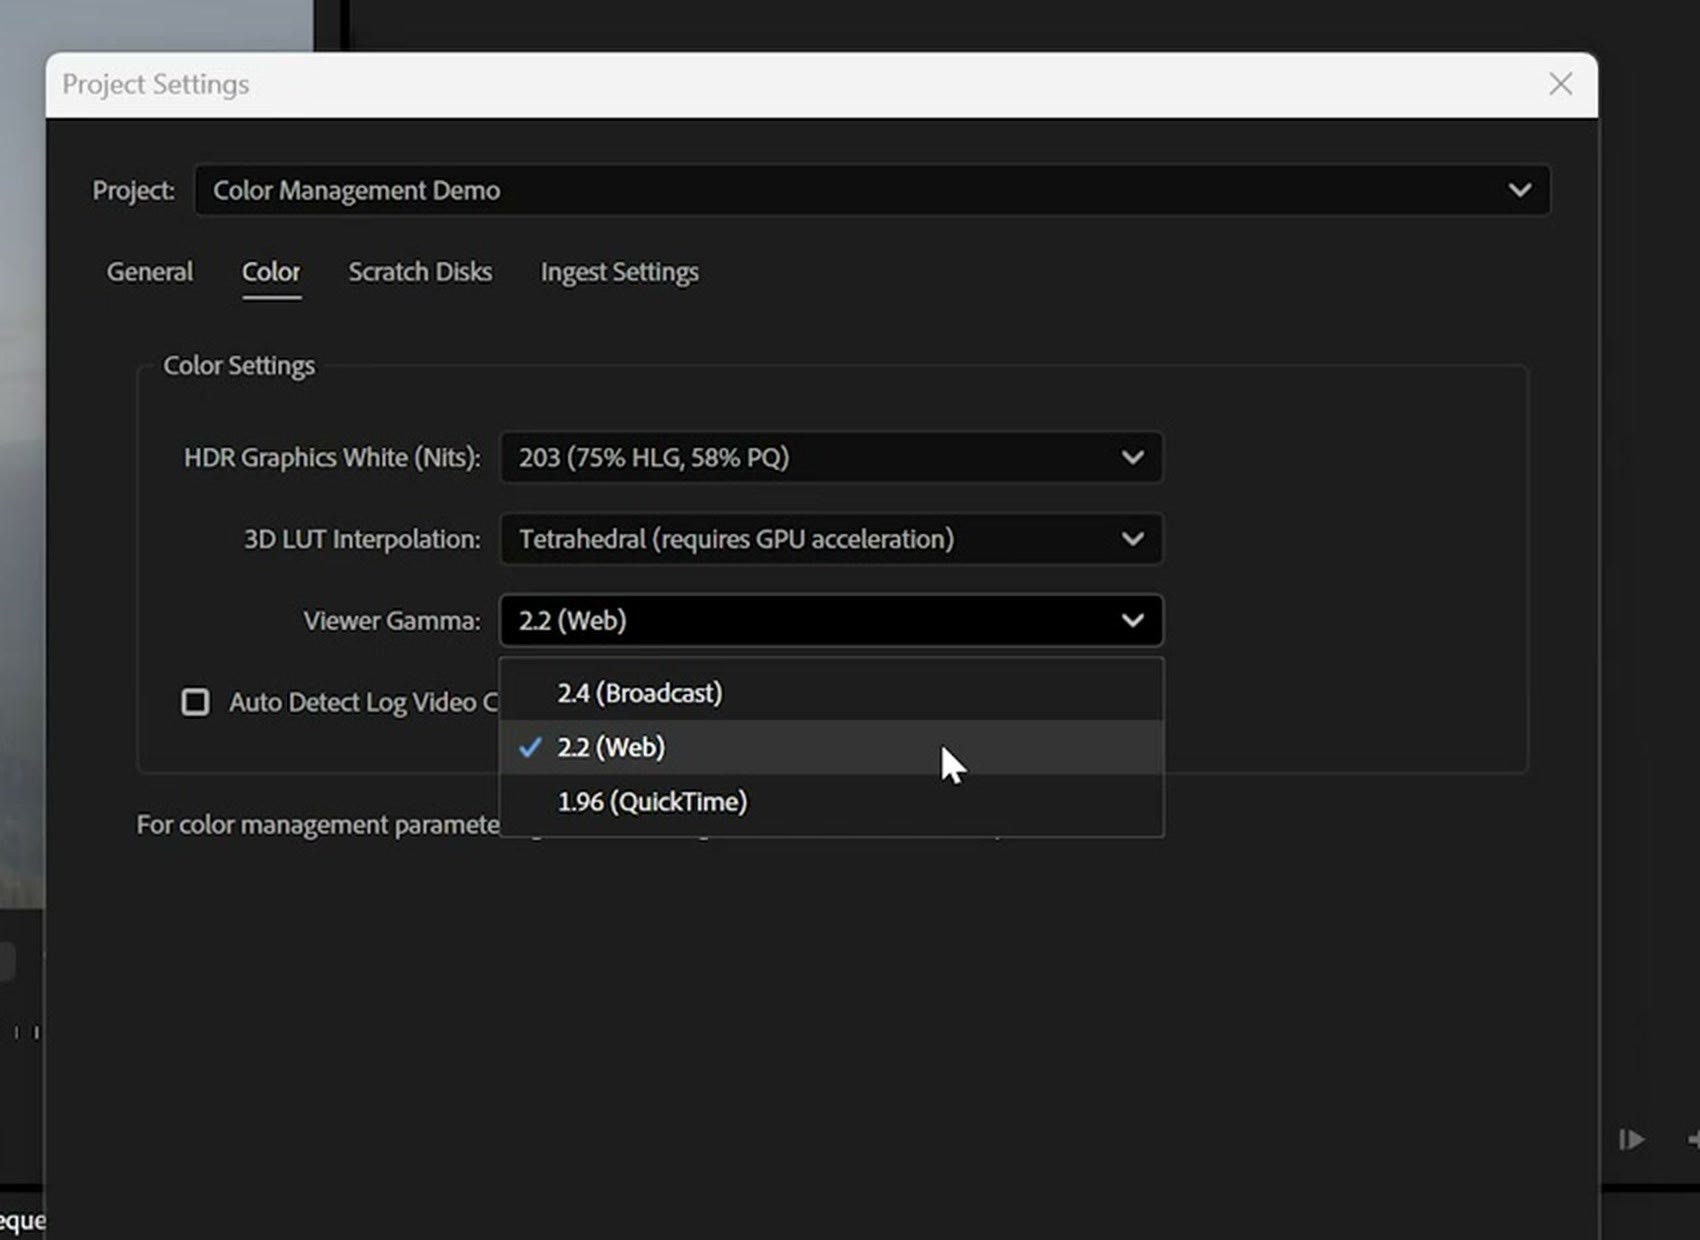
In the past Premiere has had a lot of issues, let’s say, whenever it comes to the quality of color you get out of the program. Specifically, if you’ve ever exported a video from Premiere and the colors came out washed out and desaturated and you thought “why the heck is that happening,” this setting is one way to fix it.
Here’s why it matters. By default Premiere is an editing program built for broadcast companies, as in people editing video for television, not for YouTube or Instagram or TikTok. And a video made for television has a different brightness and contrast level than one made for viewing on the internet. So to make sure your colors are going to look accurate, set Viewer Gamma to 2.2 (Web). If it says 2.4 (Broadcast), you don’t want that. You want 2.2 (Web), which, as the name implies, is the one you use if you’re editing videos for the web. Yes.
And if for some reason that doesn’t fix your washed out exports, because computers and programs can be difficult like that, I have another tutorial on fixing desaturated colors in Premiere Pro exports that has helped literally hundreds of thousands of people at this point, and it’ll definitely help you too.
With that done, there’s one final box to check, and it’s this very important Auto Detect Log Video Color Space box.
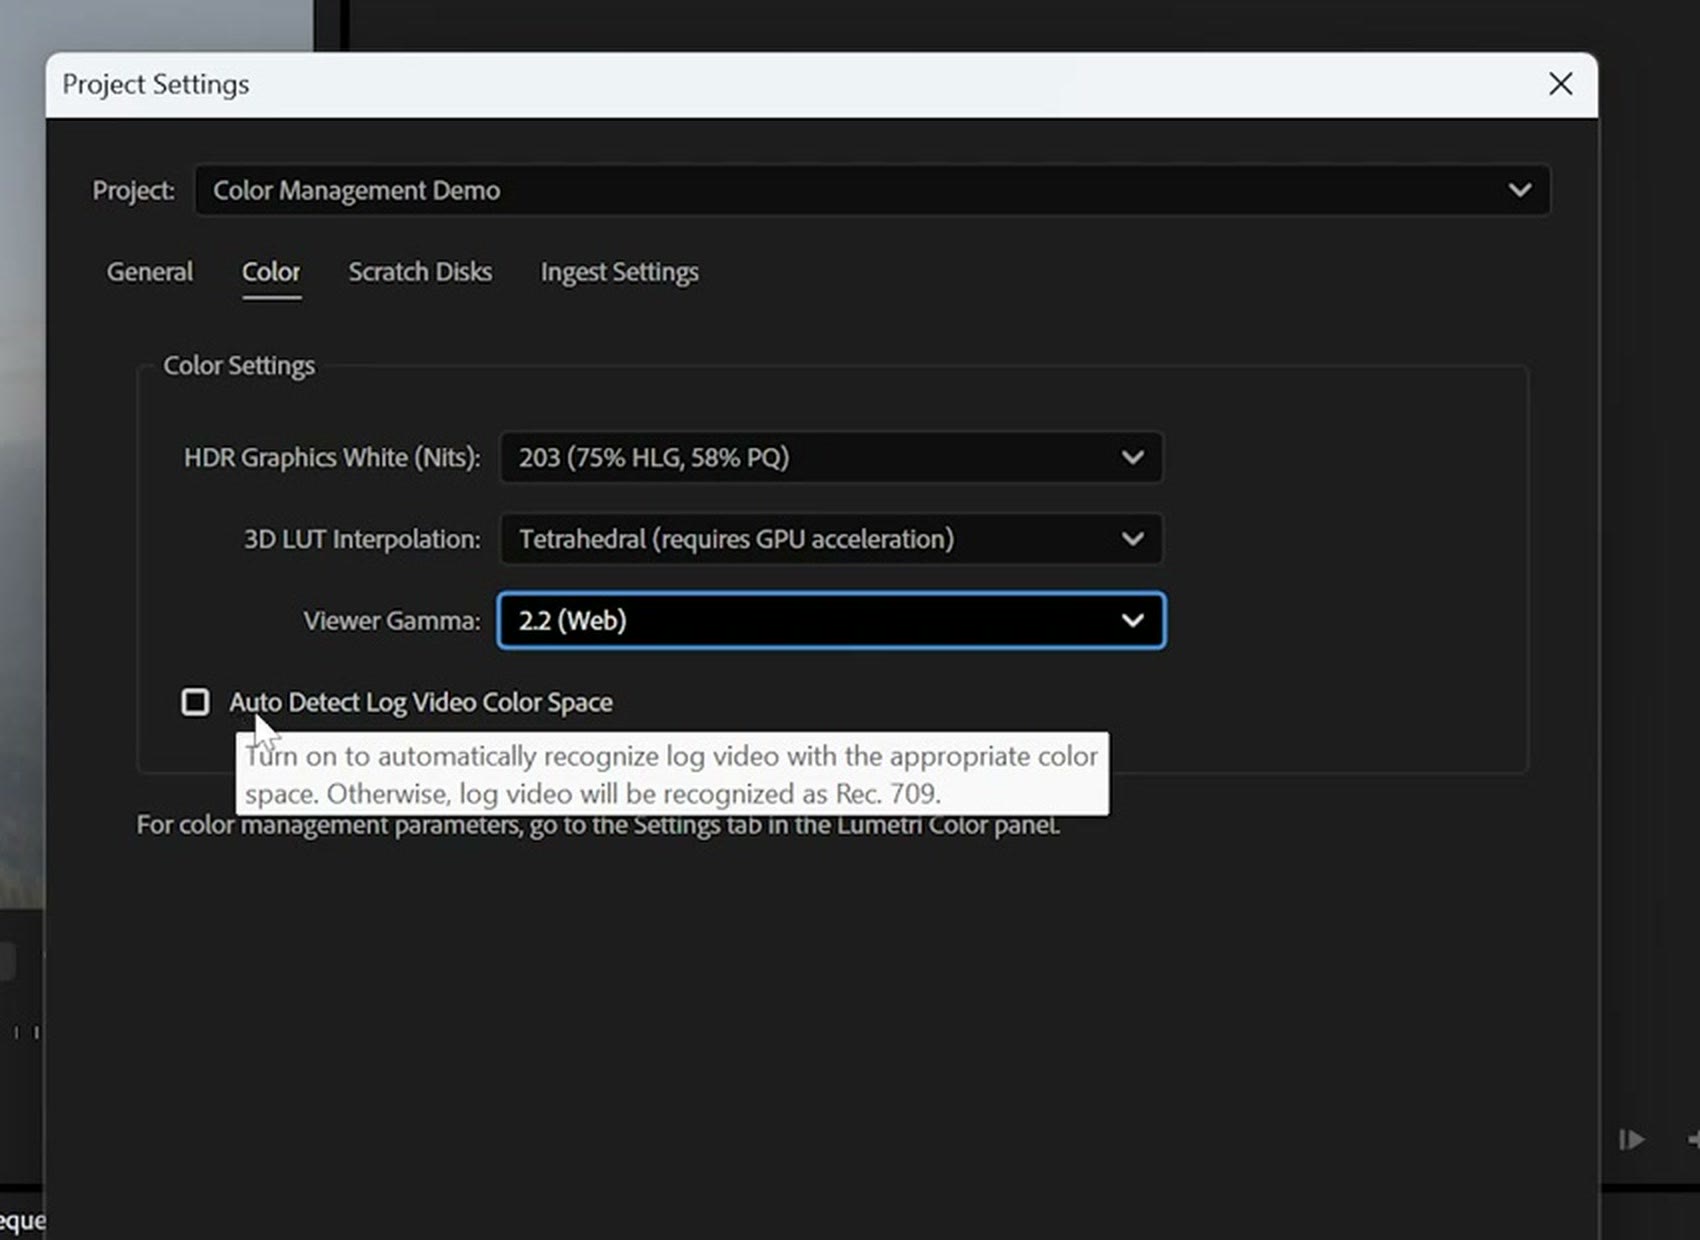
Side note, Adobe may have renamed this in future versions. In the beta they’re calling it Color Manage Auto Detected Log and Raw Media. If it says that, don’t sweat it, it’s the same thing. Just make sure the box is checked. What it does is tell Premiere Pro to look for any log footage you’ve imported and instantly bring it into the color space of your project, which makes it contrasty and saturated.
The biggest thing you need to know is that the first time you check this box in a project, there’s a chance Premiere will immediately add contrast and saturation to your clip, and there’s also a chance it won’t. If it doesn’t, do not stress, there’s another box further down that will force it, and I’ll show you where.
Good news though: because you’ve now checked this box, it’s going to stay checked. Next time you start a project you won’t need to come back into Project Settings and do this again, which means any time you import log footage into Premiere Pro from here on, it’ll automatically stop looking like log and come in with contrast and saturation already on it. Which is really awesome.
New Sequence Settings
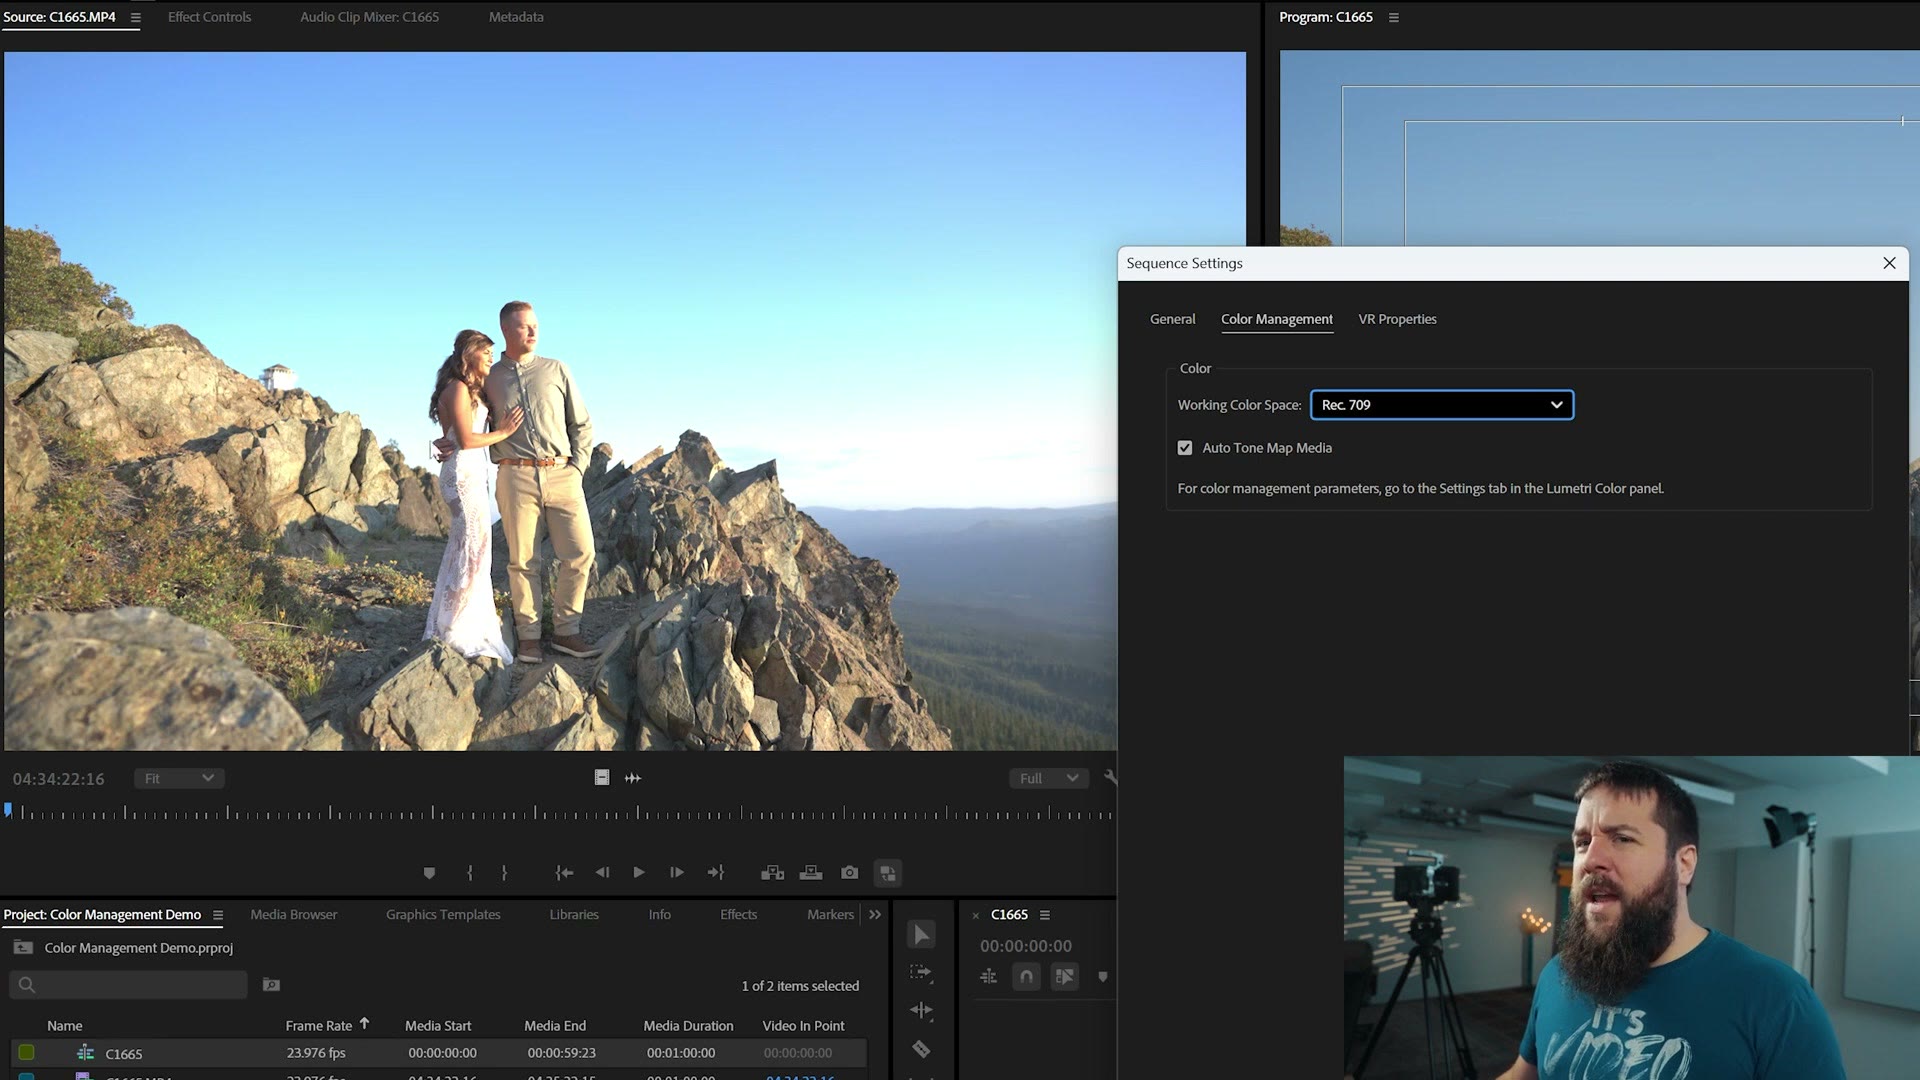
Next we need to create a sequence, because there are more color settings living in there. Press Ctrl+N on PC or Cmd+N on Mac to bring up the New Sequence dialog, and look for the Color Management tab up at the top. Alternatively, if you’re somebody who does not like using the New Sequence dialog, do not stress, you can drag your clip over to the timeline like a lot of people do, which creates the sequence automatically, and then as long as the sequence panel is selected you can go to Sequence > Sequence Settings > Color Management and find the exact same settings. Love that.
However you get there, for Working Color Space you want Rec. 709, which is also known as standard dynamic range and is the most common working color space for YouTube. The only reason to pick something else is if you filmed in HDR, want to edit in HDR, and want to export HDR for viewing on an HDR screen.
Then make sure Auto Tone Map Media is checked. This one is very important, because if it isn’t, the colors in your video can look really weird and funky. What it does is take any HDR colors and bring them down into the Rec. 709 color space properly. Premiere is basically asking “hey, do you want me to tone map this clip so it looks like it should?” Yes. Yes I do.
Enable Display Color Management
Are we done? No. Not quite. But I promise we’re getting very close. Go up to your workspaces in the top right and select the Color workspace, and over on the right you’ll see your Lumetri Color panel. Click over from Edit to Settings and expand everything, and, wow, there are a lot of settings here, aren’t there? Yes there are. Let me make it easy.
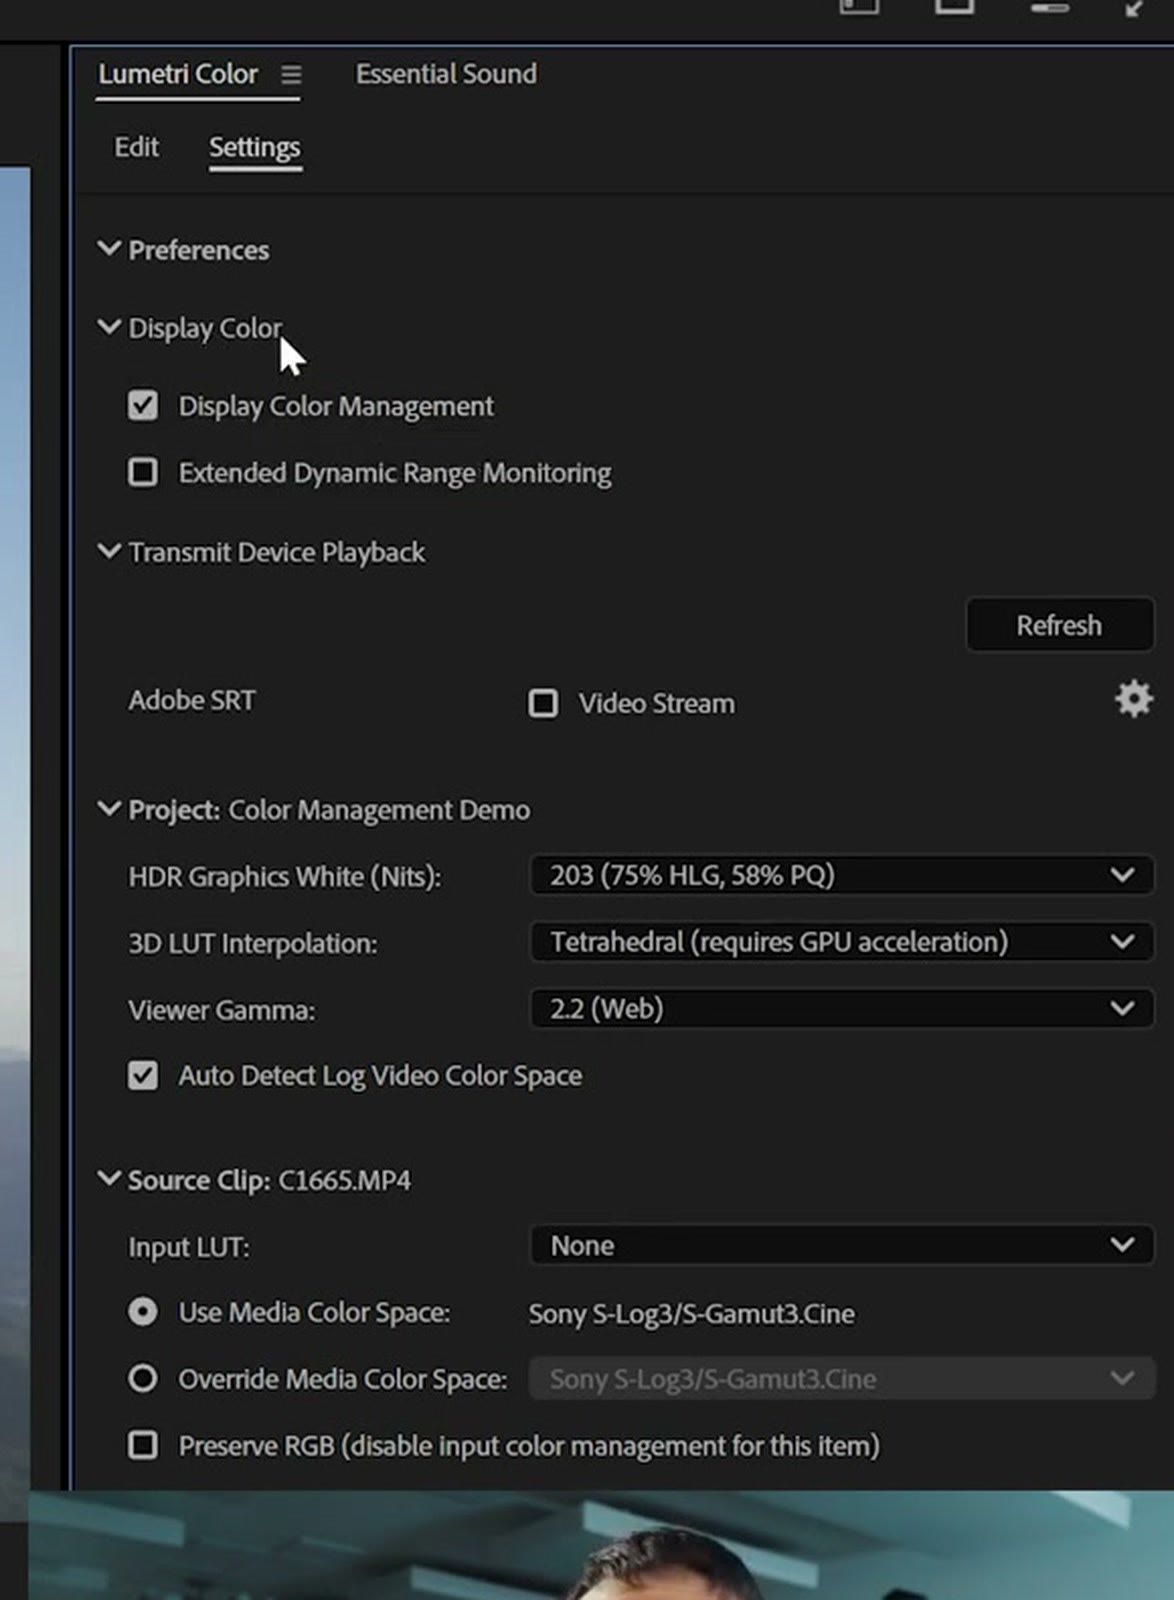
Under Preferences and Display Color, make sure Display Color Management is checked. As the tooltip says whenever you mouse over it, turn this on to display color accurate values on any monitor. In short, if you want the colors you’re looking at while you grade to be as accurate as possible, yeah, you want this checked. I can’t really think of a situation where you wouldn’t. Leave Extended Dynamic Range Monitoring off unless you’re making an HDR video, and you can ignore Transmit Device Playback.
And then look down at the Project section and, wait a second, these look familiar. HDR Graphics White, 3D LUT Interpolation, Viewer Gamma, Auto Detect Log Video Color Space. These are the exact same settings that were in Project Settings. Scroll further and there’s the sequence working color space too. So Adobe is giving you multiple ways to reach the same settings and trying to make them as easy as possible to tweak, which I really appreciate. And now you know where all of them live. And if your colors look different after you export, Viewer Gamma is the one to change.
Log Footage Still Flat? Check This Box
If you’ve made it this far and you’re thinking “Matt, you’re showing me all this color stuff and my footage still looks like log,” that’s almost certainly because of one unchecked box. Sometimes, even when you’ve ticked Auto Detect Log Video Color Space over in Project Settings, it just doesn’t apply to your video, especially the very first time you enable it. I don’t know why. I’m just the messenger here.
To fix it, go over to that same Auto Detect Log Video Color Space checkbox in the Lumetri Settings panel and check it there. Boom. Contrast and saturation, added. Done.
Change The Colors Of Any Specific Clip
A little further down that same panel is a Source Clip section, and it only activates whenever you have a clip selected. This is how you tweak the colors of any individual clip, which matters if Premiere doesn’t read that particular clip correctly. Maybe it thinks you filmed in a different log profile than you actually used, for example. And just like everything else here, you can also reach these settings by right clicking the clip in your project panel and going to Modify > Color. Same settings.
First there’s Input LUT, where you could add a LUT if you had a very specific look you were trying to convert the clip into. Just keep in mind you get no customization here. By default I’d always recommend going to the Edit tab, down to Creative, and adding your LUT there instead, because there you can control the intensity and a lot of other settings. I’d only use Input LUT if you had one very specific LUT you needed applied at this stage of the process.
Below that is how you fix it if Adobe got the color wrong. With Auto Detect Log Video Color Space checked, Premiere reads the media file and tells you what it found, in my case Sony S-Log3/S-Gamut3.Cine. But if that’s wrong, maybe the metadata got scrambled, who knows, you can select Override Media Color Space and pick from a big list of profiles instead.
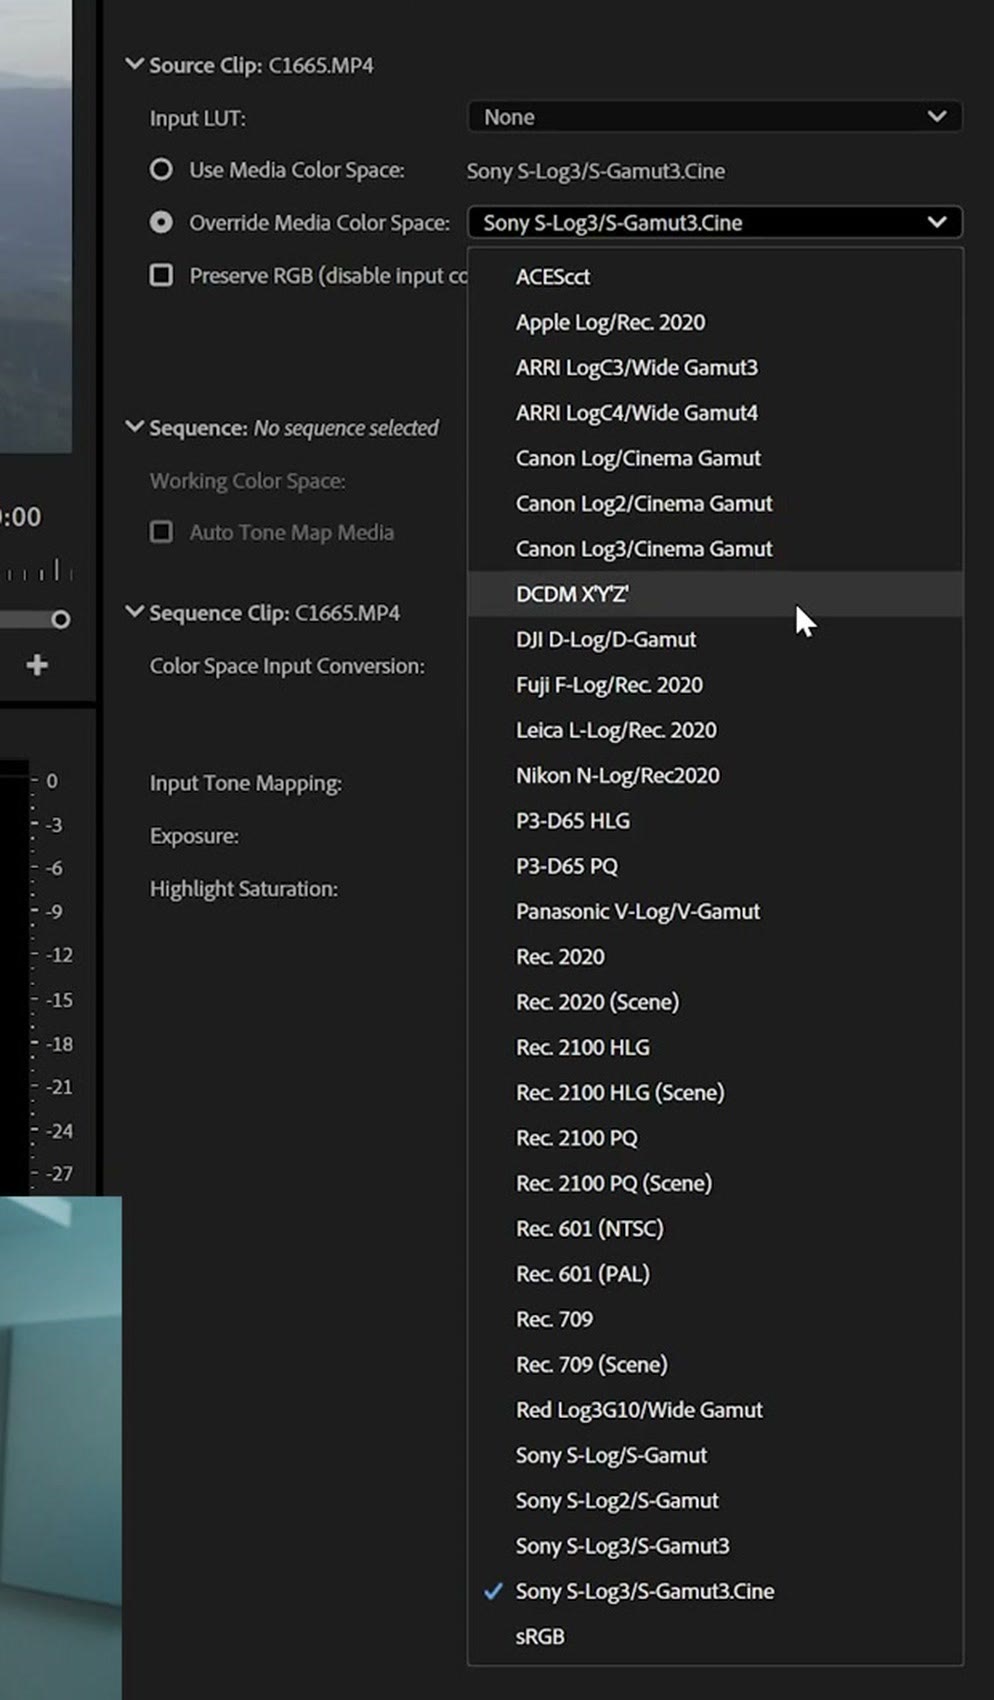
It’s like, actually no, this isn’t Sony, I filmed this in Canon Log. Oh, that looks weird, right? There’s ACES in there, there’s Apple Log, there’s a lot of different ways Premiere can read your footage. By default it uses the media color space and that should just work, but if you need to tweak it, feel free.
Now, Adobe has not added every single camera to that list yet, so you may notice some things missing, and that’s okay. I know they’re working to add more color profiles from more manufacturers, so I’d expect more cameras and log profiles to be supported in the future. And one last one: if your colors are looking weird for some reason, you can check Preserve RGB, which bypasses color management entirely for that item. Another way to tweak a clip if you need it.
Get My Color Presets
And that’s how you use color management to get amazing colors in your videos in basically one click, once you’ve set it up the first time. It’s awesome.
If you haven’t checked out my color presets yet, they work very similarly to what I just showed you, converting log footage into something that looks right, but my LUTs go a step further and apply a custom look that’s vibrant and true to life, and they work with log footage from any camera. I’ll also point you at my Edit Videos Like A Pro guide, which is completely free and will quickly show you some of my biggest tips for becoming a better video editor. Thanks so much for reading and have a great day!