I often receive questions about filming and editing, and have decided that I will post the answers to the most common questions here to help others. Expect more posts like these in the future and please let me know what questions you would like to have answered.

UPDATE: I have created two new blog posts! One is an updated blog post with export settings for 4K video in Premiere Pro. The other is an updated blog post with export settings for 1080p video in Premiere Pro CC.
Before digital cameras became popular, editing a video was as simple as cutting the actual film strip and splicing it to another film strip with tape. With the advent of digital video, there are literally hundreds of programs to use to edit and even more video formats. Choosing the proper export settings is one of the most important steps when editing video and it can be very confusing due to lack of a standard at this time. Thankfully, both YouTube and Vimeo both offer guidelines on what types of video they prefer, which does make things a bit easier.
There is a lack of photo and text tutorials for the exact settings to use in video editing software. YouTube may say it recommends h.264 at 1920×1080 but without knowing how to choose those settings in your video editor it can be very confusing. Below you will find the exact settings needed for encoding the best quality high definition YouTube and Vimeo videos while still keeping a small file size. This tutorial will work for Adobe Premiere Pro CS5, CS5.5, CS6, and CC. Earlier versions of Adobe will work with some tweaks and you can definitely adapt these settings to other video editing programs such as Final Cut Pro and Sony Vegas Pro.
Photo and Text Tutorial
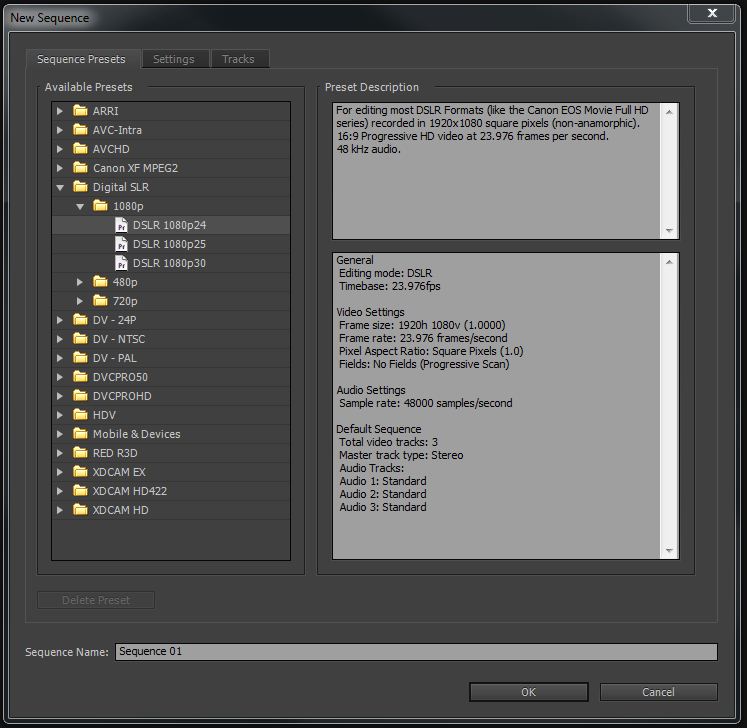
Before you even begin editing, you must create a new sequence in Premiere. This will prepare the program for the kind of video being imported. For the sake of this tutorial I am using footage from a Canon 7D at 1080p at 23.976 frames per second. Because my footage was filmed at these settings, I will select the “Digital SLR>1080p>DSLR 1080p24” sequence preset. Make sure you select the correct sequence preset or else this will cause problems when you export your footage.
Once you have imported your footage using the correct sequence settings and edited it to your liking, it is time to export your video. With the timeline selected you can either go to “File>Export>Media” or hit “Ctrl>M” on your keyboard. Both options should bring up the export settings window. The entire left side of the window is devoted to a preview window and cropping settings etc. and can be ignored. All your settings will be chosen on the right side of the window.
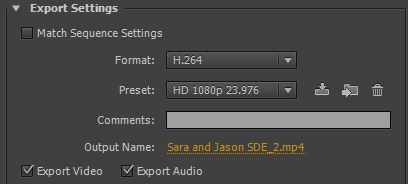
Under “Export Settings” select Format: “H.264”. You will see there are several options for H.264 but if you are exporting for HD on YouTube or Vimeo, the H.264 option offers the best quality with the best file size. You will see in the picture that I have already created a custom preset for my settings. Once you have changed all of your video settings, it would be a good idea to do the same to speed up your workflow. For now, if you are using CS6, select the “Vimeo HD 1080p 23.976” preset. This will speed up choosing the rest of the settings but if you don’t have that as an option, don’t worry and just skip it. Click “Output Name” and select where you will save your file. Make sure that both “Export Video” and “Export Audio” are checked. I’ve made the mistake of forgetting the audio checkbox and having to re-render.
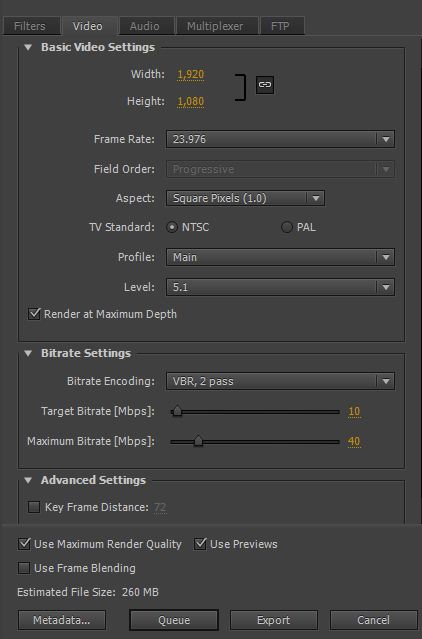
Select the video tab and you will see we are at the actual video settings window. First, go down to “Profile” and set it to “Main”. Then go to “Level” and set it to “5.1”. When you do this your video “Width” and “Height” settings will automatically change to “1,920” and “1,080”. It will also change the “Frame Rate” to “59.94”. Leave the video Width and Height at 1,920 and 1,080 and change the “Frame Rate” to “23.976”. Make sure the Aspect Ratio is “Square Pixels (1.0)”. “TV Standard” should be “NTSC”.
Your “Bitrate Settings” should be the following: “Bitrate Encoding: VBR, 2 Pass” – This will take longer to render but result in a better quality file because the encoder will run through it twice. “Target Bitrate [Mbps]: 10” and “Maximum Bitrate [Mbps]: 40”. You may see different settings that other people use for Target and Maximum Bitrate and even Vimeo recommends a Target Bitrate of only 5Mbps. Please keep in mind that you are choosing VBR which stands for “Variable Bit Rate”. This means that the video adjusts the amount of data needed depending on what is happening in a scene. If everything is changing rapidly, and there is a lot of colors in the scene it will need a higher bitrate. I set my Maximum Bitrate to “40” to make sure when it needs extra space for high intensity scenes it has room. This results in a better looking video overall. Feel free to adjust these settings if you need to.
Lastly, Make sure that “Render at Maximum Depth” is checked and “Use Maximum Render Quality”. If you used previews when editing your video, you can check the “Use Previews” box to speed up rendering a bit.
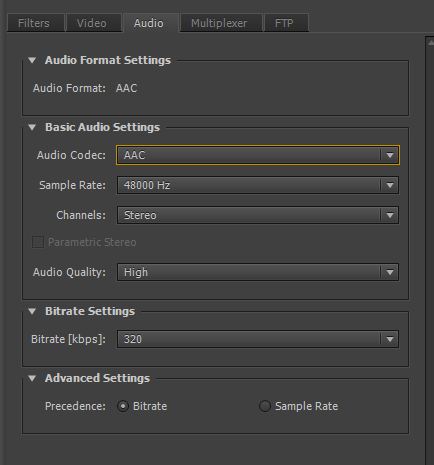
The only other settings you need to worry about are the “Audio Format Settings” under the audio tab. Your “Audio Codec” should be “AAC” with a sample rate of “48000 HZ”. “Channels” should be set to “Stereo” and “Audio Quality” to “High”. The “Bitrate [kbps]” should be set to “320” which is the equivalent of high quality CD audio. Under “Advanced Settings,” make sure “Precedence: Bitrate” is selected.
With those settings all chosen, you are ready to render. You will not need to mess with the “Filters, Multiplexer, or FTP” tabs if you are planning on only uploading your video online. The video I used in the example photos was 3 and a half minutes long and came to an estimated file size of “260 mb”. This is a great size for an HD video that will be uploaded online.
If you don’t own Adobe Premiere Pro I would highly recommend getting an Adobe Creative Cloud membership. Try out a 30 day trial of Premiere Pro CC and see how you like it!
To Summarize this article I’ve put all the settings below for easy reference:
Export Settings:
Format: H.264
Checkboxes Export Video and Export Audio
Basic Video Settings:
Width: 1,920
Height: 1,080
Frame Rate: 23.976
Field Order:Progressive
Aspect: Square Pixels (1.0)
TV Standard: NTSC
Profile: Main
Level: 5.1
Checkbox Render at Maximum Depth
Bitrate Settings
Bitrate Encoding: VBR, 2 pass
Target Bitrate [Mbps]: 10
Maximum Bitrate [Mbps]: 40
Checkboxes Use Maximum Render Quality and Use Previews
Basic Audio Settings
Audio Codec: AAC
Sample Rate: 48000 Hz
Channels: Stereo
Audio Quality: High
Bitrate Settings
Bitrate [kbps]: 320
Advanced Settings
Precedence: Bitrate
Please let me know if this tutorial was helpful to you and if you have any questions you can contact me or leave a comment.
Now that you know how to export your video in HD, learn how to export in the Cinemascope 2.35:1 aspect ratio to make your videos look more like movies.
It is a big help to me when you use any of the above product links to Adorama, Amazon, Adobe, and B&H and when you get anything. It costs you nothing, and helps me keep my site running. I have bought from all of these websites and I highly recommend them for their service, quality, and shipping speed. I recommend them all personally.