
If you only take one thing away from this whole post, make it this: Smoothness is the most important setting in all of Warp Stabilizer, and the default 50% is way too high. The absolute maximum I will ever use is 20%, I usually start at 5%, and the amount I apply most often on my own wedding films is 1%. Everything else below is for the stubborn clips that still refuse to behave after that.
To save you the dialing in, I built a set of presets with my exact settings baked in. You can download my Warp Stabilizer presets completely for free. And if you don’t have Premiere Pro yet, you can grab a free trial here.
How To Apply Warp Stabilizer
Here’s a clip I filmed recently at a wedding, and whenever I play it back it has some camera shake in it. That’s exactly the kind of thing Warp Stabilizer can fix.
Make sure you’re in the Editing tab, then go down to the bottom left to Effects and search for “Warp.” There it is, Warp Stabilizer. Click it and drag it onto the clip you want to stabilize, and it will immediately start analyzing in the background.
And that’s the point where a lot of people stop. The clip is stabilized, it looks pretty stable, time to move on and keep editing. But there are a ton of settings inside this effect that you can change to make it work much better, so let’s actually talk about them.
Make Warp Stabilizer FASTER
First, pay attention to how long the analysis takes. I have a pretty powerful computer so it moves along fairly quickly, but if you’re noticing that Warp Stabilizer is slow, make sure you’re running at least Premiere Pro version 15, which came out in March of 2021. That update added a little checkbox under Advanced called Fast Analysis. It’s checked by default, and I definitely recommend keeping it checked, because it makes the analyzing portion much faster, especially if you’re editing 4K footage.
If it’s still slow after updating, the best trick I’ve found is to only apply the effect to the part of the clip you actually need stabilized. I have made the mistake before of throwing Warp Stabilizer onto a clip several minutes long, only to realize I needed about five seconds of it. Shorter clips mean less to analyze, which means it finishes way faster.
Smooth Motion vs No Motion
Over in the Effect Controls panel you’ll see Stabilization, and underneath it Result, with a dropdown that says Smooth Motion or No Motion.
Smooth Motion is what I choose 99% of the time, because it smooths the motion in a shot where the camera is already moving. That’s great for handheld shots with subtle movement, and it’s great for gimbal shots where you want to get rid of that weird electronic movement a gimbal can introduce.
No Motion is the one to use whenever you want to completely lock a shot off and make it look like it was on a tripod. To be clear though, this is not going to turn a gimbal shot into a tripod shot. But if you were shooting handheld and trying to hold still and you’re seeing a bit of shake, No Motion can clean that up.
The MOST IMPORTANT Setting
Below those options is Smoothness, sitting at a default of 50%. This is the part I really want you to pay attention to, because this one setting makes the biggest difference in the quality of stabilization you get out of this effect, and most filmmakers leave it at 50% and move on. Please do not do that.
If you have ever had Warp Stabilizer turn your footage into jello, where the whole shot goes wobbly and stretchy, this setting is almost certainly the reason why. If you want stabilization that looks natural and organic enough that nobody can tell you stabilized it at all, taking the time to dial in Smoothness is the single most valuable thing you can do.

Here are my rules. 50% is way too high. I can count on one hand the number of times it actually looked good and didn’t introduce jello. The absolute maximum I will ever set is 20%, and honestly 20% is plenty.
Once you land on a number you like, go up to the Warp Stabilizer heading, right click on the text, and choose Save Preset. Name it something like “20% Warp Stabilizer” and click OK. After that you can find it under Effects, in Presets, and just drag it straight onto a clip.
20% is usually where I start. On a gimbal shot where I want smoother, more organic movement, 20% often looks great. On the test shot in the video though, 20% added a weird ripple, and whenever I brought the camera back in the other direction you could really see it in the chair in the bottom right, where it kind of stretches and reappears. It looks funky.
So whenever you play a clip back at 20% and it looks a little off, it’s time to go lower. And you might be thinking 15%, or 10%. No. I usually drop straight to 5%. That may not sound like much, but trust me, even that small an amount is doing a lot of work in the background. The movement feels far more organic, there’s still a touch of shake left, and it reads like I had a bigger camera on my shoulder instead of a small mirrorless.
And if it still looks weird, or it just doesn’t feel natural, drop it again, all the way down to 1%. Really. The most common amount of Warp Stabilizer Smoothness I apply to my clips is 1%, and if you’ve watched any of my wedding films, a significant portion of those shots have 1% on them, because it makes such a subtle difference. When in doubt, 1% is the answer.
Save all three as presets and you’ll basically never have to think about this again.
Method Setting
Honestly, we could stop the tutorial right there, because 90% of the time I’m just grabbing one of those three presets and slapping it on my clips. But there’s more in here that helps whenever you have a genuinely stubborn shot.
Underneath, you have Method, set to Subspace Warp by default, with Position, Position Scale Rotation, and Perspective as the other options. Think of them as different levels of stabilization, with Position being the most basic and Subspace Warp the most complex. What actually matters is that in all my years of editing, I have never had any of these work better than Subspace Warp. You are far better off dropping Smoothness to 1% than touching this. Leave it alone.
Preserve Scale, Crop Less, Smooth More
Below that is a checkbox for Preserve Scale, unchecked by default, because Warp Stabilizer normally needs to scale your video up slightly in order to stabilize it. You’ll see it report something like auto scale 100.8%, and whenever I pushed Smoothness back up to 20% that jumped to 102.1%.
Checking Preserve Scale can bring some of that scaling back down, but I would only check it whenever your footage is being scaled up a lot, because it can cause some wonky effects of its own.
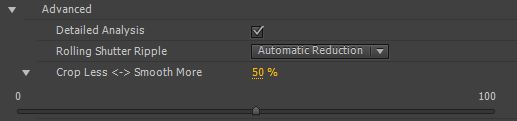
If Preserve Scale isn’t cutting it, click the Advanced arrow. There are a lot of settings under there and you can ignore almost all of them. The one I want you looking at is Crop Less <-> Smooth More, and it’s about as self explanatory as it sounds. If Premiere is cropping in too far and scaling your footage up, drag it to the left, all the way down to 1% if you need to. If your footage is still too rough, drag it right, up to 75% or 90%, however far it takes. Your shot will be more cropped, but it will be more stable.
Before you go messing with any of this though, fix your Smoothness percentage first. It has a much bigger effect than this slider does.
Borders, Synthesize Edges
Next is Borders, and under it, Framing, set by default to Stabilize, Crop, Auto-scale. You also get Stabilize Only, Stabilize Crop, and Stabilize Synthesize Edges. Same story as Method: I wouldn’t expect great results from Stabilize Only or Stabilize Crop most of the time, so keep it on the default.
That said, whenever your clip is scaling up a lot and cropping off too much of the sides, go back to Framing and pick Stabilize, Synthesize Edges. With that selected, Premiere won’t crop in. Instead it looks at the video frames before and after the one you’re on and uses them to recreate the borders of your shot. It’s magic. Well, it’s really AI, not magic, but we’ll call it magic.
It is very cool, and it comes with real tradeoffs. It’s extremely processor intensive, so don’t expect smooth playback without rendering first, and because the computer is inventing pixels from scratch there can be glitches and artifacts in the result. Sometimes it just won’t work for your clip.
If it’s close but not perfect, go back to Advanced and look at three settings. Synthesis Input Range controls how many seconds before and after each frame Premiere looks at, defaulting to 0.5 seconds. On a fast moving clip you may want a full second, just be aware that will lengthen your export times, because the effect has more to chew through. Synthesis Edge Feather defaults to 10, and it smooths where your real borders meet the synthesized ones, so feel free to push it to 20 or higher. Synthesis Edge Cropping lets you pick Left, Top, Right, or Bottom and crop that specific side.
One gotcha with that last one: whenever I cropped the top by 132, I ended up with a half cinematic black bar sitting at the top of the frame. To get rid of it, go up to Additional Scale and set it to around 120%, and the bar is gone.
Detailed & Fast Analysis
There’s a checkbox under Advanced called Detailed Analysis. If you’re still getting weird jello artifacts even after taking Smoothness as low as you’re willing to go, checking this makes Warp Stabilizer analyze your clip in much more depth. It takes significantly longer, but it has genuinely rescued stubborn clips for me that wouldn’t stabilize any other way.

Right underneath it is Fast Analysis, the speed setting from earlier. Always leave it on. It’s on by default, it doesn’t mess anything up, and I’m honestly not sure why Adobe gave it a checkbox at all. Never turn it off.
Rolling Shutter Ripple
Last one, and this one is actually really useful. Whenever you’re whipping the camera quickly left to right, maybe filming a fast dance floor or a fight scene or anything with a lot of motion in it, you can end up with an effect called rolling shutter, where the footage looks like it has ripples running through it.

Warp Stabilizer already works to remove some of that automatically. But on a really stubborn clip, switch this from Automatic Reduction to Enhanced Reduction. It takes longer to render, and it can reduce or completely remove the rolling shutter from your shot.
Final Tip To Use Warp Stabilizer Faster
Here’s the deal, and this one bit me for years before I worked out what was going on. Every single time you apply Warp Stabilizer to a clip, it generates a ton of stabilization data, thousands upon thousands of tracking points that it needs in order to hold your footage steady. That data can’t be thrown away, or you wouldn’t have stable footage, so Adobe saves all of it into your Premiere Pro .prproj project file.
And it adds up fast. I’ve had projects that were only a few hundred kilobytes suddenly balloon to 50 megabytes or more, purely from stabilization data. Now 50 megabytes doesn’t sound like much whenever we’re talking about 4K video files, but it makes a huge difference at save time. You can go from a project saving in under a second to sitting there waiting 30 seconds, or a full minute, and that happens every time you hit save and every time Premiere auto saves. It is incredibly distracting, and it yanks you right out of a fast editing groove.
So do this instead: wait until you’re finished editing to apply Warp Stabilizer at all. Make all your cuts, add your other effects, color grade, mix your audio, and then at the very end, go through and stabilize. Your saves stay fast right up until the finish line.
Where To Go From Here
If you want my exact settings without dialing anything in, the Warp Stabilizer presets are free right here.
Editing in something else, or wondering which one is better? I covered the DaVinci Resolve stabilizer in the same amount of detail, and I put the two head to head in Premiere Pro Warp Stabilizer vs DaVinci Resolve Stabilizer.
And the best stabilization is always the stabilization you don’t have to do, so it’s worth reading my moves for fixing shaky gimbal footage in camera before you ever get to the timeline. Whenever you’re ready to export what you’ve stabilized, here are my export settings for Premiere Pro.
If you want to get faster at all of this, you can also grab my Edit Videos Like A Pro guide for free.